















For advanced workflow features, you can use additional workflow applications to connect logic blocks, create approvals and notifications for transitions, or change the workflow security to determine what changes a user can make to records.
For more information on how to configure workflow, view the following topics:
- Design a workflow
Application developers design workflows to increase efficiency and ensure that all required steps are included within business processes.
- Configure workflow list lookups
Application developers configure state and state type list lookups to define a workflow's transition details using the List Lookup Definitions application.
- Configure a workflow definition
Application developers use the Workflow Builder application to configure a workflow over a table. Workflow enforces a series of states that records must pass through to reach completion.
- Configure advanced workflow features
You can build a more complex workflow by configuring transitions to enable these advances features.
- Configure workflow types
Use the Workflow Type Definitions application to configure workflow types to differentiate different paths in a workflow transition.
- Configure a workflow orchestration
Configure a workflow orchestration so a record's state and state type transitions when another record has reached a certain state and state type using the Workflow Builder and Workflow Orchestration Definitions applications.
- Configure workflow approvals
Application developers use the Approval & Notification D efinitions and Workflow Builder applications to configure workflow approvals which allow authorized users to accept or reject a request to transition a record from one workflow state to another.
- Configure messages for workflow transitions, approvals, or rejections
Configure messages when a workflow transition, approval, or rejections occurs with the Message Event Definitions , Message Template Setup , Message Definitions , Workflow Builder , Logic Block Builder , and Approval & Notification Definitions applications. Configure notifications when a workflow transition occurs with the Approval & Notification Definition and Workflow Builder applications.
- Logic blocks and workflow transitions
Application developers can configure logic blocks into a workflow transition to initiate a state change based on the logic block's criteria.
- Configure workflow types
- Configure workflow security
Configure workflow security to restrict permissions to read, update, and delete records based on workflow values using the Workflow Security Definitions , Permission Definitions , and Role Definitions applications. Security can also be used to configure restrictions on inserting records on detail tables.
- Create or customize workflow restricted fields
Define or customize lists of restricted fields for workflow with the Workflow Restricted Field Definitions and Workflow Security Definitions applications. Workflow restricted field profiles are added to access rules in workflow security to prevent users from making changes to the specified fields.
- Create or customize workflow restricted fields
- How to disable the Workflow Change action
Application developers can prevent users from making multi-row workflow changes by disabling the action in the application configuration.
Design a workflow
Application developers design workflows to increase efficiency and ensure that all required steps are included within business processes.
The following elements should be considered when designing a workflow:
- Identify repeating patterns of tasks that are necessary to complete a process.
- Outline the flow of how you want a user to navigate the tasks in the process from start to completion.
- Determine a set of workflow rules to apply in your workflow.
Basic Workflow
All workflows must start with an initial state. The default name of this state is INIT, but can be customized. For example, in the Supplier Invoices application workflow, the initial state is called Draft. Every new record begins in this state and transitions to the next state based on actions performed by the user. When a supplier invoice is processed without a purchase order in the Supplier Invoices application, a basic workflow is defined:

| State | Description | |
|---|---|---|
 | Draft | The initial state of all new records. |
 | Ready to Process | The invoice record is ready to process. |
 | Ready to Post | The application writes the GL transaction. |
 | Posted to GL | The GL transaction is posted and the workflow is complete. |
Advanced Workflow
For more complex workflows, there are advanced workflow configuration options . For example, when a supplier invoice is processed with purchase orders in the Supplier Invoices application, the following workflow apples:
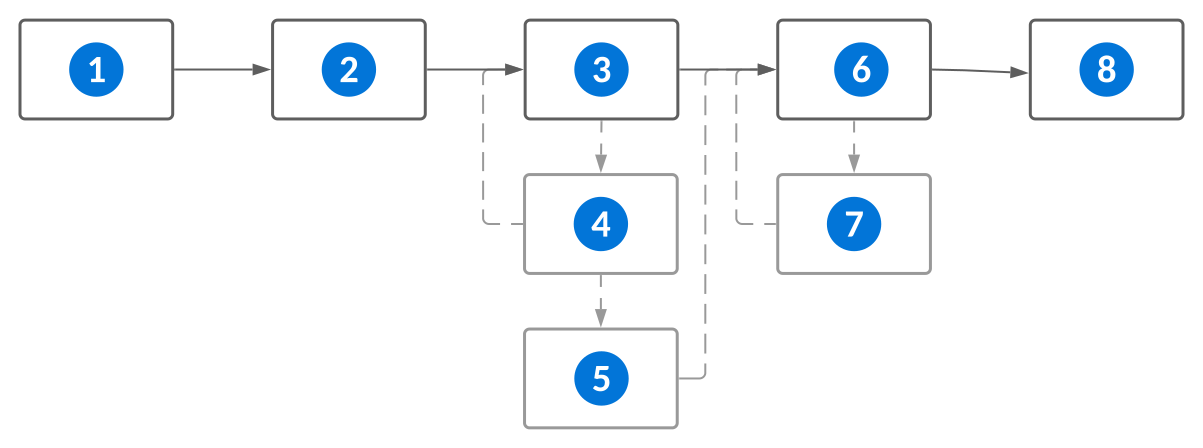
| State | Description | |
|---|---|---|
| Draft | The initial state of all new records. |
| Ready to Process | The invoice record is ready to process. |
| Ready to Match | The record is ready to process as a match with a purchase order. |
| Match Exception | The record failed to match with a purchase order. The error must be corrected and state set to Ready to Match before it can continue through the workflow. |
 | Match Override | The invoice record is set to this state when you want to override the exception in order to pay the supplier. |
 | Ready to Post | The application writes the GL transaction. |
 | Error | The GL transaction failed. |
 | Posted to GL | The GL transaction is posted and the workflow is complete. The error must be corrected and the state set to Ready to Post before it can complete the workflow. |
Add workflow to existing records
You can add workflow to a table with existing records with data transforms. Data transforms are used to update business data. Learn more in the following topics:
Configure workflow list lookups
Application developers configure state and state type list lookups to define a workflow's transition details using the List Lookup Definitions application.
Configure workflow states
You must create record statuses for records that reach a certain point in a workflow. States are unique to each workflow and are determined as part of the workflow design. In the List Lookup Definitions application, you must:
- Create a new list lookup and add values and descriptions for your states.
- Have one list lookup with a value of
NEW. The description can be whatever you want it to be. All new records in the workflow are assigned this state.
Configure workflow state types
Create state types that can be used to define controls, control behavior, and security. In the List Lookup Definitions application, you must:
- Create a new list lookup and add values and descriptions for your state types.
- Have one list lookup with a value of
INIT.All new records in the workflow are assigned this state type.
At a minimum, all workflows must include these standard state types:
InitialActiveInactiveClosedPending
After you create state and state type list lookups, add them to your workflow. Learn more in the Configure a workflow definition topic.
Configure a workflow definition
Application developers use the Workflow Builder application to configure a workflow over a table. Workflow enforces a series of states that records must pass through to reach completion.
In the Workflow Builder application, create a new record and select the internal name of the table you want to build the workflow over.
You must have list lookups configured to enter in the State List Lookup and State Type List Lookup fields. Learn more in Configure workflow list lookups.
Configure your transitions
On the Transitions page, use the visual builder to configure your states and transitions. Or, turn the Show Visual Builder toggle off and select the Add Transitions button. There are several considerations, such as:
- One of the detail transitions must have a From State of
Newand a From State Type ofInitial. The list lookup description of New can be different depending on the type of workflow. For example, Draft/Initial or Ready to Post/Initial are also acceptable combinations. - The transition trigger type you select initiates the workflow transition to the To State. Learn more in Workflow transition triggers.
- If you add manual transitions on your workflow you can optionally define an Action Label. The action label controls what text is shown on the row and form action buttons used to initiate the manual transition. If no label is defined, the buttons display the default Transition to <To Workflow State> label.
- If you add auto transitions on your workflow, you can optionally select the Enable Synchronous Processing checkbox to enable synchronous processing on your automatic transition triggers. This makes the auto transition process synchronously when the record saves, rather than being queued for asynchronous processing in the background, when triggered by an interactive edit of a record. Only three concurrent transitions may occur in synchronous processing, otherwise the system defaults to async processing.
- If you add auto transitions on your workflow, you can also optionally select the Enable Throttling checkbox for transitions which require throttling to avoid contention.
After creating a basic workflow, you can add some advanced workflow features to build a more complex workflow. Learn more in the Configure advanced workflow features topic.
Activate your workflow
Once the workflow definition has been configured, select the Active checkbox to activate the workflow.
When a workflow is active, it is enforced on all applications built over the table. There are several table types supported, such as Main and Header Detail.
To activate workflow on a Header Detail table, ensure the Header, Detail, and Header Detail tables are all configured correcly. Additionally, the Header Detail page in each table definition must be fully configured to point to the related tables. Learn more in Header Detail application configuration.
A single workflow can be attached to a Header Detail table when a single entity transition is necessary. If the header and detail must transition as independent flows, then define a separate workflow definition for both the Header and Detail tables.
Configure workflow types
Use the Workflow Type Definitions application to configure workflow types to differentiate different paths in a workflow transition.
Workflow Type Definitions
To configure a workflow type, you must know the Workflow Name, Table Name and Product Family of the workflow you are planning on adding the type(s) you create to.
Once you create a new workflow type, there are several considerations, such as:
- The Product Family must be the same as the workflow.
- The Workflow Table must be the same table the workflow is built over.
- Workflow type criteria must be unique to ensure records can only ever match one workflow type. If records match the criteria for multiple workflow types, behavior is unpredictable. Learn more in Workflow types.
In order to be included in the workflow type, a record must match all values entered in the Criteria subtable. If you need additional criteria, create additional details in the subtable.
Workflows
In the Workflow Builder application, you can associate the workflow type(s) that you configured with a workflow transition. The transition you associate with the workflow type in is now specific to this workflow type. This transition only initiates when a user selects the specific field value or values you configured in the Workflow Type Definitions application.
By default, once a record has been created and assigned a workflow type the type cannot be changed. Fields included in the workflow type criteria are also locked so values cannot be modified or deleted. You can select the Reevaluate Workflow Type checkbox on workflow definitions to allow records to reevaluate the workflow type. When selected, fields included in workflow type criteria are editable within records in an INIT state type. When the records transition out of the INIT state type, the system reviews the records for workflow type criteria and updates the workflow type as necessary.
For more information on workflow transitions, see the Workflow transition triggers topic.
Configure a workflow orchestration
Configure a workflow orchestration so a record's state and state type transitions when another record has reached a certain state and state type using the Workflow Builder and Workflow Orchestration Definitions applications.
Create a workflow orchestration definition
There are some cases where you may have multiple orchestration transitions out of the same workflow state and state type. In these cases, use the Precedence field to control the order in which the criteria for each orchestration transition is checked at run time.
In the Workflow Orchestration Definitions application, create a new orchestration and define the tables used in the orchestration. The table below details the values that must be entered in the different fields.
| Fields | Values |
|---|---|
| Orchestrating Table | The name of the driver table, or the table that leads the orchestration. |
| Target Table | The name of the table that is affected by the orchestrating table. This can be the same table, or a different table, than the orchestrating table. |
| State List Lookup | The state list lookup created for the orchestrating table's workflow. |
| State Type List Lookup | The state type list lookup created for the orchestrating table's workflow. |
After you define the tables, you must:
- In the Orchestrating Workflow Status subtable, enter one or more Orchestrating State and Orchestrating State Type pairs. These are the combinations that all orchestrating records must reach in the orchestration in order for the record to transition.
- In the Orchestrating Data Item and Target Data Item fields, enter the data item that identifies the records. This is often the
nwId. The values of both data items must match in order to link the two records. - Optionally, in the Target Table Sort Order subtable you can specify a field whose values control the order in which records for orchestration should be processed.
Create transitions with workflow orchestration
You can also configure a workflow transition that it is reliant on an orchestration so that a record does not transition to certain To State and To State Type values until all driving records reach the To State and To State Type values.
In the Workflow Builder application, open the workflow of the target table you defined in the workflow orchestration definition. There are several considerations, such as:
- The
Orchestrationoption must be selected in the Transition Trigger field in the workflow transition detail that you want to link to the orchestration table. - The name of the orchestration you created in the Workflow Orchestration Definitions application must be entered in the Orchestration Config field in the same transition.
Configure messages for workflow transitions, approvals, or rejections
Configure messages when a workflow transition, approval, or rejections occurs with the Message Event Definitions, Message Template Setup, Message Definitions, Workflow Builder, Logic Block Builder, and Approval & Notification Definitions applications. Configure notifications when a workflow transition occurs with the Approval & Notification Definition and Workflow Builder applications.
You can configure a notification to be sent when a workflow transition occurs, or create a message which is sent to selected recipients when a transition, approval, or rejection occurs.
Notifications for workflow transition
In the Approval & Notification Definitions application, configure a record with the roles or users who should receive the notification.
In the Workflow Builder application, open the workflow and:
- On the Transition page, configure your transition detail.
- In the Action Type field, select
Send Notification. - In the Action Definition Name field, enter the name of your Notification Definition record.
Messages for workflow transition
Configure your message event, template, and definition. See the Message configuration topic for more information.
In the Workflow Builder application, open the workflow and configure the workflow transition detail on the Transition page.
In the Logic Block Builder, configure a Post Run logic block on the transition, then:
- Select the Queue Event action.
- In the Details panel, in the Message Event field, enter the name of the message event you configured.
- If the business event must be executed in a certain order in relation to other events, use the Sequential Execution Key field to specify a key.
- Use the Payload Entries fields to map in values from a data source to the payload entry. These values can be used as interpolated values in the message content, or to provide recipients for the message.
Messages for approvals or rejections
Configure your messages. Messages are a multistep configuration which include a:
- Message event definition—Specify the table which you want to retrieve records from, such as addresses for emails.
- Message template—Define the content for the approval messages.
- Message definition—Define the message template, message event, and associated configuration. Together, they create the automated messages and notifications which the system sends to recipients.
See the Message configuration topic for more information.
In the Workflow Builder application, open a workflow and configure the Approval Transition that you want the notification on. Learn more in Configure workflow approvals.
In the Approval & Notification Definitions application, configure your approval. In the Notifications section, enter the name of your message event definition in the Approve Message Event or Reject Message Event field.
Conditional logic block workflow transition
Application developers can use a logic block's success or failure to determine how a workflow state transitions using the Workflow Builder and Logic Block Builder applications.
When using a logic block to conditionally trigger state transitions, you must create two detail transitions for each From State and From State Type combination. One detail transition definition determines what happens if the logic block runs successfully. The second detail transition definition determines what happens if the logic block returns an error.
Workflow Builder
In the Workflow Builder application, open the workflow to configure the detail transitions.
To configure a successful state transition, select the Add Workflow Detail button and configure the following fields:
| Fields | Values |
|---|---|
| From State and From State Type | The state and state type that you want the transition to start from. |
| To State and To State Type | The state that you want the transition to land on when the logic block is successful. For example, Complete/Closed. |
| Transition Trigger | Auto |
| Transition Delay(optional) | The amount of time that should pass before the logic block is initiated. |
| Workflow Condition | Logic Block Success |
| Logic Block | The name of the logic block. |
To configure a failed state transition, select the Add Workflow Detail button and configure the following fields:
| Fields | Values |
|---|---|
| From State and From State Type | The same state and state type values as the Logic Block Success state transition definition. |
| To State and To State Type | The state that you want the transition to land on when the logic block is successful. For example, Error/Inactive. |
| Transition Trigger | Auto |
| Transition Delay(optional) | If a duration was configured for the Logic Block Success condition, enter the same time duration entered for the Logic Block Success condition. |
| Workflow Condition | Logic Block Error |
| Logic Block | The same logic block name entered for the Logic Block Success condition. |
Logic block controlled workflow transition
Application developers can use the Queue Workflow State Change logic block action to transition a workflow record's state and state types based on validations.
If the validations in the logic block are successful, then the state transition is made. If the validations in the logic block are unsuccessful, then the transition does not occur.
For example, you could create a logic block over the Job Definition workflow to identify active jobs that have no outstanding invoices. Once those records have been identified, you could use the Queue Workflow State Change action to transition those jobs to a state of Complete. The Job Definition workflow would have to have a transition trigger of type Logic Block Controlled with a from state of Active, and a to state of Closed.
Workflow Builder
In the Workflow Builder application, select Logic Block Controlled in the Transition Trigger field of a workflow transition. Designate the required to state and to state type for the transition.
Logic Block Builder
In the Logic Block Builder application, build a logic block over the same table as the workflow definition with conditional validations. Use the Queue Workflow State Change action for any successful validations.
The Queue Workflow State Change action finds the best available logic block controlled transition in the workflow definition and executes it.
Post-run logic blocks for workflow definitions
Application developers can use the Workflow Builder application to configure post-run logic blocks to run after a workflow transition is complete, or after a conditional workflow logic blocks runs and the record is updated.
The post-run logic block can run as part of the workflow so that when specific criteria is met, the logic block initiates. It can also run for a specific transition within the workflow.
Workflow
When you configure a post-run logic block for a workflow, that logic block runs after any transitions that meet the criteria you define. If you do not add values to any of the criteria fields, that logic block applies to every transition. This criteria can include a From State and From State Type, as well as a To State and a To State Type. Defining the post-run logic blocks for the workflow instead of a transition allows you to apply a post-run logic block to multiple transitions, without having to add it multiple times.
For example, if you specify the From State as Open and the From State Type as Active for a post-run logic block, that logic block applies to all transitions from the Open state and Active state type. If you want multiple logic block to run any time a record transitions from the Open state and Active state type, you could use the Order field to configure the order they run in.
Specific Transition
When you configure a post-run logic block for a specific transition, the logic block runs after only that transition. You only specify the sequence and the name of the logic block to run because the logic block is defined as part of the transition. The Compiled Post-transition Logic Blocks subtable shows an ordered list of all the logic blocks defined for a workflow that apply to the transition, as well as the logic blocks defined for that transition.
If there is an error when a post-run logic block runs, the transition of the record that was triggered before the logic block run is unchanged. This means that if there is an error in any post-run logic blocks, the record is unchanged.
Configure a post-run logic block
In the Workflow Builder application, open a workflow and enter the name of the desired logic block in the Post-transition Logic Block field in a workflow transition.
Configure a Report Transition for workflow
Application developers can configure a report transition using the Workflow Builder and Logic Block Builder applications to ensure reports are generated successfully in a workflow.
Logic Blocks
In the Logic Block Builder application, create a new logic block with a Queue Report to Run action. In the Detail section of the action, you must have:
- The report version application for the report selected in the Select a Report Application field.
- The table the workflow is built over selected in the Post-Processing Data Source field.
Workflow Builder
The Queue Report to Run action on the logic block initiates the report once it is added to a conditional logic block workflow transition.
In the Workflow Builder application, you must:
- Select the Add Workflow Detail button to configure conditional logic block transitions for a
Logic Block Successand aLogic Block Errortransition. See the Conditional logic block workflow transition topic. - Select the logic block you created in the Conditional Logic Block field in both transitions.
- Select the Add Workflow Detail button to configure your report transitions. You must have both a
Report Successand aReport Errortransition configured.
The report transition is initiated by either a report success or a report error. Depending on which condition is met, a different transition occurs.
How to disable the Workflow Change action
Application developers can prevent users from making multi-row workflow changes by disabling the action in the application configuration.
The Workflow Change action is available in Header Detail and Advanced List application types. You can learn more in the Workflow Change action topic.
Disable this action by configuring a Control Action in the application definition on the Actions page or by using an application setting.