















Forms of the same type always show the same type of information, but they can have a different composition of regions, which organize and display information in the form. For example, a Detail form can have a header region that contains the most important fields for a record, and a body region that organizes the supporting fields.
List form
The list form displays all the records in an application, and gives you the ability to find, filter, and search for records. Because it provides access to all records in an application, the list form is the default entry point for most applications. Once you locate a record in the list form, you can open it to review additional details.
The list form always presents a list of records in the application. However, the regions available in a list form can vary based on the application type. For example, this diagram represents a standard list form and its regions:
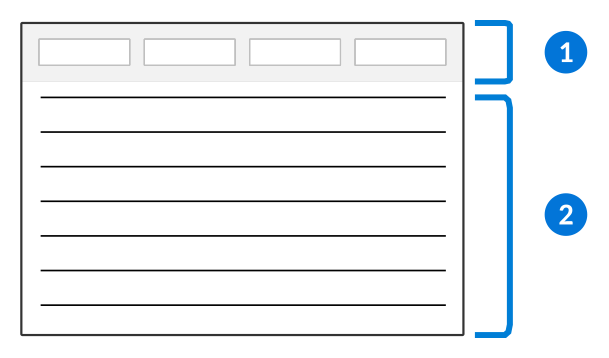
 | Column headers—Represents the fields within your application. Often, column headers contain filter fields which you can use to sort and search the list. Whether columns have filter fields is determined by the environments user interface setting. Learn more in Configure UI settings across the platform. |
|---|---|
 | Detail list region—This is a list of records in the application with columns representing key fields in the records. You can sort and filter the records in the list using the column header filters. Depending on the application, you may or may not be able to edit fields directly in the detail list. You can also open the detail for a record and see any additional fields that are not included in the list form. |
Tree style list forms
The list forms of a Tree style Relationship application can be configured in two possible ways, the Tree-List form or the Tree-Entity View form. If the Tree-Detail Form check box is not selected, then a Tree-List form displays showing relationship hierarchies on the left and a detail list of a record's relationships on the right displays in the generated application. If the Tree-Detail Form check box is selected, then a Tree-Entity View form displays showing relationship hierarchies on the left and an editable detail form of an entity record on the right displays in the generated application.
For example, these diagrams represent standard Tree style list forms and their regions:
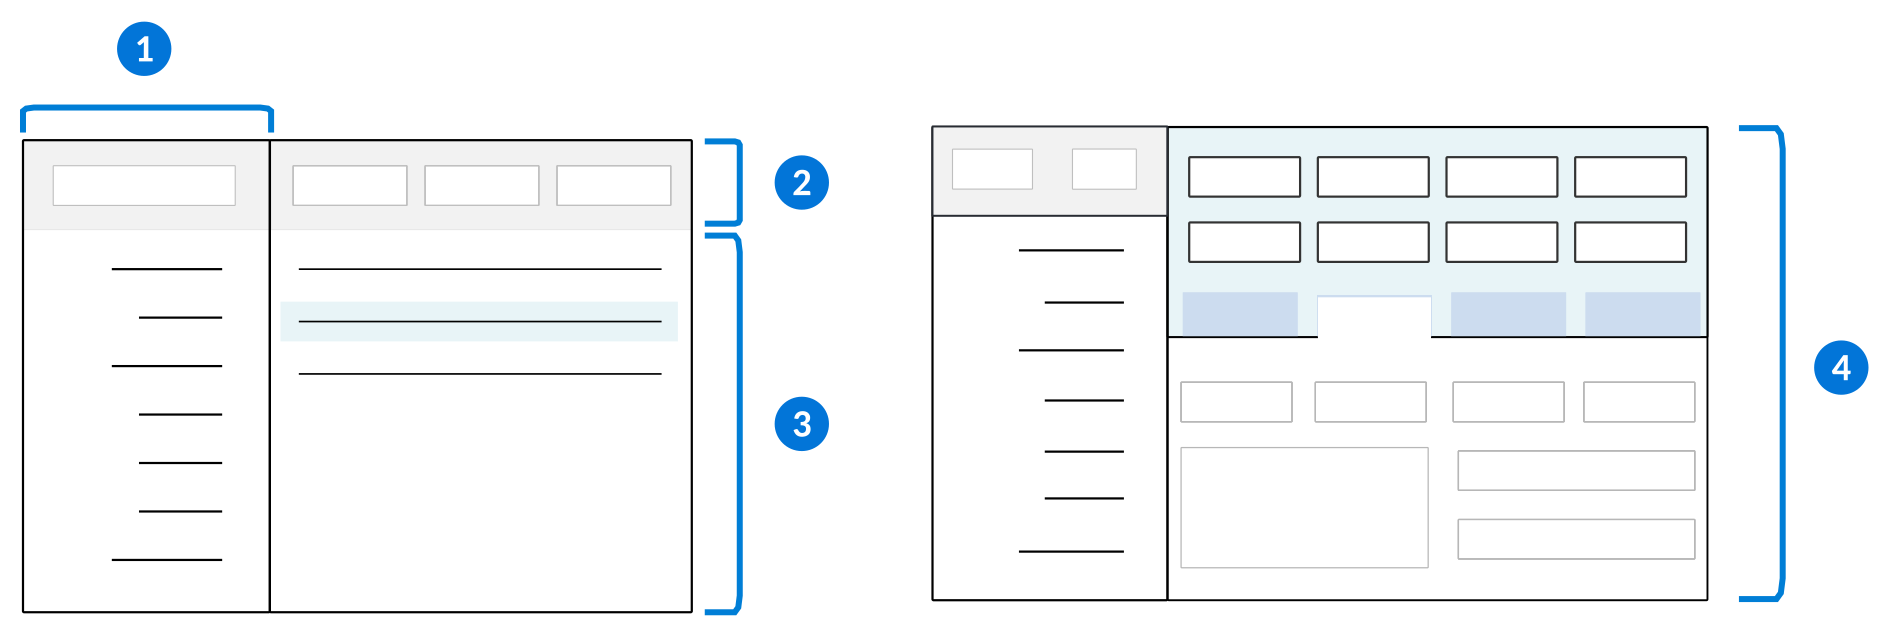
| Tree list region—This is a hierarchical representation of records in the application. When this region is available, you can expand and collapse the nodes of the tree to see the relationship between records. When you select a record in the tree, all the records immediately below it are displayed in the adjacent detail list. |
|---|---|
| Column headers—Represents the fields within your application. Often, column headers contain filter fields which you can use to sort and search the list. Learn more in Column header filters. |
 | Detail list region—This is a list of records in the application with columns representing key fields in the records. You can sort and filter the records in the list using the column header filters. You can also open the detail for a record and see any additional fields that are not included in the list form. |
 | Entity detail form region—This is the detail form of an entity record from the application specified in the Entity Application field in the Relationship application configuration. You can modify and save changes in the detail form fields within the right-hand entity view without going into the full detail form. |
Advanced navigation
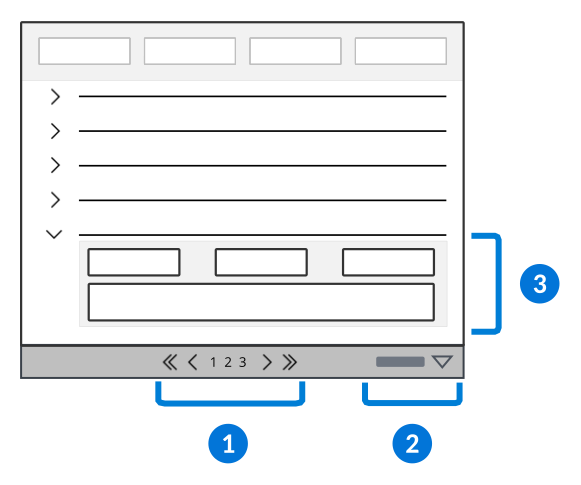
| Page navigator—Page navigation controls appear at the top and bottom of detail list regions, and offer a way to control how many rows appear on a single page. Use the page numbers and arrow buttons to load additional pages of results, and the drop-down to determine whether the list shows 15, 25, or 50 results on a page. |
|---|---|
| Column controls—The Columns menu gives you control over the order of columns in the list form. You can also use this menu to freeze columns so they remain visible as you scroll horizontally. |
| Row expansion—Some applications include additional details for a record that can be viewed from the list form by expanding the row. When available, click the row expansion icon to see these additional fields. |
Sort configuration
Configure the list form of an application to sort the values for a field or indexed field. This ensures that records are automatically sorted when the application opens based on a field's ascending or descending values.
You can create default sort orders for indexed fields in the Table Definitions application, and create default sort profiles for any sortable field in the Application Builder application. The sort profiles you create in Application Builder can also be used in the Application Setting Definitions application.
Indexed Fields - Tables
You can configure a default sort order for an indexed field. In the Table Definitions application, you must:
- Navigate to the Indexes page and create an index ID and name the field(s) that make up that index.
- Use the Sort Order field to choose which order you want the field values to be sorted in.
Learn more about what indexes are and how to use them in the Indexes section.
Sort Fields - Application Builder
Default sorts applied to applications sort fields in the order in which they were entered. For example, you could create a sort profile that has the Name field sort defined first, and a sort for the Age field defined second. Enter the Sort Name in the Sort Profile Selection field to make it the default sort for the application. When the application opens, records in the list form would be sorted alphabetically by Name first, then the Age field sort is applied.
To create a sort profile, in the Application Builder application, navigate to the Sort page where you must:
- Select the Add button to create a new sort profile in the Sort Profile subtable.
- Enter a unique Sort Name for the sort.
- Select the Edit Sort button to configure the sort orders. Sort fields entered in the sort profile are applied in the order in which they are entered.
- Define the default sort profile you want for the application in the Sort Profile Selection field. Any additional sort profiles entered in the Sort Profile subtable are optional sorts which can be shipped and applied at the discretion of the user or developer.
Application Setting Definitions
You can use any of the sort profiles you define in the Application Builder application in the Application Setting Definitions application. Any sort profile you define in the Sort Profile Selection in Application Setting Definitions overrides the default sort profile you defined in the Sort Profile Selection field in the application configuration.
Detail form
The detail form of an application displays the fields for one primary record, but can also show information maintained in other applications depending on the application configuration. In most applications, record maintenance is done in the detail form.
The detail form can vary depending on the type of application you are in and how it was configured. The following diagram represents a detail form and its regions:
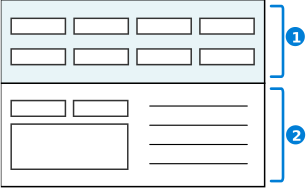
| Header region—Contains the most significant fields of the record. The header is positioned above application pages and is visible at all times. |
|---|---|
| Detail region—Contains additional fields related to the application. In many cases, fields in the detail region are organized in to pages. |
Additional regions
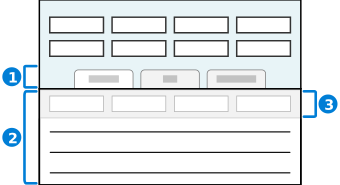
| Pages selection region—Detail forms with many fields often organize the fields into pages. Select a page to open it in the detail region.
|
|---|---|
| Detail list region—A detail form can include a subtable or list region that shows information related to the current record. Detail lists regions have many of the same navigation and control options as a list form. |
| Column headers—Use the filter fields in this row to sort and search a list. Filter fields are available at the top of most list regions in the column headers. |
Header Detail form
The header detail form shows the master header record and a detail list of all sub records that are managed by the header. In this form, you can view and maintain the header record, and can open an associated detail record.
This diagram represents the header detail form and its regions:
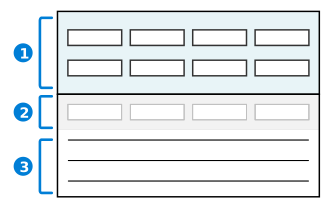
| Header region—In the header detail form, the header region includes fields that identify the primary record and common fields that are also included in the detail records. |
|---|---|
| Column headers—Use the filters fields in the column header to sort and search the list. |
| Detail list region—In the header detail form, all records in the detail list are intrinsically linked to the header record. From here, you can add additional detail records, or sort and filter existing records using the filter row. You can also open the detail for a record and see any additional fields that are not included in the list form. |
Application pages and rows best practices
These best practices ensure that application pages and rows are configured consistently throughout Nextworld.
Configure pages and rows on the Pages and Rows page in the Application Builder application.
Pages
Only use a maximum of six pages in an application. Any more than six would appear overcrowded. Configure the pages as A through F, with A being the first page and F being the last page.
Be descriptive and concise when adding a titles to pages. Page names should not repeat any field names or row separator titles. Avoid creating page titles like Other or More Information.
Pages should be used when there are enough differentiating fields to logically separate the sections.
Fields should be placed on pages that logically reflect the purpose of the field. For example, the application Purchase Orders has multiple pages including Accounting, Supplier, and Terms. The field Payment Terms logically belongs on the Terms page, not on Accounting or Supplier.
Rows
Only use a maximum of:
- Six fields in a row. Any more would result in unnecessary side scrolling.
- Six columns across the page. Any more than six would appear overcrowded.
Row separators can be configured using the Hide Row Separator checkbox. If you don't select the checkbox, a row separator appears above the row associated with the unselected checkbox. If you do select the checkbox, the row separator is hidden and does not appear on the user interface.
When configuring row separators in the header, you must:
- Hide the row separator that would appear above the header. The header's position as the topmost section of the application which means it does not need to separated from anything above it.
- Place a row separator below the header. The exception is when there are pages immediately below the header.
- Add a collapsable row separator in the header if there are too many fields and the header appears disorganized.
When configuring row separators in the detail form, you must:
- Keep row separator titles consistent. If some row separators have titles, then all row separators must have titles except for the row separator directly beneath the header.
- Titles should provide value and should not repeat the page title.
- Make all row separators collapsible so that the end user has control over which field areas they want displayed or which ones they don't want displayed.
- Avoid having row separators on every row. Row separators should be used to logically organize fields. Do not use a row separator when the fields don't logically fit together in the context of an application.
Assign a Static Text data item its own row in the Row field, and only one column in the Columns in Row field. Assigning only one column to a Static Text data item ensures that the text is fully extended across the generated application. If you assign more than one column to a row with a Static Text data item, the text becomes condensed in the generated application.
When configuring row assignments in the Row field, only use the single letters. For example, use A instead of A Custom 01. If you try to use the custom format, you will receive an error when you try to save your application. The custom format is used for customizing Nextworld applications only.
List form field layout best practices
These best practices ensure that application list forms are configured consistently throught Nextworld.
Configure the list view on the List Form Fields page in the Application Builder application.
Place the most important fields in the beginning of the list.
Limit Primary and Available fields to 10 fields that support the main purpose of the application. The exception to this rule is the list view for integration applications. These may exceed the 10 field limit. List other fields as available hidden to provide options for customers to set their column preference. The limit on the number of fields that can be displayed is 40.
Only use an Aggregation feature for a list form field if the application either restricts the number of records that can be viewed or is over a table that does not contain a large amount of records. In applications with a significant amount of records, the system has to go through all the details to recalculate an amount whenever you make a change in the filters. This can greatly affect the performance of the system. A possible exception to this is if you are using a Header Detail application. In a Header Detail application, the amount of detail records displayed in the list view is limited to those that are associated to the header. If you use the filters and the amount field must be recalculated, performance is typically not impacted if the Header Detail doesn't contain too many detail records associated with a header.
Position ItemDescription to the right of Item in both list and detail forms. If you need to use ItemType, place it to the right of ItemDescription.
Position the most important fields to the left, and the less important fields to the right. Fields that:
- Create context should be positioned to the left.
- Require entry in the list view should follow the fields that create context.
- Are defaulted or not required should go to the right.
Configure the display types so that only fields that support the main purpose of the application are visible. The display type options are:
| Display Type | Used for |
|---|---|
| Primary Tree | Required tree fields in a tree style relationship application. |
| Primary | Required fields that are critical to the application. |
| Expansion | Disabled or defaulted fields that are rarely used for filtering. |
| Excluded | Fields that do not need to be displayed. |
| Available | Fields that are important to the business process. The user will be able to hide these fields if they are not used as part of their business process. |
| Available-Hidden | Additional fields that the user may want to show. These fields can be shown if needed. |
Expansion rows should be limited to two rows.
Always configure the Notes field to display as Expansion.
Index Query Restriction
If your table holds a large data set that is often queried, use index restriction query to limit the choices of fields to query to maximize performance.
Fetch option best practice
Use the Fetch Options field in Application Builder to control the list view filtering options. This best practice describes when to use each option.
The Fetch Options field controls what filters a user must enter when filtering application records. The configuration of this field should be based on the amount of records in a table, the type of data stored in the records, and an understanding of how users filter and use the records.
The list below describes the different options and when to use them:
- Require Single Filter—use for tables that store transactional data where the user filters with one unique value, such as Application Name when filtering for a specific application record.
- Require All Header Filters—use for Advanced List applications when the header filters create a unique key, such as Buyer and Status when searching purchase requisitions. Use this option for Advanced List applications built over Join tables.
- User Action Required—use for tables that store a high volume of transactional data where users add one or more filters before viewing results, such as Transaction Type, Organizational Unit, and Transaction Date or GL Account and Transaction Date when filtering for transactions. Use this option when there is a significant number of records that can take longer to load.
Header best practices
These best practices ensure that users experience a consistent header design throughout Nextworld applications.
Configure field placement in the Application Builder application.
Position check boxes to be as far right as possible. The exception to this is when there are fields that are being hidden or shown by the checkbox. The check box should be positioned to the left of those fields.
If the header looks too large, consider moving the pages to the top of the header. Moving pages to the top of a header requires not specifying a header row. With no header specified, the pages automatically display at the top of the application. Follow these steps to move pages to the top of an application with an existing header:
- In Pages and Rows, clear the Header Row and Header Row To fields.
- In the Rows subtable, find the rows that you want to be in your header, and select App Header Area from the Row Color list lookup.
- Generate and then launch the application to see the pages at the top and the rows beneath configured to look like a header.
If the header looks too large, but you have at least six core context fields that are necessary for every page, consider configuring a single header row. If the header consists of only one row with pages directly beneath it, configure the header color to display as white. Follow these steps to create a single row header with a white background color:
- In Pages and Rows, specify the header row. Make sure the Header Row and Header Row To display the same value.
- In the Rows subtable, find the header rows that you want to be in your header and select Card from the Row Color list lookup.
- Generate and then launch the application to see the single row header above the pages, displayed in the same color as an open page.
Sample header template
A header template is one way to ensure that users see a consistent, predictable field layout across Nextworld applications, particularly those applications that are part of the same family or module. This makes use and navigation of applications more intuitive.
Field positions should remain consistent throughout applications to avoid a disorganized user interface. Consider making a field placement template for groups of applications. For example, manufacturing application headers and education application headers may be different, but should remain consistent within their families or modules.
Below is an example template for a header. This template displays the maximum amount of header fields in a family to demonstrate the purpose of different field regions:
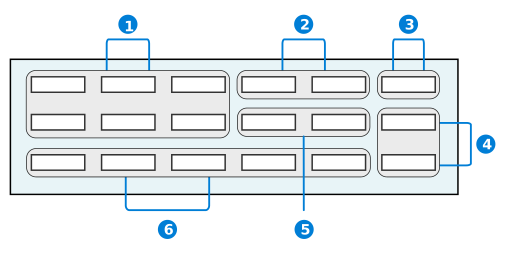
These different regions place fields in certain locations on the header depending on what kind of information they capture for the record.
Use this region to place:
| Region | Description | Examples |
|---|---|---|
| Fields that capture basic background information about the record. | Name, Type, and Description |
| Fields that capture status information. These fields are not workflow related and are primarily list lookups. | TaskPriority |
| Fields that capture the organizational unit of a record. | OrganizationalUnit |
| Fields that capture location information about the record. | PrimaryAddress and BirthCountry |
| Fields that have default values. These are fields that require numbers generated from other field values or IDs generated from the creation of records. | ContactID and TransactionAmount | |
| Fields that are check boxes. | Inactive or CustomerOnHold | |
 | Fields that capture date and time information about the record. | SentDate and BirthDate |
 | Fields that capture additional information that does not fit into the other regions. | Notes |
Detail form field layout best practices
These best practices ensure that application detail forms are configured consistently throughout Nextworld.
Configure the detail view on the Detail Form Fields page in the Application Builder application.
Always position:
- The
Inactivecheckbox in the top row and to the far right under the Save button. - The
OrganizationalUnitfield in the top row and to the far right.- The exception to this is if you are configuring
OrganizationalUnitin a module settings application. If you are configuringOrganizationalUnitin a module settings application, position it in the top row and to the far left.
- The exception to this is if you are configuring
- The Company field in the top row right before Organizational Unit. This field is required to be entered prior to the Organizational Unit. Disable Organization unit until a Company is entered. A company can be defaulted by an application setting.
- The exception to this is if you are configuring Company in a module settings application. If you are configuring Company in a module settings application, position it in the top row and to the far left.
- The
ItemDescriptionfield to the right ofItemin both list and detail views. If you need to useItemType, place it to the right ofItemDescription.
Try to place the Notes field on a separate page. If the application purpose requires Notes to be more visible, the field can be displayed where needed.
Additional status fields, such as BudgetStatus or CompleteStatus, should be positioned in the top row of the header and to the far right.
Inline application best practices
These best practices ensure that inline applications are created consistently throughout Nextworld.
Inline applications can bring a friendlier UI experience to the user when interacting with data from multiple sources. See Inline applications for more information.
When creating an inline application, there needs to be a data item defined for the detail/child application. That data item should be created as an Type and named the same as the application. For example, SerialAssociationComponents and WOSerialAssociationAssemblies.
The object data item created to represent the detail/child application should be included in the host table and application. When naming the host table and application, it should end with the name Host. However, this is optional since you can create an inline application over an existing table or use an existing application. Here are some examples, WOSerialAssociationHost (table and host application), WOOutputTransactionSerialsHostLB (table), WOOutputTransactionSerialsHost (host application), PickListHostLB (table), and PickListHost (host application). The SerialAssociationComponents and WOSerialAssociationAssemblies data items are in the WOSerialAssociationHost table.
- Performance Considerations
- The table holding the data item should not be placed inside high risk tables. For example, do not put this type of data item in the
WorkOrderHeadersorSalesOrderHeaderstables. Heavily used transaction tables should not hold inline applications. - Do not use extensive advanced filtering through the data mappings. Using advanced filtering with multiple expressions will impact performance. Instead, load the data and perform table filtering through logic.
- For example, see the
WOMaterialTransactionSerialsHostapplication and theSelectWOMaterialTransactionSerialsdetail/child application. Logic was written in theInitializeWOMaterialTransactionSerialsHostlogic block to load the data and decrease the amount of advanced filtering needed in the application.
- For example, see the
- The table holding the data item should not be placed inside high risk tables. For example, do not put this type of data item in the
- The use of common context works well when the detail/child application is a list view that needs to be filtered based on values selected from the host application. For example:
- Host Application:
WOSerialAssociationHost- Publishers: WorkOrder, ParentSerialMaster
- Subscribers: ParentSerialMaster
- Application:
WOSerialAssociationAssemblies- Publishers: SerialMaster
- Application:
SerialAssociationComponents- Subscribers: WorkOrder, ParentSerialMaster
- Host Application: