















Branch lifecycles are created and used for discrete development projects. For example, you may create multiple branch lifecycles and switch between them for feature development and bug fixes. After you complete development in a branch lifecycle, you create a merge request. When the request approved, all the metadata objects in the branch lifecycle are merged into the base lifecycle and the branch lifecycle is deactivated. Use the Lifecycle menu in the Main Menu bar to change lifecycles.
Additionally, all changes to metadata objects within a branch lifecycle are tracked, including the users who made those changes.
Use the following applications when working with branch lifecycles:
- Branch Lifecycle Management application—Create new branch lifecycles, check metadata objects into the branch lifecycles, keep track of changes and contributors, and create merge requests.
- Merge Requests application—Make notes, request changes, and approve merge requests.
Branch Lifecycle Management application
Application developers use the Branch Lifecycle Management application to create branch lifecycles, track changes made to metadata within those lifecycles, and create merge requests. This application is available in the Developer Studio.
After you create a branch lifecycle, it's accessible in the Lifecycle menu. You can use the Add to Lifecycle form action to select multiple objects and check them into the branch lifecycle. Alternatively, when you change your current lifecycle to the branch lifecycle, any objects you check out are added to the branch lifecycle. You can view all of the objects in the branch lifecycle on the Changes page.
When development in the branch lifecycle is complete, use the Create Merge Request form action. When the merge request is approved, the objects in the branch lifecycle are merged into the base lifecycle.
After the branch lifecycle is no longer needed, use the Deactivate form action. Only active branch lifecycles are accessible from the Lifecycle menu.
Design page
Use the Design page to describe the project you're developing in this branch lifecycle.
Changes page
Use the Changes page to view all the metadata objects that have been created, modified, or deleted within the branch lifecycle.
Contributors page
Use the Contributors page to view all the users that have modified metadata objects within the branch lifecycle.
You can add a contributor manually, but any user that modifies metadata within the branch lifecycle is automatically added to this page.
Manual Tests page
Use the Manual Tests page to track any manual tests related to the development work in this branch lifecycle.
Test Harness Results page
Use the Test Harness Results page to track any logic block test harness results related to the development work in this branch lifecycle.
Auto Test Results page
Use the Auto Test Results page to track any automated tests related to the development work in this branch lifecycle.
Merge Requests application
Application developers use the Merge Requests application to track, review, and approve changes to objects within a branch lifecycle. The Merge Requests application is accessible from the Navigation Menu, or from within the Developer Studio.
After a merge request is approved, the changes are merged into the base lifecycle. Learn more in Branch lifecycles and Merge request workflow.
In the Header region, select the type. This dictates the reviewers required for your merge request, or allows you to create a merge request for metadata sharing. Learn more in Metadata sharing.
Optionally, add a merge request tag. Tags enable you to group related merge requests. This allows you to populate a Metadata Manifest with all of the merge requests tagged with the same value. Select an existing tag or open the Merge Request Tags application to add a new one.
Metadata Objects page
View the metadata objects that are a part of a merge request and the details of each object.
Reviewers page
View the list of reviewers for this merge request, and the approval status of the merge request.
Comment Summary page
View comments from both authors and reviewers concerning the objects in the merge request.
Notes page
View additional notes or information relevant to the merge request. For example, updates to the design based on reviewer feedback can be included on this page.
Merge request workflow
The workflow for the Merge Requests application controls how metadata objects developed in branch lifecycles, approved, and merged into the base lifecycle.
The following diagram represents the different stages of a merge request:
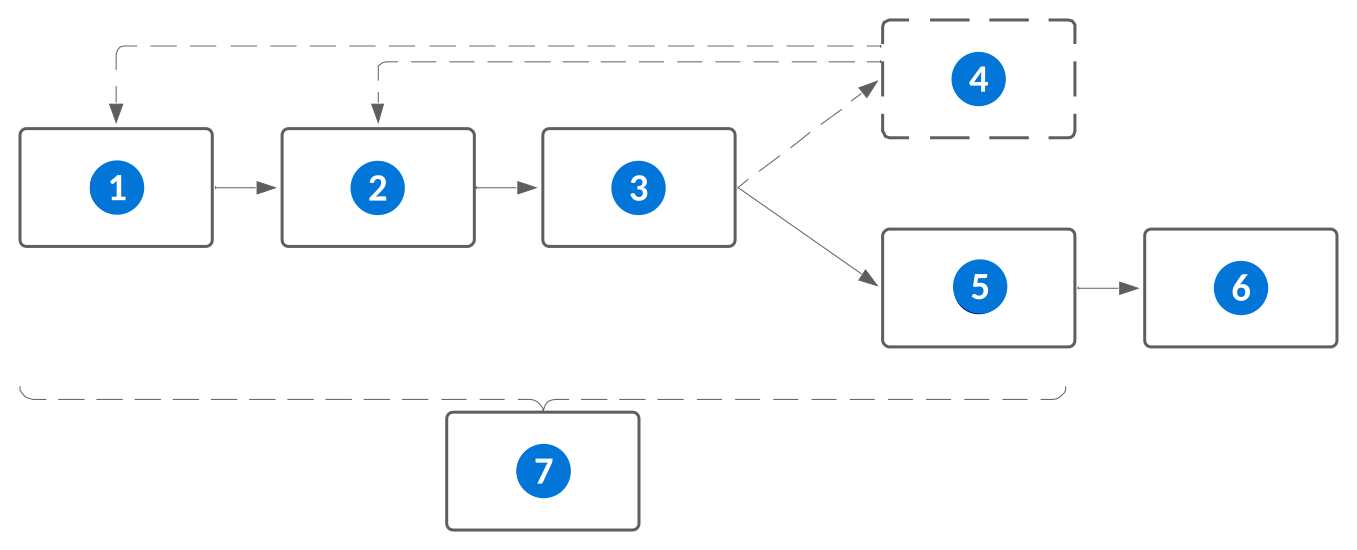
| State | Description | |
|---|---|---|
 | Draft | This is the initial default state for a new merge request. While the merge request is in this state:
|
 | Ready to Review | The creator of the merge request transitions the merge request to this state to indicate that it is ready for review. |
 | Under Review | The reviewers of the merge request transition it to this state after they have started reviewing it. The Approved check box is enabled next to each assigned reviewer in this state. |
 | Changes Requested | The reviewers of the merge request transition it to this state if they need the merge request creator to make changes before the merge request can be approved. The author can manually transition from this state back to Draft or Ready to Review. |
 | Approved | This state automatically transitions once all required reviewers have approved the merge request. |
 | Merged | This state automatically transitions once the objects in the merge request have successfully been merged to the base lifecycle. |
 | Closed | If a merge request is no longer needed, you can transition it to this state from any state aside from Merged. Once the merge request is in the Closed state, the status can't be changed. If required, you must create a new merge request. |