















There are three panels used for configuration in Report Builder. Each panel serves a different purpose in configuration, as seen in the diagram below.
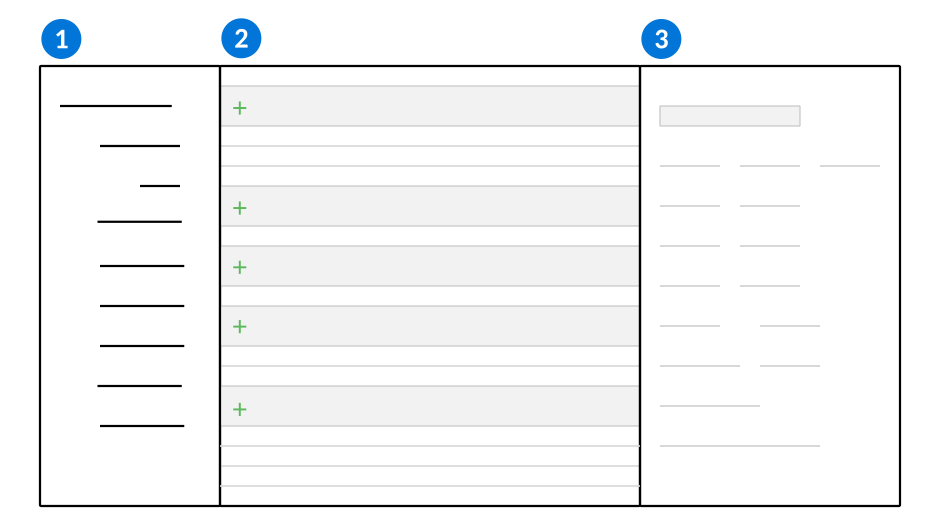
 | Structure panel—View the list of data and inputs available to build and generate your report. Use the structure tree to add, remove, and reorder items within sections of the report. |
|---|---|
 | Viewer panel—View a visual representation of the report where you can add, delete, reorder, or resize content items. Collapse the Viewer to hide the section labels of the report. This allows you to see what the report looks like without using the Preview button. Select the Add Group |
 | Details panel—View and configure properties of the report. Select a content item from the Viewer panel, or a node from the Structures panel, to open the details. For example, if you select the Each content item in the report has an optional Export Column field in the Details panel. Add an export column value to reposition content items so that headers and footers can align with detail content items in the same column. The content item with the largest pixel width determines the size of the column in CSVs and Excel. |
 icon to add a group and configure how the fields are grouped together. This adds Group Header and Group Footer sections above and below the detail.
To learn more about content item types, optional toggles, and action menu options, see the Report Builder configuration options topic.
Report configuration
Application developers configure reports with the Report Builder application to create report templates. Then, they create report version applications that allow business users to generate reports using those templates.
Report Builder
In the Report Builder application, you must:
- Create a new record and specify the data source table. If the data in the table must be processed by a logic block, such as data in a flat table, specify the logic block in the Report Data Logic Block field. Learn more in Flat table reports.
- Save the record and select the Report Builder action to design your report template.
- Design your report template. Learn more in Report Builder.
- Use the Generate Application and Table action to create an inputs table with fields that reflect all the inputs specified in the report template, and to create a
Report Versionapplication over the inputs table.
Learn more in the Report naming conventions and standards topic to reference the naming conventions and standards when building reports.
Report Builder configuration options
Report Builder configuration options include content item types, referencing company logos, operations for interacting with the template, and action menu buttons that interact with the input table.
Content Item Types
Section items and content items are used in Report Builder to control areas of the report, and the data you want represented in those areas. The content item type determines where the content item gets its value.
| Type | Purpose |
|---|---|
| Box | Provides an easy way to draw a rectangle around other content in the selected section, when combined with the border options in the Styles section. |
| Constant | Allows you to specify a value for the selected content item. This value can never change. |
| Field | Displays the current value of a particular field from the report data source in the selected content item. |
| Formula | Performs basic mathematical functions using values from the report and displays the result as the selected content item's value. |
| Input | Uses a selected input as the value of the selected content item. |
| Label | Label a content item with either the field label, or short field label, from the specified data item's synonym. |
| Page Break | Ends the content for that page. Content after the page break starts on the following page. |
| Subreport | Displays the selected subreport in the content item. A subreport is another report called within this report. |
| System | Uses a special value for the selected content item, such as the current date or the current page number. |
Logos
Company logos can be used in reports. Associate a logo with the company record in the directory, and use Company as a table lookup field on the report table. Reference that field as a content item in order to show the company logo in the report.
Barcodes
Barcodes can be used in reports. Add a content item of type Field with a display of Field Value. Then, in the Styles section in the Barcode field, select the type of barcode you want in your report.
Toggles
There are several toggles in Report Builder that give you additional operations for interacting with your report template, such as:
- Show Preview toggle—View the report template you built as a PDF file with data pulled in from the data source table. A report version application must exist in order to use the preview option. If you have any additional data items that you have added as input values, they appear blank in the preview because these data items do not originate from the data source table.
- Mark as Draft toggle—Save a report template even though errors have been detected. In order to save outside of draft mode, you must resolve those errors. If there is a report version application built over the report template and you save the template in draft mode with errors, then reports in the report version application fail anywhere you are able to run them.
- Show Export Columns toggle—View the configured export column values in the Viewer panel. Each content item in the report has an optional Export Column field in the Details panel. Add an export column value to reposition content items so that headers and footers can align with detail content items in the same column. The number for each column appears next to the content item it is configured on when the toggle is selected.
Action Menu
There are several options in the Actions dropdown menu to help simplify creation of an input table, and creation of a report version application over the input table. The table below details several available actions.
| Actions | Purpose |
|---|---|
| Generate Application and Table | Creates and saves an inputs table. Once the inputs table is saved, a report version application is built and saved over the inputs table. The two new objects are automatically given the correct report naming standards. Learn more about the correct report naming standards in the Report naming conventions and standards topic. You remain in Report Builder while the two objects are created, and receive a notification when they are successfully saved. |
| Create Inputs Table | Takes you to the detail form of the Table Definitions application, and creates an inputs table for your report. Use this action to review the inputs table format before saving. The table is not automatically saved. |
| Edit Inputs Table | Takes you to the filtered list form of the Table Definitions application. Open the table record to update and edit the inputs table. |
| Edit Report Version Application | Takes you to the filtered list form of the Application Builder application. Open the application record to update and edit the report application. |
Report Builder application
Application developers use the Report Builder application to define their reports, and create report templates.
To create a report, specify the table that contains the business data you need to display in a report. If you build a report over a flat table, specify the associated logic block in the Report Data Logic Block field.
After you save your report, use the Report Builder action to design your report template. Learn more in Report Builder.
Learn more about creating and using reports in Reports.