















All of your environments exist in the release pipeline. The release pipeline is a set of environments that facilitates the connection between internal Nextworld environments and customer environments. This means that your environments always run on the latest version of the Nextworld platform for you to develop, and contain the latest base metadata for you to extend. After your solutions have been developed and tested you can deliver them from the release pipeline to your customer's environments downstream.
The names of your environments start with the format of YY.n, where YY represents the year, and n represents the major version number of the year.
The following diagram shows the standard environments you have access to and how metadata migrates between them:
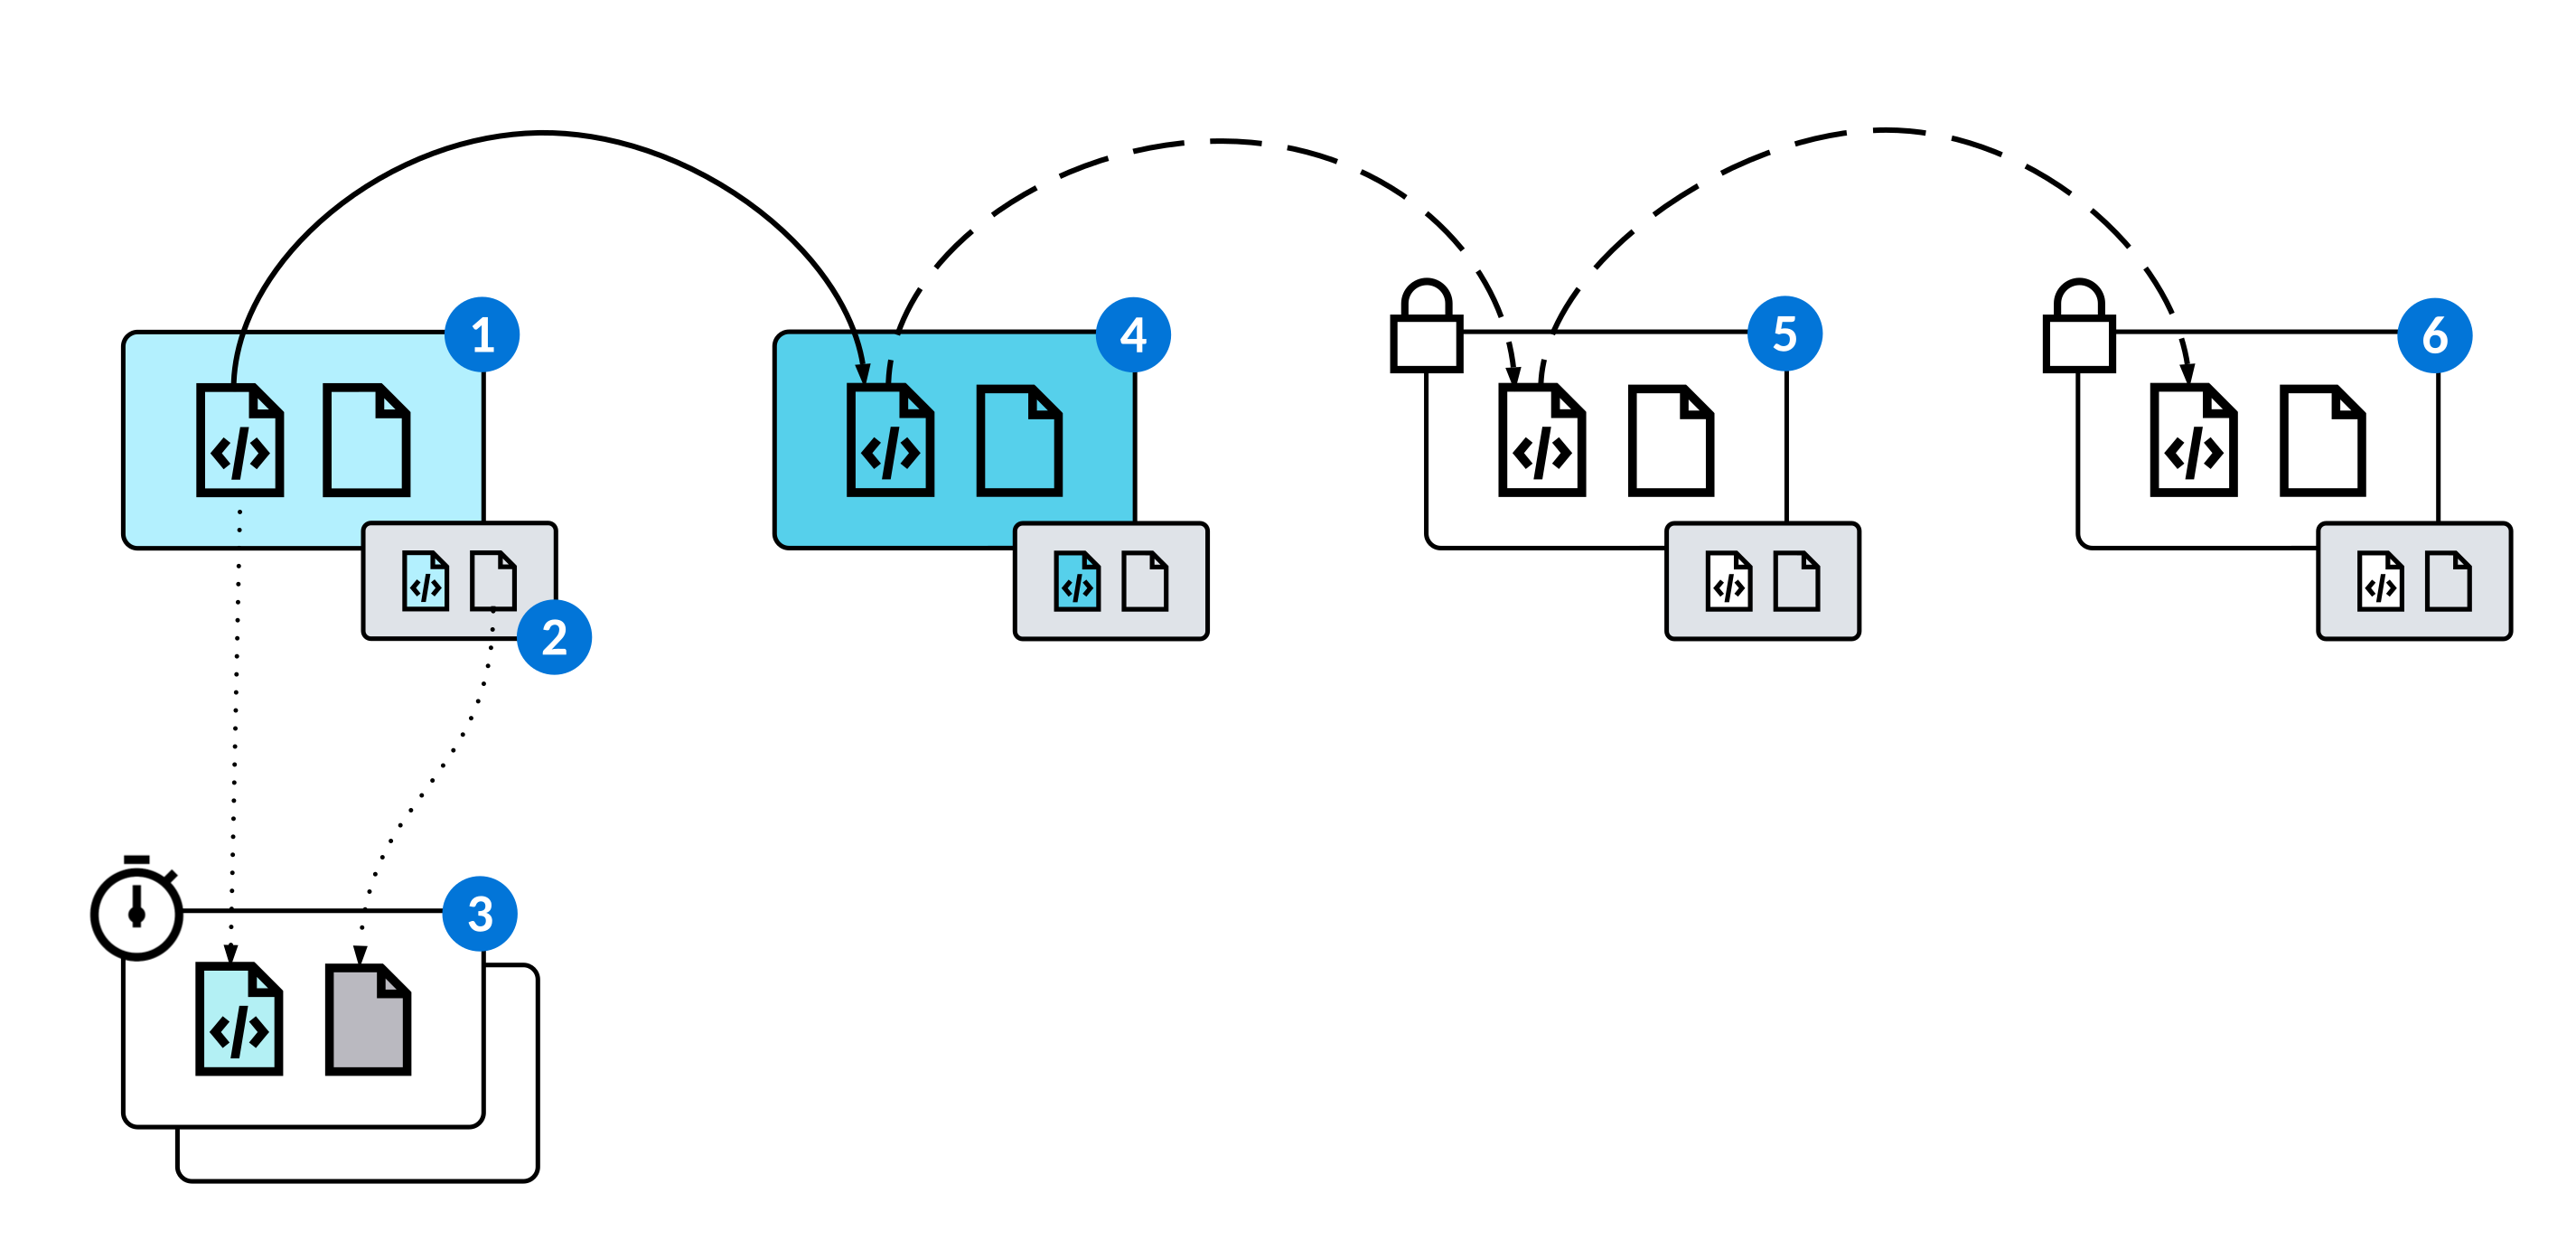
 | YY.nRPDevPartner—Use to develop your solutions. After you've developed and tested your metadata, you can manually migrate it to YY.nDevPartner, where it automatically migrates downstream to customer environments on a regular interval. Learn more about how to migrate your metadata in Deliver your metadata to customers. |
 | Child environments—Each of your environments also comes with a child environment. A child environment shares the same metadata as its parent environment, but holds its own set of business data. Typically, child environments are used to store sample business data for testing or demos. The names of these environments reflect their parent environments. For example, YY.nRPDevPartnerSeed is used for holding the sample business data you use to test your solutions in temporary tenants. |
 | Temporary tenants—Create temporary tenants for testing, demos, and more. Temporary tenants are isolated environments which contain the metadata and business data from different environments. For example, you might create a temporary tenant with the metadata from YY.nRPDevPartner and the business data from its child environment, YY.nRPDevPartnerSeed. You can run automated tests or sign into this temporary tenant to manually test your metadata before you migrate it to the YY.nDevParner and it automatically migrates to customers. Learn more in Temporary tenants. |
 | YY.nDevPartner—This is your staging environment, and is used to deliver your solutions to your customers. Metadata you migrate here automatically migrates downstream on a regular cadence to the test environment, then to the demo environment, and finally to customer environments in production. |
 | YY.nTestPartner—Use to conduct any final tests.When your metadata is migrated to this environment, it is merged to base. This means that the ownership of your metadata changes from Owned to Base, and you can no longer make changes to it. This ensures that all the metadata from Nextworld and solution development partners is delivered to customers as a unified product which they can customize to fit their needs. |
 | YY.nDemo—Use to conduct any demos. This is the final environment in the release pipeline before your metadata is delivered to customers. You can create temporary tenants using the metadata here to conduct demos, but you cannot modify any of your metadata in this environment, as it has already been merged to base. |
Deliver your metadata to customers
Solution development partners create and promote metadata manifests to migrate metadata downstream to their customers.
Develop all your metadata in YY.nRPDevPartner, your development environment, before promoting it to YY.nDevPartner your staging environment. From there, Nextworld will automatically migrates your metadata downstream to customer environments as part of scheduled patches if your organization is opted into that mechanism. Learn more about the environments you have at your disposal and their purposes in Standard solution development partner environments.
For hot patches and partners who are not opted into scheduled patching, there is an additional promotion to YY.nTest that is required.
To define the metadata you need to migrate to your staging environment, you reference the merge requests that are created and approved when developing in branch lifecycles. The following table describes the applications you use in each stage of the process:
| Stage | Application(s) | Description |
|---|---|---|
| 1 | Branch Lifecycle Management Merge Requests | Develop and extend metadata in a branch lifecycle. When your work is complete, create a merge request. After the merge request is approved, the metadata is merged into the base lifecycle. Learn more in Branch lifecycles. |
| 2 | Metadata Manifest Utility | Add the merge request to a metadata manifest. This creates a bundle that references all the metadata listed in the merge request. You can add multiple merge requests to a single manifest. Learn more in Metadata Manifest Utility application. |
| 3 | Validation Rule Catalog Validation Scope Definitions Validation Workbench | Check that your metadata is in a valid state and adheres to various best practices. Learn more in Validating Metadata. |
| 4 | Promotion Manager | Specify your Source Environment and Target Environment and migrate all of the metadata referenced in the metadata manifest. Each time you run a promotion, you migrate all the metadata objects referenced in the manifest as they currently exist in the base lifecycle. That is, if you modify an object in the base lifecycle after you include it in a metadata manifest, the latest version is migrated when you run a promotion.Learn more in Promotion Manager application. |
Validating Metadata
Solution development partners validate that their metadata adheres to various rules, ensuring that their solutions are in a valid state, follow best practices, and more.
Nextworld develops validation rules for different purposes. For example, the Valid References rule checks that references between metadata objects are valid. If you deleted a data item, but forgot to remove it from the Fields subtable of a table definition, you could run a validation of this rule on your metadata and fix the invalid reference before you promote it to your customers.
You should validate that your metadata adheres to these rules before you deliver it to customers. You can also schedule a job that validates the metadata in your development environment periodically. Learn more in Schedule a recurring validation.
Use the following applications to validate metadata against different rules:
- Validation Rule Catalog application—Browse the various rules that you can validate your metadata against. Certain rules are required to be validated in order to promote your metadata.
- Validation Scope Definitions application—Define the metadata you need to validate. You can specify a filter, such as all the metadata in a product family, or you can select one or more metadata manifests.
- Validation Workbench application—Choose the metadata to validate, and the rules to validate it against. View any metadata that violates the selected rules, and learn how to fix any issues.
Validation Rule Catalog application
Solution development partners use the Validation Rules Catalog application to browse the available rules they can validate their metadata against. They validate these rules to ensure their solutions are following best practices and are configured as intended.
For example, the Valid Shippable Families rule checks that every metadata object in a given scope is in a product family that's allowed to migrate. Each family definition has a Family Type, and objects in a Personal type family violate this validation rule. If you include a logic block in a metadata manifest that's accidentally assigned to the Playpen family, the logic block is flagged as a violation when you validate the manifest. You then have the opportunity to change the product family of the logic block and ensure it works as intended before you deliver it to your users.
You can open each record in the detail form to see a description of the rule. To validate your metadata against a rule, use the Validation Workbench application. Learn more in Validating Metadata.
Validation Scope Definitions application
Solution developers use the Validation Scope Definitions application to define the groups of metadata they need to validate against different rules.
After you define a scope, you can validate the metadata within that scope against different validation rules in the Validation Workbench application. Learn more in Validating Metadata.
To define the scope of the metadata you need to validate, choose a Validation Scope Type:
| Type | Description |
|---|---|
Filter | Use a Filter type to define a broad scope of metadata. In the Metadata Filter Set subtable, add a record for each type of metadata you need to validate, and define a Data Filter for metadata of that type. If you do not define a filter for a type of metadata, all objects of that type are included in the scope.This type of scope is best for validations that you need to run on a recurring basis. For example, you could schedule a validation of all the metadata in a product family every week. To define the scope for this validation, you would add a record for every type of metadata and configure each with a filter for that product family. Learn more in Schedule a recurring validation. |
Manifest | Use a Manifest type to define a more specific scope of metadata by selecting one or more metadata manifests. Metadata manifests must have a status of either Bundled or Available to include them in a scope.This type of scope is best for validating new metadata that you're ready to deliver to your customers. Learn more about creating and promoting metadata manifests in Deliver your metadata to customers. |
Validation Workbench application
Solution developers use the Validation Workbench application to validate groups of their metadata against various rules. After they run these validations, they evaluate any rule violations and make the necessary changes to their metadata.
To validate your metadata, you must first define a scope in the Validation Scope Definitions application. You can browse the various rules to validate that metadata against in the Validation Rule Catalog application. Learn more in Validating Metadata.
The Validation Workbench application is made up of the following application steps:
- Validation Profiles application step
Use the Validation Profiles application step to either select or define a validation profile, and then run the validation.
- Validation Runs application step
Use the Validation Runs application step to view a summary of each validation run.
- Rule Violations application step
Use the Rule Violations application step to examine each metadata object that violated a rule, and solutions on how to fix them.
Validation Profiles application step
Use the Validation Profiles application step to either select or define a validation profile, and then run the validation.
The Validation Profiles application step is part of the Validation Workbench application.
A number of existing validation profiles are delivered by Nextworld. You should validate your metadata against these rules to ensure your applications are adhering to best practices. The PromotionValidations rule is validated automatically each time you promote a metadata manifest.
To create your own profile, give it a name and use the Add Rule Instances button to specify each of the rules that you want to validate your metadata against.
For each rule you include in the profile, specify a Violation Severity. You can filter on the severity the Rule Violations application step after you validate. Save the record before running the validation.
Run a validation
To run a validation on a profile, select the Select Validation Scope action, select a scope, and then use the Validate Profile action to run the validation.
Validation Runs application step
Use the Validation Runs application step to view a summary of each validation run.
Each record in represents a single run of a validation profile, and is assigned a unique Run ID. You can view the total number of objects validated in the run, and the number of objects that violated a rule.
The Validation Runs application step is part of the Validation Workbench application.
Rule Violations application step
Use the Rule Violations application step to examine each metadata object that violated a rule, and solutions on how to fix them.
Every rule violation includes a Solution that details exactly how to modify your metadata so that it does not violate a rule.
For example, the solution to fix an object that violates the Valid References rule may include the following Error Message and Solution:
The table ItemLedger is referencing the data item StorageTemperature, which does not exist. If the data item StorageTemperature is supposed to be deleted, remove uses of it in the table. If the object is supposed to exist, make sure it exists in the environment for future validations.
The Rule Violations application step is part of the Validation Workbench application.
Schedule a recurring validation
Schedule a metadata validation to run on a recurring basis to ensure that your metadata is in a valid state and adheres to various validation rules.
Prerequisites
Before you can schedule a validation, you must configure:
- A validation scope definition. Typically, the validations you schedule should encompass a broad scope of metadata, and use a Validation Scope Type of Filter. Learn more in Validation Scope Definitions application.
- A validation profile. Learn more in Validation Workbench application.
Schedule a validation
In the Job Scheduler application, create a new job, and define how often it should run page. Learn more in Scheduled jobs.
In the Jobs subtable, add a new record:
- In the Job Nickname field, provide a unique name for the job.
- In the Type field, select
Logic Block. - In the
Background Task Logic Blockfield, enter theInspectionProfileRunBackgroundlogic block.
Then, select the Create Mappings field action in the Data Mappings field, and add two mappings with a source type of Constant. In the first mapping, specify:
ObjectSetCriteriaNameLookupas the destination field.- Your validation scope definition as source value.
In the second mapping, specify:
InspectionProfileNameas the destination field.- Your validation profile as the source value.