















Select the Logic Block Builder form action, or navigate to the Logic Block Builder page, to view or select a logic block's actions.
The Logic Block Builder is comprised of three panels. Each panel serves a different purpose in building a logic block, as seen in the diagram below:
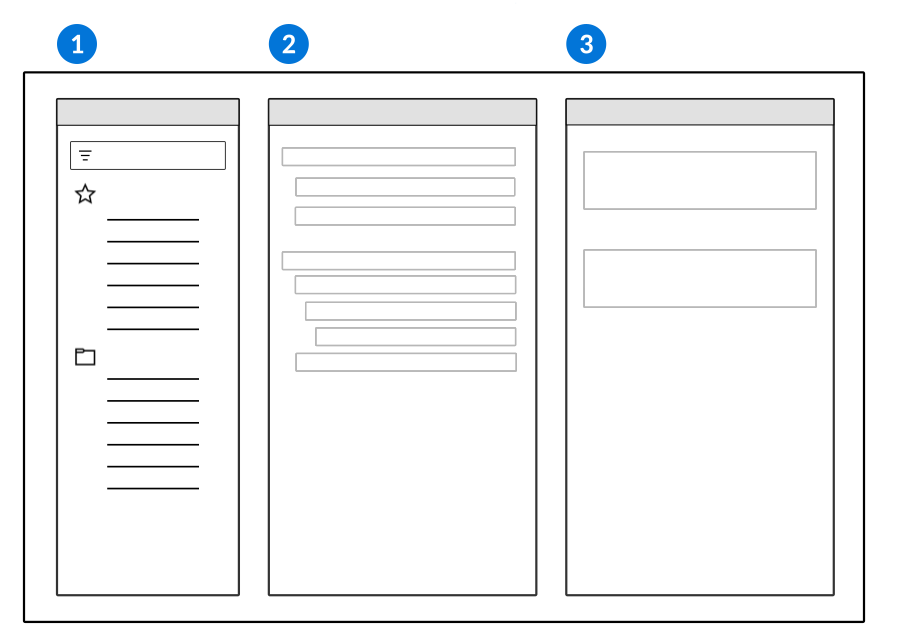
 | Actions panel—The list of all available actions used to create logical expression. Logic block actions are categorized by their function. You can favorite useful actions so they are visible at the top of the list. Favorited actions are specific to the type of logic block you are building, and persist across different lifecycles. This panel is only visible when you have access to edit the logic block. |
|---|---|
 | Logic Block panel—The sequence of logic block actions you select and define. Open the Logic Action Menu  on a selected action to access configuration shortcuts. |
 | Properties panel—The configuration options for the action selected. |
See the Logic block foundations: Design, develop, and test section for more information on logic blocks.
Compare addresses with a logic block
Compare addresses with logic blocks using the Conditional or Fetch actions.
Use Fetch actions to compare addresses using address attributes. For example, you can use the AddressFull attribute to compare whole addresses. For the AddressFull attribute to be populated, the record containing it must have been saved at least once. This can cause issues in some circumstances such as passing a temporary DSN or defining an Address variable.
If you use a Conditional action to compare addresses, you don't need to speciy an address attribute.
Configure a dynamic logic block to use in a customization
Dynamic logic blocks provide a way to dynamically call a logic block in a specific process. Use this when we know most customers will want to customize the process and not use the base functionality.
For example, base functionality can be delivered to determine the pricing of an item on a sales order or how to generate a lot or serial number for an item. These are examples where we know some customers may want to have their own customization to fit their specific needs. Delivering the base functionality to handle a dynamic logic block provides a way for customers to create their own logic and have it called by the base functionality.
Once you have identified a process where you think most customers would want their own logic, the following steps should be followed.
- Create a List Lookup
- Name Dynamic Logic Blocks
- Examples, Generate Lot Number Dynamic Logic Blocks or Procure to Pay Pricing Solution Dynamic Logic Blocks
- Customization Pattern = Complete Unlock Or Allow Additions (if some logic block is being delivered out of the box for them to select).
- The List Lookup Value must be the exact name of the logic block that will be used for the dynamic logic block call.
- Example,
GenerateLotNumberMonthCodeTransactionDatein the Generate Lot Number Dynamic Logic Blocks list lookup.
- Example,
- If you think the customer could use different logic blocks based on another list lookup, then this list lookup could have a dependent list lookup.
- Example, Generate Lot Number Dynamic Logic Blocks is dependent on the Lot Generation Frequency list lookup. That means different logic blocks could be available based on the frequency of the the lot generation.
- Name Dynamic Logic Blocks
- Create a Data Item of type Text
- SameNameAsLLCreateInStep1DynamicLB
- Lookup Name = Name of the list lookup created in step one.
- Lookup type = Single Selection Lookup
- It is best practice to mention the name of the source table the customized logic block should use.
- Example, see the OrdertoCashPricingSolutionDynamicLB data item.
- Add the data item to the table where the user can specify the logic block to be used. An example is in
Base SettingsorItemOrgUnit. This field now just acts like any other text data item tied to a list lookup and the user can specify the logic block to use .- Examples, GenerateLotDynamicLB and GenerateSerialDynamicLB in the
ItemOrgUnitstable. ProcureToPayPricingSolutionDynamicLB, OrdertoCashPricingSolutionDynamicLB,IntercompanyPricingSolutionDynamicLB added toBaseSettingsand ReservationSupplyManagementDynamicLogicBlock added toReservationSettings.
- Examples, GenerateLotDynamicLB and GenerateSerialDynamicLB in the
- In the base logic block, the table with the new data item can be fetched to access the name of the logic block to use for processing. Use the Call a Logic Block - Dynamic action and pass in the name retrieved from the table.
- The input for the logic block that the customer creates must be the same as the table used for the logic block that executes the Call a Logic Block - Dynamic action.
- Examples,
GenerateSerialNumbersLBorRetrievePriceLB.
- Examples,
Message lists and error handling for logic blocks
Message lists hold all of the messages generated when logic blocks are run, such as error or warning messages. Every logic block has one message list by default that holds all of its current messages, but you can also create additional message lists that other logic block actions can reference.
When a logic block calls another logic block and messages are returned to the calling logic block, there are two ways to interact with these messages:
- Assign message to new list—The calling logic block creates a new message list during execution to hold any returned messages from the processing logic block. When the Adopt All Messages checkbox is cleared in the Call a Logic Block action, you can name the new message list. Once messages are assigned to the new list, execution continues as normal regardless of if errors are returned or not.
- Adopt messages—The calling logic block adopts the messages of the processing logic block. The default message list is used when you select the Adopt All Messages checkbox in the Call a Logic Block action, or use the Add All Messages action.
Messages are shown on the screen if the logic block runs on the UI, are returned to the parent logic block if was called by another logic block, or are saved in the batch job if it was run asynchronously.
There are several logic block actions that can interact with the message list, as seen in the table below.
| Logic block action | Interaction with message lists |
|---|---|
| Call a Logic Block | When selected, the Adopt All Messages checkbox executes all messages from a processing logic block as part of the parent logic block. When the messages are adopted, it behaves as if the messages were set in the parent logic block itself. If any errors are returned from the child logic block's message list, execution is interrupted. When cleared, the Adopt All Messages checkbox allows you to create a new message list. This enables application developers to access the message list in any action that follow the Call a Logic Block action. See the Call a Logic Block action topic for more information. |
| Add All Messages | Copies the messages from one logic block's message list to the current logic block's message list. Once the messages are copied execution of the logic block continues, even if the message list contains message with a severity of Error. See the Add All Messages action topic for more information. |
| Create Message | Create a new message or error and add it to the current logic block’s message list. If a message with severity of Error is created, execution is not interrupted. The message is added to the current message list and execution continues. Once the logic block is done executing, the field associated with the error message in the error source section is highlighted. See the Create Message action topic for more information. |
| Interrupt with Error | Configure specific errors to interrupt logic block execution. This action is similar to the Create Message action, except you can't set the severity of the message or map from a pre-existing message since the severity level must always be error for this action. When the Interrupt With Error action is triggered during the execution of a logic block, the message is created, added to the current logic block’s message list, and execution is immediately interrupted. Once the logic block is done executing, the field associated with the error message in the error source section is highlighted. See the Interrupt With Error action topic for more information. |
| Conditional | Tells the logic block to do one thing if a message list is empty or contains errors, and another thing if the message list is not empty. This enables application developers the ability to designate when errors should be processed during execution instead of automatically being processed after the Call a Logic Block action. See the Conditional action topic for more information. |
| Loop Message List | Loops the messages in the message list. This enables you to loop the messages, create a message action, then select which messages are returned and displayed to the user. See the Loop List action topic for more information. |
Parallel processing in logic blocks
Application developers use parallel processing to batch process large amounts of business records efficiently.
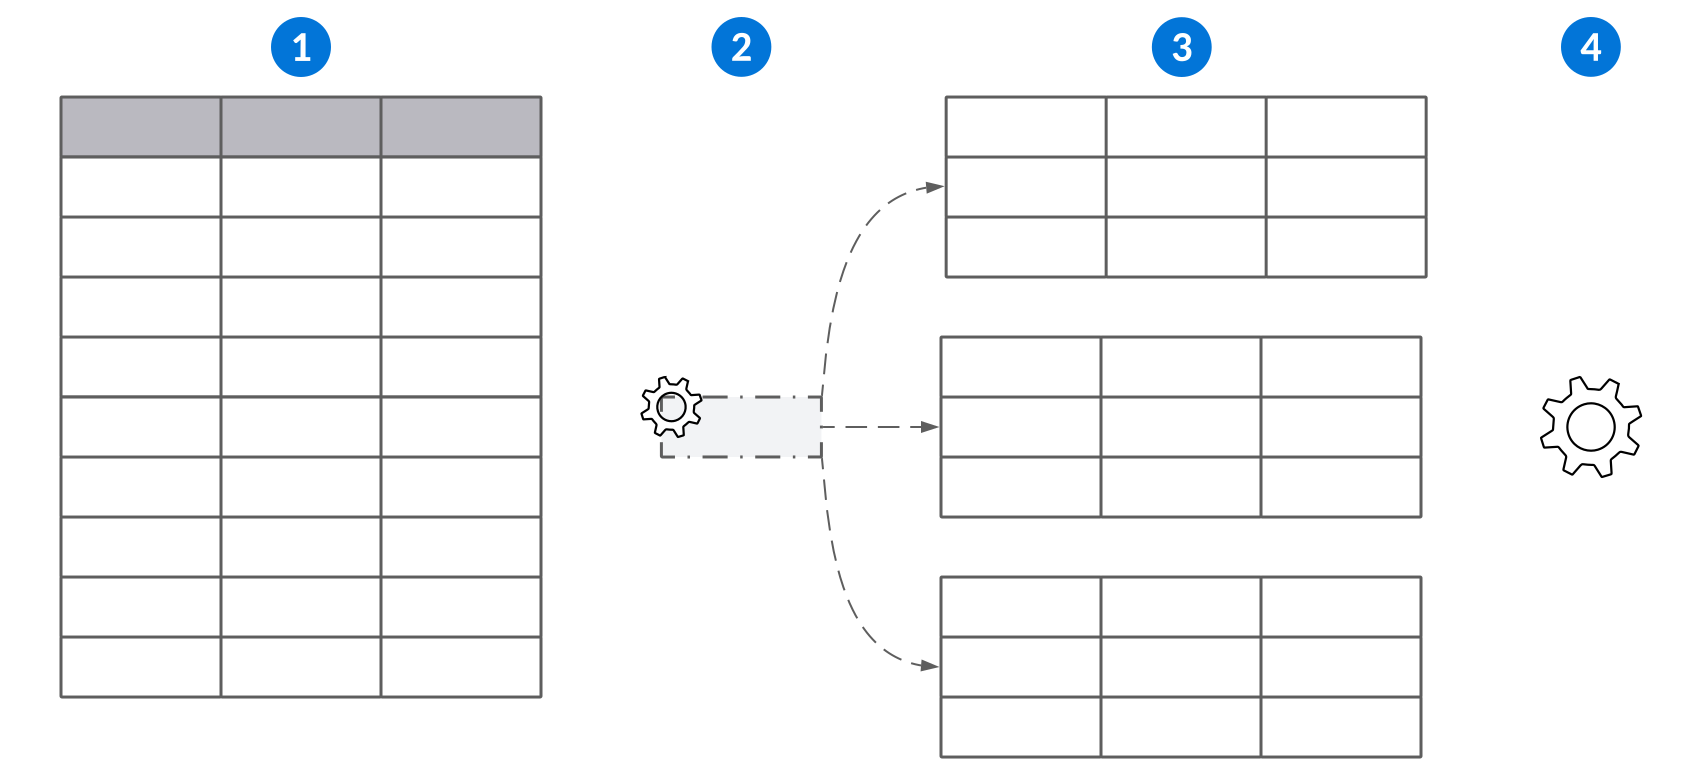
Traditional batch processing involves a single logic block moving sequentially through the records. Often, records are independent of one another and do not require sequential processing. Parallel processing enables you to filter for the required records, sort them into buckets, then process the buckets concurrently to save time.
For example, customers may recurrently need to make batch payments from within an application. There may be thousands of payment records that must be processed at a time, and a normal batch job can only process a single record at a time. This process is time-sensitive and can be detrimental to the business if it does not process quickly. With parallel processing, the batch of records can be divided into multiple buckets so that the logic block can process the buckets concurrently. This allows the records to be processed significantly faster than with traditional batch processing.
The diagram below illustrates how parallel processing works:
| Action | For example... | |
|---|---|---|
| Identify the table that has a large quantity of records you need to process. | The application table which holds payment records. |
| Build a logic block with the Queue Parallel Processing action to refine which records from the table should be included, and to select the logic block which should be used to process the selected records. Optionally, define distinct fields for any variables that extend outside of a single row in a query. This aggregates rows based on unique values found in the specified distinct field, then a logic block processes those aggregated rows together. Optionally, select bucket fields to indicate how the records should be divided into buckets. You should only specify bucket fields if records must be sorted into specific buckets to avoid contention. If no bucket field is specified, the system divides the records equally into buckets based on their nwId. | Filter for any records that have not been processed. If there are multiple rows for each order number, you could specify the Order Number field as a distinct field to ensure the logic block processes all of an order's rows at the same time. If orders are created under multiple customer IDs and the customer's records should be processed within the same bucket, you could specify the Customer ID field as a bucket field. This would ensure each customer's records are processed in their own bucket. |
| The system divides the records into buckets. Each bucket is processed by the same logic block concurrently. | |
 | Optionally, assign a post-run logic block that is initiated after the parallel processing is complete. | For example, using a post-run logic block to change the status of the processed payment records to complete. |
Order of execution
The order of execution for parallel processing is:
- The table records are mapped into buckets.
- A batch job for each bucket is queued.
- Each record in a bucket is provided as input to the processing logic block when the batch job runs.
- Once all the records in all of the buckets have been processed, any specified post-run logic blocks run.
Learn more in Queue Parallel Processing action.
Effective dates
Use the Effective Dates logic block pattern to check that the effective dates of records do not overlap.
- EffectiveFrom is not empty.
- If EffectiveThrough is populated, it is greater than or equal to EffectiveFrom.
- Fetch the existing record if the call mode is Edit.
- When the call mode is Edit, check if EffectiveThrough∅ is empty
- True: Check if EffectiveThrough is empty OR EffectiveThrough ≥ greater than or equal to current EffectiveFrom
- False: If EffectiveFrom ≥ greater than or equal to EffectiveFrom AND EffectiveFrom ≤ less than or equal to EffectiveThrough
- Overlap found
- False: If EffectiveFrom ≤ less than or equal to EffectiveFrom
Validate that effective date range a record or groups of records is within the effective date range of another record.
Single record validation
To validate the effective dates of a since header detail record, you must configure your logic to check:
- If EffectiveFrom [Detail] ≥ greater than or equal to < less than EffectiveFrom[Header]
- Set an error
- If EffectiveThrough [Header] ∃ is not empty OR EffectiveThrough [Header] ≥ greater than or equal to and EffectiveThrough [Header]> greater than EffectiveThrough[Header]
- Set an error
Build your logic block over the header table, and then add it to the table as a Post Update table trigger. Configure your actions as follows:
- Fetch detail records by EffectiveFrom date Ascending (limit 1)
- If EffectiveFrom [Detail] < less than EffectiveFrom [Header]
- Set an error
- If EffectiveThrough [Header] is ∃ is not emptycheck the EffectiveThrough dates
- Fetch Details where EffectiveThrough ∅ is empty (limit 1)
- Records Found then
- Set an error
- Fetch detail records by EffectiveThrough date Descending (limit 1)
- If EffectiveThrough [Detail] > greater than EffectiveThrough[Header]
- Set an error
Insert into detail records without saving to the database
Use a logic block to insert records into the Detail of a Header Detail application to make records available to users as part of a business process. If a user cancels the transaction, the detail records aren't saved.
For example, you can configure a logic block to populate open invoices for a supplier so a user can select invoices to pay. These types of logic blocks should be launched from the UI when a user initiates the Header Detail form of an application.
Configuration requirements
To configure, the logic block must:
- Be built over the Header Detail table.
- Insert records into the Detail table.
- Define criteria to fetch existing records if Detail records do not exist. If Detail records do exist, do not populate new records.
Examples of this configuration include the DefaultRoutingInquiry and UpdateInvoices logic blocks.
Additional mappings in logic blocks
Additional mappings allow you to pass in values from fields added in downstream environments. There are several scenarios where fields are changed or added to tables after they have been delivered to the partner or customer. For example, customer defined attributes (CDAs) and fields in customized tables are defined by customers at the time of implementation, and extension fields are defined by solution developers in their own tenants. Additional mapping options are available on logic block actions, such as the Insert Record, Insert Subtable Record, Call a Logic Block, and Save HD actions.
When values are passed into one of these logic block actions, there are some scenarios where added fields are not included. If the logic block actions reference an entire data source, any added fields are automatically included. If the logic block action only passes values as individual Field Mappings, you must configure additional mappings to include the added fields.
Example
In the Supplier Invoices application, when a record transitions to a workflow state of Posting, the WritePayablesGL logic block initiates to create a General Ledger transaction record. A common extension or customization pattern is to include a field for Reference Number on both the Supplier Invoice and General Ledger. Supplier Invoice and General Ledger have different table shapes and fields, so the logic block actions use Field Mappings, rather than a DSN, to pass the specific values needed between the records.
To ensure any new fields, such as Reference Number, added to the underlying tables are included, an Additional Mapping of PayablesHeader, which is the data source for the Supplier Invoice table, was specified on the insert logic block action at the time of design. Without the additional mapping specified, the Reference Number from the Supplier Invoice would be empty on the General Ledger record.
Header Detail tables
For additional mappings on Header Detail tables, use additional mappings on inserts on the Header and Detail tables. To get the mappings on the detail of a Header Detail, you must specify them on the insert to the Detail record itself. Mappings specified on the Save HD action only apply to the Header record.
Order of Operations
The sequence in which you create the additional mappings should match their relative importance. Once a field's value is found in a data source, that becomes the value for the target and the system stops looking for a value. However, any field mappings included in the logic block overwrite existing values found from the source record or additional mappings. The first DSN listed as an additional mapping should have the highest priority, since values are picked up from sources in the following order:
- The source record.
- The values from CDAs, Extended fields, or fields added to Customized tables in the order they were entered in additional mappings.
- Individually mapped fields.
For example, you could have an entire table, additional mappings for CDAs, Extended fields and fields on a Customized table, as well as individually mapped fields included as data sources for a logic block. In this instance, the following occurs:
- The new empty DSN is created and passed to the called logic block or logic block action.
- The values from the underlying table referenced as a DSN are mapped to the new DSN.
- The values from the custom, extended, and CDA fields from additional mappings are mapped to the new DSN in the order in which the additional mappings were entered. These values do not overwrite any previously found values from the table.
- The values from individual fields included as DSNs are mapped to the new DSN. These values overwrite any existing values found from the table or additional mappings.
Copy Additional Mappings action
Use the Copy Additional Mappings action to copy the additional mappings from one, or many, data sources into a specified target data source.
Logic blocks that fetch data from other data sources and use that data to populate values in a preexisting data source should use this action. If you insert a new record, any additional mappings from the other data sources are available. If you update an existing data source in your logic block which previously had few values populated, the Copy Additional Mappings action ensures any fields added in downstream development are also included in the update. For example, the PopulateCustomerCreditFields logic block fetches data from the ReceivablesHeader data source and uses that data to populate values. To ensure all of the fields from the ReceivablesHeader data source are included in the fetch, the PopulateCustomerCreditFields logic block should copy the additional mappings from the ReceivablesHeader data source.
Exclude dates in Date Time calculations
Exclude dates in your date time calculations with the Calendar Event Definitions and the Logic Block Builder applications.
Prerequisites
You must already have your calendar definition configured. Learn more in the Calendar configuration topic.
Calendar Event Definitions
In the Calendar Event Definitions application, create event records which define the dates you want to exclude. The event definition is tied to the calendar record which allows you to use it as an input in your logic block.
Logic Block Builder
In the Logic Block Builder, you must:
- Create a logic block record. Often, this is a logic block of type
Transactionbuilt over the same table as the application which holds the calendar. - Select the Find Date action.
- In the action, specify the calendar name and the start and end dates for the calendar.
- Use the Excluded Days section to specify if you want specific days, such as weekends, excluded.
- Use the Excluded Dates sections to specify the calendar event definition as an input. This allows you to exclude the dates you configured in the event definition.
JSON manipulation in logic blocks
Manipulate JSON objects and arrays using the Set Values action in your logic block. Optionally, pass the JSON objects and variables to external endpoint requests.
Set Values action
You can use the Set Values action to create JSON fields and variables in your logic block. Then, you can use them in the request body for endpoint requests. You can:
- Set JSON variables and fields from text variables or fields that contain valid JSON in the same shape as the target.
- Set JSON variables and fields from Object variables or fields that contain valid JSON in the same shape as the target.
- Have JSON arrays or objects as fields in a temp table and pass them between logic blocks. These can only be used as work fields and cannot be persisted to the database.
Learn more in Set Values action.
Call External Endpoint action
You can use the Call External Endpoint action to pass JSON fields and variables to external endpoint calls. This enables you to produce and use JSON request and response payloads of indefinite complexity and depth. Learn more in Call External Endpoint action.
You can also:
- Output the response code from the call into a new number variable.
- Output responses by response code to new variables, variables, new DSNs, and DSNs. This enables you to conditionally perform logic based on what the endpoint returns.
Optionally, use the Loop Array action to loop over a given array and output to a new variable.