















Filters are made up of expressions, which consist of fields, operators, values, and more. These key parts play the following roles in the expression:
- Field—Which column you want to filter. For example, the Date column.
- Operator—How you want to filter the column. For example,

Greater Than or Equal To. - Value—What to filter for. For example, 01/01/2022.
This would filter for dates greater than or equal to, 01/01/2022 in the Date column.
Once a filter is applied, you are able to use modifiers in the column header's filter fields to refine values further. Learn more in Column header filters.
The following diagram shows the elements of the Advanced Filter:
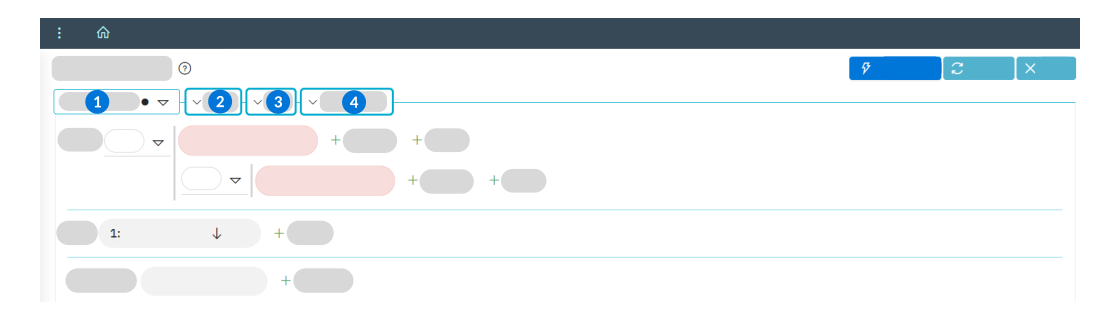
 | Filter Menu—Select, create, or edit saved filters. |
|---|---|
 | Filter—Create groups of expressions, which are connected by a condition type. A condition type is used to either widen or narrow your filter results. A condition type can be either:
For example, you are configuring an expression to display records with a balance equal to $100, and a second to filter for the date of May 4. If your condition type for the expression group is |
 | Sort—Sorts the record list by either ascending or descending values for the field, or fields selected. |
 | Aggregation—Summarize the contents of a column at the bottom of the list form. For a column of number fields, the count results in a summation of the values of all records returned by the active filter. For non-number columns, the count represents the number of records returned by the filter that have a value in that field. For a column of currency values, the aggregate is automatically grouped by currency codes. Each currency code represented in the list form has its own aggregated value at the bottom of the column. |
Filter menu
The Filter menu is accessible from the top of a list form of an application. It contains a list of any pinned filters associated with the application, as well as any saved filters you have created. You can switch between different filters to make the information you need in the application more easily accessible.
For example, if an account manager regularly needed to filter invoices by a single supplier, and then sort the records by date, they could use the Filter menu to create a saved filter. When they open the application to view all invoices, they can select the saved filter in the Filter menu and see only the records that they need.
Saved filters only apply to the application you create them in, and are user-specific by default. That means you can create as many as you want.
Pinned filters, indicated by the Pinned  icon, are delivered as part of an application, and can be accessed from within the Filter menu.
The Filter menu also allows you access to the Advanced Filter editor, which you can use to create saved searches that are more complex than those you can configure with the column header filter. Learn more in Advanced Filter.
The Filter menu includes the following buttons:
 | Select the Create button to open the Advanced Filter editor and edit, name, and save the current configuration of the column header filters. |
 | Select the Clear All Filters button to remove all filters applied in the column header filters. |
 | If you have a saved filter applied, select the Edit button to open the current saved filter in the Advanced Filter editor. |
 | If you have a saved filter applied and have applied changes to the column header filters select the Save button to update the configuration of the saved filter. |
 | If you have a saved filter applied and have applied changes to the column header filters, select the Clear Filter Changes button to revert back to the saved filter. |
 | In the Filter menu, select the Set Default button to apply the saved filter each time you open the application. Select the button again to clear the default saved filter. |
 | In the Filter menu, select the Set Global button to make the saved filter available to other users. Select the button again to remove the filter from the Filter menu of all other users. |
 | In the Filter menu, select the Delete button to remove the saved filter from the Filter menu. |