















Traditional document processing requires exact formatting, field mapping, and structured imports to match external data to a platform table. Nextworld's IDP capabilities remove these constraints, allowing you to build a flexible document processing workflow using the following features:
- Vision-language models—Interpret documents as images rather than structured text, extracting information and reasoning about content regardless of document type or format.
- Semantic search—Recognizes variations in terminology and phrasing within imported documents, accurately matching information to the appropriate fields and values in a platform table.
- Logic block validations—Validates document data after import, allowing you to review or transform the data before it is committed to the database.
- Workflow approvals—Routes records to an appropriate approver after they are processed, but before they are committed.
- Webhooks—Automatically forwards email attachments into an IDP workflow where they are processed, extracted, then committed to a platform table. Learn more in Automate email forwarding with webhooks using OAuth.
You can tailor your document processing workflow to match the requirements for your company. You may use one, or many, platform features to create your IDP workflow.
The diagram below reviews an example of Intelligent Document Processing within the Nextworld platform:
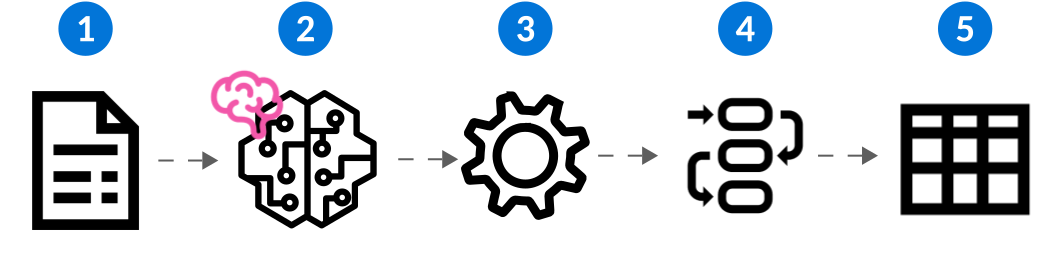
 | Unstructured documents of different formats and types are received or imported into a staging table within the platform through API integrations, webhook configurations, or manually. |
|---|---|
 | Documents are sent to an LLM with vision-language capabilities by a prompt definition. |
 | Processed data is sent back to the platform in the shape of a platform table, then validated by logic blocks. |
 | The newly created record is sent for review with workflow approvals. |
 | The approved record is sent from the staging table to the transactional table. |
Available Solutions
Nextworld offers IDP solutions which are designed, built, and delivered based on your specific business needs.
Automate email forwarding with webhooks using OAuth
Use webhooks to automatically forward emails and attachments into an internal platform table. This process uses Nextworld Intelligence to import, review, and classify documents before they are processed and committed as records. Setup requires configuration both within Nextworld and in external systems, including Microsoft Entra and Power Automate.
What we deliver
Nextworld delivers the basic infrastructure required for email forwarding, including:
- Staging table which parses incoming data:
InboundEmails - Webhook Definition that retrieves emails:
InboundEmails - Endpoint Definition that retrieves attachments from emails:
InboundEmails - Email application where you can view incoming files: Payables Automation Email Log application
What you must configure
Setting up email forwarding requires configuration in three areas: Microsoft Entra, Power Automate, and Nextworld. Complete the steps in the order listed below.
Step 1: Configure an app registration in Microsoft Entra
Before configuring Power Automate or Nextworld, you must set up an app registration in Microsoft Entra. Your Entra administrator must complete this step.
In Entra, complete the following:
- Create an app registration and define a client secret. Note the expiration date you set for the secret, as it will need to be renewed when it expires.
- Add the
Mail.Readpermission to the app registration. This permission can be scoped to a single inbox if your administrator knows how to configure it; otherwise it defaults to broader mailbox access. - Note the following values from your app registration, as you will need them when configuring OAuth in Nextworld:
- Tenant ID
- Client ID (your app ID)
- Client secret
Step 2: Configure Power Automate
Nextworld provides a Power Automate flow template you can import to handle email forwarding. The email account used to own the flow must have access to Power Automate. If it does not, work with your IT department to grant access before proceeding. Nextworld recommends using a shared service account as the flow owner rather than an individual user account, so the flow is not disrupted if the user's account changes.
To import and configure the flow:
- In Power Automate, navigate to My Flows and create a legacy import.
- Upload the zip file provided by Nextworld. Do not unzip the file before uploading.
- Switch the Review Package Content from
UpdatetoCreate New. - Select the flow owner. Nextworld recommends using a shared service account.
- Import the file.
- Once the import is complete, open the flow and edit. Make the following changes:
- Mailbox address—Replace the placeholder email address with the email address of the inbox that will receive the documents you want to process. Nextworld recommends using a dedicated inbox for this purpose rather than a general communication mailbox.
- Environment URL—In the
Initialize URLvariable, replace the placeholder with your Nextworld environment URL. Use your development environment for initial testing, then update to your production environment when you go live. - Webhook definition name—Enter the internal name of your webhook definition. If you are using the delivered webhook definition without changes, enter
InboundEmails. If you have customized or created your own, enter that internal name instead. - Username and password—Enter the credentials of the Nextworld user the flow will authenticate as. The username must match the username field on the user record in Nextworld, not the email address. Nextworld recommends using a dedicated integration user account.
- Review the condition steps in the flow and confirm that the dynamic content references appear as highlighted tokens rather than plain text. If any references appear as plain text, remove and reselect them using the Power Automate dynamic content picker.
- Save the flow.
Step 3: Configure Nextworld
In Nextworld, you must configure a webhook setup record, create an OAuth record, and customize the delivered endpoint definition
Navigate to the Webhook Setup application and:
- Create a new record.
- Enter
InboundEmailsin the Webhook Definition field. - Select a lifecycle.
- Mark the record as Active.
- Copy the automatically generated URL and use it in your Power Automate flow.
Navigate to the OAuth Setup application and create a new record using the following values:
- Type—Select Client Credentials
- Token URL—Enter the Microsoft OAuth token URL in the following format, replacing [TenantID] with your Entra tenant ID: https://login.microsoftonline.com/[TenantID]/oauth2/v2.0/token
- Client ID—Enter the app ID from your Entra app registration
- Client secret—Enter the client secret from your Entra app registration
- Scope—Enter https://graph.microsoft.com/.default
If your emails include attachments, navigate to the Endpoint Definitions application and:
- Customize the delivered
InboundEmailsendpoint definition. - Add the endpoint URL provided by Microsoft for your Entra environment.
- Reference the OAuth record in the OAuth Config Record field.
Testing
To test your configuration, send an email to the inbox you configured in Power Automate. Processing may take a few minutes. You can monitor incoming emails in the Payables Automation Email Log application.
Freight Document Intelligence
Freight Document Intelligence uses AI and automation to extract and process freight-specific documents, such as bills of lading (BL), rate of confirmations, and carrier invoices. It then matches that data to the appropriate platform records, enabling three-way matching across purchase order, shipping, and payables workflows.
Learn more about Nextworld's Intelligent Document Processing (IDP) in Intelligent Document Processing.
Without automation, freight document processing requires manual data entry and careful cross-referencing to ensure that what was ordered, received, and invoiced all align. Errors or mismatches at any stage can delay payments, create inventory discrepancies, and require significant time to reconcile. Freight Document Intelligence eliminates this manual effort by automatically extracting and matching document data and having you review discrepancies before any records are created or updated.
How Freight Document Intelligence works
When a document is submitted, the platform processes it through the following stages:
1. Document intake—Unstructured freight documents, such as bills of lading or supplier invoices, are received or imported into a staging table through API integrations, webhook configurations, or manual upload.
2. AI-powered extraction—Documents are sent to a vision-language model with a prompt definition. The model extracts key fields such as supplier name, document number, ship date, line item details, and order references, from documents with varied layouts or formats.
3. Validation—Processed data is returned to the platform in the shape of a platform table and validated by logic blocks. Discrepancies or potential issues, such as duplicate invoice numbers, are surfaced for review before the record is committed.
4. Human-in-the-loop review—The newly created record is presented to a reviewer alongside the source document, allowing them to confirm extracted values and approve the record before it is finalized.
5. Record commitment—The approved record is moved from the staging table to the transactional table. Downstream actions, such as updating purchase order status to Received or creating a payable, are triggered automatically.
Freight document composite application
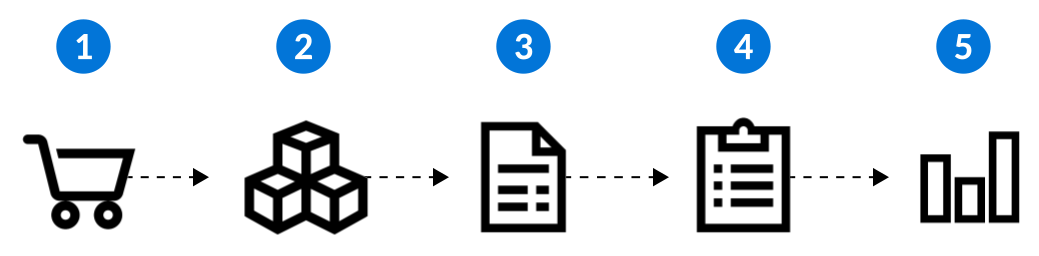
Navigate to the Freight Document Processing composite application to start your freight document workflow. The diagram below shows what actions to perform in each application step:
| Callout | Step of the workflow | Application |
|---|---|---|
| Use the Purchase Orders application step to create a purchase order. The system automatically routes it to the supplier, initiating the procurement process. | Purchase Orders application |
| Use the Bill of Lading application step to upload a bill of lading document to the application. The model extracts document data and creates a draft record for human-in-the-loop review. Once the reviewer confirms the extracted BOL data matches the shipment, they can transition the purchase order to Received status directly from the BOL application. | Bill of Lading application |
| Use the Payable Document Processing application step to upload the supplier invoice, then Nextworld Intelligence extracts key fields, such as invoice number, line item details, and order references, and creates a draft payable record linked to the received purchase order. You review the extracted data to confirm accuracy, then create the payable directly from the application. The application can handle both PO-backed and non-PO-backed invoices. | Payables Document Processing application |
| Once the carrier invoice is created, you can view and manage the invoice record in the Supplier Invoice application, tracking it through any remaining approval or posting steps. | Supplier Invoices application |
| You can view the purchase order record to confirm that the item was received into inventory and that the full procurement cycle, from order to receipt to invoice, is reflected in the system. | View Purchase order application |
Additional options
Optional configurations you can incorporate into your workflow include:
- Webhooks—Automatically forwards email attachments into the document processing workflow where they are processed, extracted, then committed to a platform table. Learn more in Automate email forwarding with webhooks using OAuth.
Automate email forwarding with webhooks using OneDrive
Use webhooks to automatically forward emails and attachments into an internal platform table. This process uses Nextworld Intelligence to import, review, and classify documents before they are processed and committed as records. This configuration retrieves email attachments through a OneDrive intermediary and does not require an Entra app registration.
What we deliver
Nextworld delivers the basic infrastructure required for email forwarding, including:
- Staging table which parses incoming data:
InboundEmails - Webhook Definition that retrieves emails:
InboundEmails - Endpoint Definition that retrieves attachments from emails:
InboundEmails - Email application where you can view incoming files: Payables Automation Email Log application
Because this method retrieves attachments through OneDrive instead of querying the email directly, you must use an Environment Override to change the endpoint definition to No Auth.
What you must configure
Setup requires configuration in Nextworld and Power Automate. Complete the steps in the order listed below.
Step 1: Create an environment override in Nextworld
Navigate to the Environment Override application and:
- Create a new record.
- Select
EndpointConfigfor the override table, and enter InboundEmails for the endpoint record. - Select the Edit row action to open the detail detail.
- In the Overrides subtable, enter the name of the field you want to override, and provide the value you want in the field.
In the Environment Override Assignment Setup application, you must create a new record. Enter the name of your override definition, and the name of the environment you want it applied in.
Step 2: Configure Nextworld webhook setup
Navigate to the Webhook Setup application and:
- Create a new record.
- Enter
InboundEmailsin the Webhook Definition field. - Select a lifecycle.
- Mark the record as Active.
- Copy the automatically generated URL and use it in your Power Automate flow.
Step 3: Configure Two Power Automate Flows
Contact your Nextworld representative for the pre-built flow files. The files arrive mostly configured and require you to fill in a small number of fields rather than building flow logic.
For your first power automate flow, you must:
- In Power Automate, navigate to My Flows and create a legacy import.
- Upload the zip file provided by Nextworld. Do not unzip the file before uploading.
- Switch the Review Package Content from Update to Create New.
- Select the flow owner. A dedicated OneDrive connection is required for the Create file step. Using the same account as the flow owner is the simplest setup, though any OneDrive in your network can be used.
- Import the file.
- Once the import is complete, open the flow and edit. Make the following changes:
- Mailbox address—Replace the placeholder email address with the email address of the inbox that will receive the documents you want to process. Nextworld recommends using a dedicated inbox for this purpose rather than a general communication mailbox.
- Environment URL—In the Initialize URL variable, replace the placeholder with your Nextworld environment URL. Use your development environment for initial testing, then update to your production environment when you go live.
- Webhook definition name—Enter the internal name of your webhook definition. If you are using the delivered webhook definition without changes, enter InboundEmails. If you have customized or created your own, enter that internal name instead.
- Username and password—Enter the credentials of the Nextworld user the flow will authenticate as. The username must match the username field on the user record in Nextworld, not the email address. Nextworld recommends using a dedicated integration user account.
- Review the condition steps in the flow and confirm that the dynamic content references appear as highlighted tokens rather than plain text. If any references appear as plain text, remove and reselect them using the Power Automate dynamic content picker.
- Save the flow.
For your second Power Automate, the flow retrieves each attachment and sends Nextworld the resulting file information through an HTTP call:
- In Power Automate, navigate to My Flows and create a legacy import.
- Upload the zip file provided by Nextworld. Do not unzip the file before uploading.
- Switch the Review Package Content from
UpdatetoCreate New. - Select the flow owner. A dedicated OneDrive connection is required for the Create file step. Using the same account as the flow owner is the simplest setup, though any OneDrive in your network can be used.
- Import the file.
- Once the import is complete, open the flow and edit the relevant steps to point to your OneDrive folder. Update the URL action in the environment override endpoint definition you created in Step 1 to point to the URL generated by the Power Automate "When HTTP Request is Received" action.
- On the flow's trigger step, set Who can trigger the flow? This is what restricts access to the No Auth endpoint, since the endpoint itself has no authentication. Options include Anyone, Any user in my tenant, Specific users in my tenant, or a custom value.
- Save the flow.
About the OneDrive file
The attachment copy created in OneDrive is not automatically deleted after Nextworld retrieves it. If storage limits become a concern, it can be removed through a separate cleanup process.
Testing
To test your configuration, send an email to the inbox you configured in Power Automate. Processing may take a few minutes. You can monitor incoming emails in the Payables Automation Email Log application.