















Use flat tables when you need to report on data from:
- Multiple tables, when you cannot access the necessary data by creating a new Join table
- Header Detail tables
- Continuous or transitional tables for cubes
These objects contain data from multiple sources that must be compressed into a single flat data source table in order to be used in reports.
The data for a flat table is populated by a logic block that queries a series of tables, applies filters based on report parameters, and inserts the retrieved data into the flat table. The logic block you create to retrieve data must be the same table that is used as the report table. After the logic block runs, you can create an application over the flat table to view and validate that the data that you want to be in the flat table was populated correctly. After you validate, you can use the flat table as the data source table in a report. Any time you run a report, the logic block fetches refreshed data and inserts it into the flat table so that data is always up-to-date and current when you run a report.
The diagram below depicts the report building process when you use data from a flat table data source:
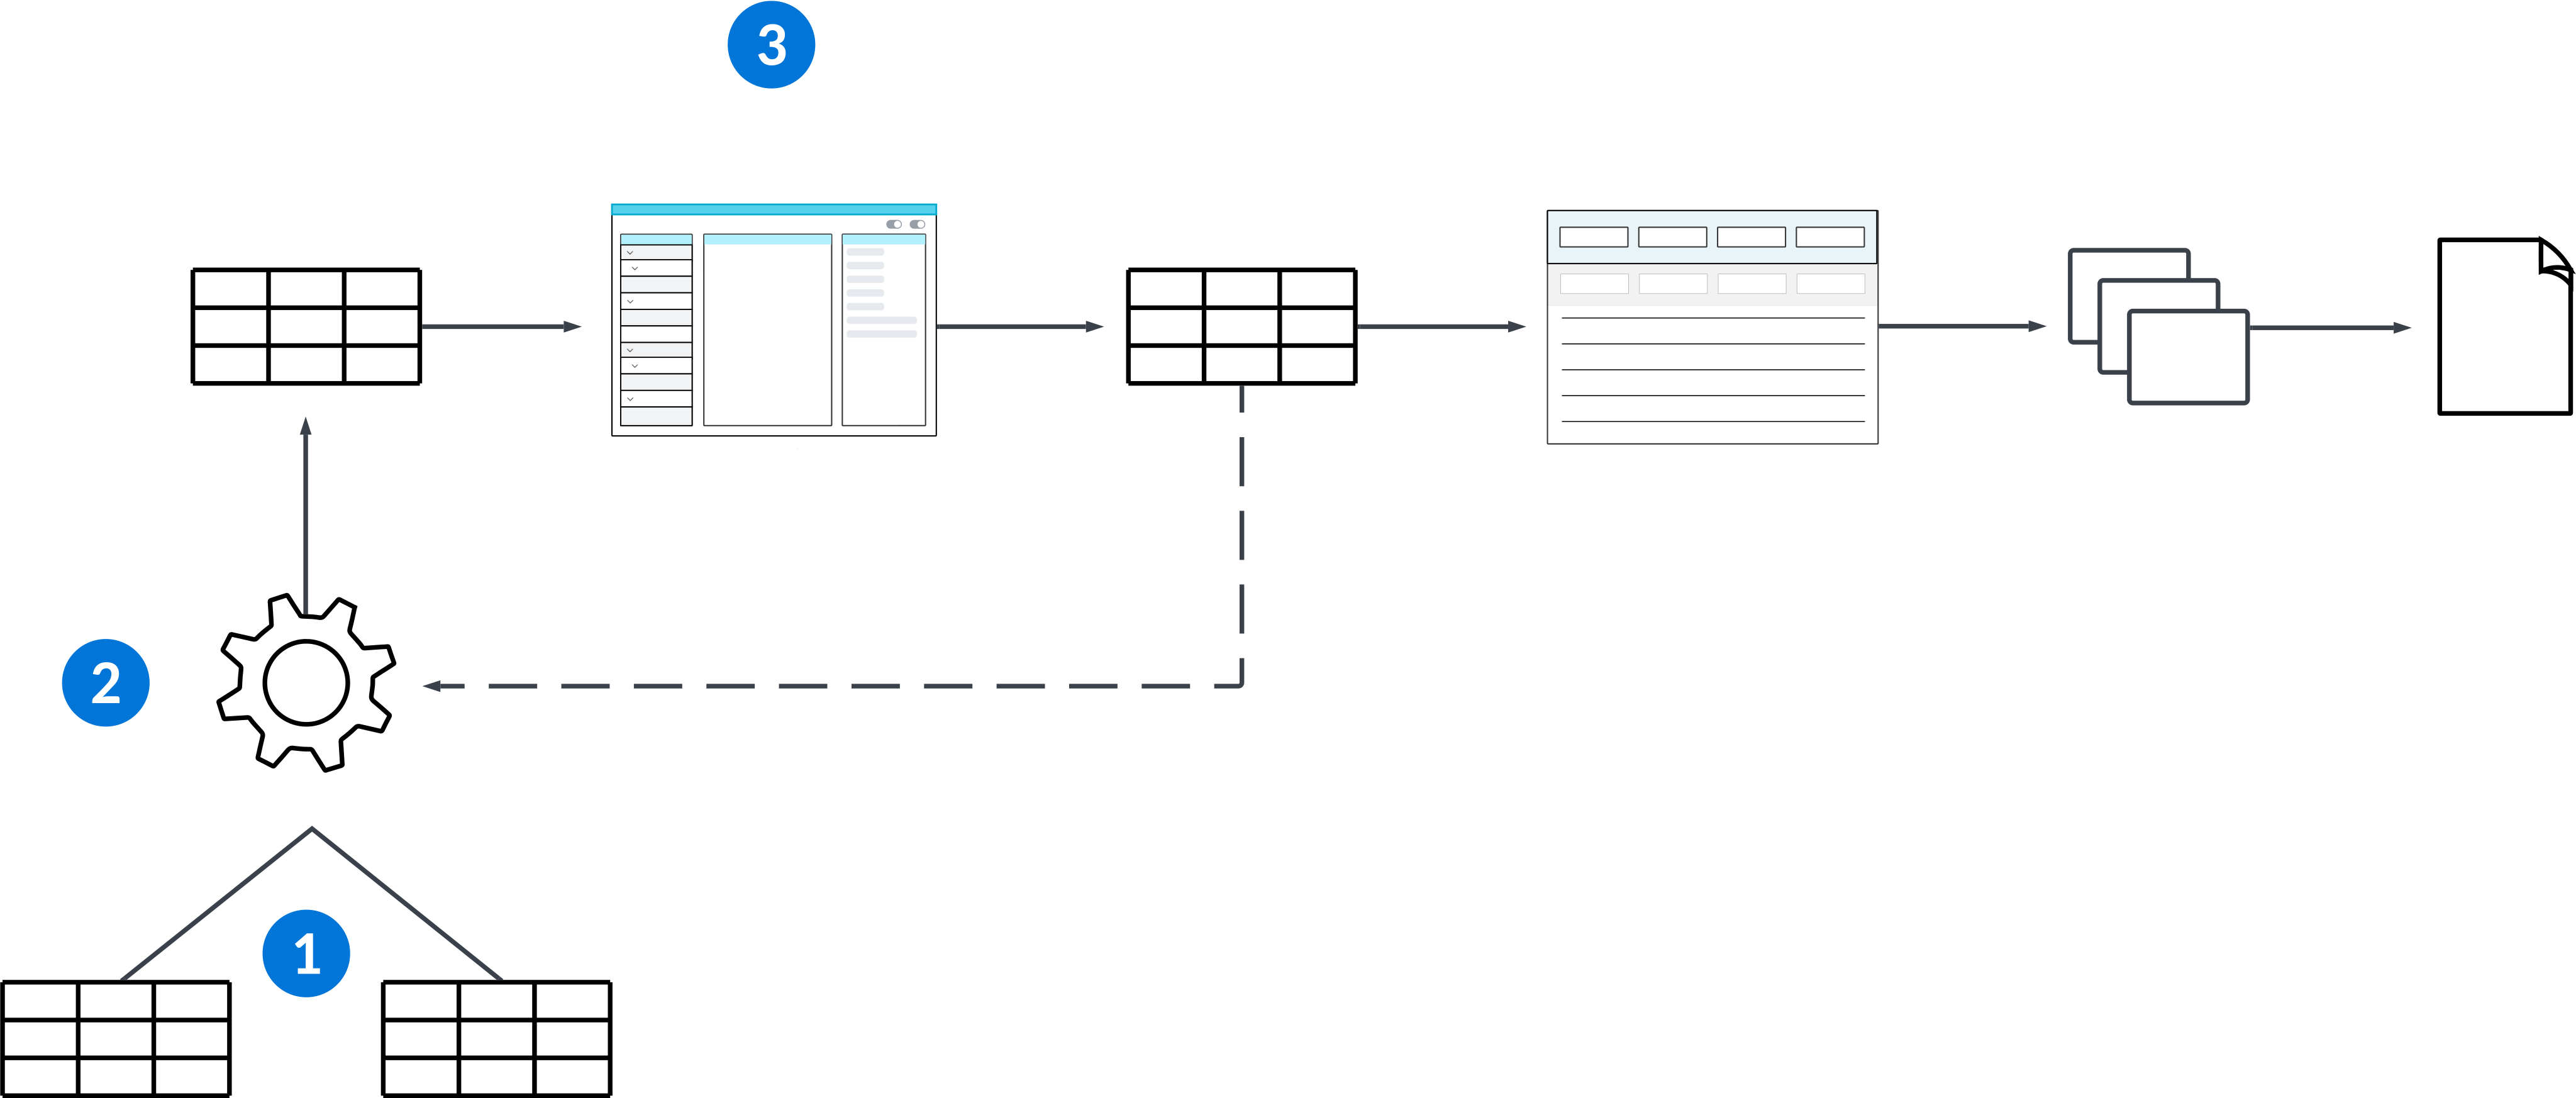
 | Data sources—Tables that contain data you want to represent in a report. |
|---|---|
 | Logic block—Build a logic block over the report version table that pulls in data from the data sources and deposits the data into a flat table. |
 | Report Builder record—Create a record over the flat data source table in the Report Builder application with the basic information about the report. |
Learn more in Flat table report configuration and Reports.
Flat table report configuration
Configure a flat table report in the Table Definitions, Logic Block Builder, Report Builder, and Application Builder applications to build a report from data in a flat table and logic blocks.
Learn more in the Report naming conventions and standards topic to reference the naming conventions and standards when building flat reports.
Table—Report Version
The report version table can be created in the Table Definitions application, or in the Report Builder by selecting the Create Inputs Table form action located within the Actions menu. When configured via the Report Builder, the default inputs along with any additional inputs you added appear in the Fields page of the table.
The Report Version table is where you can pass parameters or inputs to the execution logic block. To configure a Report Version table in the Table Definitions application, you must:
- Create a new table of type
Main. - On the Fields page, add the
ReportAppConfigFieldsdata item group. - Add any additional data items that you want to act as field inputs for the logic block.
Table—Flat table
The Flat table contains copied data that can be used in a report. To create a Flat table in the Table Definitions application, you must:
- Create a new table of type
Main. - Use
FlatReportDataas the security group for the table. This security group restricts users so they can only access records created by them. - On the Settings page, select the Purge Active checkbox.
- Choose
Flat Report Datain the Purge Configuration Group field. This feature purges older data that is no longer relevant from the table to accommodate the up-to-date data that may be continuously inserted into this table. - Ensure that the Create Audit field is clear.
- On the Fields page, in the Fields subtable, add the following data items:
ReportExecutionIDReportVersion
- Select Required for the
ReportExecutionIDandReportVersiondata items. - Add any additional data items that you want available in the Report Builder. The values of these fields are inserted through the logic block.
Logic Blocks
In the Logic Block Builder application, you must:
- Create a new logic block over the Report Version table you created.
- Set the logic block to Public.
- Ensure that the Use NATE container checkbox is cleared.
- Configure the logic block that deposits data into the flat table as a
Background Taskin the Type field. This ensures that the task does not time out if you are querying a large set of data. - Open the Logic Builder to create the logic block according to your requirements.
- Insert records into the flat table you created.
- Add
ReportExecutionIdandReportVersionto every record inserted into the flat table. - Define outputs based on the logic you wrote above.
- Add
Report Builder
In the Report Builder application, you must:
- Create a new report over the flat table you created.
- Specify the logic block you created above in the Report Data Logic Block field.
- Save the new report and refresh the list to see the new report record.
- Select the Report Builder form action to start creating a report template.
Report version application
Configure a Report Version application where users can run reports. In the Application Builder application, you must:
- Create an application of type
Report Version. - Use the inputs and available fields from the report version table to create filters for the users to narrow down their report parameters.
- On the Detail Form page, add the
ReportVersiondata item.
Debug flat table reports
Debug report issues, such as the data no displaying correctly when you run the report, by troubleshooting the table data and running a debug session for the logic block.
The steps below assume that:
You have a logic block and flat table attached to the report record.
You have a report version application built over the report record. The report version application is where users can execute the report.
To begin the setup for viewing flat data or debugging the logic block that flattens data, navigate to the base environment that you are developing in, as well as your personal lifecycle.
Troubleshoot flat data
If you run a report and the data does not group together as expected, or if the wrong data is shown, you can troubleshoot the data before you run a debug session. Troubleshooting the data allows you to check the data setup for problems or issues before checking the logic block. If troubleshooting the data reveals why the data is not displaying correctly, then you can make the change to the setup without having to run a debug session.
In the Application Builder application, you must:
- Create a new application of
Standardstyle, andStandardtype, over the same flat table defined in the report record. - Set the Display to
Primaryfor any fields from the flat table that contain data that you want to look at or validate. Do the same for theReportVersionandReportExecutionID. - Save, generate, and launch the application. You can view data in your lifecycle and the working environment where the report is usually run.
Set up a debug session
If the data setup is correct after you troubleshoot the flat data, the logic block may not be processing correctly. Before you start a debug session on the flattening logic block, you must set up the logic block in the UI so that a user action can run the logic block.
In the Application Builder application, you must:
- Filter for the report version application built over the report record.
- Check Out or Copy this application into your personal lifecycle.
- On the Actions page of the copied or checked out application, create a row action to run the flattening logic block.
- Save the copied report version application and generate your lifecycle version.
When the setup is complete, you can debug the flattening logic block in your lifecycle and the working environment where the report is usually run. In the copied, generated application, you can now select the Debug button and click the row action that runs the flattening logic block. Learn more about the logic block debugging process in the Run a logic block debug session section.