















Ed the Builder creates the components of your project that you requested in the Project creation window, as well as any additional artifacts or features that he identifies as required based on the prompt you entered.
Once the project has been built, you can continue to add and refine the application by providing additional prompts. Your instructions can be anything, from adding additional features, changing existing components, fixing bugs, or retrying something that the Project Builder attempted but failed at.
Some consistent UI elements are shared with the rest of the platform, but Project Builder allows you more flexibility with the design and structure of your projects. Learn more in Project Builder.
Navigation
Project Builder is comprised of three panels, as seen in the diagram below:
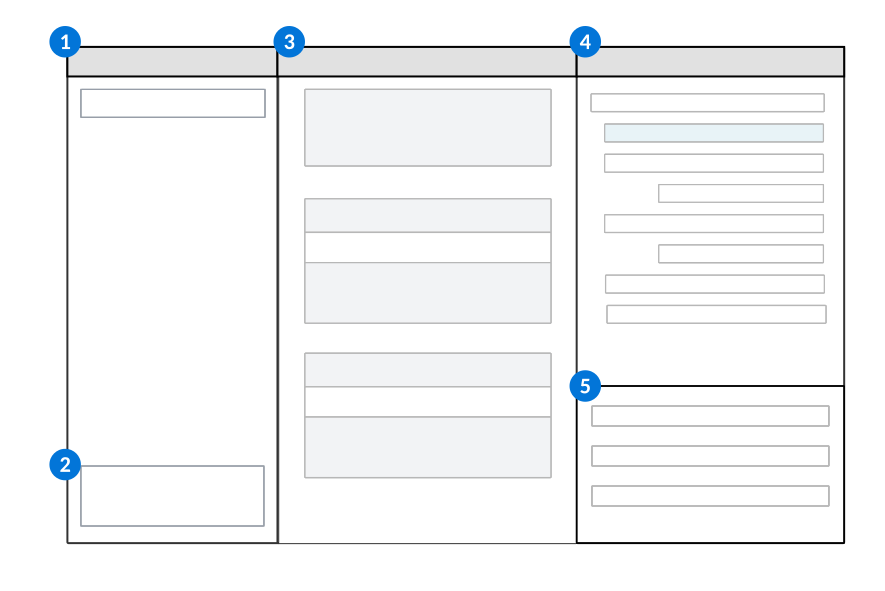
 | Ed the Builder panel—View the progress of your project and answers to your questions. Ed the Builder provides real-time updates as he processes your requests. |
|---|---|
 | Request field—Enter your prompts and questions for Ed the Builder. You can ask Ed the Builder to add, delete, or update components of your project. |
 | Viewer panel—View the object you have selected in the Artifacts panel. For example, you can review the Project Specifications used to build your project, or a preview of your application or logic blocks. There are several buttons available at the top of the panel when the project application is being viewed, including:
|
 | Artifacts panel—Navigate between different components of your project. Select an object to view information about it in the Viewer panel. |
 | General Configuration information—View project details such as the Application Name, description, or Product Family. |
Select Element
Select Select Element in the Viewer panel to select and modify one or more elements in your application. Make changes directly in the Element Properties panel, or describe them conversationally to Ed the Builder.
Search Apps
Table lookup fields in your application include a built-in search app by default which has the primary, secondary, and tertiary fields for the table.
To configure which fields display in a table lookup field's search app, use one of the following:
- Select Select Element, then select the table lookup field or its search icon.
- Select Configure Search Apps from the application-level actions.
Checkpoints
Checkpoints save your entire project and all of its associated metadata at a distinct point in time. This allows you to experiment and iterate over your project while retaining the ability to restore previous versions.
Project Builder automatically creates a checkpoint after every prompt you send, once the work finishes. You can also create a checkpoint yourself at any time by selecting the Create Checkpoint  button at the top of the Artifacts panel.
If a prompt doesn't work as expected, select Undo in the chat input. Undo restores the last automatically created checkpoint, which is the state of your project from right before you sent your most recent prompt. Undo goes back only one checkpoint, and it is available only when you are on your most recent checkpoint. To go back further, restore an earlier checkpoint from the Version History tab.
View and manage your checkpoints in the Version History tab, next to the Artifacts tab. Select a checkpoint to restore, rename, or delete it, or to add a description. For automatic checkpoints, the description contains the prompt that was sent before the checkpoint was created. Your current checkpoint is identified at the top of the list.
The system automatically creates a checkpoint for your current project version if you navigate to an earlier checkpoint.
Checkpoint retention
Because Project Builder creates a checkpoint after every prompt, a project can build up a large number of them. Once a project reaches 50 automatic checkpoints, the oldest automatic checkpoint is deleted each time a new one is created. To protect a checkpoint from being deleted, mark it as Keep this Version. Checkpoints you create manually are marked this way automatically.
Artifacts
Project artifacts are either Owned or Referenced.
Ownedartifacts are created and managed by the project. They can only be edited conversationally within the project that owns them and are read-only in their traditional metadata applications.Referencedartifacts are imported from other projects or from traditional metadata records. They are read-only within your project.
Delete or remove artifacts
Use the Artifact Actions menu in the Artifacts panel to delete or remove an artifact from your project.
- Delete Artifact—Permanently deletes an Owned artifact and its metadata from your project. Related objects that aren't independently visible in the Artifacts panel, such as a table's data items and list lookups, are deleted along with it. Delete Artifact does not check whether the artifact is used elsewhere in your project, so review usages before deleting. A checkpoint is created automatically before the deletion runs, so you can restore your project to this point if needed.
- Remove from Project—Detaches a Referenced artifact from your project without deleting its underlying metadata.
Open artifacts in a new tab
To view an artifact's metadata object in Developer Studio, open the Artifact Actions menu in the Artifacts panel and select Open in New Tab, or double-click the artifact. The object's detail form opens in a new Developer Studio tab.
This works for every artifact type that represents a metadata object, such as tables, logic blocks, and applications. Owned artifacts are read-only in their traditional metadata applications, so you can open them to review but not to edit.
Manually edit artifacts
If you need to make changes to an Owned artifact through traditional development methods, you can convert your artifact to a Referenced artifact within your project. Converting ownership removes the artifact from Ed the Builder's conversational management and makes it available for manual editing in its traditional metadata application.
To convert your artifact, select the Manage Outside Project button in the Artifact Actions menu of the Artifacts panel.
Considerations for the Manage Outside Project button:
- Applications and logic blocks cannot be converted.
- Once converted, the artifact is permanently managed outside of the project. Ed the Builder can no longer modify it conversationally.
- Once converted, changes to values such as security group, family, and module must be manually applied, and synthetic data cannot be generated or deleted. Ensure you purge any data you don't want persisted in your project before you release.
Artifact topics
Artifacts inside project builder can have additional capabilities than traditionally built metadata. Learn more in the following topics:
- Agents in Project Builder
Create and manage agents directly within Project Builder, or add existing agents, to handle requests and automate work in your AD applications.
- Applications in Project Builder
View and interact with the AD application Ed the Builder creates for your project.
- Data imports in Project Builder
Create and manage data imports directly within Project Builder to bring spreadsheet data into your AD applications without leaving the project.
- Data model in Project Builder
View the tables, fields, and structure of your project within a visual layout in the data model.
- Endpoint definitions in Project Builder
Create and configure external API endpoints directly within Project Builder to connect your agentic applications to external systems.
- Logic blocks in Project Builder
Create and manage the business logic and automations for your project built application.
- Project specification in Project Builder
View the requirements Ed the Builder has captured for your project throughout development with the project specification.
- Prompt definitions in Project Builder
Create and manage prompt definitions directly within Project Builder, or add existing prompts, to use in the logic blocks of your AD applications.
- Security in Project Builder
Configure who can access and interact with your application with AD security artifacts.
- Webhooks in Project Builder
Create and configure webhooks directly within Project Builder to receive and process inbound requests from external systems.
- Workflow in Project Builder
Configure the state transitions and approval flows that govern how records move through their lifecycle in your AD application.