















Applications are pattern-based. Once a user understands the different application forms, all platform applications become easy to manage and navigate.
The diagram below illustrates how information from a table is shown in an application in list form, and an application in detail form.
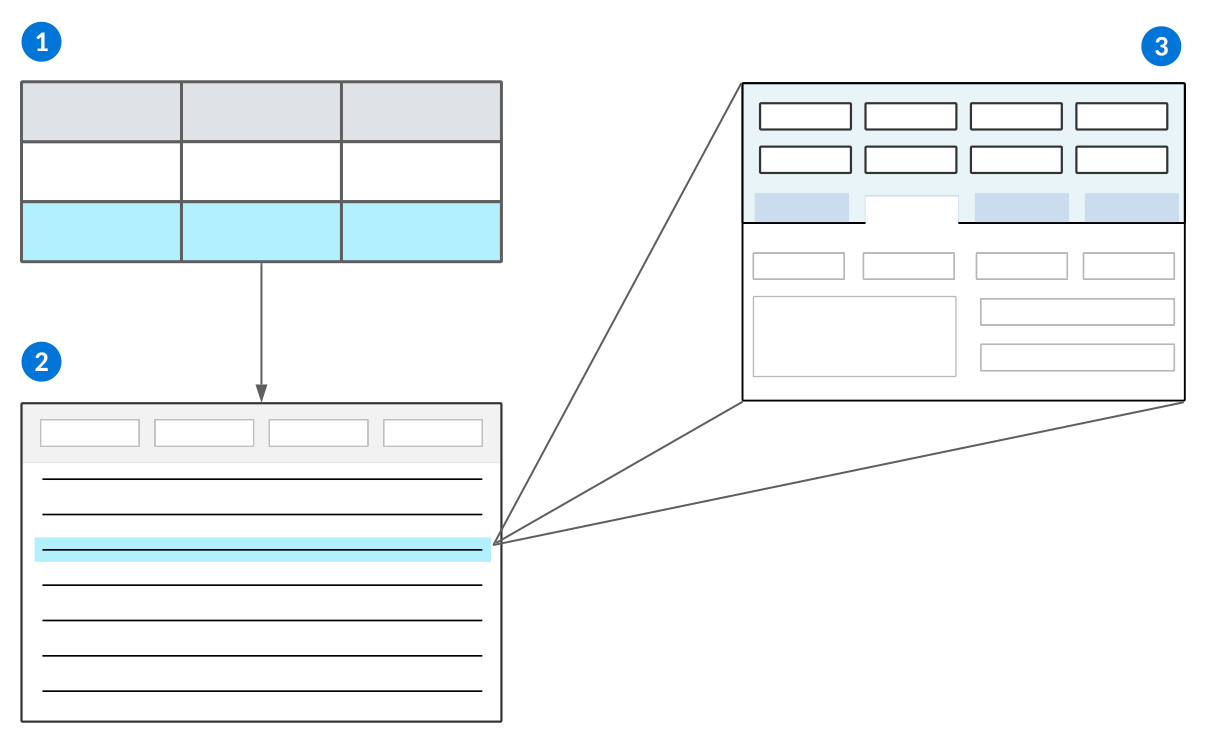
 | Tables—Every application is built over a single table. The column headers that organize the table's data become the fields where you enter information in the application. During application configuration, you can decide how you want the fields and other UI elements to be organized. Records are stored in the table, but are visible in the application in different forms. |
|---|---|
 | Application in list form—A list form displays all the records in an application, and gives you the ability to find, filter, and search for records. The filterable column headers in the list form are the same column headers found in the table. The application type and style determines if an application has a list form, or if records are organized in a different format. Learn more in Application types and styles. |
 | Application in detail form—A detail form displays the fields and values for one primary record. The detail form often shows additional table data for that record that isn't visible from the list form. |
See the topics in the Application types and styles section.
Side-by-Side View
Some application types can open and edit different applications or records in a side-by-side view. You cannot create or delete within this view. These application types include:
Standard—All application styles can open records in the side-by-side view.Advanced List—All application styles, unless they have Grouped Detail or Group By options configured, can open records in the side-by-side view.Header Detail—All application styles, including multi-detail, can open records or applications in the side-by-side view. Side-by-side view can open Header to Detail, or List to Header.Relationship—OnlyStandardstyle applications can open records in the side-by-side view.
To open the side-by-side view, select the Open Side-by-Side  button in the row action menu, or hold Option (Mac) or ALT (PC) and double select the record you want to open from the list or detail list. When the side-by-side view is open, you can still filter and page between records, but you cannot use row actions, select multiple records, or pin other pages such as the application level help or keyboard shortcuts.
Application Builder
Application developers use the Application Builder to configure applications. You can access Application Builder from the Navigation Menu, or open it as a component of the Developer Studio.
The Application Builder shows different configuration options when you create a new record versus open an existing record. For example, in new records you may only select fields which already exist in the application's table previous to saving. Once the record is saved, you can create new fields for your application.
The diagram below shows the structure of the Application Builder once an application record is created:
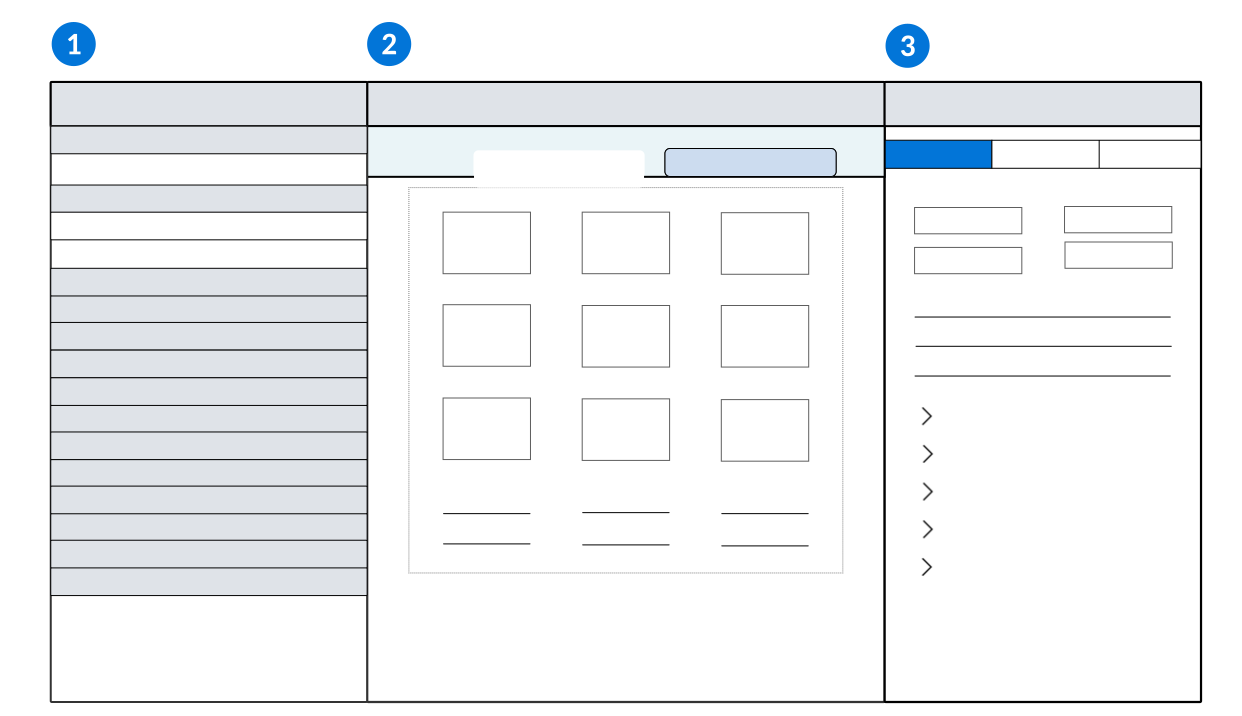
| Configuration panel—Configure components of your application. Select the form you want to configure, then expand each section to view existing configurations, or select the Create  button to add a new one. For example, you can expand the Existing Fields section to see data items that exist in the application's table, or expand the New Fields section to select new data item types to configure. |
|---|---|
| Viewer panel—Select a form in the Configuration panel to edit the fields, pages, rows, and subtables for your application. You can also drag and drop fields from the Existing Fields and New Fields sections to the location you want them. When you add options such as application links and actions, the configuration fields are shown in this panel. |
| Properties panel—View the properties of the application, such as the application type, style, and name. Or, select an object in the Viewer panel to view and edit that object's properties. Once you are done configuring your application, select the Generate  button above this panel. When you receive a notification that your application has generated, select the Launch  button. When you configure options such as application links and actions, this panel is hidden. |
Related topics:
- Learn more about how logic blocks can be used in application actions in Ways to initiate a logic block.
- Application types and styles
- Configure actions for an application
- Application advanced features
- Sort configuration
- List form field layout best practices
- Detail form field layout best practices
- Subtable data item best practices
- Application pages and rows best practices
Inline applications
Inline applications allow you to add a fully functioning application or report into the detail form of another application.
Inline applications can only be Interactive Reports, or Mini Apps of type Standard, Advanced List, or Tree.
The diagram below illustrates how multiple applications can be used inside the detail form of another application:
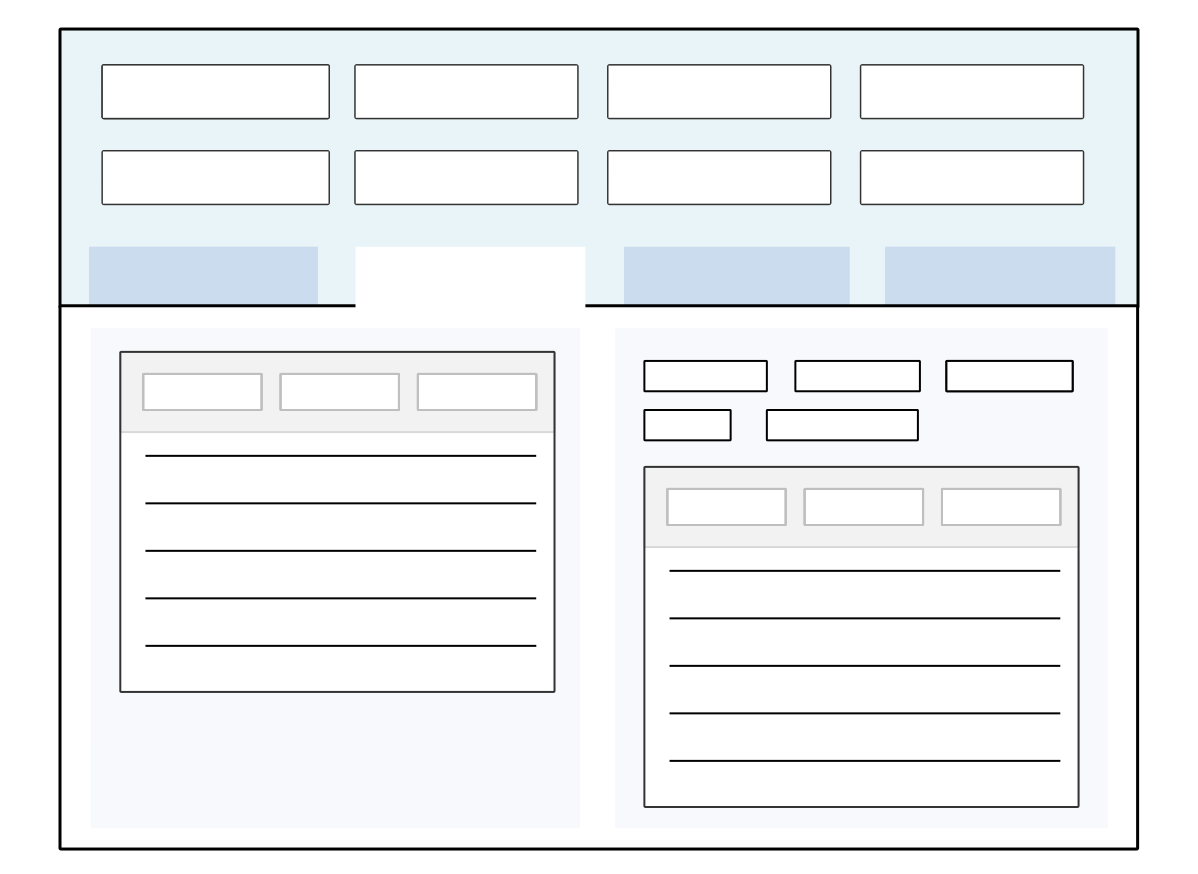
See the Configure inline applications topic for more information on how to add an inline interactive report or application.
Configure inline applications
Configure inline applications with the Data Item Definitions application, Application Setting Definitions, and Application Links subtable in the Application Builder application. Inline applications allow you to add an application into the detail form of another application.
To create a read-only inline application, disable the data item of the inline application in the application record or application setting definition. To conditionally have a read-only inline application, configure a logic block to disable and enable the fields. To control whether the inline application is read-only with security, use restricted field profiles or workflow restricted field profiles.
Data Item Definitions
In the Data Item Definitions application, create a data item of type Object. This data item must be added to the primary application's underlying table.
Inline Application
Configure the application or interactive report which you want included inline. Inline applications can only be Interactive Reports, or Mini Apps of type Standard, Advanced List, or Tree Only.
Primary Application
In the Application Builder application, add your data item to the detail form of your primary application. This determines where the inline application is populated.
In the Configuration panel, in the Application Links section, select the Create button and configure an application link with the following fields:
- In the Link Name field, enter the name you used for the data item. These names must match for the configuration to work.
- In the Link Destination field, enter the name of the inline application or interactive report you want shown.
- In the Link Destination field, select
Application. - Use the Destination Type field to map in a
Titledata mapping type to control the display name of your inline application. Optionally, use data mappings to filter the results you want seen in the inline application
Logic Block Considerations
There are several considerations for inline applications and logic block configuration, such as:
- Inline applications are held in the same NATE container as their primary application. Any changes made to the primary or inline applications are held in a single container which the logic block can access.
- Logic blocks that apply UI hints to a field are only applied to the field and application selected during configuration. If the same field is used in the primary application or other inline applications, the UI hints are not applied.
- Logic blocks used to refresh the display on a primary application also refresh the inline applications. Refresh displays configured on the inline applications do not apply to the primary.
Record notes
Enable record notes in applications to allow business users to attach supplementary notes and comments to records. Notes are attached to individual records, and support a chronological history or dialogue about the record.
Record notes are enabled at the table level. Once enabled, all applications built over the table share the same note history. For example, if you enable record notes for the Directory table, users see notes on all applications built over that table, which include the Company Directory and the detail of the Customers and Contacts application.
You can control access to notes using either security or control actions on an application or application setting.
For details on how to enable record notes, see Enable record notes for an application.
Control actions for record notes
Optionally, use control actions to limit users' ability to engage with record notes. For example, you can prevent users from using threads in their notes.
In both the Application Builder and Application Setting Definitions applications, you can use control actions on the Actions page to restrict users' ability to use record notes. These control actions are related to record notes:
Row Record Notes— Hide the record notes option on the list form. This prevents the record note option from appearing in the row action menu and hides the Notes icon that indicates rows with associated notes.
Form Record Notes— Hide the record notes option on the detail from. This prevents the record note option from being present on the record detail form.Record Notes Create— Restrict the ability to add a note to a record.Record Notes Delete— Restrict the ability to remove a note from a record.Record Notes Edit— Restrict the ability to modify an existing note.Record Notes Filter and Sort— Restrict the ability to search and reorder within a record note.Record Notes Reply— Restrict the ability to respond within a record note thread.
Enable record notes for an application
Application developers configure their applications to support record notes using the Table Definitions application.
Table Definitions
In the Table Definitions application, open the table that your application is built over. On the General Configuration page, select the Allow Notes checkbox.
Configure Security
Security is a required component. Record notes are not available to users until security is set up.
- In the Permission Definitions application on the Row Security page:
- In the Security Group field, enter
sysRecordNotes. - In the Filter Field field, enter
NoteOwningSchema. - In the Filter Value field, add the name of the table that you have configured record notes for.
- In the Security Group field, enter
- Associate the permission with any functional roles used to create notes.
You can also configure actions to control how users interact with record notes. To learn more, visit Configure actions for record notes.
Templates
Use templates to define the content you want used in different business processes, such as creating records or defining notifications.
There are several types of templates available, including:
- Record templates—Enable in applications so users can create records with pre-defined values. Learn more in the Record Templates and Enable templates in an application topics.
- Message templates—Create as part of a message definition. Define the content that is sent out in messages when a business event is completed. Learn more in the Messages and Message templates topics.
- Field templates—Enable in applications so users can select from different pre-defined values in a field which are accessible from a field action button. Learn more in the Field Templates and Configure a field with content templates topics.
Record Templates
Application developers can enable record templates so business users can create records with pre-defined field values.
These types of record templates can be enabled for records in an application:
- Manual templates—This type of record template is useful to business users when the information you are filling out in an application is consistent but does not occur on a regular basis, or certain fields do not have the same data every time.
- Recurring templates—This type of template is used when the information you are filling out in an application is consistent and occurs at scheduled intervals.
Enable templates in an application
Application developers configure their applications to support templates using the Table Definitions and Application Builder applications.
Table Definitions
In the Table Definitions application, you must:
- Specify a Type of
MainorHeader Detail. - On the Settings page, under the Advanced Settings section, select the Template Compatible checkbox.
Application Builder
In the Application Builder application, you must:
- On the General Configuration page, specify the template-compatible table you configured previously for the Table Name.
- Select an option in the Enable Template Options field.
Field Templates
Use field templates to attach a field action button on the field of an application which provides predefined values.
The content is defined in the Content Item Definitions application, then the content record, data item, and application name are referenced in the Text Template Setup application.
The type of data item determines what information can be stored in the field, such as numbers or text. For example, Text Editor data items creates a text box with full formatting, such as the number of text lines allowed and default text for the field which a user can replace.
Link multiple templates with the same field to create a dropdown menu which users can select from. The original reference text self updates from the template in the Text Template Setup application. Learn more in the Configure a field with content templates topic.
Text Template Setup application
Use the Text Template Setup application to link content templates with a field in an application. These templates are then accessible with a field action button on the field.
Content templates are defined in the Content Item Definitions application, then referenced in the Text Template Setup application with the name of the application and the data item. One, or many, templates can be attached to the same field, resulting in a field action button which enables users to select their content.
Learn more in the Configure a field with content templates topic.
Configure a field with content templates
Configure field templates to have predefined content available as a field action button on a field within an application with the Content Item Definitions and Text Template Setup application.
Prerequisites
The application must be configured with the data item you want to use in the template setup.
Content Item Definitions
In the Content Item Definitions application, you must:
- Create a new record of type
Template Content. - In the Source Content field, enter the content you want shown in the data item.
Text Template Setup
In the Text Template Setup application, you must:
- Create a new record.
- Enter the internal name of the data item, application, application setting, and content record.
Once the record is saved, a field action button is created next to the field. Optionally, you can create multiple templates and link them to the same field to have multiple templates available in the field action button.
Conditional Field Dependencies
Conditional field dependencies allow you to conditionally apply a field characteristic to the dependent field based on the value selected in the controlling field. For example, defaulting the a currency value in the dependent field to be a negative number if a specific list lookup value is selected in the controlling field.
Unlike normal field dependencies, conditional field dependencies allow you to have different results in the dependent field based on the value selected in the controlling field.
For example, if you wanted values entered into the Unit Price field to be negative by default in records where the Transaction Type is Customer Credit Memo, you would configure the following values in the Conditional Field Dependencies subtable:
- Controlling Field Type: Negative Currency Field
- Controlling Field: TransactionType
- Controlling Field Value: Customer Credit Memo
- Dependent Field: UnitPrice
If Customer Credit Memo is selected in the Transaction Type field, any value entered in the Unit Price field automatically is defaulted to a negative number. At the time of record creation, users can still choose to input a positive value.
Configure attachments for applications
Attachment options are included by default on all application types. They are accessible within a dialog box, but can be configured to appear inline on the detail form of a record. You can also adjust the threshold size of file types which controls the size of files which are automatically previewed in the Attachment Manager.
File Size Thresholds
Only certain file types can show previews. The threshold file size determines whether the attachment automatically shows a preview, or if a user has to select the Click to Preview File button to load it. You can change the default threshold size using the List Lookup Definitions application.
The default threshold sizes for different file types are detailed in the table below.
| Threshold Size | File Types |
|---|---|
| 1.5 MB | .xls, .xlsx, .xlsm, .ods, .har, .json, .nwjson, .txt, .md, .csv |
| 3.5 MB | .webp, .jpg, .jpeg, .gif, .png, .pdf, .html, .svg, .docx, .avif |
| 6.5 MB | .mp4, .mov, .webm, .mp3, .wav, .ogg |
The file size thresholds are defaulted in the system, but can be changed.
In the List Lookup Definitions application, you must:
- Open the
AttachmentPreviewThresholdOverridelist lookup. - Add a list lookup key for each file type which you want to change the threshold for. Any file types not included in the table remain with the default threshold file size.
- For the Value field, enter the file extension. For example, "csv". The file name should be entered lowercase and without punctuation.
- For the Description field, enter
threshold<size>, wherethresholdis a constant and <size> is the desired threshold size in bytes. Do not include comma separators in the size. For example, "threshold 3500000".
For the value and description combination described, the new threshold for .csv files would be 3.5 MB.
Inline Attachments
Inline attachments show the Attachment Manager inside the detail form of a record, rather than in a mini app window. To enable inline attachments for an application, you must:
- In the Table Definitions application, add the
AttachmentGroupIDdata item to the table your application is built over. - In the Application Builder application, on the Detail Form Fields page, place the data item in the column where you want the Attachment Manager. Ensure that the field is sized and positioned effectively.
Hide or Disable Attachments
Learn more about hiding or disabling the Attachments buttons in the Control Actions topic.
Camera scannable fields for mobile users
Application developers can configure applications to enable camera scannable fields. Camera scannable fields allow users of the platform to scan a barcode with a phone or tablet to fill in detail form fields.
This feature is useful for mobile users who want to scan barcodes to complete tasks while working. For example, warehouse workers that are scanning inventory items.
When a field has been configured to be camera scannable, mobile platform users see the Scan Barcode  icon. Once a user selects the icon, they can scan a barcode to update the field's value. If a value already exists in the field, the barcode value overrides it. Once the field value is updated, any logic blocks associated with a field value change on the field are executed. For example, a logic block could analyze the data received then parse it into multiple fields in the application.
Fields that are modified based on a barcode scan do not need to be visible on the current form of an application. For example, a single barcode could contain the length, width, and height of a shipping carton. Each attribute needs to be copied into a field so that a logic block can calculate shipping costs based on those dimensions, even if those fields aren't visible.
There are multiple ways to configure a field as camera scannable. Learn more in Configure camera scannable fields.
Configure camera scannable fields
Configure camera scannable fields in the Application Builder or Application Setting Definitions applications. Scannable fields allow mobile users to scan a barcode to input values into application detail form fields.
To configure a field as camera scannable, select the Camera Scannable checkbox in one of the following places:
- In the Application Builder, in the Application Properties panel, on the Detail Form Fields page, in the Field Selection subtable.
- In the Application Builder, in the Configuration panel.
- In the Application Setting Definitions application, on the Layout page, in the Field Options subtable.
Camera scannable fields are only supported on certain data item types, including:
- Text
- Number
- Date
- Time
- DateTime
- Web Link
- Phone
- Table Lookup
Configure multiple value scanning
To configure an application that can process multiple values in a single barcode scan, you must:
- Configure a
Field Value Changedevent action on the camera scannable field. Learn more in Logic blocks and event actions. - In the logic block for the event action, use the Text Manipulation action to configure string values. Learn more in Text Manipulation action.
- Use the Loop Conditional action to separate the string value into individual components and set the values into the appropriate fields. Learn more in Loop Multiple Selections action.
Enable single click to edit fields
Enable the Single Click to Edit option in your Advanced List and Detail applications. When selected, list form fields open in edit mode after a single click.
In the Application Properties panel of your application record, expand the Additional Options and select the Single Click To Edit checkbox.
Configure an iFrame for an application
Configure an iFrame field for your application in the Data Item Definitions, Content Item Definitions, and Application Builder application.
Data Item Definitions
In the Data Item Definitions application, or within the New Fields section of the Application Builder, you must:
- Create a data item of type
Object. - The name of the data item must start with
znwInlineIframe.For example,znwInlineIframeExampleDataItem.
Table Definitions
If you manually created the data item in the Data Item Definitions application, add it to your application's table.
Application Builder
In the Application Builder, you must:
- Ensure the iFrame data item is displayed in the application.
- Optionally, display the
EndpointURLdata item for initial testing and troubleshooting. - In the Field Dependencies section, create a new Publisher record and:
- Set the From to Detail, then select EndpointURL.
- Set the To to the ScopeName you enter in the Content Item Definition record you create in the next step.
Content Item Definitions
In the Content Item Definitions application, create a new record, then:
- Name the record the same name as the iFrame data item.
- Select
Source URLfor the Content Item Type. - In the Source URL field, enter the source URL. The format should be
${CC.ScopeName.FieldName}
Populate EndpointURL
To populate the EndpointURL, you can:
- Use an endpoint or logic block call to dynamically generate the URL and set the EndpointURL field.
- Manually enter the URL in the EndpointURL field of the application if you want to use a static URL for testing.
Troubleshooting
If you see a 404 Not Found, check that the EndpointURL is populated and points to a real resource.
Clear your browser cache and do a hard reload to ensure the latest content is loaded.