















The diagram below shows how records are stored in tables and seen in an application built over the table.
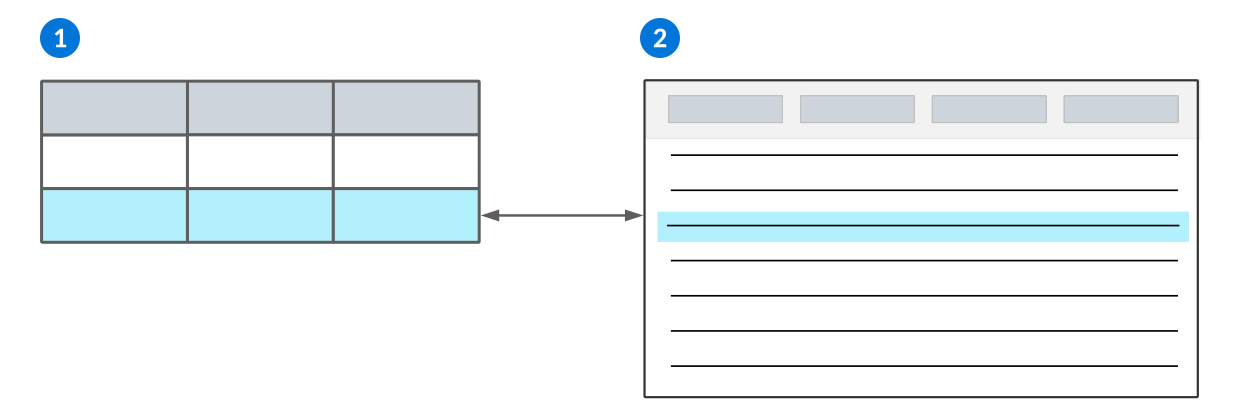
 | Table—Enter fields into the table to create both column headers and detail view items for your application. The table rows become records in your application. |
|---|---|
 | Application in list form—When you add a record in your application, it is saved as a row in your table. |
Tables can include visible data items that appear as fields in applications, as well as hidden data items. Data items that are hidden don't appear in the application, but can be used for logic blocks or other functions that a business user doesn't need to see.
Multiple applications can be built over the same table. All records stored in the table are accessible in every application built over that table.
Every table has a table type, which controls some structure and features options in the table. Different table types are required for different application types. For example, a main table is commonly used with the Standard applications, while module settings applications can only be built over a settings table.
For more on table types, see Table types.
Common fields
Common fields are data items that share values when they are used in two tables in the same application. For example, a Subtable and Main table, or a Header table and Detail table.
When a value is entered into one of the common fields, the value automatically populates in the common field of the other table.
Common fields are configured in the Table Definitions application. If the table is a Header Detail table, configure common fields in the Header / Detail page. For other types of tables, configure common fields on the Relationships page.
By default, common fields cannot be changed after they have been automatically populated. Use the Allow Changes Selection field to configure if users can change or clear a common field value in a Detail table or Subtable field.
Common fields allow you to:
- Align information between tables.
- Filter a table lookup field or search application.
- Create unique indexes for the Subtable or Detail table.
Updating common fields with logic
If you use logic to update one of the common field values, you must provide the Header Detail table as the Data Source Name. This allows the system to recognize the common fields between Header and Detail tables.
Work fields
Work fields are used to temporarily hold values when processing a record in the table. The value stored in the work field are not saved to the table.
In the Table Definitions application, configure fields as work fields with the Work Field checkbox.
Use a work field with a logic block to calculate and populate a field which you don't want saved to the table. For example, your company processes invoices in a Header Detail application, and you receives a payment from a supplier that has multiple open invoices. In this application, there are three fields that work together, Total Amount, Remaining Amount, and Apply Amount:
- The Total Amount field and Remaining Amount field are in the Header, and the Apply Amount field is in the Detail.
- The Total Amount field is the amount the supplier has paid the company.
- The Apply Amount field is the amount to apply to an invoice.
- The Remaining Amount field is the work field.
- A logic block takes the amount in Apply Amount field and subtracts that from the Total Amount field, and then displays that calculation in the Remaining Amount work field. This allows a user to check the remaining balance once an invoice has been processed, without having to save that amount to the table. The remaining amount is not a value that needs to be saved, but is useful in double checking amounts and calculations in the ledger.
You can also use a work field to enter manual information that you don't want saved to the table. For example, if you use an application to enter information for checks to be deposited, you can manually sum the expected deposit and enter that control value in the work field. As you enter all of the checks, you can use a logic block to add the amounts and enter the total in a calculated value field. If the final calculated value is different than the expected control value, you can review your entries for discrepancies. When you save your record, the calculated value is saved as part of the record, but the expected value in the work field is not.
Table and data purge
Table purges remove unnecessary data from platform tables.
Purges are environment specific, and enable you to select the specific records in each table that you want to remove. They can be manually initiated, or scheduled to occur recurrently.
To create your own table purge, use the Data Purge Definitions application. Learn more in Data Purge Definitions application.
Some tables are delivered with a recurrent purge already configured on them. These table purges are created and maintained by Nextworld, and are indicated by the Purge Active checkbox in the table definition record.
Data Purge Definitions application
System administrators use the Data Purge Definitions application to purge table data.
To create a data purge, you must:
- Create a new record and define the tables you want included.
- Filter for the records you want included. If no filter criteria is selected, the entire table is purged.
- Select the Execute Validations form action.
- Once the validation is complete, select the Execute Preview form action to review the data which is included in the purge definition.
- Select the Execute Purge form action to initiate the purge.
Optionally, you can call the DataPurgeExecutePurgeWrapper logic block and pass it your data purge definition record to have the purge run recurrently on a scheduled job.
Some tables are delivered with a recurrent purge already configured on them. These table purges are created and maintained by Nextworld, and are indicated by the Purge Active checkbox in the table definition record.
Data Purge Runs application
System administrators use the Data Purge Runs application to review the status and run information for purges configured in the Data Purge Definitions application.
Filter the list form for the purge definition you want to review. Open a record to review details about the purge, such as the run time, status, and run user.
On the Preview Results page, review any errors for failed purges or results of successful ones.
Learn more in Data Purge Definitions application.
Purge Configuration Setup application
Use the Purge Configuration Setup application to configure a schedule to purge table data. This application is for internal use only. Instead, use the Data Purge Definitions application.
Learn more in Data Purge Definitions application.
You can either select a single table to purge, or create a purge group to include multiple tables. Purge groups are defined in the List Lookup Definitions and Table Definitions applications. Purge groups don't automatically include related records. For example, if the table you're purging has a subtable main field, purge the related table separately, or add it to the same purge group so both run on the same schedule. The only exception is Header Detail applications, where purging a header automatically includes its details.
Once you select your table or purge group, determine the frequency you want the purges to occur. Purges can be configured to occur at a frequency between 1 and 24 hours. You also select the minimum number of hours a record must have existed to be included in the purge. For example, you can set a purge frequency of 24 hours, with a purge age of 8 hours. The purge occurs every 24 hours, but only records that are older than 8 hours are included in each purge.
Single Table Purge Configuration
To configure a single table purge, in the Purge Configuration Setup application, you must:
- Enter the name of the table you want to purge in the Table Name field.
- Select the frequency which you want the purge to occur.
- Enter the minimum number of hours a record must exist to be included in the purge.
- Select the Purge Active checkbox.
Purge Group Configuration
Purge groups allow you to select multiple tables to purge at the same time. To configure:
- In the List Lookup Definitions application, open the
PurgeGrouprecord and add a unique name for your purge group in the Lookup Keys subtable. - In the Table Definitions application, on the General Configuration page of each table you want included, add the name of your purge group into the Purge Configuration Group field. Select the Purge Active checkbox.
- In the Purge Configuration application, enter the name of your purge group in the Data Purge Group field. Select the frequency of your purge, as well as the minimum number of hours a record must exist to be included. Select the Purge Active checkbox.
Table Definitions application
Application developers use the Table Definitions application to create and modify tables.
Use this application when creating a table for an application and establishing its table definition. The table definition is a collection and configuration of data items you’ve chosen to display as fields in your application.
The defining information of a table including the table’s name, type, category, and description is stored in the Table Definitions application header. After the header information is entered, you can further specify a table definition by using the application's pages. These pages can be configured based on what kind of application you want to build.
Use the Sync Security row action to ensure that other metadata objects related to the table are in the correct security group. When selected, Sync Security identifies all logic blocks and applications built over the table and sets their security group to be the same as the table.
Use the Refresh Table row action to update the indexes on a table, while allowing updates to continue. This refresh takes longer to complete, but has no downtime.
Use the Force Refresh row action to update the indexes on a table, while locking any changes from occurring if an index was removed. This refresh has a faster execution, but does have downtime.
See the Tables section for more information on configuring tables.
General Configuration page
You must define your product module and family. You can also specify your reason for creating the table, add action blocks, or define a customization pattern.
Settings page
Define the relationships your table has to other tables. For most table types, this is the page where you can:
- Define your primary and secondary type ahead search fields if you have added any table lookups.
- Enter the primary field (child) and the field for the parent if you are creating a relationship application.
If you are creating a Join table, this is the page where you can:
- Specify the join type.
- Input the primary and secondary tables that have at least one common field that you want to join.
- Enter the common fields that will join the primary and secondary tables.
See Relationship application configuration for more information on building relationship applications from combined tables.
If you are creating a header detail table, the page name changes to Header Detail and you can:
- Input the header table and detail tables you want to use to create the header detail table connection.
- Enter the fields that link the detail table to the header table.
See Header Detail application configuration in the Header Detail application section for more information on building header detail applications from header, detail, and header detail type tables.
Fields page
Create data items as fields and use additional tools to configure how you want your fields to display and act in your application. Use tools to:
- configure fields to reflect the calculated values of other fields.
- lock fields after an entry has been saved.
- require fields to have a value before it can be saved.
- configure table lookup fields.
Filtered Lookups page
Create and configure a table lookup to filter values in one field to narrow the value selections in another field.
For more information, see Filtered table lookups.
Indexes page
Create indexes and add index fields to help performance when querying or retrieving data from a table.
See the Indexes section for more information on configuring indexes.
Triggers page
Add and configure trigger logic blocks to execute an Insert, Update, or Delete action against the table either before or after a record is saved.
See the Table triggers section for more information on configuring table triggers.
Table Comparison Utility application
System administrators and application developers use the Table Comparison Utility application to generate a record of the changes made to tables in their environments between releases.
To generate a new record, you can enter a product family to include all tables within that family, or select individual tables. Once you have entered the prior and new releases which you want to compare, select the Generate Comparison form action.
Once the record is available, select the View Results form action to open the Table Comparison Results application. Once opened, you can view the list of all the tables included in the report. Open the detail form of the records to view any changes. Learn more in Table Comparison Results application.
Table Comparison Results application
System administrators and application developers use the Table Comparison Results application to view the records generated in the Table Comparison Utility application. Records contain changes made to tables between releases.
To access the Table Comparison Results application, select the View Results form action button in a record within the Table Comparison Utility application. Once opened, you can review the list of each table included in the table comparison record. Open a record to view details, such as new, deleted, or updated fields or indexes for that table.
Learn more in Table Comparison Utility application.
Workflow and tables best practices
These best practices ensure that workflow is configured correctly in applications that require workflow statuses.
Workflow is configured in the List Lookup and Workflow Builder applications.
Use Workflow to enable business process flows and/or approvals:
- If a record (transaction) must go through different states or statuses. Workflow automatically places the workflow state on a table, so there is no need to add a field for state.
- To configure active/inactive status for records. For example,
ChartofAccountsuses workflow to indicate inactive accounts. Use workflow, instead of a true/false field on master data tables to allow a customer to add approvals.
The table is automatically configured with the workflow fields required to support workflow. You do not need to add workflow state or state type to the table.
If the table already has workflow and another status is needed to represent additional information, a static list lookup or checkbox can be used. For example, in the General Ledger, the state represents the state of posting. A checkbox is used to show the transaction was voided. Workflow should be considered first before adding a static field.
Table Lookup typeahead best practices
These best practices ensure that table lookups are configured consistently and correctly throughout Nextworld.
Table lookups are defined as Data Items that are associated to the table in the Table Definitions application for use as the foreign key to the table.
Create at least one data item as the table lookup for each table.
Create additional table lookup data items for a table as needed. The primary reasons for creating additional table lookup data items for the same table is either when there are multiple foreign key references to the same table by the same base table or when the use of a data item of a different name adds clarity to the foreign key reference. For example, in the case of multiple foreign key references, the work center table has a foreign key references to the IssueLocation and the CompletionLocation which are both table lookups over the InventoryLocations table. For example of the case of adding clarity, there are multiple table lookups over the directory to reference a Supplier, Employee, Customer, etc.
If only one field is needed to uniquely identify a record, make that field the primary type ahead field. This will make integrations to the table easier since only the primary field will need to be mapped.
Ideally, the primary and secondary lookup fields will uniquely identify a record. The type ahead search will only display distinct occurrences of the primary and secondary lookup fields. When the combination of the primary and secondary are not unique, the user will need to use the magnifying search icon to select record in the case of duplicates.
Identify a limited set of additional fields that will be available to applications over tables that have a foreign key reference to the table. Choose only the fields that will be broadly used by many applications. Start with a conservative list and add additional fields as needed.
Select the Typeahead Only if the field is a table lookup field and you know you don't need any of the lookup fields except the primary and secondary search fields. This ensures that the unnecessary fields do not appear in the application.
Company and Org Unit best practices
This topic describes best practices for the Company and Org Unit table lookup data items.
Org Unit name and numeric code do not need to be unique in Nextworld. This requires every table with a field that represents an Org Unit (table lookup to Directory) also have a Company in the table.
Add a Filter Table Lookup to filter Org Unit by Company.
Field lock best practices
These best practice ensure that table field lock check boxes are configured consistently and correctly throughout Nextworld.
Fields are locked in the Table Definitions application.
Use the Locked check box to prevent a field value from changing after the record is saved. Simply disabling a field in the application using a logic block or application setting will not ensure that the field cannot be changed.
- Fields that are populated by automatic numbers should be locked. Locking the automatic number field ensures that it will not be changed causing a gap in numbering or collision with a future automatic number.
- A field that is used as the Workflow Type must be locked. If it is not locked, the workflow instance may become corrupt and unable to progress.
- Typically, fields that make up the unique key that is used to identify a specific record should be locked w/ the exception of fields in the unique key that establish effective date ranges. For example, the unique key for
SupplierItemRelationshipisSupplier,Item,OrganizationalUnit, andEffectiveFrom.Supplier,Item, andOrganizationalUnitare locked.EffectiveFromis unlocked so the effective date range of the record can be modified. - Lock additional fields as needed to maintain data integrity or to meet business needs.