


.svg)


The table below reviews different workflow components.
| State | Records transition through different states, also known as statuses, such as Draft, Ready to Invoice, Invoiced, or Paid. Each state indicates where the record is in the workflow process, and allows logic blocks and other configuration options to be attached at different parts of the workflow design. States are unique to each workflow and are determined as part of workflow design. |
|---|---|
| State Type | State types are used to classify different states. One, or many, states can belong to the same state type. For example, Draft could have a state type of INIT, Ready to Invoice and Invoiced could have a state type of Active, and Paid could have a state type of Closed. State types enable more granular control of of security and data integrity. You can attach workflow security to different state and state type combinations to control who can modify records at different stages of the workflow process. Learn more in Workflow security. |
| Transitions and Transition Triggers | A transition is the movement of a record move from one state and state type combination to a different state and state type. Transitions define the parameters for how and when a record can be moved to a new state. Transition triggers are the actions that prompt a record to make a transition. For example, you can configure a transition to be manual, meaning a user can change the record status through use of a form action, or you could have an approval transition that requires designated approvers to approve or reject a record's transition. Learn more in Workflow transition triggers and Approval Definitions application. |
| Workflow Types | Enables you to create a workflow with multiple paths that each have unique requirements. The workflow path used is determined by the field value entered by a user. Learn more in Workflow types. |
There are also optional workflow features that can be configured, such as:
- Orchestration—A function that allows you to have one workflow affect another workflow. With orchestration in place between two tables' workflows, a record in one table is unable to make a state/state type transition until a record in another table reaches a specific state/state type. Learn more in Workflow orchestration.
- Notifications—Information sent to a user about the workflow process. These come in the form of a platform notification, email, or both. Learn more in Configure messages for workflow transitions, approvals, or rejections.
- Customization—The ability to customize workflows that are in production. Customization currently supports adding approvals and inserting additional steps between existing steps. Learn more in Workflow customizations and subflows.
Quick Start
Use the Quick Start button the home page to create a new workflow or subflow definition. During creation, you can create new state and state type lookups, or use existing ones.
Workflow applications
Workflow applications include:
- Approval Definitions application
The Approval Definitions application allows system administrators or integrators to specify who can approve records to transition into different workflow states.
- Workflow Builder application
Application developers use the Workflow Builder application to configure and apply workflows. Workflows automate the transition of a table record from one state and state type to another. A workflow must be built over a table so that you can build state transitions for the table's records to go through to completion.
- Workflow Comparison Utility application
Use the Workflow Comparison Utility application to compare current workflows to customized versions of the workflow, versions in other lifecycles, or any combination of these variations.
- Workflow Orchestration Definitions application
Use the Workflow Orchestration Definitions application to define a workflow orchestration profile that controls the transition of a record in one workflow based on the transition of another workflow.
- Workflow Queued Auto Transition Inquiry application
Use the Workflow Queued Auto Transition Inquiry application to review any transition with a status of pending, error, or submitted.
- Workflow Queued Transition Inquiry application
Use the Workflow Queued Transition Inquiry application to review and monitor the status of workflow auto-transitions and effective date transitions. These trigger types run asynchronously in the background.
- Workflow Restricted Field Definitions application
Use the Workflow Restricted Field Definitions application to define lists of restricted fields for use in workflow security.
- Workflow Security Definitions application
Application developers and system administrators use the Workflow Security Definitions application to configure workflow security profiles so that a state or state type controls who can access workflow attributes.
- Workflow Type Definitions application
Application developers use the Workflow Type Definitions application to configure workflow types, and the criteria for the type.
Workflow types
Workflow types are a way to differentiate unique paths in a workflow transition through specific field values in records.
Workflow type definitions require at least one field and field value pair. To align with a workflow type, a record must have the specified value for that field. If the workflow type has multiple field and field value pairs defined, a record must match all of the pairs to be included in the workflow type.
For example, the Sales Orders application contains at least three workflow types that direct the user down different workflow paths. The workflow path is dependent upon the value in the SalesOrderType field. The values you can choose from in this field are SO, QT, and CO. The workflow steps that users follow to complete the sales order depends on what workflow type they choose:
| Workflow steps | |
|---|---|
| SO | OPEN > READY TO PICK > SHIPPED > INVOICED or CLOSED |
| QT | OPEN > QUOTE WON orQUOTE LOST |
| CO | OPEN > INVOICED |
Create unique workflow type criteria
If a workflow has multiple workflow types configured, you must ensure the conditions for each workflow type are unique. If records match the criteria for multiple workflow types, behavior is unpredictable. There should only be one workflow path available for each record.
For example, you could have a PayablesTransaction workflow type configured with the following criteria:
| Field | Operator | Value |
| TransactionType | Equals | SupplierInvoice |
And you could have the PayablesTransactionSource workflow type configured with the following criteria:
| Field | Operator | Value |
| TransactionType | Equals | SupplierInvoice |
| Source | Equals | ExternalSystem |
These two workflow types do not have unique criteria. If a supplier invoice record is created with a transaction type of SupplierInvoice and a source of External system, it would meet the criteria for both the PayablesTransaction and PayablesTransactionSource workflow types.
To make the workflow types unique, you could add the following to the PayablesTransaction workflow type:
| Field | Operator | Value |
| TransactionType | Equals | SupplierInvoice |
| TransactionType | Does not equal | ExternalSystem |
When a supplier invoice record is created in this application with a transaction type of SupplierInvoice and a source of External system, it would only meet the criteria for the PayablesTransactionSource workflow type.
Reevaluate workflow type
By default, once a record has been created and assigned a workflow type, the workflow type cannot be changed. Fields included in the workflow type criteria are also locked so values cannot be modified or deleted.
You can select the Reevaluate Workflow Type checkbox on workflow definitions to allow records to reevaluate the workflow type. When selected, fields included in workflow type criteria are editable within records in an INIT state type. When the records transition out of the INIT state type, the system reviews the records for workflow type criteria and updates the workflow type as necessary.
Workflow orchestration
Use workflow orchestration to change one record's workflow state when a different record's workflow state changes. This could be defined between records in two different tables, or between records on the same table.
Workflow orchestration is commonly used in Header Detail applications. For example, you could set up an orchestration that automatically changes all associated detail records to match the header record's state. Without orchestration, a user would have to manually change each individual detail to match the header state.
Workflow orchestration definitions are configured in the Workflow Orchestration Definitions application, then applied to workflow definitions in the Workflow Builder application.
In each workflow orchestration definition, you must define the:
- Orchestrating Table and Orchestrating Data Item —The starting point of the orchestration. When the workflow on this record reaches the state and state type combination defined in the workflow definition, the target record's workflow state and state type are changed.
- Target Table and Target Data Item—The ending point of the orchestration. The state and state type of this record's workflow transitions when the orchestrating record transitions.
When you add the orchestration definition to a workflow definition, you define the state and state type a record changes from and to when the requirements of the orchestration profile are met.
Learn more about configuring workflow orchestration in the Configure a workflow orchestration topic.
Header Detail example
The Inventory Count application is built over a Header Detail structure that contains multiple workflow orchestrations between the InventoryCountHeader table and InventoryCountDetails tables. The following is one of the orchestration profiles configured for this application:
| Profile Name | Inventory Count Header Canceled |
|---|---|
| Orchestrating Table | InventoryCountHeader |
| Target Table | InventoryCountDetails |
| Orchestrating State | CANCEL |
| Orchestrating State Type | CANCELED |
This profile is used in the InventoryCountDetails workflow with a Orchestration trigger. The transition is configured with the following values::
| From State | From State Type | Orchestration Config | To State | To State Type |
|---|---|---|---|---|
| INPROGRESS | ACTIVE | Inventory Count Header Canceled | CANCEL | CANCELED |
When Detail records have a INPROGRESS/ACTIVE status and the header transitions to CANCEL/CANCELED, the Detail records also transition to CANCEL/CANCELED. This would prevent anyone from trying to process the inventory count when it has been voided.
Workflow transition triggers
Configure transition triggers on the Transitions page in the Workflow Builder application.
Transition triggers prompt transition changes by either manually initiating, automatically initiating, initiating through orchestration or logic blocks, or on a specific date and time. The table below summarizes the transition triggers that you can use to initiate a transition.
| Transition Type | Transition initiates... | Example |
|---|---|---|
Manual | When an application user manually changes the state from the row action or form action menu. For manual transitions, you can optionally define a data item of type | |
Approval | Based on the response of a user that has the authority to approve or reject a workflow transition. | |
Auto | Automatically based on the amount of time that has passed. The time durations you can choose from are Queue Immediately, Process Asynchronously, Queue in 15 Minutes, Process Asynchronously, Queue in 1 Hour, Process Asynchronously, Queue in 12 Hours, Process Asynchronously, and Queue in 1 Day, Process Asynchronously. For Queue Immediately, Process Asynchronouslythere is about a 15 second latency. Automatic transitions make asynchronous changes to a record. Once automatic transitions have been initiated, the record is locked until all auto transition have occurred and the record automatically refreshes upon completion. Use these transitions during stages of the business process that do not require user interaction with the record. Or, if the transition initiates complex logic blocks that should be run in their own transaction boundary, regardless of user save. If you add auto transitions on your workflow, you can optionally select the Enable Synchronous Processing checkbox to enable synchronous processing on your automatic transition triggers. Rather than being queued for asynchronous processing in the background, synchronous processing transitions run in their own transaction boundary but occur immediately after the record is edited by a user and saved. | For example, financial records are often set up to manually transition into |
Orchestration | When another table's workflow has reached a specific state/state type. Orchestration can be set up between any two tables. For orchestration in header and detail tables, you can configure it so that:
| For example, you could initiate a transition on table one when table two reaches a state of Reimbursed and a state type of Closed. |
Logic Block Controlled | By a logic block Queue Workflow State Change action. Logic block controlled transitions are initiated by a UI action or a batch job. The UI action or batch job executes a logic block that queues the state change which matches the From State in the workflow. | For example, a logic block transitions a work order from |
Effective Date | On the date, or date and time, found in the Date or DateTime data item specified in the Effective Date Data Item field. If the date specified in the data item is in the past, the transition is initiated. At five minute intervals, the system submits any outstanding workflow records with the current effective date transition to the workflow processing queue. If the data item in the transition is a type it will transition at midnight in the tenant's default time zone. If the data item in the transition is a type it will transition the instant in time defined in the time zone defined. Both will default to tenant time zone if no time zone is specified. You can select either | For example, if the DateTime data item holds a value of 9:30am on March 1, 2023, and you had a value of On Date selected, the transition would occur at that exact date and time. |
Report | By a Report Success or Report Error condition. The Queue Report to Run action is typically triggered by a logic block transition, then a report transition is initiated by the report's success or failure. See the Configure a Report Transition for workflow topic. | For example, a logic block success transition could initiate a report to run and change the state from In Progress to Send Deposit Invoice. If the report succeeds, a report transition changes the state from Send Deposit Invoice to In Progress. If the report errors, a report transition changes the state to Failed to Send. |
Workflow Throttling
Workflow throttling reduces the likelihood of contention between workflow transitions running in parallel. By default, the system processes as many transitions in parallel as possible. Parallel processing can cause contention issues if multiple transitions are trying to update the same record.
Auto Transitions can enable throttling by selecting the Enable Throttling checkbox on the transition in the workflow definition. The majority of workflow Auto Transitions do not have risk of contention and do not need to be throttled, however, there are several scenarios where it should be enabled, such as:
- Auto Transitions which update the same record in the same table.
- Multiple Auto Transitions which orchestrate a single record. For example, multiple Detail records orchestrating the same header record. In this instance, throttling should be enabled in the detail records.
Throttled transitions limit the number of workflow transitions that can be executed in parallel. For detail tables, transitions are processed one a time for the associated header record. For other tables, throttled transitions limit the number of workflow transitions that can be executed in parallel.
Workflow approvals
Approvals require an authorized user to accept or reject certain transactions before they can move forward in a business process. The approval requests are configured on selected workflow transitions to control when records can move from one workflow state to another.
Workflows
Workflow transitions are the movement of records from one state to another. Transitions are configured in the workflow definition in the Workflow Builder.
Approvals are only required on workflow transitions of type Approval Transition. When the from state on a record is transitioned to the specified to state, the approval process is initiated. Learn more in Workflow transition triggers.
Approval options
Once a record has been submitted for approval, the system generates and sends a notification or email to each of the designated approvers for the record. The route of delivery is configured in the Approval Definitions application. The approvers can then view the approval request through the Approval Requests application, or access the record directly. Messages can also be optionally configured to notify the appropriate recipients once the approval request has been accepted or rejected. Learn more in Configure messages for workflow transitions, approvals, or rejections.
Authorized approvers and configuration options, such as length of time a request is active or number of required approvers, are configured in the Approval Definitions application. The person or people who can approve the workflow transition can be specified by:
- Name—For example, an Inventory Manager has to approve adjustments to ensure the transaction is accurate before a transaction can transition to a workflow state of Processed. The name of the Inventory Manager would be specified as the approver.
- Role—For example, someone on the accounting team must approve before an expense report can transition to a workflow state of Posted. The Accountant role would be specified as the approver, so anyone with that role could approve the transition.
- Decisions/Logic Blocks—For example, a buyer who is new to the organization may only be able to transition a purchase order to a workflow status of Purchased if the goods and/or services are under $10,000. If they have a purchase order that exceeds their maximum allowed order cost, they would need an approver to approve the transition. You could use a logic block or decision definition to dictate which person receives the approval request depending on how large the order is, such as:
- Greater than $100,000 - Manager of Procurement
- Greater than $500,000 - Director of Supply Chain Operations
- Greater than $1,000,000 - CFO
- Greater than $5,000,000 - CFO & CEO both
Approval applications
There are several applications used for approval configuration:
- Workflow Builder—Configure your workflow definition. The definition must include transition triggers of type Approval Transition, an Action of type Approval Required, and the approval definition referenced in the Action Details field.
- Approval Definitions application—Configure your approval definition. Define the recipients, notification method, and other configuration options, and reference the workflow definition.
- Approval Cycles application—Review information about approval definitions such as the name of the table which holds the business record that the associated approval is for, the status of the approval, and whether the record is to be automatically approved.
- Approval Request application—View the status of an individual request, the name of the user who requested the approval, and the assigned approvers.
- Message Event Definitions, Message Template Definitions, and Message Definitions applications—Configure the system to automatically send messages to internal or external recipients when an approval is approved or rejected. Reference the message event definition in the approval definition.
Learn more in Configure workflow approvals.
Sequence of workflow execution
This topic reviews the order of execution for a workflow transition as the system makes changes to a record.
The order of execution is:
- The initial transition starts processing. The transition could be of any type, including orchestration, logic-block controlled, manual, or automatic.
- Decisions and conditional logic blocks are evaluated.
- Any post-run logic blocks run.
- Orchestrations initiated by step 1 occur.
- Any workflow queued from the post-run logic block occurs. These transitions will follow the same sequence of events, starting with a.
Workflow security
Use workflow security to grant or restrict access to records in a table based on their workflow state and/or state type.
Workflow Security Definitions
In the Workflow Security Definitions application, you can configure workflow security profiles so that a state/state type controls who can access specific workflow attributes, such as:
- Control who can access a record with workflow by securing read, update, delete, and insert actions based on the record's workflow state/state type.
- Define restricted field profiles to identify fields on a record that you want to restrict or grant access to based on that record’s workflow state/state type.
Workflow Restricted Field Definitions
In the Workflow Security Definitions application there is a table lookup to profiles in the Workflow Restricted Field Definitions application. If you create a workflow restricted field profile, it does not initially restrict any of the fields. To restrict the fields, the workflow restricted field profile must be added to the workflow security profile in the Workflow Security Definitions application. Once the restricted field has been added, then the fields in that workflow restricted field profile are unable to be updated by the user at the state(s) specified in the workflow security profile.
Once the workflow security profile is complete, it needs to be added to a permission definition.
Permission Definitions
In the Permission Definitions application, the Workflow Data Security page controls a user’s ability to see and interact with data based on the workflow state or state type combination. In a permission profile, the workflow data security record serves as a pointer to the workflow security profile that is defined through the Workflow Security Definitions application.
The Workflow Secured Transition Access subtable in Permission Definitions allows you to make secured state transitions available to users. In the Workflow Builder application there is the Secured checkbox to make specific transitions secured. This ensures that if someone is trying to access a transition that is marked as secure, they must have an administrator grant access if they want to see the transition.
When you define a workflow and table on the Workflow Transition Security page, a user then has full access to all secured transitions on that workflow. If a workflow does not have the Secured checkbox selected for any transitions, then you do not need to configure anything on the Workflow Secured Transition Access subtable.
Configure workflow
Application developers can design and configure a workflow to enforce a lifecycle of states that an application's records must pass through using the List Lookup Definitions application and Workflow Builder application.
For advanced workflow features, you can use additional workflow applications to connect logic blocks, create approvals and notifications for transitions, or change the workflow security to determine what changes a user can make to records.
For more information on how to configure workflow, view the following topics:
- Design a workflow
Application developers design workflows to increase efficiency and ensure that all required steps are included within business processes.
- Configure workflow list lookups
Application developers configure state and state type list lookups to define a workflow's transition details using the List Lookup Definitions application.
- Configure a workflow definition
Application developers use the Workflow Builder application to configure a workflow over a table. Workflow enforces a series of states that records must pass through to reach completion.
- Configure advanced workflow features
You can build a more complex workflow by configuring transitions to enable these advances features.
- Configure workflow types
Use the Workflow Type Definitions application to configure workflow types to differentiate different paths in a workflow transition.
- Configure a workflow orchestration
Configure a workflow orchestration so a record's state and state type transitions when another record has reached a certain state and state type using the Workflow Builder and Workflow Orchestration Definitions applications.
- Configure workflow approvals
Application developers use the Approval Definitions and Workflow Builder applications to configure workflow approvals which allow authorized users to accept or reject a request to transition a record from one workflow state to another.
- Configure messages for workflow transitions, approvals, or rejections
Configure messages when a workflow transition, approval, or rejections occurs with the Message Event Definitions , Message Template Setup , Message Definitions , Workflow Builder , Logic Block Builder , and Approval Definitions applications. Configure notifications when a workflow transition occurs with the Notification Definition and Workflow Builder applications.
- Logic blocks and workflow transitions
Application developers can configure logic blocks into a workflow transition to initiate a state change based on the logic block's criteria.
- Configure workflow types
- Configure workflow security
Configure workflow security to restrict permissions to read, update, and delete records based on workflow values using the Workflow Security Definitions , Permission Definitions , and Role Definitions applications. Security can also be used to configure restrictions on inserting records on detail tables.
- Create or customize workflow restricted fields
Define or customize lists of restricted fields for workflow with the Workflow Restricted Field Definitions and Workflow Security Definitions applications. Workflow restricted field profiles are added to access rules in workflow security to prevent users from making changes to the specified fields.
- Create or customize workflow restricted fields
- How to disable the Workflow Change action
Application developers can prevent users from making multi-row workflow changes by disabling the action in the application configuration.
Design a workflow
Application developers design workflows to increase efficiency and ensure that all required steps are included within business processes.
The following elements should be considered when designing a workflow:
- Identify repeating patterns of tasks that are necessary to complete a process.
- Outline the flow of how you want a user to navigate the tasks in the process from start to completion.
- Determine a set of workflow rules to apply in your workflow.
Basic Workflow
All workflows must start with an initial state. The default name of this state is INIT, but can be customized. For example, in the Supplier Invoices application workflow, the initial state is called Draft. Every new record begins in this state and transitions to the next state based on actions performed by the user. When a supplier invoice is processed without a purchase order in the Supplier Invoices application, a basic workflow is defined:

| State | Description | |
|---|---|---|
 | Draft | The initial state of all new records. |
 | Ready to Process | The invoice record is ready to process. |
 | Ready to Post | The application writes the GL transaction. |
 | Posted to GL | The GL transaction is posted and the workflow is complete. |
Advanced Workflow
For more complex workflows, there are advanced workflow configuration options . For example, when a supplier invoice is processed with purchase orders in the Supplier Invoices application, the following workflow apples:
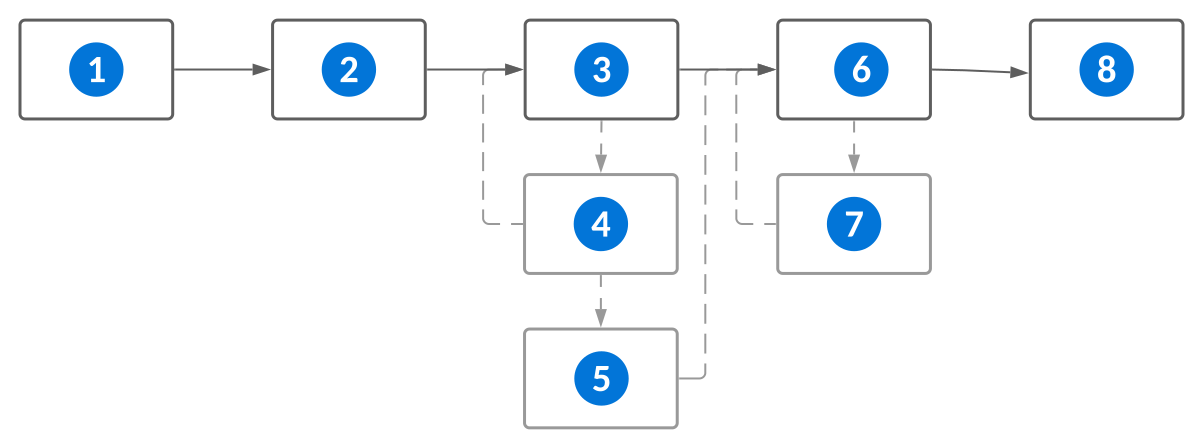
| State | Description | |
|---|---|---|
| Draft | The initial state of all new records. |
| Ready to Process | The invoice record is ready to process. |
| Ready to Match | The record is ready to process as a match with a purchase order. |
| Match Exception | The record failed to match with a purchase order. The error must be corrected and state set to Ready to Match before it can continue through the workflow. |
 | Match Override | The invoice record is set to this state when you want to override the exception in order to pay the supplier. |
 | Ready to Post | The application writes the GL transaction. |
 | Error | The GL transaction failed. |
 | Posted to GL | The GL transaction is posted and the workflow is complete. The error must be corrected and the state set to Ready to Post before it can complete the workflow. |
Add workflow to existing records
You can add workflow to a table with existing records with data transforms. Data transforms are used to update business data. Learn more in the following topics:
Configure workflow list lookups
Application developers configure state and state type list lookups to define a workflow's transition details using the List Lookup Definitions application.
Configure workflow states
You must create record statuses for records that reach a certain point in a workflow. States are unique to each workflow and are determined as part of the workflow design. In the List Lookup Definitions application, you must:
- Create a new list lookup and add values and descriptions for your states.
- Have one list lookup with a value of
NEW. The description can be whatever you want it to be. All new records in the workflow are assigned this state.
Configure workflow state types
Create state types that can be used to define controls, control behavior, and security. In the List Lookup Definitions application, you must:
- Create a new list lookup and add values and descriptions for your state types.
- Have one list lookup with a value of
INIT.All new records in the workflow are assigned this state type.
At a minimum, all workflows must include these standard state types:
InitialActiveInactiveClosedPending
After you create state and state type list lookups, add them to your workflow. Learn more in the Configure a workflow definition topic.
Configure a workflow definition
Application developers use the Workflow Builder application to configure a workflow over a table. Workflow enforces a series of states that records must pass through to reach completion.
In the Workflow Builder application, create a new record and select the internal name of the table you want to build the workflow over.
You must have list lookups configured to enter in the State Lookup and State Type Lookup fields. Learn more in Configure workflow list lookups.
Configure your transitions
On the Transitions page, use the visual builder to configure your states and transitions. Or, turn the Show Visual Builder toggle off and select the Add Transitions button. There are several considerations, such as:
- One of the detail transitions must have a From State of
Newand a From State Type ofInitial. The list lookup description of New can be different depending on the type of workflow. For example, Draft/Initial or Ready to Post/Initial are also acceptable combinations. - The transition trigger type you select initiates the workflow transition to the To State. Learn more in Workflow transition triggers.
- If you add manual transitions on your workflow you can optionally define an Action Label. The action label controls what text is shown on the row and form action buttons used to initiate the manual transition. If no label is defined, the buttons display the default Transition to <To Workflow State> label.
- If you add auto transitions on your workflow, you can optionally select the Enable Synchronous Processing checkbox to enable synchronous processing on your automatic transition triggers. This makes the auto transition process synchronously when the record saves, rather than being queued for asynchronous processing in the background, when triggered by an interactive edit of a record. Only three concurrent transitions may occur in synchronous processing, otherwise the system defaults to async processing.
- If you add auto transitions on your workflow, you can also optionally select the Enable Throttling checkbox for transitions which require throttling to avoid contention.
After creating a basic workflow, you can add some advanced workflow features to build a more complex workflow. Learn more in the Configure advanced workflow features topic.
Activate your workflow
Once the workflow definition has been configured, select the Active checkbox to activate the workflow.
When a workflow is active, it is enforced on all applications built over the table. There are several table types supported, such as Main and Header Detail.
To activate workflow on a Header Detail table, ensure the Header, Detail, and Header Detail tables are all configured correcly. Additionally, the Header Detail page in each table definition must be fully configured to point to the related tables. Learn more in Header Detail application configuration.
A single workflow can be attached to a Header Detail table when a single entity transition is necessary. If the header and detail must transition as independent flows, then define a separate workflow definition for both the Header and Detail tables.
Configure advanced workflow features
You can build a more complex workflow by configuring transitions to enable these advances features.
The following topics review advanced workflow configuration options:
- Configure workflow types
Use the Workflow Type Definitions application to configure workflow types to differentiate different paths in a workflow transition.
- Configure a workflow orchestration
Configure a workflow orchestration so a record's state and state type transitions when another record has reached a certain state and state type using the Workflow Builder and Workflow Orchestration Definitions applications.
- Configure workflow approvals
Application developers use the Approval Definitions and Workflow Builder applications to configure workflow approvals which allow authorized users to accept or reject a request to transition a record from one workflow state to another.
- Configure messages for workflow transitions, approvals, or rejections
Configure messages when a workflow transition, approval, or rejections occurs with the Message Event Definitions , Message Template Setup , Message Definitions , Workflow Builder , Logic Block Builder , and Approval Definitions applications. Configure notifications when a workflow transition occurs with the Notification Definition and Workflow Builder applications.
- Logic blocks and workflow transitions
Application developers can configure logic blocks into a workflow transition to initiate a state change based on the logic block's criteria.
- Configure workflow types
Configure workflow types
Use the Workflow Type Definitions application to configure workflow types to differentiate different paths in a workflow transition.
Workflow Type Definitions
To configure a workflow type, you must know the Name, Table Name and Product Family of the workflow you are planning on adding the type(s) you create to.
Once you create a new workflow type, there are several considerations, such as:
- The Product Family must be the same as the workflow.
- The Workflow Table must be the same table the workflow is built over.
- Workflow type criteria must be unique to ensure records can only ever match one workflow type. If records match the criteria for multiple workflow types, behavior is unpredictable. Learn more in Workflow types.
In order to be included in the workflow type, a record must match all values entered in the Workflow Type Criteria subtable. If you need additional criteria, create additional details in the subtable.
Workflows
In the Workflow Builder application, you can associate the workflow type(s) that you configured with a workflow transition. The transition you associate with the workflow type in is now specific to this workflow type. This transition only initiates when a user selects the specific field value or values you configured in the Workflow Type Definitions application.
By default, once a record has been created and assigned a workflow type the type cannot be changed. Fields included in the workflow type criteria are also locked so values cannot be modified or deleted. You can select the Reevaluate Workflow Type checkbox on workflow definitions to allow records to reevaluate the workflow type. When selected, fields included in workflow type criteria are editable within records in an INIT state type. When the records transition out of the INIT state type, the system reviews the records for workflow type criteria and updates the workflow type as necessary.
For more information on workflow transitions, see the Workflow transition triggers topic.
Configure a workflow orchestration
Configure a workflow orchestration so a record's state and state type transitions when another record has reached a certain state and state type using the Workflow Builder and Workflow Orchestration Definitions applications.
Create a workflow orchestration definition
There are some cases where you may have multiple orchestration transitions out of the same workflow state and state type. In these cases, use the Precedence field to control the order in which the criteria for each orchestration transition is checked at run time.
In the Workflow Orchestration Definitions application, create a new orchestration and define the tables used in the orchestration. The table below details the values that must be entered in the different fields.
| Fields | Values |
|---|---|
| Orchestrating Table | The name of the driver table, or the table that leads the orchestration. |
| Target Table | The name of the table that is affected by the orchestrating table. This can be the same table, or a different table, than the orchestrating table. |
| State Lookup | The state list lookup created for the orchestrating table's workflow. |
| State Type Lookup | The state type list lookup created for the orchestrating table's workflow. |
After you define the tables, you must:
- In the Orchestrating Workflow Status subtable, enter one or more Orchestrating State and Orchestrating State Type pairs. These are the combinations that all orchestrating records must reach in the orchestration in order for the record to transition.
- In the Orchestrating Data Item and Target Data Item fields, enter the data item that identifies the records. This is often the
nwId. The values of both data items must match in order to link the two records. - Optionally, in the Target Table Sort Order subtable you can specify a field whose values control the order in which records for orchestration should be processed.
Create transitions with workflow orchestration
You can also configure a workflow transition that it is reliant on an orchestration so that a record does not transition to certain To State and To State Type values until all driving records reach the To State and To State Type values.
In the Workflow Builder application, open the workflow of the target table you defined in the workflow orchestration definition. There are several considerations, such as:
- The
Orchestrationoption must be selected in the Transition Trigger field in the workflow transition detail that you want to link to the orchestration table. - The name of the orchestration you created in the Workflow Orchestration Definitions application must be entered in the Orchestration Config field in the same transition.
Configure workflow approvals
Application developers use the Approval Definitions and Workflow Builder applications to configure workflow approvals which allow authorized users to accept or reject a request to transition a record from one workflow state to another.
After you've created a basic workflow in the Workflow Builder application, you can create an approval definition for your workflow approval.
You can also configure notifications or emails that are sent out when certain workflow transitions occur. See the Configure messages for workflow transitions, approvals, or rejections topic for more information.
Create an approval definition
Use the Approval Definitions application to specify who can approve a record transition through a workflow process. Approvers can be defined individually, by their role, by a logic block, or by a Decision record that dynamically determines the list of approvers. For more information see the Approval Definitions application topic.
Create a transition with an approval
A workflow that contains an approval-based process must have the following transitions:
- A transition to initiate the approval request
- A transition to move the process forward because the transition was approved
- A transition to move the process forward because the transition was rejected
In the Workflow Builder application, open the workflow you want to configure approvals in.
For the transition that initiates the approval request, configure the following fields:
| Fields | Values |
|---|---|
| Action Type | Approval Required |
| Action Definition Name | The approval definition you want to initiate when this transition occurs. |
| To State Type | Pending |
For the transitions that approve and reject the request, configure the following fields:
| Fields | Values |
|---|---|
| From State | The To State value from the transition that sends the approval request. |
| From State Type | The To State Type value from the transition with the approval request. |
| Transition Trigger | Approval |
If the transition is for an approved record transition, configure the following fields:
| Fields | Values |
|---|---|
| To State and To State Type | The state and state type that the record should transition to when it has been approved. |
| Workflow Condition | Approval Approved |
If the transition is for a rejected record transition, configure the following fields:
| Fields | Values |
|---|---|
| To State and To State Type | The state and state type that the record should transition to when it has been rejected. |
| Workflow Condition | Approval Rejected |
Additionally an approval request can be withdrawn, but only the person who initiated the approval request is authorized to withdraw it.
If the transition is to withdraw an approval request, configure the following fields:
| Fields | Values |
|---|---|
| To State and To State Type | The state and state type that the record should transition to when it has been recalled. |
| Workflow Condition | Approval Withdrawn |
Notifications
To configure notifications when transitions, approvals, or rejections occur, see the Configure messages for workflow transitions, approvals, or rejections topic.
Approval backup configuration
System administrators use the Backup Approvers Setup application to create a list of backup approvers for an approval request. The list is then attached to the approval record in the Approval Definitions application.
Prerequisites
Ensure the approvers are included in the Directory table and configured with the directory user link in the Directory User Tenant Setup application.
Backup Approvers Setup
In the Backup Approvers Setup application:
- Create a new record and give it a unique identifying name. For example, you can give it a name, such as Expense Report Approvers, that would describe the purpose of backup approvers list.
- In the Approval Backups subtable, enter the users you want as backup approvers.
For more information see Backup Approvers Configuration application.
Approval Definitions
In the Approval Definitions application:
- Open the approval definition you want to add backup approvers to.
- In the Approvers section, enter the name of the backup approvers list you created in the Backup Approvers Setup application.
- After you enter the backup approver list, the user assigned the approval request for the record can have the users on the list approve on their behalf. You can you reuse this backup approver list for other users as needed.
Configure messages for workflow transitions, approvals, or rejections
Configure messages when a workflow transition, approval, or rejections occurs with the Message Event Definitions, Message Template Setup, Message Definitions, Workflow Builder, Logic Block Builder, and Approval Definitions applications. Configure notifications when a workflow transition occurs with the Notification Definition and Workflow Builder applications.
You can configure a notification to be sent when a workflow transition occurs, or create a message which is sent to selected recipients when a transition, approval, or rejection occurs.
Notifications for workflow transition
In the Notification Definitions application, configure a record with the roles or users who should receive the notification.
In the Workflow Builder application, open the workflow and:
- On the Transition page, configure your transition detail.
- In the Action Type field, select
Send Notification. - In the Action Definition Name field, enter the name of your Notification Definition record.
Messages for workflow transition
Configure your message event, template, and definition. See the Message configuration topic for more information.
In the Workflow Builder application, open the workflow and configure the workflow transition detail on the Transition page.
In the Logic Block Builder, configure a Post Run logic block on the transition, then:
- Select the Queue Event action.
- In the Details panel, in the Message Event field, enter the name of the message event you configured.
- If the business event must be executed in a certain order in relation to other events, use the Sequential Execution Key field to specify a key.
- Use the Payload Entries fields to map in values from a data source to the payload entry. These values can be used as interpolated values in the message content, or to provide recipients for the message.
Messages for approvals or rejections
Configure your messages. Messages are a multistep configuration which include a:
- Message event definition—Specify the table which you want to retrieve records from, such as addresses for emails.
- Message template—Define the content for the approval messages.
- Message definition—Define the message template, message event, and associated configuration. Together, they create the automated messages and notifications which the system sends to recipients.
See the Message configuration topic for more information.
In the Workflow Builder application, open a workflow and configure the Approval Transition that you want the notification on. Learn more in Configure workflow approvals.
In the Approval Definitions application, configure your approval. In the Notifications section, enter the name of your message event definition in the Approve Message Event or Reject Message Event field.
Logic blocks and workflow transitions
Application developers can configure logic blocks into a workflow transition to initiate a state change based on the logic block's criteria.
For more information on how to configure logic blocks and workflow transitions, view the following topics:
- Conditional logic block workflow transition
Application developers can use a logic block's success or failure to determine how a workflow state transitions using the Workflow Builder and Logic Block Builder applications.
- Logic block controlled workflow transition
Application developers can use the Queue Workflow State Change logic block action to transition a workflow record's state and state types based on validations.
- Post-run logic blocks for workflow definitions
Application developers can use the Workflow Builder application to configure post-run logic blocks to run after a workflow transition is complete, or after a conditional workflow logic blocks runs and the record is updated.
- Configure a Report Transition for workflow
Application developers can configure a report transition using the Workflow Builder and Logic Block Builder applications to ensure reports are generated successfully in a workflow.
Conditional logic block workflow transition
Application developers can use a logic block's success or failure to determine how a workflow state transitions using the Workflow Builder and Logic Block Builder applications.
When using a logic block to conditionally trigger state transitions, you must create two detail transitions for each From State and From State Type combination. One detail transition definition determines what happens if the logic block runs successfully. The second detail transition definition determines what happens if the logic block returns an error.
Workflow Builder
In the Workflow Builder application, open the workflow to configure the detail transitions.
To configure a successful state transition, select the Add Workflow Detail button and configure the following fields:
| Fields | Values |
|---|---|
| From State and From State Type | The state and state type that you want the transition to start from. |
| To State and To State Type | The state that you want the transition to land on when the logic block is successful. For example, Complete/Closed. |
| Transition Trigger | Auto |
| Transition Delay(optional) | The amount of time that should pass before the logic block is initiated. |
| Workflow Condition | Logic Block Success |
| Logic Block | The name of the logic block. |
To configure a failed state transition, select the Add Workflow Detail button and configure the following fields:
| Fields | Values |
|---|---|
| From State and From State Type | The same state and state type values as the Logic Block Success state transition definition. |
| To State and To State Type | The state that you want the transition to land on when the logic block is successful. For example, Error/Inactive. |
| Transition Trigger | Auto |
| Transition Delay(optional) | If a duration was configured for the Logic Block Success condition, enter the same time duration entered for the Logic Block Success condition. |
| Workflow Condition | Logic Block Error |
| Logic Block | The same logic block name entered for the Logic Block Success condition. |
Logic block controlled workflow transition
Application developers can use the Queue Workflow State Change logic block action to transition a workflow record's state and state types based on validations.
If the validations in the logic block are successful, then the state transition is made. If the validations in the logic block are unsuccessful, then the transition does not occur.
For example, you could create a logic block over the Job Definition workflow to identify active jobs that have no outstanding invoices. Once those records have been identified, you could use the Queue Workflow State Change action to transition those jobs to a state of Complete. The Job Definition workflow would have to have a transition trigger of type Logic Block Controlled with a from state of Active, and a to state of Closed.
Workflow Builder
In the Workflow Builder application, select Logic Block Controlled in the Transition Trigger field of a workflow transition. Designate the required to state and to state type for the transition.
Logic Block Builder
In the Logic Block Builder application, build a logic block over the same table as the workflow definition with conditional validations. Use the Queue Workflow State Change action for any successful validations.
The Queue Workflow State Change action finds the best available logic block controlled transition in the workflow definition and executes it.
Post-run logic blocks for workflow definitions
Application developers can use the Workflow Builder application to configure post-run logic blocks to run after a workflow transition is complete, or after a conditional workflow logic blocks runs and the record is updated.
The post-run logic block can run as part of the workflow so that when specific criteria is met, the logic block initiates. It can also run for a specific transition within the workflow.
Workflow
When you configure a post-run logic block for a workflow, that logic block runs after any transitions that meet the criteria you define. If you do not add values to any of the criteria fields, that logic block applies to every transition. This criteria can include a From State and From State Type, as well as a To State and a To State Type. Defining the post-run logic blocks for the workflow instead of a transition allows you to apply a post-run logic block to multiple transitions, without having to add it multiple times.
For example, if you specify the From State as Open and the From State Type as Active for a post-run logic block, that logic block applies to all transitions from the Open state and Active state type. If you want multiple logic block to run any time a record transitions from the Open state and Active state type, you could use the Order field to configure the order they run in.
Specific Transition
When you configure a post-run logic block for a specific transition, the logic block runs after only that transition. You only specify the sequence and the name of the logic block to run because the logic block is defined as part of the transition. The Compiled Post-transition Logic Blocks subtable shows an ordered list of all the logic blocks defined for a workflow that apply to the transition, as well as the logic blocks defined for that transition.
If there is an error when a post-run logic block runs, the transition of the record that was triggered before the logic block run is unchanged. This means that if there is an error in any post-run logic blocks, the record is unchanged.
Configure a post-run logic block
In the Workflow Builder application, open a workflow and enter the name of the desired logic block in the Post-transition Logic Block field in a workflow transition.
Configure a Report Transition for workflow
Application developers can configure a report transition using the Workflow Builder and Logic Block Builder applications to ensure reports are generated successfully in a workflow.
Logic Blocks
In the Logic Block Builder application, create a new logic block with a Queue Report to Run action. In the Detail section of the action, you must have:
- The report version application for the report selected in the Select a Report Application field.
- The table the workflow is built over selected in the Post-Processing Data Source field.
Workflow Builder
The Queue Report to Run action on the logic block initiates the report once it is added to a conditional logic block workflow transition.
In the Workflow Builder application, you must:
- Select the Add Workflow Detail button to configure conditional logic block transitions for a
Logic Block Successand aLogic Block Errortransition. See the Conditional logic block workflow transition topic. - Select the logic block you created in the Conditional Logic Block field in both transitions.
- Select the Add Workflow Detail button to configure your report transitions. You must have both a
Report Successand aReport Errortransition configured.
The report transition is initiated by either a report success or a report error. Depending on which condition is met, a different transition occurs.
Configure workflow security
Configure workflow security to restrict permissions to read, update, and delete records based on workflow values using the Workflow Security Definitions, Permission Definitions, and Role Definitions applications. Security can also be used to configure restrictions on inserting records on detail tables.
Create a workflow security profile
In the Workflow Security Definitions application, create a new record. There are several considerations, such as:
- The Profile Name is used to identify the workflow security profile in the Permission Definitions application.
- The name of the table that contains the workflow this security profile is associated with should be entered in the Table field.
Create access rules
In the Access Rules subtable, select the Add Access Rules button to create each access rule needed for the security profile.
The table below explains what each field and their corresponding values define as filter criteria for the access rules. All of the fields are optional. If you leave one of these fields empty, the access rule applies to all possible values for this field. If you leave all of the fields empty, you can select the Read or Update checkboxes to allow users to read and/or update the record regardless of the workflow selected, or the Type, State, or State Type, the record is in.
| Fields | Values in this field define... |
|---|---|
| Workflow | The name of a workflow that is built over the table specified above. |
| Workflow Type | The name of a workflow type that is configured for the workflow. |
| From State | A state. The access rule applies only to records with this state. |
| From State Type | A state type. The access rule applies only to records with this state type. |
There are different access levels for user interactions with records that you can set. The table below explains what each field and their corresponding values define for user access.
| Fields | Values in this field define... |
|---|---|
| Allow Delete | Whether users are allowed to delete records. For Header Detail applications, the State and State Type defined in the access rule refer to the Detail table. |
| Allow Insert | Whether users are allowed to insert records into the detail table. This checkbox is only present for Header Detail applications. For Header Detail applications, the State and State Type defined in the access rule refer to the Header table. If the state and state type defined in the access rule aren't in the header table, users cannot insert records into the detail table, even if the checkbox is selected. If you have a blank access rule with no fields defined and the checkbox selected, a user can add records to the detail table no matter what state or state type the header or detail is in. |
| Allow Update | Whether users are allowed to make changes to records. For Header Detail applications, the State and State Type defined in the access rule refer to the Detail table. |
| Read | Whether users are allowed to view records. For Header Detail applications, the State and State Type defined in the access rule refer to the Detail table. |
If you created a restricted fields profile in the Workflow Restricted Field Definitions application, enter the name in the Workflow Restricted Fields Profile.
When a profile is entered, users are prevented from making changes to the fields defined in the profile even when the Allow Update checkbox is selected for the access rule. Learn more in the Create or customize workflow restricted fields topic.
Permission Definitions
In the Permission Definitions application, create a new record and add the workflow security profile on the Workflow Security page.
Role Definitions
If the permission isn't already being used in a role, navigate to the Role Definitions application and assign the permissions to a role.
Create or customize workflow restricted fields
Define or customize lists of restricted fields for workflow with the Workflow Restricted Field Definitions and Workflow Security Definitions applications. Workflow restricted field profiles are added to access rules in workflow security to prevent users from making changes to the specified fields.
Customize an existing workflow restricted field profile if you want to change or limit access to fields based on a workflow state which was delivered to you. This allows you to prevent users from making changes to tenant owned custom fields. Only definitions which have the AllowAdditions value selected in the Customization Pattern field are allowed to be customized.
Create a new workflow restricted field profile if you need to create a new workflow state and limit access to the fields, or if your delivered workflow restricted field profile does not allow customization.
Customize a workflow restricted field profile
To customize a restricted field profile, in the Workflow Restricted Field Definitions application, you must:
- Open the definition.
- In the Restricted Fields subtable, select the Add button to create an entry for each additional field that should be restricted. Only tenant owned fields can be added.
Create a workflow restricted field profile
To create a new restricted field profile, in the Workflow Restricted Field Definitions application, you must:
- Create a new record.
- In the Restricted Fields subtable, select the Add button to create an entry for each field that should be restricted.
- In the WorkflowRestrictedFieldList.DataItemLookup field, select the name of the data item associated with the field.
In the Workflow Security application, you must:
- Create a new record.
- Select the table the workflow is built over.
- In the Access Rules subtable, enter the name of the restricted field definition.
Learn more in the Configure workflow security topic.
How to disable the Workflow Change action
Application developers can prevent users from making multi-row workflow changes by disabling the action in the application configuration.
The Workflow Change action is available in Header Detail and Advanced List application types. You can learn more in the Workflow Change action topic.
Disable this action by configuring a Control Action in the application definition on the Actions page or by using an application setting.
Workflow customizations and subflows
Customize workflows to add or modify existing processes in the workflow such as transitions, orchestrations, logic blocks, and approvals.
Select the Customize row action on a workflow definition to create a customized definition. You can customize a workflow by making changes in the workflow definition, or by adding a subflow definition.
Workflow definition customizations
This table describes the different customizations you can do in a workflow definition:
| Workflow feature | Customization |
|---|---|
Logic blocks | Add new post-run or multi-transition logic blocks to existing workflows. You cannot modify or remove any of the base or post logic blocks. |
| Existing transition fields | Change the values of the following fields in existing workflows as long as the workflow's validations allow for it:
|
| Notifications | Add new notifications into the Action Type field. |
Subflow definition customizations
This table describes the different customizations you can do in a subflow definition:
| Workflow feature | Customization |
|---|---|
| Approvals | Add new approvals to existing workflows. You cannot modify existing approvals. |
| Workflow Types | Add a new workflow type to existing workflows. Add new transitions to your customized workflow with that workflow type specified. |
| Orchestration | Add new orchestrations to existing workflows. You cannot modify or remove any of the base orchestrations. |
| Transitions | Add new transitions to existing workflows. |
| State and State Types | You can create new transitions which exist between existing You can use any of the values from the list lookups defined in the State Lookup and State Type Lookup fields. If you want to use a new value that does not exist in the current list lookup, you must customize that list lookup to add it in. You can only add new values to the lookup if it has a customization pattern of |
Subflows can be added to both workflow definitions and inside of other subflows. Only transitions with the Allow Subflows checkbox selected in the parent definition may have subflows attached to them.
A transition path is the Base sequence of states a record must go through from start to finish. For example:
New / Initial | > | To Do / Active | > | In Progress / Active | > | Done / Closed |
When you configure a subflow definition you can add steps in between the transition path's sequence of states, but you can't change the states or the order of the sequence they are in. For example:
New / Initial | > | To Do / Active | > | In Progress / Active | > | Review / Active | > | Reviewed / Active | > | Exit Subflow / Active | > | Done / Closed |
Learn more in Subflows and Subflow configuration.
Learn more about how to update a Customized workflow in the Customized workflow and base workflow updates and Configure customized workflow updates topics.
Customized workflow and base workflow updates
Customized workflows do not automatically receive updates whenever the Base version changes in a new release or patch.
The Customization Status field in the list form of the Workflow Builder application shows a customized workflow's state in relation to the base version. The values of this field are automatically generated and are only used on customized workflows. Custom workflows with a Current status are up-to-date with the latest base version. When the Customization Status field shows an Update Available status, this indicates that a new base version exists for that workflow and you are able to begin a merge of your current customizations with the newest base version features.
You can continue to use your customized workflow version as your Active workflow without immediately updating the newest Base version, but you cannot make any additional changes to that custom workflow until the updates have been applied.
To update your workflow, you can create a draft of what your current customizations would look like when merged with the latest base version before you commit to the update. The workflow draft merge preserves your current, In-Active custom workflow while it creates an updated version that combines your current customizations with the newest base version features. When the draft merge is complete, you can review the updated version and mark it as your Active workflow if you are satisfied with the merge, or you can reject the draft merge and create a new customized workflow over the latest base workflow.
Draft merge process flow
The following diagram outlines the steps that make up a successful workflow draft merge process:
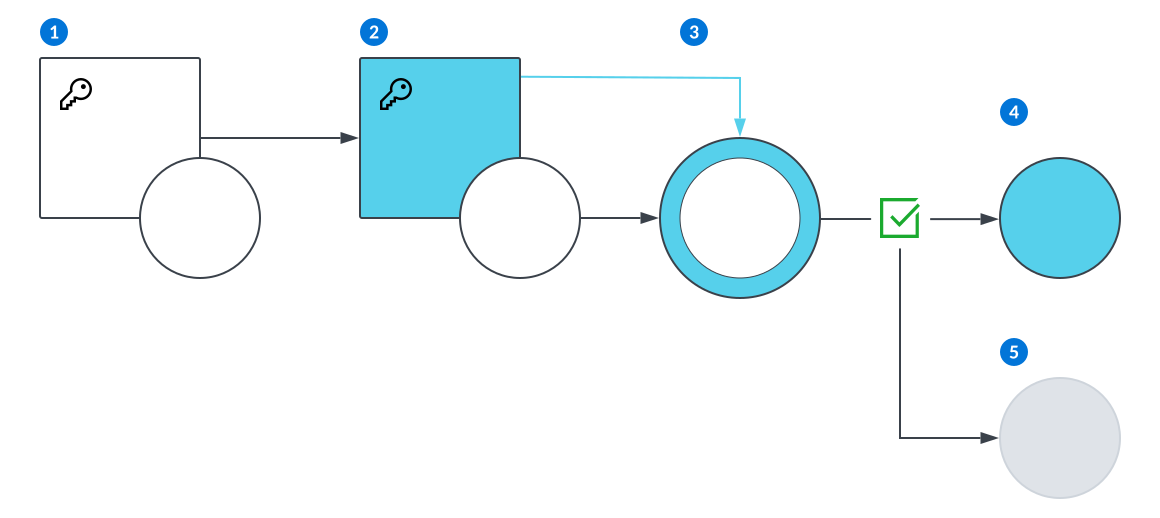
 | Original version of objects. |
|---|---|
 | Updated version of objects. |
| A customized workflow exists over a base workflow. |
| The base workflow is automatically updated when a new version of the base workflow is released. The custom workflow does not receive any updates and remains the same as it was before. The Customization Status field shows an Update Available status. |
| You create a draft merge copy of the workflow to see how your current customization is merged with the new base version. |
| You accept the draft merge workflow by marking it as your In-Active workflow which causes the older version to be archived. |
| Archived version of object. |
To configure your workflow update, see the Configure customized workflow updates topic.
Configure customized workflow updates
Configure a customized workflow update in the Workflow Builder application when the Customization Status field indicates the Base version of the workflow has been updated.
Workflow Builder
In the Workflow Builder application, you must:
- Select the Update row action on the custom workflow you want to merge with the newest base version. This creates a copy of the original workflow which is used to contain a drafted merge of the customized workflow and the newest base version.
- Refresh the Workflow Builder application list form to see the copy of the custom workflow next to the custom workflow. The custom workflow retains its name while the copy is named
<custom workflow name>UpdateInProgress. - Open the
<custom workflow name>UpdateInProgressworkflow to review the changes made to the custom workflow when it was merged with the newest base version. - Select the Mark As Active row action if you are satisfied with the changes made in the draft merge workflow. This archives the original customized definition with the name
<custom workflow name><current date>. This allows you to revert back to the old version of the customized workflow if you discover something wrong with the merge. You can delete the archive once you feel it is no longer necessary. - If the merged workflow does not meet your requirements, you can delete it and make changes in the original custom workflow before attempting another merge. You can also create a new custom workflow over the newest base version and recreate the customizations you had before.
The <custom workflow name>UpdateInProgress workflow name automatically changes to match the name of the base version it is customized off of and the definition changes to a Current status. This workflow is then moved into Active.
Subflows
Use subflows to add additional transitions, states, and approvals into existing workflow definitions. You cannot delete existing states, state types, or transitions.
A subflow definition consists of the transitions that you define to support your business processes, and where those transitions are configured to take effect within the parent workflow. The parent workflow can be a standard workflow definition, or another subflow.
For example, a parent workflow definition could have the following transitions configured:
| Workflow Type | Transition Trigger | From State | From State Type | To State | To State Type | Allow Subflows |
|---|---|---|---|---|---|---|
| Supplier Invoice | Manual Transition | In Progress | Initial | Ready to Reconcile | Active |  |
| Supplier Invoice | Auto Transition | Ready to Reconcile | Active | Reconciled | Closed | |
| Supplier Invoice | Auto Transition | Ready to Reconcile | Active | Error | Active | |
| Supplier Invoice | Manual Transition | Error | Active | Ready to Reconcile | Active |
You could create a subflow definition which has the following transition configured:
| Transition Trigger | From State | From State Type | To State | To State Type | Allow Subflows |
|---|---|---|---|---|---|
| Manual Transition | Review | Active | Reviewed | Exit Subflow |
The subflow definition can use different combinations of fields on the Subflow Configuration page to attach the subflow to different places in the parent workflow.
| If you want your subflow attached to... | Use the fields... | Result |
|---|---|---|
| All transitions in the parent definition that match the To State and To State Type designated, regardless of the From State and From State Type. A parent workflow definition may have multiple transitions with different From State and State Types and the same To State and Type. | SubflowParentStates.SubflowParentState: Ready to Reconcile SubflowParentStates.SubflowParentStateType: Active | The subflow manual transition from Review to Reviewed is attached between In Progress and Ready to Reconcile, and between Error and Ready to Reconcile. |
| One transition in the parent definition that matches the From State and State Type, and the To State and State Type. A parent workflow can only have one transition that has the same From State and State Type, and To State and State Type. | SubflowParentStates.SubflowParentFromState: In Progress SubflowParentStates.SubflowParentFromStateType: Initial Parent To State: Ready to Reconcile SubflowParentStates.SubflowParentStateType: Active | The subflow manual transition from Review to Reviewed is attached between the In Progress and Ready to Reconcile statuses. |
| Any transition in the parent definition that matches the To State, To State Type, and Workflow Type. A parent workflow can have different Workflow Types that further define the records, such as Supplier Invoice and Supplier Credits. A parent workflow definition may have multiple transitions with different From State and State Types, but the same To State, Type and Workflow Type. | SubflowParentStates.SubflowParentState: Ready to Reconcile SubflowParentStates.SubflowParentStateType: Active SubflowParentStates.SubflowParentWorkflowType: Supplier Invoice | The subflow manual transition from Review to Reviewed is attached between In Progress and Ready to Reconcile, and between Error and Ready to Reconcile, for any records of type Supplier Invoice. |
| One transition in the parent definition that matches the From State and State Type, To State and State Type, and the Workflow Type. A parent workflow can only have one transition that has the same From State and State Types, To State and State Types, and Workflow Type. | SubflowParentStates.SubflowParentState: In Progress SubflowParentStates.SubflowParentStateType: Initial SubflowParentStates.SubflowParentFromState: Ready to Reconcile SubflowParentStates.SubflowParentFromStateType: Active SubflowParentStates.SubflowParentWorkflowType: Supplier Invoice | The subflow manual transition from Review to Reviewed is attached between In Progress and Ready to Reconcile, for records of type Supplier Invoice. |
Subflow configuration
Configure subflows in the Workflow Builder application. Subflow definitions enable you to add additional transitions, states, and approvals into an existing workflow definition.
Configure the subflow
Open the Workflow Builder application from the Navigation Menu or within the Developer Studio. Identify the workflow definition where you want to add a subflow. To add a subflow definition, the workflow transition must have the Allow Subflows checkbox selected.
Create a new record in the Workflow Builder and select Subflow Definition. Then:
- Enter the parent workflow definition's name.
- On the Subflow Configuration page, configure your subflow. You must have the To State and From State of the transition from the parent workflow which you want to insert your subflow definition between.
- On the Transitions page, add detail lines for the transitions you want included in the subflow.
- Ensure one detail line uses the
Exit SubflowTo State Type. Records never exist in this state type, but it is necessary to include so the system know when the record should exit the subflow and continue in the base workflow definition transition path.
- Ensure one detail line uses the
Enable the subflow definition
Once a subflow definition has been created, it is not active until:
- The parent workflow definition has been customized by selecting the Customize row action.
- The subflow definition has been marked as Active. This can be done during subflow configuration. If the subflow definition was delivered, you must customize the subflow definition and select the
Activecheckbox.
Control which records use subflow
To control which records in an application use the subflow definition, you can configure a decision definition in the Decision Builder application. Then, specify that decision definition in the Decision field of the subflow definition.
For example, the Expense Reports application has a workflow definition enabled. If you wanted to add an approval to the workflow, you could create a subflow definition with an approval in it. If you wanted to specify that only expenses which exceed a certain dollar amount require the approval, you would create a decision definition which specifies the criteria for a record requiring the subflow be enabled.
Learn more in Decisions.
Workflow conversion with data transforms
Workflow conversions enable you to update, add, or remove workflows in applications through use of data transform logic blocks.
Use workflow conversions to:
- Add a workflow definition to tables with existing business data.
- Convert the workflow type on a set of records based on filter criteria you provide. This makes workflow changes backwards compatible.
- Update the workflow state of existing business records to another state and state type.
Data transform logic blocks update table records so they can operate with a changed application. Learn more in Data transforms.
Within a data transform, there are multiple ways to build a workflow conversion, such as:
Update Workflow action—Allows you to set workflow state and workflow state type on a set of records defined in the Fetch Record action. Use this action when you need to change existing workflow on a set of records to a new state or state type. This action is the preferred approach for workflow conversions since the system reevaluates the workflow type of records, including any workflow types added by partners or customers in downstream development. This action is only intended for workflows without subflows enabled. Learn more in [link: 'UpdateWorkflowAction'].
Bulk Update action—Allows you to set workflow state, workflow state type, and workflow type on a set of records defined in the Bulk Update action. This is helpful when you want new workflow on a table that already has data within it. This action should only be used if you are adding or removing workflow from a table. This includes converting a Header Detail workflow definition to separate Header and Detail workflow definitions. Learn more in Bulk Update action.
For configuration information, see Data transform configuration for application developers.
Data transform configuration for application developers
Application developers configure data transforms using the Logic Block Builder application, Data Transform Definitions application, temporary tenant applications, and Data Transform Execution Plan application to update business data so that the data can operate with a changed application.
Logic Blocks
In the Logic Block Builder application, create a logic block of type Data Transform, then:
- Use the Bulk Update action for records to be uniformly altered. It is the most efficient way to alter a collection of records where all the records need to be updated to the same set of values.
- Use an Update Record action when records need to be individually queried and altered. In these cases, the records need to be fetched with an applicable fetch logic block action and then updated.
- The Table Name or Inputs and Outputs are not needed unless the logic block is a child logic block that is called from another data transform logic block that is using a Chunk Fetch.
If you want to log messages during the run of a logic block, in the Set Message action select the message type Data Transform Message. To ensure the user running the data transform is aware of the status of the data transform operation, select either Background Task Progress or Background Task Summary type for the Set Message action.
A Set Message action of type Data Transform Message does not interrupt the processing of subsequent records. Even if an error occurs and the Message Severity is Error, the data transform continues to execute logic actions and any successfully altered records remain when the transform is complete.
To interrupt the processing of the data transform in case of an error and prevent any records from remaining, a Set Message action with message type Alert and Message Severity Error can be used.
For more information see Data transform logic blocks.
Data Transform Definitions
After you have built your data transform logic block, add the logic block record to the Data Transform Definitions application. You must enter your logic block record in the application to run or test the data transform.
In the Data Transform Definitions application, you must:
- Enter the name of the data transform logic block you have created. Only a data transform type logic block can be used in the Data Transform Definitions application.
- Enter the name of the initial data transform in the Dependency field if your data transform is dependent upon another data transform executing first.
- Test your data transform in a personal tenant. You must also test your data transform in the same lifecycle as the lifecycle the data transform logic block is located in.
- Select Test Transform from the row actions menu in the Data Transform Definitions application to initiate your data transform test.
- Add the name of each table modified by the data transform in the Tables Altered section. The table modified by the data transform logic block is automatically populated into this section when the data transform record is saved. However, any other tables modified by the data transform must be manually added this section.
For more information see Data Transform Definitions application.
Temporary tenants applications
Create a temporary tenant to test your data transform.
In either the Temporary Tenants - Test or Temporary Tenants - Server applications, you must:
- Create or import several records to test your data transform if the seed environment specified in the temporary tenant template does not have sufficient data to test the data transform.
- Select Renew in the row actions menu for the personal tent to extend the expiration date two weeks if you need to use the personal tenant beyond the specified expiration date.
- Select Clean in the row actions menu if you want to regenerate the environment as it existed in your personal tenant before you tested your data transform.
Data Transform Execution Plan
Data Transform Definitions application
Use the Data Transform Definitions application to test your data transform logic block. This type of logic block can only be run when connected to a record in the Data Transform Definitions application.
When configuring a data transform to test a data transform logic block, keep in mind the following:
- Data transforms generally run against only one table. However, they can run against more than one table (such as a Header table and then a Detail table), by using loops within the data transform logic block running the transform.
- A data transform cannot be used for table types involving multiple tables such as Join or Header Detail table types.
- Additionally, data transforms cannot modify tables that are used to hold transitory or temporary data. These table types include:
- Work Tables
- Report flat tables
- Cube tables
- Data transforms use only one type of logic block—data transform logic block.
- Each data transform is associated with only one logic block.
- The name of each table modified by the data transform must be added to the Tables Altered section. The table modified by the data transform logic block is automatically populated into this section when the data transform record is saved. However, any other tables modified by the data transform must be manually added this section.
- If a target release is provided in the Release field of the Data Transform application, your data transform runs when a tenant/zone is upgrading to the indicated release. If the field is empty, your transform does not run during an upgrade.
- Leave the Release field empty for data transforms associated with a patch action or with the activation of specializations to Nextworld metadata objects.
- Solution Partners cannot build a data transform over a base object, but they can build a data transform over a specialization that they have built for a base object.
Transform dependencies
A data transform may be dependent upon another data transform to run first. If your data transform is dependent upon another data transform running first, the Dependency field of the application displays the initial data transform.
Test the data transform
Select Test Transform from the row actions menu for the applicable record in the Data Transform application to test your data transform.
Note the following requirements for testing a data transform:
- Test your data transform in your temporary tenant that is populated with the appropriate business data.
- Once your testing is complete and you've determined that the data transform runs as expected, transfer the data transform to the designated testing/QA personnel for inclusion in a data transform execution plan so it can be run in the appropriate environments.
For more information see Data transforms and Data transform logic blocks.
Workflow applications
Approval Definitions application
The Approval Definitions application allows system administrators or integrators to specify who can approve records to transition into different workflow states.
Configure your approval definition with the approvers you want associated with the workflow. Approvers can be a single person, a role, or variable depending on conditions set in either a decision definition or logic block. Approvals are only required on workflow transitions of type Approval Transition which are configured in the workflow definition record.
If the designated approver accepts the approval request, the record moves to the next workflow state. If the approver rejects the request, the record either stays in the same workflow state until any issues are resolved, or it can transition into an alternate workflow state designated in the workflow record. For example, a rejected record could be transitioned to a workflow state such as Pending.
Once a record has been submitted for approval, the system generates and sends a notification or email to each of the designated approvers for the record. The approvers can then view the approval request through the Approval Requests application, or access the record directly.
Number of approvers
You can specify the number of approvers a record needs to transition to either an approved or rejected state. For example, if you have a record that is in an ACTIVE state, you can specify that the state cannot transition to CLOSED until a majority of the configured approvers have approved the record. Alternatively, you could accept the approval decision of the first reviewer and not wait for any additional approvers to review the record. The approvers required are determined by the Approvers Needed field. You can also configure other options such as setting the number of days before a record may be automatically rejected if no approval or rejection is received
Configure approvers
There are several ways to configure approvers, such as:
- Define a fixed list of approvers by adding user names to the Users subtable.
- If you define a fixed list of users, you can use the Backup Approvers field to specify backup approvers should the specified user be unavailable or specify a deactivation delegate who can make approvals if the original user's account has been deactivated. For more information, see Approval backup configuration and Users.
- Define a fixed list of roles by adding them to the Roles subtable. Any user associated with the defined role becomes an approver.
- Specify a logic block that determines the list of approvers in the Logic Block field. The logic block must use the Build Directory Collection action to build the list of approvers.
- Specify a Decision record of type
Approvalthat dynamically determines the list of approvers or an automatic approval based on the fields in the record being approved. For example, you can set match criteria so that if a transaction is below $1,000, then the record is automatically approved. For more information, see Approval Decisions.
Backup approvers
In addition to the primary approvers, you can also have backup approvers. Backup approvers are notified of all approvals and can perform the same functions as the primary users for the approvals. To create a backup approver list, you must:
- Ensure the approvers are included in the Directory table and configured with the directory user link in the Directory User Tenant Setup application.
- In the Approvers section of the Approval Definitions application, in the Users subtable, select the backup approvers table lookup.
- Select the Create button, name your backup approvers list, then add the appropriate user directory records.
If a workflow approval:
- Uses a Decision to specify the approver, you must create the backup approval list then enter the list name next to the approver you want the list applied to in the Group Definitions application.
- Specifies a specific user as the approver, the user is the only one who can designate backup approvers for the transition.
Designated approvers
In addition to primary and backup approvers, you can specify a designated approver who receives approvals when your account is configured with an Out of Office status through the User Profile menu. To configure a delegate approver,
- Select the Configure Out of Office Status button from the Profile tab in the User Profile menu.
- In the Default Delegate field, select the name of your delegate approver.
- In the Approvers section, select the Enable Delegation checkbox.
If the approval request should only go the originally defined approver, do not select the Enable Delegation checkbox.
Reminders
The Reminders section lets you configure how often a notification is sent to an approver for an approval request. For example, if a designated approver does not respond to an approval request within a defined time limit, a reminder notification be sent to the approver. Use this section to control how many reminders are sent, how often, and if any specific event triggers the reminder.
Notifications
Use the Notification Type field to specify how a notification is sent—by system notification, email, or both.
Solution developers
If you are creating applications as part of a solution that will be delivered to other customers and environments, do not create approvals as part of your solution. A workflow with approval requests should not be delivered to the customer as part of the workflow. Approval requests must be configured as part of the customer implementation.
You can use the Notification Definitions application to create a notification that is separate from an approval request. This notification can be configured and delivered with a workflow as long as the notification is tied to a role or group, but not a user or decision. The customer must configure the user list for a notification when the workflow is delivered to them, but the notification roles stay the same.
Backup Approvers Configuration application
Use the Backup Approvers Setup application to designate backup approvers for a workflow approval request. Backup approvals are notified of all approvals and can perform the same function as the users assigned as the primary approvers.
Backup approvers can only be applied against a specified user or an approver designated by a Decision; they cannot be specified for approvers designated by logic blocks or roles.
To create a backup approver list, you must:
- Ensure the approvers are included in the Directory table and configured with the directory user link in the Directory User Tenant Setup application.
- Select the Create button, name your backup approvers list, then add the appropriate user directory records.
Once created, you can reference the backup approvers list in the Approval Definitions application.
If a workflow approval:
- Uses a Decision to specify the approver, you must create the backup approval list then enter the list name next to the approver you want the list applied to in the Group Definitions application.
- Specifies a specific user as the approver, the user is the only one who can designate backup approvers for the transition.
For more information see Approval Definitions application and Approval backup configuration.
Notification Definitions application
Application developers can attach a notification to a workflow to inform specific users about a record transitioning from one state to another.
When configuring a notification definition, keep in mind the following:
- Use the Workflow field to identify the specific workflow to attach the notification definition to.
- The Notification Type can be either
Notification,Email, orNotification and Email. - Use the Days Before Deletion field to set the number of days (this includes weekends and holidays) up to a maximum of 365 days before the notification is automatically deleted. If the field is left empty, no expiration date is attached to the notification.
- Use the fields in the Recipients section to designate who should receive a notification.
Workflow Builder application
Application developers use the Workflow Builder application to configure and apply workflows. Workflows automate the transition of a table record from one state and state type to another. A workflow must be built over a table so that you can build state transitions for the table's records to go through to completion.
Use the header fields to specify the table that the workflow is built over, the list lookups that hold the states and state types for your workflow, and a description of the workflow. Use the application pages to configure the properties of the workflow.
General Configuration
Specify the product family and module. Optionally, indicate whether the workflow should use a NATE container, is an extension, and what its customization properties are.
In the Specification section, write a detailed blueprint for the workflow describing how the workflow should function and why it was created. For more information on writing a helpful specification, see Specifications best practices.
Multi-transition Logic Blocks
Specify any post-transition logic blocks which should run.
Transitions
Configure your workflow transitions. By default, the visual builder is toggled on, but you can turn the toggle off to manually create your transitions.
The diagram below shows the components of the visual builder.
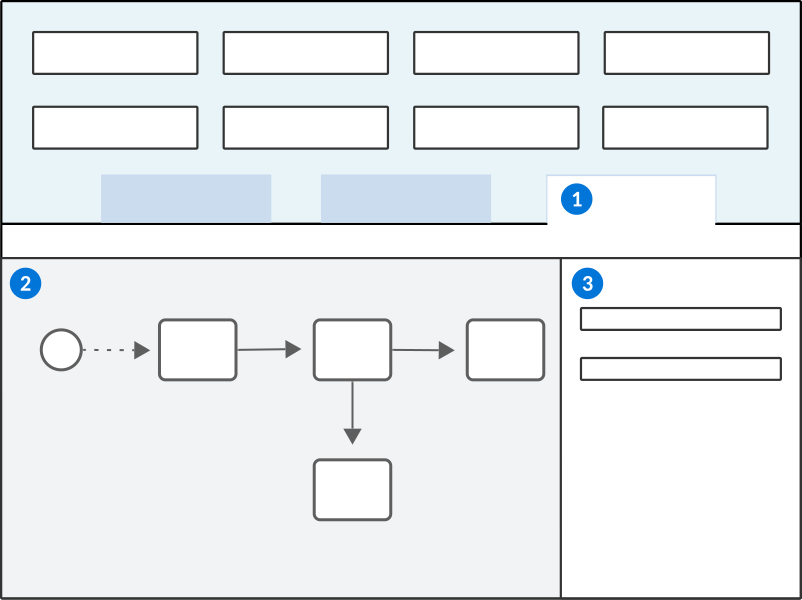
| Transitions page within the Workflow Builder application. |
|---|---|
| Viewer panel—Add your states and transitions with the buttons at the top of the panel. Select components within the Viewer panel to open the properties or view additional details. For example, boxes represent states and state types, while lines which connect the boxes represent transitions. Select a box to view the properties of the state you are configuring, or select a line to view details about the transition. |
| Properties panel—Configure the properties of your states and transitions. |
For more information on creating a workflow transition, see the Configure a workflow definition section.
Workflow Comparison Utility application
Use the Workflow Comparison Utility application to compare current workflows to customized versions of the workflow, versions in other lifecycles, or any combination of these variations.
For example, you can compare a workflow for bank deposits to see what changed between the base version and the customized version, or what changed between the base version and the version in a specified lifecycle.
The Source and Compare To sections of the Workflow Comparison Utility application allow you to specify the workflos you want to compare. After you run the comparison with the Compare Workflows form action, use the Results section to view the differences between them.
Source and Compare To sections
- In the Source section, use the Current Workflows field to identify one or more workflows, separated by commas, to be compared.
- In the Compare To section, use the Workflows to Compare field to identify one or more workflows for comparison. To compare the same workflows as entered in the Source section, but in different lifecycles or customizations, leave the Workflows to Compare field blank and just select either the Use Customized Version checkbox to compare different lifecycles or customizations to the base workflow.
In the Source and Compare To sections use the field or checkbox described below to refine your specified workflows:
- Lifecycle—identifies the lifecycle where the workflows are located. If no lifecycle is specified, the application defaults to the base lifecycle.
- Use Customized Version—select this checkbox to use the customized versions of the specified workflows.
Select the Compare Workflows form action to compare the workflows.
Results section
Changes discovered between workflows when a comparison has been run are displayed in the Workflow Changes field of the Results section on the application. Depending upon which fields changed, the changes may be marked as either as Added, Removed, or Updated.
When the Workflow Comparison Utility application runs, it compares multiple fields in each workflow. If any changes are found to fields that identify a workflow transition, the change is marked as Removed in the Compare To Version and marked as Added in the Source version.
Any other field changes identified during a comparison are considered updates. These are displayed showing both the original value and the updated value, which appears in parentheses. For example, if a sequence number for a workflow changed from 20 to 2, the change would appear as follows: Updated 20(2).
Workflow Orchestration Definitions application
Use the Workflow Orchestration Definitions application to define a workflow orchestration profile that controls the transition of a record in one workflow based on the transition of another workflow.
Workflow orchestration is commonly used for workflows with header and detail tables. The actions in the Orchestrating Table serve as the trigger for actions in the Target Table.
For workflow structures with both a header and a detail table, either table can serve as the Orchestrating Table. A transition in a header table can trigger a transition in the related detail table or conversely a transition in a detail table can trigger a transition in a header table.
Orchestration can take place at various stages of a workflow, not just at the beginning of a process. For example, if a header is in an open active state/type and then is manually moved to canceled, the workflow orchestration for the header table can also move the related detail records to a canceled state.
Development considerations
There are several considerations when you create a workflow orchestration, such as:
- The Precedence field enables you to set the precedence of workflow transitions. Values for this field range from 1 to 5, with lower numbers having a higher precedence value. If the Precedence field is empty, the system assigns a value of 1 to the field. A workflow transition should not have two workflow orchestration configurations with the same precedence value as it is arbitrary which would be chosen in that situation. However, if the workflow orchestration definition is using logic blocks for transitions, the transitions can have the same precedence, but would have different outcomes.
- The Orchestrating Workflow Status subtable allows you to use more complex logic and wildcards. For example, you can configure the application so that whenever the workflow header reaches any canceled state type regardless of what the workflow state is, the associated detail records also transition to canceled.
- The Target Table Sort Order subtable allows you to specify a field whose values control the order in which records for orchestration should be processed.
Orchestration transitions happen in the same transaction boundary as the process which initiated them. For example, you could have a Header table which orchestrates the transition of two Detail tables. When the orchestration happens, if one of the Detail record transitions results in an error and causes the Detail table to return to the previous state, the Header table also is reverted to the previous state.
Workflow Queued Auto Transition Inquiry application
Use the Workflow Queued Auto Transition Inquiry application to review any transition with a status of pending, error, or submitted.
If a workflow transition succeeds, the record is deleted and does not show in this application.
Search for a specific transition record by entering the nwID of the record in the Record Id field. Open the transition record to view information such as why the transition has failed.
Select the Bulk Queue For Reprocessing form action to initiate a bulk resubmission of all failed queued workflow transition records.
Workflow Queued Transition Inquiry application
Use the Workflow Queued Transition Inquiry application to review and monitor the status of workflow auto-transitions and effective date transitions. These trigger types run asynchronously in the background.
Once a workflow transition is initiated, a record is created in the Workflow Queued Transition Inquiry application with information on its status. Open the workflow status record to review additional information, such as trigger time, triggering user, and record Id. If a queued workflow transition has a status of Error, the error message and submission history are shown, as well as the number of automatic re-attempts that occurred.
Learn more in Workflow Home and Workflow transition triggers.
Workflow Restricted Field Definitions application
Use the Workflow Restricted Field Definitions application to define lists of restricted fields for use in workflow security.
Once the workflow restricted field profile is created, you can reference it in the Access Rules subtable in the Workflow Security Definitions application. This prevents users from being able to change the specified fields even if an update is permitted for other fields.
See the Configure workflow security topic for more information.
Workflow Security Definitions application
Application developers and system administrators use the Workflow Security Definitions application to configure workflow security profiles so that a state or state type controls who can access workflow attributes.
You can create access rules in a workflow security profile to:
- Control who can read, update, delete, and insert actions in a workflow
- Define restricted field profiles created in the Workflow Restricted Field Definitions application that restrict or grant access to certain fields in a workflow
For more information on workflow security, see the Workflow security topic.
Workflow Type Definitions application
Application developers use the Workflow Type Definitions application to configure workflow types, and the criteria for the type.
Use this application to define different workflow types. A workflow type must be associated with a workflow, table, and family. Workflow types are used in workflows to specify different transitions for records that have specific values. That is, use workflow types to create variations of workflows using different field values. The workflow type is where you define the criteria for field values in application records. Learn more in Configure a workflow definition.
Use the header fields to define the workflow type name, the workflow the type is associated with, the workflow table, and the family the workflow belongs to. Use the Workflow Type Criteria subtable to define the criteria for the type. Use the Field, Operator, and Value fields to define the criteria for the type.
If a single workflow type detail has more than one value defined for a field, Nextworld strings together those values using OR. This means that the workflow transition is applied if a record has any of those values.
If a workflow type has more than one detail defined, Nextworld strings together the details using AND. This means that the workflow transition is applied only if records match all of the criteria.
Workflow best practices
These best practices ensure that workflow is configured consistently throughout Nextworld.
State and state type
Common state and state types should be used throughout the system to maintain consistency.
Usage of the colors and icons should also be consistent across workflows.
A new workflow state list lookup should be created for each new workflow. This ensures that additional new states can be created without affecting other workflows.
A new workflow state type list lookup should be created for each new workflow. This ensures that additional new state types can be created without affecting other workflows. At a minimum, a new workflow state type list lookup should be created for each product family. This will allow each product family to make changes to the state types without affecting other families.
WorkflowStateTypes list lookup is a common list lookup shared by many workflows. The values in this list lookup should not be changed or extended without permission as it could impact several workflows that are sharing the list lookup.
All workflows should include the standard five state types. At a minimum, a standard list lookup for each family should be created with the standard five state types:
| Lookup Value | Lookup Description | Lookup Icon | Text Color |
|---|---|---|---|
| INIT | Initial | ||
| ACTIVE | Active | ||
| INACTIVE | Inactive | ||
| CLOSED | Closed | ||
| PENDING | Pending |
The Pending state type can only be used for approvals. Pending is used when a workflow transition requires approval and is configured as the To State Type value alongside the To State value.
Workflow steps
The first step of every workflow must be configured with the From State Lookup Value = NEW and From State Type Lookup Value = INIT. However, the description of the NEW workflow state can be changed in the list lookup. For example, in the WorkOrderTransaction workflow the description for the NEW state type is 'Ready to Post'.
| From State | From State Type |
|---|---|
NEW | INIT |
Workflow steps should be sequenced in a logical order. Sequence the steps in increments of 10 or 100 to allow for room to insert additional steps. The sequencing of workflow steps does not affect processing, it is simply used for organization of steps in a logical order.
Transitions
If you use the Auto workflow transition with an Queue Immediately, Process Asynchronously duration, you must define an error state.
Do not have Post-transition Logic Blocks on Manuals. This works great for the delivered base application, but if a customer customizes the workflow and changes the Manual to an Auto, the end user will never see an error thrown by the Post-transition Logic Blocks. The record's workflow will be stuck in an error state. If a logic block on the Manual could fail, that transition needs to be either a Logic Block, or the validation should be moved to the Action Blocks or an Event Definition that has a Workflow State Change. This ensures the workflow of the record will not get stuck.
Minimize transaction processing and keep logic simple in any workflow transitions. Having large amounts of processing within workflow will slow the transition of the record.
Description Field on Transitions
All Logic Block Controlled Transitions should use this field to describe how and where those transitions are invoked. This includes listing the logic blocks that queue the transition. This is important for those that need to extend or customize our workflows. Do not add information to this field that provides no value or is just duplicating obvious information that can be found on the workflow transition. For example, a description is not needed to explain what a manual transition is doing, this just creates more noise. Focus on adding information to the description field that will help those who are extending or customizing the transition.
Approvals
A workflow with approvals should never be shipped because approvals should be entirely customizable for the customer. If there is an approval that you think should be delivered with a workflow, then the approval must be considered absolutely necessary to the workflow's definition. A notification that is separate from an approval can be configured and shipped with a workflow as long as they are tied to a role and not a user. The customer must configure the user list when the workflow is shipped to them, but the shipped roles stay the same.
Always include the SYS - Base User role in the Roles subtable of the approval definition.
Effective Date Transition Trigger Type
Effective date transitions will automatically retry 3 times back to back. However, a manual transition to allow the user to get out of the state where a failed effective date transition ended up should be delivered. For example, if there is an effective date transition from Pending Active to Active, but it fails, the record will stay at Pending Active (or an Error state if the workflow is setup that way). You need to give the end user a way to manually get out of Pending Active to Active or Error to Active (or Pending Active).
Informational status
The purpose of an informational status field is to track an additional status that is a sub-status to the workflow status. This is done with an additional field that is managed by the business logic and is not part of the workflow. It is simply another status field added to the table.
If an informational status field is added to a table that has workflow, the field should be qualified with a descriptive word before the word Status. This is needed so the field will not be confused with the workflow status field. For example, in the Supplier Invoices application, a transaction that can be U, PP, FP, Pend, NA, or PH using the SupplierInvoicePaymentStatus field. The transaction record can be in its final state, PTGL, but multiple payments can be made against the supplier invoice record, so the SupplierInvoicePaymentStatus field is used to convey the status of the payment against the invoice. Using workflow to convey partial states can be difficult to manage and can cause a lot of back and forth in workflow.
Updating existing workflows
Avoid saving workflows in base lifecycles. If a workflow is saved in a base lifecycle, any customized workflows are automatically notified of a change, even if nothing was updated. This causes an update to be required in the customized workflow.
Workflow common pattern best practices
The best practices ensure that common workflow patterns are used throughout Nextworld.
Workflows are categorized as one of the following types for the purpose of standardizing the workflows across Nextworld:
Active/Inactive workflow pattern best practices
These best practices ensure that all workflows used to identify Active and Inactive records follow a consistent workflow pattern.
Tables with Master, or core business, data must use workflow when a status of Active or Inactive must be applied to records. By using workflow, customers can add approvals to master data.
Use state and state type names and their associated icons and colors consistently so that they are that are similar to other Active/Inactive workflows.
The following table demonstrates the necessary state types you must use and the standard states to use alongside the state types in Active/Inactive workflows.
| State type | State |
|---|---|
| NEW | |
| ACTIVE ERR | |
| NON-STANDARD state type | PENDING PENDING ACTIVE |
(reserved for approvals) | |
| INACTIVE | |
Workflow steps delivered cannot be removed by the customer.
- Do not deliver pre-configured approvals.
- Deliver the smallest subset of steps for the business flow to allow customers to add their own steps
Sequence the workflow steps to order the flow according to the normal flow of events. Sequence numbers should initially skip by 100 to accommodate inserting new steps in the future.
Business process workflow pattern best practices
These best practices ensure that all workflows used to manage business processes follow a consistent workflow pattern.
Create new workflow state and state type list lookups for business processes since they are unique to the business process and likely to change over time.
Business process workflows must be unique to each business process, but should still maintain consistency by using common state, state types, icons, and colors.
The following table demonstrates the necessary state types you must use and the standard states to use alongside the state types in business processes workflows.
| State type | State |
|---|---|
| NEW HISTORICAL | |
| OPEN | |
| NON-STANDARD state type | HOLD |
(reserved for approvals) | |
| CLOSED HISTORICAL CANCELED |
Workflow steps delivered cannot be removed by the customer.
- Do not deliver pre-configured approvals.
- Deliver the smallest subset of steps for the business flow to allow customers to add their own steps
Sequence the workflow steps to order the flow according to the normal flow of events. Sequence numbers should initially skip by 100 to accommodate inserting new steps in the future.
Alternate Flows:
Workflow Type is used to transition a record differently than the normal flow based on a one or more values in a record. For example, both a sales order and a sale quote are stored in the SalesOrder table (header/detail). A sales quote has a different business flow than a sales order. The workflow type utilizes the field, SalesOrderType, to configure the different business flow.
- Name the workflow type to represent the intent of the flow. For example, SalesQuoteHeader.
- The name of the workflow should be in upper camel case.
- Do not add Workflow Type in the name.
Chosen by Decision option is used to set the To state to different states depending on various conditions.
- Use this option when the from state can transition to more than one state, based on the decision criteria.
- There is no error state. If an error state is required, use a conditional logic block.
Success/Error
- Use this option to determine if the transaction succeeded or failed. An error must be set in the logic block to set the record to an error state.
- Do not auto transition a error state to a non-error state.
GL transactions workflow pattern best practices
These best practices ensure that all workflows used to process transactions to the General Ledger follow a consistent workflow pattern.
GL Transaction workflow
Transactions writing to the General Ledger must use workflow to post to the GL. For example, a supplier invoice posts to the GL using a workflow transition from Ready to Post to Posted. This allows a customer to add approvals for a supplier invoice prior to posting to the GL.
Use state and state type names and their associated icons and colors consistently so that they are that are similar to other transaction workflows.
Transaction workflows that post to GL must contain a RTP and PTGL states.
The following table demonstrates the necessary state types you must use and the standard states to use alongside the state types in transaction workflows.
| State type | State |
|---|---|
| NEW HIST | |
| RTP NMI ERR | |
| NON-STANDARD state type | |
(reserved for approval) | |
| PTGL HIST CSD |
Transaction Workflow - Immediate Post
Use this pattern when the transaction should be submitted for processing immediately. For example, WorkOrderTransactions workflow automatically triggers posting a transaction as soon as the record is created.
A transaction that results in an error should be discarded by moving it to DISCARD where it is processed and then DISCARDED.
Historical transactions are moved to HISTORY/Closed without processing the transaction.
The following table demonstrates the necessary state types you must use and the standard states to use alongside the state types in immediate post transaction workflows.
| State type | State |
|---|---|
| NEW HISTORY | |
| ERROR DISCARD | |
| NON-STANDARD state type | |
(reserved for approvals) | |
| POSTED HISTORY DISCARDED |
Workflow list lookup best practices
These best practices ensure that all workflows list lookups follow a consistent workflow pattern.
For each workflow, define a unique workflow state list lookup and workflow state type list lookup. Do not share across workflow so customers can customize their workflows independently.
- Add the words 'Workflow Status' to the name of the State list lookup. For example, SalesOrderDetail Workflow Status
- Add the words 'Workflow State Type' to the name of the State Type list lookup. For example, SalesOrderDetailWorkflow State Types
Set both list lookups customization pattern to Allow Additions.
Workflow State list lookup:
- Include New as a standard value in the State list lookup. The user interface defaults to New on create.
Workflow State Type list lookup:
- Include the standard 6 values for a State Type list lookup: Initial, Active, Inactive, Closed, Pending, Exit Subflow.
- Create a unique state type value only if the original six values do not suffice and you need to uniquely identify a state type. For example, in manufacturing, the state type of Release has sufficient meaning to drive logic.
- Do not hard code in a logic block against the State Type values. You can only hard code against the State Type list lookup.
- Exception: In an integration, a logic block can set the value to a state type that is combined with a state type of Initial. This provides the ability to migrate data and set to a Historical/Initial status which auto transitions to a Historical/Closed status.
- Pending is reserved for approvals and cannot be used for any other purpose.
- Exit Subflow is reserved for use in subflows only.
Workflow standard icons and colors
In general, there needs to be consistency in the usage and meaning of an icon in workflow.
As much as possible, use the following set of icons to convey the stated meaning, presented in the standard color.
Never use a spinning icon for a workflow that may persist for a period of time, needs user interaction, or may have long processing time. For example, never use for a Closed state as the transaction may stay at this state indefinitely. However, that type of icon may be permitted if you need a Processing state that does not need user interaction and has a quick processing time.
When selecting the color be aware of when to use a spectrum color versus a semantic color. Semantic colors should be used if you want the color to show meaning and hold true to a theme. For example, in some locales the color red means bad or error, but in other places, that color may mean good or success. If your state is truly a bad state, choosing is better than . That means will be colored based on the theme or locale. While using will always be red regardless of the theme or locale. Learn more in Theme color types and Themes best practices.
| Icon | Meaning | Color |
|---|---|---|
| New | ||
| Draft | ||
| Review | ||
| Review | ||
| To Do | ||
| Pending | ||
| Ready (ASAP) | ||
| Ready (conditional move) | ||
| Pending | ||
| Pending Approval | ||
| Active | Automatic | |
| In progress | ||
| Done | Automatic | |
| Closed, Locked | Automatic | |
| Canceled | ||
| Inactive | ||
| History | ||
| Hold | ||
| Past Due | ||
| More Information | ||
| Error | ||
| Priority, Critical | ||
| Discarded |
Best practices for workflow released to production
These best practices ensure that, once a workflow configuration has been released to production, you do not making changes that will be disruptive to customers. Changing workflow configurations may negatively affect current transactions.
Once a workflow has been developed and delivered, it is considered active in a production environment. Customers can customize a workflow and add additional steps, change the type of transition, and add approvals and notifications. When a new release is delivered, customers are not immediately required to merge any workflow changes. They can continue to use the existing customized version, but they cannot make any further changes to the old workflow until they merge.
Do not make the following changes:
- Do not delete workflow states that are included in the workflow.
- Do not delete workflow state types that are included in the workflow.
- Do not delete a workflow transition that would leave existing records stranded at an intermediate step with no path to progress to completion.
- Do not remove a workflow type from the workflow.
- Do not remove a value from a workflow type.
- Do not move from a standard workflow to an orchestrated workflow or vice versa. If this is necessary, approval is needed.
If you replace a logic block that is called in the workflow with a new logic block, ensure the old logic block will still work as it did in a previous release, since the customer is not required to immediately merge the updated workflow.
Considerations:
- Customers may have customized your worfklow.
Backwards compatibility strategy:
- Create a new version of workflow. The new version will apply to new records, but the old records will follow the old workflow. Any logic blocks on the old workflow must continue to work as before.
- Add additional steps if needed to preserve the original flow.