


.svg)


In this section:
- Application monitoring
Conduct application monitoring sessions to collect performance data on the processes built into your business logic. This allows you to troubleshoot issues and optimize your applications.
- Branch lifecycles
Application developers create and modify metadata in branch lifecycles to segregate work until development is complete. Then, the work is reviewed before all the metadata objects in the branch lifecycle are merged into the base lifecycle.
- Data transforms
Application developers use data transforms to update business data so that the data can operate with a changed application. Examples of changes to an application that may require a data transform include adding or removing fields in a table or changing how a value is calculated.
- Data generation process
Application developers use the Data Generator suite of applications to create randomized sets of business data that they can use for testing or demonstrations.
- Decisions
Application developers use the Decision Builder application to configure decisions with conditional rules for what occurs in different processes.
- Notifications
Notifications are automatically sent by the system to alert users when background tasks or processes start or finish. Notifications can be sent internally as a bell message in the Notifications menu, or externally through emails.
- Required fields
Required fields must have a value entered in them before you can save a record. You can make fields required in the Table Definitions application or Application Builder , or conditionally required using the Style Definitions application and Logic Block Builder .
- Troubleshooting: Why can't I change a field value?
This topic reviews reasons why a field may be locked, disabled, or field value changes have not persisted, within an application.
- Record Batch Definitions application
Application developers use the Record Batch Definitions application to define the records and parameters for a batch definition. Batch definitions are similar to a job scheduler which periodically runs on a group of records, except you specify both a time limit and record limit for when the batch should be processed.
- Deprecating and removing delivered metadata
Nextworld application developers and solution development partners that need to remove support for features that they've already delivered to their customers must develop deprecation strategies that consider the impact on their users.
- Metadata translations
If the applications and other metadata you create need to be used in other languages, you're responsible for managing the translations for those objects with the translation workbench applications.
- Metadata sharing
Transfer Customized and Owned metadata objects across tenant environments, or between environments that are running on different versions of the platform.
- Customization Merge Utility application
Internal operations use the Customization Merge Utility application to perform customization merges in internal development environments.
- White Label Definitions application
System administrators use the White Label Definitions application to implement their own brand and logos within the platform.
Application monitoring
Conduct application monitoring sessions to collect performance data on the processes built into your business logic. This allows you to troubleshoot issues and optimize your applications.
Performance data includes the time that a particular activity took to complete and the number of times the activity was executed. An activity is an individual action that occurs automatically as a result of an initial user interaction with an application. Activities can include logic blocks, database transactions, commitments to NATE containers, calls to external endpoints, and more. Collect this performance data and then analyze it in different ways using the Application Monitoring Utility and Application Monitoring Workbench applications.
For example, you could use application monitoring to collect data on all the activities that are triggered when you select a particular form action, including logic blocks, database transactions, and more. You expect the business logic of this action to insert three records into a table. However, when you examine these activities, you might notice that there are actually nine database transactions recorded, including six insert transactions and three delete transactions. Using the information derived from application monitoring, you could examine the transaction boundaries the related logic blocks run in, and make changes to improve the performance of the form action.
In order to make the most out of application monitoring, you should have an understanding of the activities you expect to be collected as your business logic is executed. In addition, application monitoring is best suited for discrete business processes. A single user action can trigger thousands of activities, so you should only monitor a single process at a time. Learn more in Application monitoring best practices.
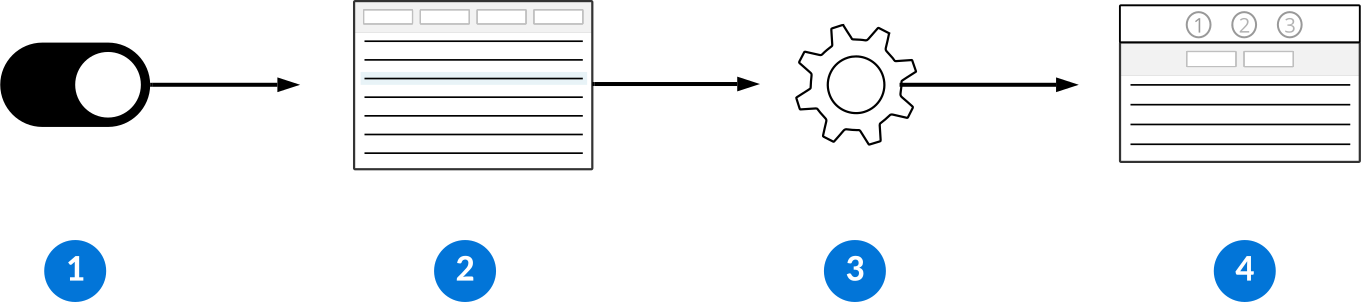
The following diagram shows the process of collecting and analyzing performance data:
 |
|
|---|---|
 | The Application Monitoring Utility application contains all the recent monitoring data for every session started by users in your environment. Filter for your session by name to see the data you need to examine. Each record represents a single activity and the time it took to process. Use the Drill Down row action on an activity record to view all the activities that began between the activity's start time and the end time. For example, you could drill down into a logic block activity and see the database transactions that occurred as a result of the logic block. After you drill down, you can open the detail form of each activity record. Learn more in Application Monitoring Utility application. |
 | To examine a session in more detail, use the Generate Session Analysis row action in the Application Monitoring Utility application on an activity in your session. After generation is complete, you can use the View Session Analysis row action to open the Application Monitoring Workbench application. |
 | Use the Application Monitoring Workbench application to view generated summaries of session data. This is the same performance data collected in the Application Monitoring Utility application, but it's modified and aggregated in different ways, allowing you to analyze logic blocks, SQL statements, table interactions, and more. Learn more in Application Monitoring Workbench application. |
Logic block log messages
In Logic Block Builder, you can use the Log Message logic block action to surface additional information in the application monitoring applications. When you monitor a process that includes a logic block with log messages included, you can view activities of type Log Message, which contain the information defined in the Log Message action.
For example, if you have a logic block that conducts a calculation, you can capture the results of that calculation in a log message. If you monitor the process in which this logic block runs, you can filter for the log message in an application monitoring application. This allows you to verify if the calculation is correct.
In addition, you can use log messages to determine whether certain logic block actions are being performed, and to filter activities down to the segments of your business logic which require attention. Log messages have no impact on performance and are only generated when the logic block runs during an application monitoring session.
Application Monitoring Utility application
The Application Monitoring Utility application contains performance data collected on applications and application components in your environment.
Performance data is made up of individual activities that occur when a user interacts with an application. Each record in the Application Monitoring Utility application represents a single activity and how long it took to complete. It also includes additional information depending on its type. For example, a database transaction activity contains a SQL statement, while a logic block activity includes the name of the logic block.
Activities are collected during monitoring sessions that can be performed by any user in the environment. The Application Monitoring Utility application contains activities from all sessions conducted in the last ten days. Filter for activities that are part of a specific session using the Session Id field. Both activities that occur as a result of a user interaction and those that are part of a background task are collected, even if the background task starts after the monitoring session ends. Learn more about monitoring sessions in Application monitoring.
Use the Drill Down row action to view all the activities that occurred between that activity's start and end time. For example, you can drill into a logic block activity to see the database transactions that took place while the logic block was processing.
Generate a session analysis
Sometimes, you can get the information you need from the Application Monitoring Utility application. However, you can Use the Generate Session Analysis row action on one of the activities in the session to analyze a session in more detail.
After you're notified that the generation is complete, use the View Session Analysis row action to open the Application Monitoring Workbench application. There, you can view the performance data in different ways to analyze logic blocks, SQL statements, table interactions, and more. Learn more in Application Monitoring Workbench application.
Application Monitoring Workbench application
The Application Monitoring Workbench composite application contains performance data that is parsed and summarized in different ways. Application developers analyze this information to optimize the performance of their applications and troubleshoot issues.
For example, if you wanted to find out why it's taking longer than expected to save a record in an application you built, perform a monitoring session and generate a session analysis. You may discover that a logic block triggered when a record is saved fetches the same record multiple times when it only needs to fetch it once. With this information, you can refine the design of your logic block and optimize the performance of your application. Learn more in Application monitoring.
The Application Monitoring Workbench application contains all the session analyses that have been generated in your environment. You must use the Generate Session Analysis row action on a record in the Application Monitoring Utility application to view the associated session in the Application Monitoring Workbench application. After you use the filter header in the Session Summary application to view a single session, the same filter is applied when you move between each application.
The Application Monitoring Workbench application is made up of the following components:
- Session Summary application
Use the Session Summary application step to filter for your application monitoring session across all application steps in the Application Monitoring Workbench application.
- Parsed Session application
Use the Parsed Session application step to view all the activities that occurred during the monitoring session. This application step is most useful for filtering for specific activities.
- Table Summary application
Use the Table Summary application step to view a list of all the tables accessed during the monitoring session based on the type of database transaction activity that occurred. Each record displays the number of queries, updates, inserts, or deletes performed on a specific table.
- SQL Summary application
Use the SQL Summary application step to view each unique database transaction activity that occurred during the monitoring session, the number of times the SQL statement was executed, and the average time it took to process.
- Embeddings SQL Summary application
Use the Embeddings SQL Summary application step within the Application Monitoring Workbench application to examine the SQL statements that pertain to the Nextworld Intelligence semantic search utilities.
- Logic Block Summary application
Use the Logic Block Summary application step to view each unique logic block that processed during the monitoring session, the number of times it was executed, and the average time it took to process.
- Data Import Summary application
Use the Data Import Summary application step within the Application Monitoring Workbench application to review the performance of data import definitions.
- Call Stack application
Use the Call Stack application step to view the logic blocks that ran during your monitoring session in a hierarchy. When evaluating performance, the Call Stack application step is a useful starting point to narrow down the areas of your business logic that could be improved for performance.
Session Summary application
Use the Session Summary application step to filter for your application monitoring session across all application steps in the Application Monitoring Workbench application.
This application step also provides an overview of each of the session analyses generated in your environment. Use the Edit row action on a session to view the total time for all the activities in the session and the total number of activities by activity type.
Parsed Session application
Use the Parsed Session application step to view all the activities that occurred during the monitoring session. This application step is most useful for filtering for specific activities.
The Parsed Session application step displays activities in way a similar to the Application Monitoring Utility application. However, the details of each activity are separated into multiple fields so that the activities can be filtered in additional ways.
Use the Drill Down row action to view all the activities that occurred between that activity's start and end time.
Table Summary application
Use the Table Summary application step to view a list of all the tables accessed during the monitoring session based on the type of database transaction activity that occurred. Each record displays the number of queries, updates, inserts, or deletes performed on a specific table.
Use this application to quickly determine if the number of database transactions performed against a table are what you expect and to view all the tables accessed during the session.
SQL Summary application
Use the SQL Summary application step to view each unique database transaction activity that occurred during the monitoring session, the number of times the SQL statement was executed, and the average time it took to process.
Whereas the Parsed Session application can be filtered to show the total number of SQL statements, the SQL Summary application shows the total number of unique SQL statements.
Use the Explain Analyze row action to generate additional information about the query in the Explain Analyze Result field. For example, you can use this row action to view additional information about the indexes which were used to execute the query. If you notice that the index is auto-generated, you may be able to improve the performance of queries to the table by adding a new index.
Embeddings SQL Summary application
Use the Embeddings SQL Summary application step within the Application Monitoring Workbench application to examine the SQL statements that pertain to the Nextworld Intelligence semantic search utilities.
Logic Block Summary application
Use the Logic Block Summary application step to view each unique logic block that processed during the monitoring session, the number of times it was executed, and the average time it took to process.
Data Import Summary application
Use the Data Import Summary application step within the Application Monitoring Workbench application to review the performance of data import definitions.
For each run of a data import definition that you capture with application monitoring, the Data Import Summary application step displays two records that summarize the import. One record summarizes the processing activities for the import, and the other displays the activities resulting from the records being inserted into the tables. You can see how many records were imported, how long they took to process, and the average time to process and insert each record.
Call Stack application
Use the Call Stack application step to view the logic blocks that ran during your monitoring session in a hierarchy. When evaluating performance, the Call Stack application step is a useful starting point to narrow down the areas of your business logic that could be improved for performance.
The list form includes all parent logic blocks that were triggered as a direct result of a user interaction with the application as well as any background task logic blocks. These logic blocks represent distinct processes that may have happened simultaneously. Open the detail form to view all the logic blocks that were called by the parent logic block and its children. Expand the nodes manually, or use the Expand Node's Children row action to see all the logic blocks and their place in the process.
Use the Drill Down row action to view all the activities that occurred between that activity's start and end time. When you drill down in the Call Stack application, only activities that are a part of that Process are included. This means that drilling into two separate parent logic blocks displays two different sets of activities, even if they occurred simultaneously. The Drill Down - DB and Drill Down - LB row actions function in the same way, but also filter for database transaction or logic block activities, respectively.
Application monitoring best practices
These best practices ensure application monitoring sessions are performed consistently and efficiently throughout Nextworld.
Application monitoring has the potential to expose some sensitive data. Keep this in mind when performing an application monitoring session.
Keep application monitoring sessions as short as possible by only performing a single user action per session. Application monitoring creates large amounts of data, so this prevents unnecessary pressure on the database and ensures that the performance data you collect is useful to analyze.
Repeat monitoring sessions to verify that the performance data are consistent. A single session may take longer than expected due to external variables, but if the same activities are consistently slow across multiple sessions, it can indicate an issue or design flaw.
While you should keep the monitoring sessions themselves as short as possible, you should wait until all background tasks are complete to use the Generate Session Analysis row action in the Application Monitoring Utility application. This ensures that all relevant activities are included in the Application Monitoring Workbench application.
Branch lifecycles
Application developers create and modify metadata in branch lifecycles to segregate work until development is complete. Then, the work is reviewed before all the metadata objects in the branch lifecycle are merged into the base lifecycle.
Branch lifecycles are created and used for discrete development projects. For example, you may create multiple branch lifecycles and switch between them for feature development and bug fixes. After you complete development in a branch lifecycle, you create a merge request. When the request approved, all the metadata objects in the branch lifecycle are merged into the base lifecycle and the branch lifecycle is deactivated. Use the Lifecycle menu in the Main Menu bar to change lifecycles.
Additionally, all changes to metadata objects within a branch lifecycle are tracked, including the users who made those changes.
Use the following applications when working with branch lifecycles:
- Branch Lifecycle Management application—Create new branch lifecycles, check metadata objects into the branch lifecycles, keep track of changes and contributors, and create merge requests.
- Merge Requests application—Make notes, request changes, and approve merge requests.
Branch Lifecycle Management application
Application developers use the Branch Lifecycle Management application to create branch lifecycles, track changes made to metadata within those lifecycles, and create merge requests. This application is available in the Developer Studio.
After you create a branch lifecycle, it's accessible in the Lifecycle menu. You can use the Add to Lifecycle form action to select multiple objects and check them into the branch lifecycle. Alternatively, when you change your current lifecycle to the branch lifecycle, any objects you check out are added to the branch lifecycle. You can view all of the objects in the branch lifecycle on the Changes page.
When development in the branch lifecycle is complete, use the Create Merge Request form action. When the merge request is approved, the objects in the branch lifecycle are merged into the base lifecycle.
After the branch lifecycle is no longer needed, use the Deactivate form action. Only active branch lifecycles are accessible from the Lifecycle menu.
Design page
Use the Design page to describe the project you're developing in this branch lifecycle.
Changes page
Use the Changes page to view all the metadata objects that have been created, modified, or deleted within the branch lifecycle.
Contributors page
Use the Contributors page to view all the users that have modified metadata objects within the branch lifecycle.
You can add a contributor manually, but any user that modifies metadata within the branch lifecycle is automatically added to this page.
Manual Tests page
Use the Manual Tests page to track any manual tests related to the development work in this branch lifecycle.
Test Harness Results page
Use the Test Harness Results page to track any logic block test harness results related to the development work in this branch lifecycle.
Auto Test Results page
Use the Auto Test Results page to track any automated tests related to the development work in this branch lifecycle.
Merge Requests application
Application developers use the Merge Requests application to track, review, and approve changes to objects within a branch lifecycle. The Merge Requests application is accessible from the Navigation Menu, or from within the Developer Studio.
After a merge request is approved, the changes are merged into the base lifecycle. Learn more in Branch lifecycles and Merge request workflow.
In the Header region, select the type. This dictates the reviewers required for your merge request, or allows you to create a merge request for metadata sharing. Learn more in Metadata sharing.
Optionally, add a merge request tag. Tags enable you to group related merge requests. This allows you to populate a Metadata Manifest with all of the merge requests tagged with the same value. Select an existing tag or open the Merge Request Tags application to add a new one.
Metadata Objects page
View the metadata objects that are a part of a merge request and the details of each object.
Reviewers page
View the list of reviewers for this merge request, and the approval status of the merge request.
Comment Summary page
View comments from both authors and reviewers concerning the objects in the merge request.
Notes page
View additional notes or information relevant to the merge request. For example, updates to the design based on reviewer feedback can be included on this page.
Merge request workflow
The workflow for the Merge Requests application controls how metadata objects developed in branch lifecycles, approved, and merged into the base lifecycle.
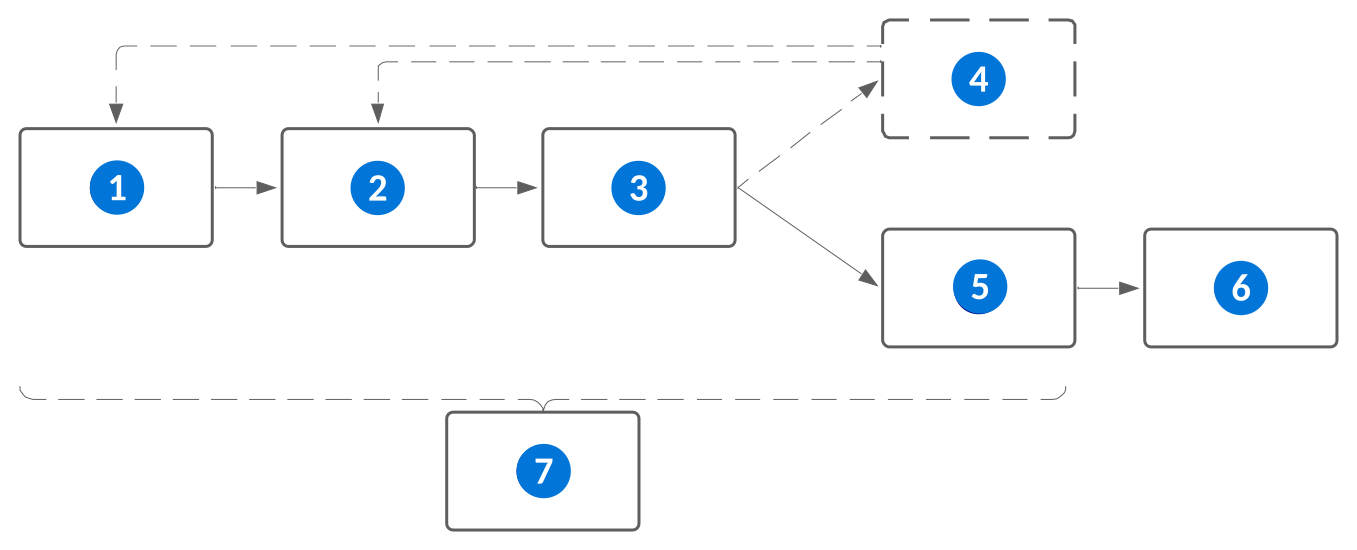
The following diagram represents the different stages of a merge request:
| State | Description | |
|---|---|---|
| Draft | This is the initial default state for a new merge request. While the merge request is in this state:
|
| Ready to Review | The creator of the merge request transitions the merge request to this state to indicate that it is ready for review. |
| Under Review | The reviewers of the merge request transition it to this state after they have started reviewing it. The Approved check box is enabled next to each assigned reviewer in this state. |
| Changes Requested | The reviewers of the merge request transition it to this state if they need the merge request creator to make changes before the merge request can be approved. The author can manually transition from this state back to Draft or Ready to Review. |
 | Approved | This state automatically transitions once all required reviewers have approved the merge request. |
 | Merged | This state automatically transitions once the objects in the merge request have successfully been merged to the base lifecycle. |
 | Closed | If a merge request is no longer needed, you can transition it to this state from any state aside from Merged. Once the merge request is in the Closed state, the status can't be changed. If required, you must create a new merge request. |
Data transforms
Application developers use data transforms to update business data so that the data can operate with a changed application. Examples of changes to an application that may require a data transform include adding or removing fields in a table or changing how a value is calculated.
A data transform usually runs against only one table for each data transformation. Data transforms execute without any of the typical integrity checks that protect data, so use data transforms sparingly. Data transforms do not enforce security and they do not execute any validations or table triggers. If you can change your design or use a logic block to accommodate the changes to your table, you should consider those options before creating a data transform.
A data transform can be used in a development environment to modify data and can be included in a release to modify production data.
Some use cases where data transforms update data in a table include:
- A field in the table needs to be populated or the programming logic won't run correctly.
- A field in the table may need a specific value which not all the records in the table currently display, so the specific value needs to be entered into all the records in the table.
- A table has been split into two different tables, and data needs to be moved from one table to the other table.
To execute a data transform application developers create a data transform type logic block and then configure and test the logic block in the Data Transform Definitions application.
For more information see Data Transform Definitions application, Data transform logic blocks and Temporary tenants.
Data transform best practices
These best practices ensure that data transforms are configured consistently throughout Nextworld.
Use of data transforms should be identified as early in the development process as possible, ideally during the design phase.
Data transforms should run quickly and repeatedly without re-processing all the records again in order to limit environment downtime.
A data transform should be responsible for only updating one table. If one table is dependent on the success of another table’s data transform, this can be handled by configuring the transform’s dependency on the Data Transform Record.
Use a Set Message of type Data Transform Message to communicate critical and summary information only.
Data transform logic block best practice
Bulk Update is the preferred method of transformation, as it grabs all the records that match the filter criteria and updates them with the fields set in the Field Mappings.
There should only be one logic block for a table. If there is an existing data transform for the table you need to convert, add to that logic block instead of creating another one.
Data transform logic blocks cannot be built over Header/Detail tables. If you want to transform a Header/Detail table, build an individual transform for the header, and one for each detail related to that table.
Data transforms development and deployment process
Application developers use a three-stage process for data transformations—develop, test, and deploy.
Here are the stages in the data transform process:
Process | Description |
| Develop and test | An application developer initiates the following steps for a data transformation:
|
| Deploy to a development environment | Deploy the data transform in your development environment. See Data Transform Execution application for more information. |
| Deploy to production environment (Solution Developers and Nextworld base only) | Data transforms move downstream like other metadata objects. Nextworld performs the following actions as part of a new release:
|
Data transform configuration for system administrators
System administrators configure data transform executions in the Data Transform Execution application.
In the Data Transform Execution application, you must:
- Name the execution plan.
- Add all the data transforms to be executed in the execution plan.
- Use the Environments field to specify all the environments the data transforms are designated to execute in.
There are optional configurations, such as:
- To run the data transforms without committing any changes to the database, select the Draft Mode checkbox. This allows you to see if there are any errors in the transformed records.
- To include all direct and indirect dependencies in the execution plan, select the Include Dependencies checkbox. To make it optional to include dependencies in the execution plan, do not select the Include Dependencies checkbox. Only dependencies listed in the execution plan run, and they run in dependent order.
For more information see Data Transform Execution application.
Data Transform Execution application
System administrators use the Data Transform Execution application to execute one or more data transforms.
There are several considerations for configuration, such as:
- To verify that a data transform can complete without errors prior to permanently altering the data, select the Draft Mode checkbox to run the data transforms without committing any changes to the database.
- If all direct and indirect dependencies must be included in the execution plan, select the Include Dependencies checkbox. To make it optional to include dependencies in the execution plan, do not select the Include Dependencies. Dependencies listed in the execution plan run in dependent order.
- During execution, data transforms execute in all environments listed in the Environments field.
Additionally, when a data transform runs to update a business record it changes the Modified Date and Modified By User values of the record. The Modified By User value of the record uses the system user credential.
- If the data transform creates a new record, it doesn’t keep the original Created By User or Created Date values from the original business record.
- If a data transform inserts a record, that record has the system user credential for Created By User and the current date time for Created Date field.
For more information see Data Transform Definitions application.
Temporary tenants
Temporary tenants are isolated environments that are used for manual testing, automated testing, demos, and more. You can create temporary tenants with a temporary tenant template, which specifies the environments containing the metadata and business data you need in each temporary tenant.
Temporary tenants are referred to as tenants because, like your own tenant, they have their own set of users and are isolated from your other environments. After it's created, you can sign in to a temporary tenant just like you sign into any of your other environments. However, you must use the usernames and passwords that are automatically generated when you create the temporary tenant instead of your own username and password that you use to sign into your standard environments.
Temporary tenants are automatically destroyed when they expire, and their data is never migrated to other environments. However, you can extend these expiration dates depending on your needs.
The following diagram shows how your business data and your metadata from different environments is used to create temporary tenants:
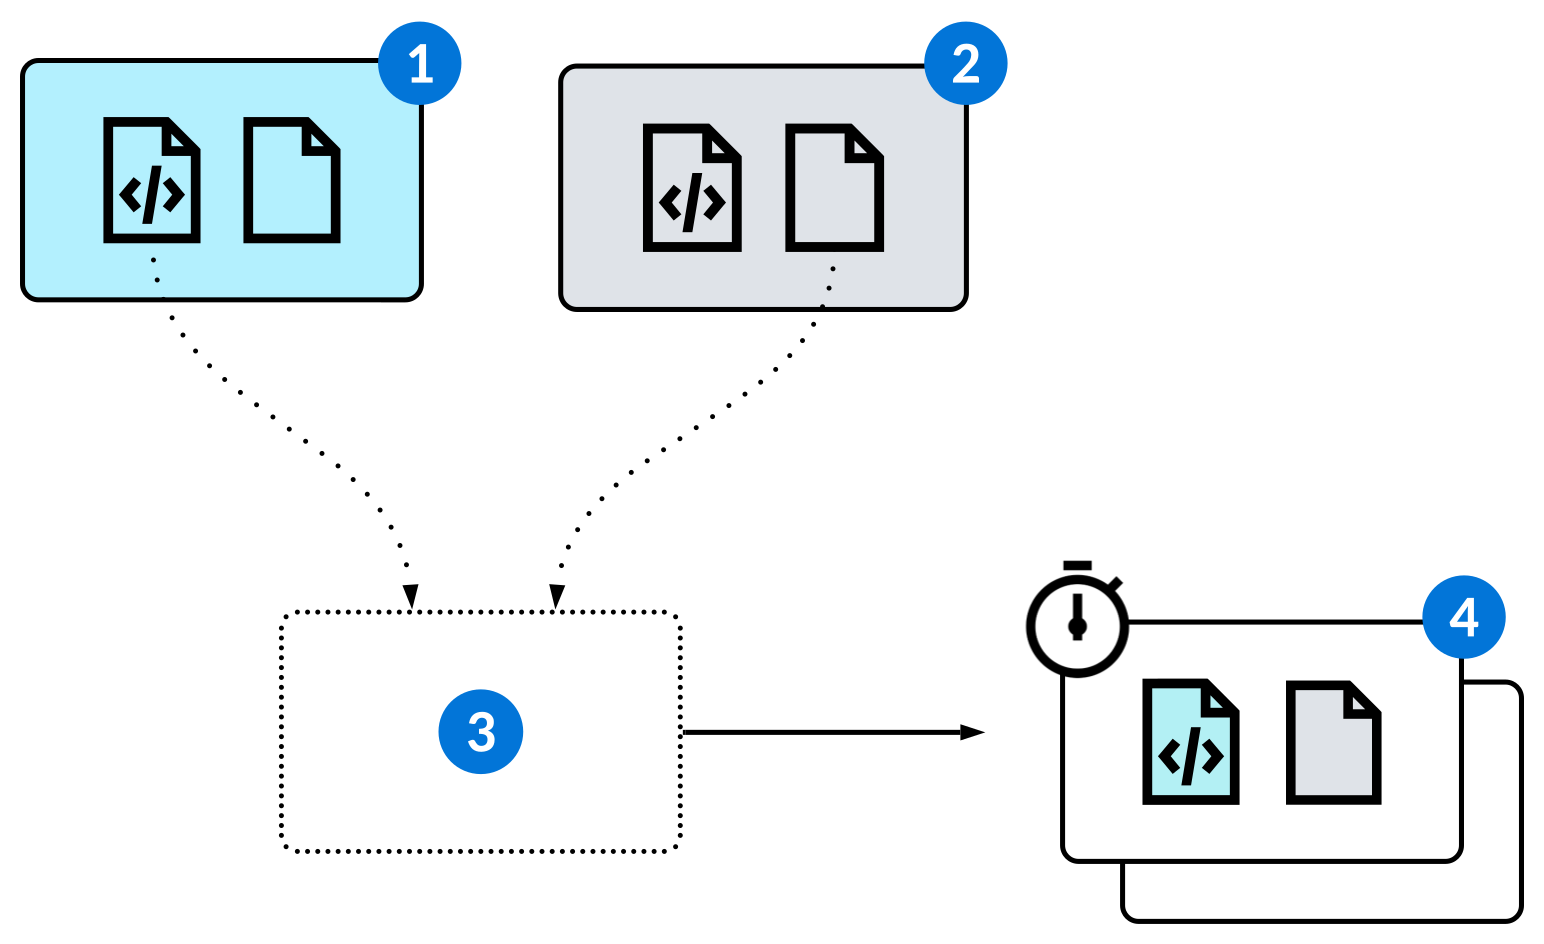
| Base environment | The environment containing the metadata you need in your temporary tenants. For example, if you need a temporary tenant to test the metadata in your development environment, specify that environment as your base environment in the temporary tenant template. |
|---|---|---|
| Seed environment | The environment containing the business data you need in your temporary tenants. For example, if you need a temporary tenant to test the metadata in your development environment, specify the environment where you manage your sample data as your seed environment in the temporary tenant template. |
| Temporary tenant template | Set up temporary tenant templates to quickly create temporary tenants whenever you need them. The temporary tenant template record specifies the base environment and seed environment in which data is copied from to create temporary tenants using the template. You should always create temporary tenant templates in your development environment. There are different applications to create temporary tenant templates, depending on your use case. Learn more in: |
| Temporary tenants | Each temporary tenant is created using a temporary tenant template. When a temporary tenant is created, it's populated with a copy of the business data and metadata from the environments defined in the template. There are different applications to create temporary tenants, depending on your use case. Learn more in: |
Temporary tenant users
When you create a new temporary tenant template, you specify a Base User. This user should have all of the roles needed to perform the necessary tasks in the temporary tenants. Each time a temporary tenant is created using the template, Actual Users with all the roles of the Base User are created. You sign in to the temporary tenant as one of these users.
Manual testing
Each time you perform a manual test, do so in a temporary tenant. This ensures that tests are repeatable and that the actions performed while testing don't affect data in other environments. Learn more in Application testing.
Automated testing
Each time a test action or test suite is submitted, a temporary tenant is created automatically. By default, the temporary tenant is destroyed as soon as the test is complete and results are recorded. However, when submitting a test action, you can specify an existing temporary tenant that is not automatically destroyed when the test is complete.
You should also use a temporary tenant when using the Nextworld recording tool to create test actions. Learn more in Create automated tests with the Nextworld recording tool.
Data transform testing
Use a temporary tenant to test a data transform and make sure it's working as intended before you run it in a shared environment. If the data in your seed environment isn't sufficient for your test, you may need to create or import additional records. Learn more in Data transforms.
Temporary Tenant Template Setup - Demo application
Use the Temporary Tenant Template Setup - Demo application to create templates for temporary tenants for use in demos. After you configure templates, use the Temporary Tenants - Demo application to create isolated environments where you can demo your features without compromising data in other environments.
To create a template, specify the environments in which to pull metadata and business data from in your temporary templates. Specify a Base User that has all the necessary roles to conduct your demonstrations. Learn more in Temporary tenants.
After you create a template, navigate to the Temporary Tenants - Demo application to create temporary tenants using your template. You can also use the Create Tenant action from the Temporary Tenant Template Setup - Demo application. Learn more in Temporary Tenants - Demo application.
Temporary Tenant Template Setup - Server application
Use the Temporary Tenant Template Setup - Server application to create templates for temporary tenants that require advanced configuration. After you configure templates, use the Temporary Tenants - Server application to create isolated environments where you can conduct tests and more without compromising data in other environments.
To create a template, specify the environments in which to pull metadata and business data from in your temporary templates. Learn more in Temporary tenants.
After you create a template, navigate to the Temporary Tenants - Server application to create temporary tenants using your template. You can also use the Create Tenant action from the Temporary Tenant Template Setup - Server application. Learn more in Temporary Tenants - Server application.
Migrations and Users page
On the Migrations and Users page, specify users in the Base Test Users subtable. These users should have all the roles required to complete your tests and other work.
In the Tables to Migrate subtable, include all the tables to migrate from the seed environment when a new temporary tenant is created using the template.
Secondary Zone page
On the Secondary Zone page, you can select an additional seed environment to migrate additional Tables to Migrate sample data from.
Temporary Tenant Template Setup - Test application
Use the Temporary Tenant Template Setup - Test application to create templates for temporary tenants for automated and manual tests. After you configure templates, use the Temporary Tenants - Test application to create isolated environments where you can test your applications without compromising data in other environments.
To create a template, specify the environments in which to pull metadata and business data from in your temporary templates. Specify a Base User that has all the necessary roles to conduct your automated and manual tests. Learn more in Temporary tenants.
In the Tables to Migrate subtable, include all the tables to migrate from the seed environment when a new temporary tenant is created using the template.
After you create a template, navigate to the Temporary Tenants - Test application to create temporary tenants using your template. You can also use the Create Tenant action from the Temporary Tenant Template Setup - Test application. Learn more in Temporary Tenants - Test application.
Temporary Tenants - Demo application
Use the Temporary Tenants - Demo application to create temporary, isolated environments that you can use to demonstrate your features without affecting data in other environments. You create tenants using templates configured in the Temporary Tenant Template Setup - Demo application.
The Temporary Tenants - Demo application includes all the temporary tenants that have been created to demonstrate features. Open a record in the detail view to access the login information to access that tenant.
To create a new temporary tenant, select the Create Tenant form action, then:
- Select a temporary tenant template.
- Optionally, specify a Custom Expiration Date for the tenant, as well as Custom Usernames that you can sign into the tenant with.
- If you have demo data in another lifecycle you want to migrate, use the Lifecycle to Migrate From field on the Advanced page.
Use the Record in New Tab action to sign into the temporary tenant in a new tab and open the recording sidebar. Learn more in Create automated tests with the Nextworld recording tool.
Learn more in Temporary tenants.
Temporary Tenants - Server application
Use the Temporary Tenants - Server application to create temporary, isolated environments that require advanced configuration. In these tenants, you can conduct tests and more without affecting data in other environments. You create tenants using templates configured in the Temporary Tenant Template Setup - Server application.
The Temporary Tenants - Server application includes all the temporary tenants that require advanced configuration. Open a record in the detail view to access the login information to access that tenant.
To create a new temporary tenant, select the Create Tenant form action and select a temporary tenant template. Optionally, you can specify additional Roles for the base user of the tenant.
Use the Record in New Tab action to sign into the temporary tenant in a new tab and open the recording sidebar. Learn more in Create automated tests with the Nextworld recording tool.
Learn more in Temporary tenants.
Temporary Tenants - Test application
Use the Temporary Tenants - Test application to create temporary, isolated environments that you can use for automated and manual tests without affecting data in other environments. You create tenants using templates configured in the Temporary Tenant Template Setup - Test application.
The Temporary Tenants - Test application includes all the temporary tenants that have been created for testing. Open a record in the detail view to access the login information to access that tenant.
To create a new temporary tenant, select the Create Automation Instance form action and select a temporary tenant template. Optionally, you can specify additional Roles for the base user of the tenant. If you need to create an automated test that includes an approval, you can select Approval Test checkbox and specify the Approval Definition when you create the temporary tenant. Learn more in Validate approvals in automated tests.
Use the Record in New Tab action to sign into the temporary tenant in a new tab and open the recording sidebar. Learn more in Create automated tests with the Nextworld recording tool.
Learn more in Temporary tenants.
Data generation process
Application developers use the Data Generator suite of applications to create randomized sets of business data that they can use for testing or demonstrations.
For example, you may need to run an automated test on the business logic of an application that handles a large amount of records. Rather than creating records manually in your seed environment, you can use the data generation applications to define the variability of the records you need.
The diagram below shows the components you need to generate business data:
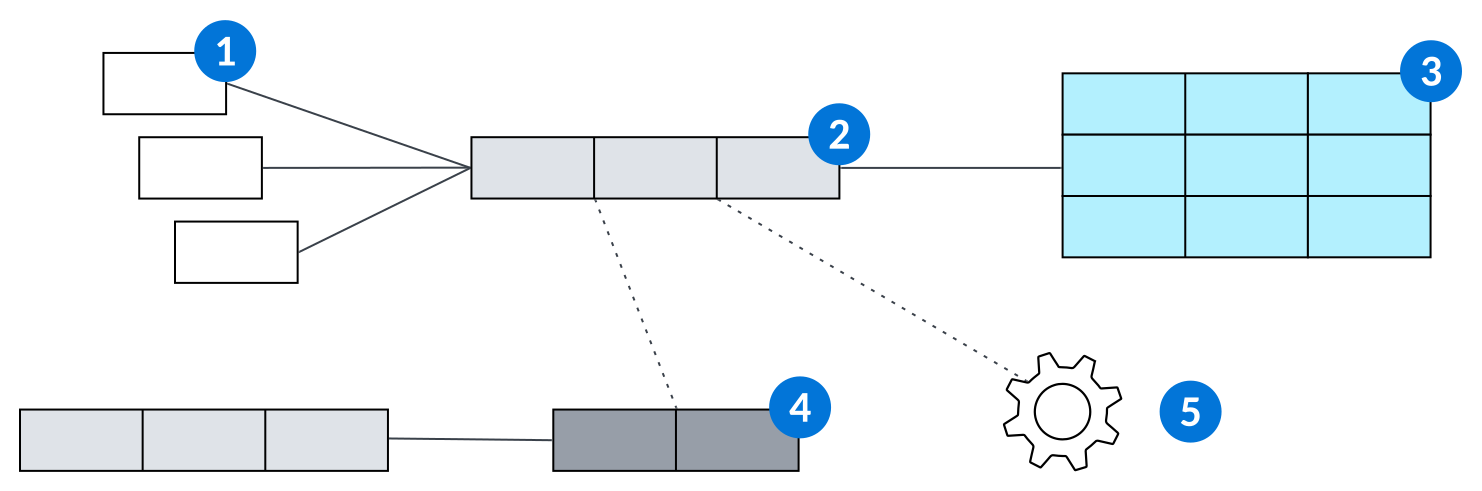
| Field Value Generator application—Define the type of variability and distribution for the values in a field. Depending on the field type, you can set the field value to have a random value within a range, define values with custom distribution, and more. Field value generators can be reused in multiple record generators. Learn more in Field Value Generator application. | |
| Record Generator application—Define a table you need to generate data for. Include all the relevant field value generators for the fields in that table. Record generators can be reused in multiple data generators, and you can create multiple record generators for the same table for additional variability. Learn more in Record Generator application. | |
| Data Generator application—Define different record generators and how many time each should run. You can create up to one million records. Learn more in Data Generator application. | |
| Data Generator Subtable/Detail Table Config application—Optionally, if you need to generate data in subtables or detail tables, create additional record generators for those auxiliary tables. For example, if you needed to generate detail records for a Header table, create a record generator for the header table and for the detail table. In the Data Generator Subtable/Detail Table Config application, define detail table and the variability in the number of detail records you need for each header record. Then, specify this configuration in the record generator for the header record. Each time the header record generator runs, associated detail records are also created. Learn more in Data Generator Subtable/Detail Config application. | |
| Pre Insert Logic Block—Optionally, you can specify a Pre Insert Logic Block on a record generator, which runs after the record is generated, but before it's inserted into the table. For example, you may generate detail records that include randomized debits and credits, but need to ensure that they balance to not cause an error. You can create a logic block that inserts another detail record to balance the total amount before the header record and detail records are inserted. |
Field Value Generator application
Use the Field Value Generator application to define the variability of values created in a field during data generation.
Field value generators are defined in record generators, which are used to create records in bulk using the Data Generator application. Learn more in Data generation process.
There are different types of generation methods you can select depending on the type of field. For example, you could choose Random With Custom Distribution, which allows you to specify values and the percentage chance each value is inserted in the field each time the field value generator runs as part of a record generator.
There are multiple options when generating a field value for a table lookup field:
Table Lookup (Query for existing record)—Specify filters that narrow down the records in the referenced table.Table Lookup (Insert new record)—Specify a record generator that inserts a record into the referenced table. The generated record is then used to determine the table lookup field value.
Record Generator application
Use the Record Generator application to define how and where records are created during data generation.
Record generators are made up of field value generators, and are then defined in the Data Generator application to create records in bulk. Learn more in Data generation process.
To create a record generator, define the table to generate data for and include all the relevant field value generators for the fields in that table. Optionally, you can specify additional record generators for subtables or detail tables. You can also specify a Pre Insert Logic Block to modify the record before it's inserted into the table.
Data Generator Subtable/Detail Config application
Use the Data Generator Subtable/Detail Table Config application to assemble record generators for subtable or detail tables.
After you create record generators for your auxiliary table and define them in this application, specify the data generator subtable/detail table config on the record generator for the primary table. This creates the relationship between the primary record and it's auxiliary records. Learn more in [link: ''].
Use the Number Of Records To Insert and Record Variability subtables to create variability in the number and type of auxiliary records to generate when the primary record generator runs.
Data Generator application
Use the Data Generator application to create randomized sets of data for testing or demonstrations.
Data generators are made up of record generators, which are made up of field value generators. Learn more in Data generation process.
Specify all the record generators and the number of records that each should create. You can generate up to one million records in a single data generation job. Select the DataGeneratorRecordGenerators.DataGenRecordGenDeleteTableData checkbox for each record generator to delete all records from the table before new records are generated and inserted. This also deletes data from all detail tables or subtables that have auxiliary record generators configured for them and linked to the primary record generator.
Use the Execute row action to begin the data generation process. Track the data generation job in the Jobs application.
Decisions
Application developers use the Decision Builder application to configure decisions with conditional rules for what occurs in different processes.
There are several processes that can use decisions, such as:
- Approvals—Determines which approver is required to progress a workflow.
- Messages—Determines which message template should be used.
- Workflow—Determines which transition a workflow should take.
Similar to logic blocks, each decision is built over a table, and has access to the fields stored in the table. These fields can be used as input fields in a decision record. Input fields contain the values you want to use in the decision rules.
Decision rules are a collection of values arranged as if/then rules. If the criteria of a rule is met, then a specific outcome takes place. Decision rules are made up of two key components:
- Rule paths—The criteria that define a certain path that the record can follow. Rules paths are made with the values from the input fields. The values are used in expressions to create the rule concerning them. Rule paths are configured using the fields in the Decision Rules section.
- Actions—The behaviors that take effect when the criteria from the rules have been met. Actions are the outputs of a decision rule execution. The action options that display depend on the decision type. Actions are configured using the Action field.
After you've created a decision, you can reference it in an application record that has the Decision field. Once it is added to an application record, the rules within the decision can be evaluated and executed. Decision rules are evaluated when the record it is associated with is executed, prompting the decision to take one or more actions based on the field values.
Match policy
Every decision needs a match policy to determine the order in which the rules of the decision are checked. The match policy ensures that no overlapping or contradictory rules are satisfied at the same time. The options for the Match Policy field are:
- First—The first satisfied rule in the subtable is followed from top to bottom.
- All—Multiple rules may be satisfied. All satisfied rules are followed, and the actions of all satisfied rules are all executed.
Next Decisions
Use the Next Decision field to define any other decision matrices that should be processed directly after a rule path is followed. When another decision is processed directly after a rule path, then the actions of both the rule and the other decision's decision rules are accumulated and executed together.
When setting up a rule path with a Next Decision, you can optionally change field values in the second decision using change fields. Change fields allow you to choose the field that contains the value you want to change and define then the exact value that you want to use in the Next Decision record. If you use change fields, then the second-run decision has a driver table record with the specified field changed and makes decisions based off of that new value.
Change fields are not saved to the database, they are only used internally while executing a Next Decision.
Approval Decisions
Approval decisions allow you to specify a set of rules that manage approver authority over workflow records.
An approval decision for a record is based on the values of the input fields from the decision record and the values in the approval record. The decision can take the following actions:
Add Approval Group—Add a user group to the list of approvers for this approval.Add Supervisor—Add the supervisor of the user who requested the approval to the list of approvers.Automatically Approve—Automatically approve the record's workflow transition.
Use the Decision field in an Approval Definitions application record to attach a decision record (from the Decision Builder application) to an approval. When setting up an approval, you can specify a decision record that executes when the approval record is set in motion.
Example
You could create a decision record in the Decision Builder application to specify rules about who must approve purchase orders based on certain values in the purchase order. For example, your company may require these purchase order rules be followed for it to be approved:
- If the user requesting the approval is the CEO, automatically approve the workflow transition.
- If the purchase order type is non-stock, and the requested quantity is less than 10, automatically approve the workflow transition.
- If the purchase order type is non-stock, and the requested quantity is between 10 and 15, add the supervisor of whoever is trying to transition this record to the list of approvers.
- If the purchase order type is non-stock, and the requested quantity is greater than 15, add the user group
Managersto the list of approvers. - In all other cases, add the user group
GeneralApproversto the list of approvers.
To determine the rules you want to create for your decision record, choose the specific system inputs and fields needed in the Inputs section. You can configure this as follows:
| System Input | Input Field 1 | Input Field 2 |
|---|---|---|
User Requesting Approval | ProcurementLineType | PurchasingQuantity |
Next you would use expressions, change values, next decisions, and actions in the Rules section to define the specific rules you want to create. Based on the requirements listed above you would configure the Rules section as follows:
| System Input Expression | Input Field 1 Expression | Input Field 2 Expression | Action | Action Details |
|---|---|---|---|---|
"ceo@nextworld.net" | Automatically Approve | |||
"Non-Stock" | <10 | Automatically Approve | ||
"Non-Stock" | [10..15] | Add Supervisor | ||
"Non-Stock" | >15 | Add Approval Group | Managers | |
Add Approval Group | GeneralApprovers |
Decision rule expressions
When creating a decision, you must define rules that determine the course of action for a record. These rules include expressions, which require syntax and evaluation. This topic explains syntax guidelines for creating expressions within the Decision Builder application.
A decision is made up of one or more decision rules. Decision rules are a collection of values arranged as if/then rules. If the criteria of a rule is met, then a specific outcome takes place.
Each decision rule is composed of the following:
- Input fields values from the input table record. The values of input fields are used in expressions to create the rule which concerns them.
- An expression which contains a set of criteria for the input field's decision. If the criteria in the expression is true, then an action takes place.
- The action that takes place if the expression criteria is matched at run time.
Configuration
Create decision rules in the Rules subtable. There is an expression field for each input field of your decision in the rows of the subtable. By default, there is only an expression field for Input Field 1. You must enter values in Input Field 2, Input Field 3, and Input Field 4 before their corresponding expression fields appear in the subtable.
In Decision Builder expressions, the left-hand side of the expression is implied from the value of the associated input field. For example, instead of an expression being field1 <= 12, the expression is just <= 12. When a decision is run, the input expressions are always evaluated as true or false. If all input expressions in a single rule evaluate as true, then that rule is followed.
Create expressions by clicking into an expression field. This opens a dialog box with different button options available to help you build an expression based on the value of the input field. You can use multiple options to build your if/then rule expression.
The following sections describe the different options you can use to build an expression.
Comparisons
Use simple comparison to compare the value of the input field to a constant or other field value. Create comparisons with the <, >, and = buttons. If you need to determine if the input field value is equal to another constant or field value, only enter the value in the expression. In other words, use the Field or Constant buttons to enter the desired value and not the = button. For example:
| Example expression | Expression true if... |
|---|---|
| "200" | input field value is 200 |
| <100 | input field value is less than 100 |
| <field2 | input field value is less than the value of field2 |
| <=25 | input field value is less than or equal to 25 |
| >15 | input field value is greater than 15 |
| >=50 | input field value is greater than or equal to 50 |
Intervals
Intervals can be used on number type input fields when checking if an input field value is contained within a boundary or lies outside of it. Create intervals with the .. button. You can use parentheses or brackets on your interval to declare whether the boundary value should be included or not. Parentheses and brackets that face each other, such as the ( ) and [ ] buttons, creates an AND scenario in the interval expression. Parentheses and brackets facing away from each other, such as the ) ( and ] [ buttons, creates an OR scenario the interval expression. For example:
| Example expression | Expression is true if... |
|---|---|
| (1..5) | input field value > 1 and input field value < 5 |
| [10..20] | input field value >= 10 and input field value <= 20 |
| )50..100( | input field value < 50 or input field value > 100 |
| ]50..100[ | input field value <= 50 or input field value >= 100 |
| [20..30) | input field value >= 20 and input field value < 30 |
Alternatives
Alternatives in expressions create more options for the expression to be true. Create alternatives in an expression with the , button. The comma creates an OR scenario between two components of an expression. For example:
| Example expression | Expression is true if... |
|---|---|
| 1,5,9 | input field value = 1 or input field value = 5 or field = 9 |
| field2,field3 | input field value equals either the value or field2 or the value of field3 |
| "100","200" | input field value = "value1" or input field value = "value2" |
| 1,[5..10] | input field value = 1 or input field value is within 5 and 10 |
Using functions
Functions are another way to define a rule. The Not, Is Empty, and Exists buttons are the functions currently available in expressions. For example:
| Example expression | Expression is true if... |
|---|---|
| Not(5) | input field value is any number other than 5 |
| Not(field2) | input field value is not equal to the value of field2 |
| IsEmpty(field1) | field1 value is empty or null |
| Exists(field1) | field1 value is not null |
Decision Builder application
Use the Decisions Matrix application to create a basic if/then conditional with resulting sets of actions. It provides a simple way to automate common business processes without needing extensive technical developer experience.
Decisions Matrix application records can either be created by Nextworld developers and shipped with other application metadata, or created directly by customers. For example, a customer may add approvals to a workflow process. The approval may require an if/ then scenario, such as if John Smith is the individual requesting the transaction approval, then automatically approve the transaction.
The records in this application must contain decision rules, which provide a simple, flow-based approach to implementing business logic. Decision rules are a set of actions that are performed when a set of criteria is met. The decision criteria is based on at least one defined input field. The decision actions are the business process paths taken when criteria is met. If there are multiple actions for one set of criteria, they are performed simultaneously and independent of each other when criteria is met. In other words, the actions run at the same time and do not rely on one another for completion.
For example, a decision rule may follow this logic:
| Criteria | Action |
|---|---|
| If the shipped item amount is less than zero... | ...then change the workflow status to Invoiced. |
The decision rule must be configured in the following format:
| Input Field 1 | Input Field 1 Expression | Action | Workflow Transition Key |
|---|---|---|---|
ShippedQuantity | >0 | Invoiced |
Learn more about decision rules and how to configure them in the Decisions section.
Notifications
Notifications are automatically sent by the system to alert users when background tasks or processes start or finish. Notifications can be sent internally as a bell message in the Notifications menu, or externally through emails.
Different types of notifications are organized and sent out within notification channels. All users receive notifications for each notification channel, but you can opt out or change your preferred method of delivery by creating a record for that channel in the Notification Delivery Setting application. For example, if you want to opt out of notifications for workflow approvals, you would create a delivery setting record for the Approvals channel and specify no value for the delivery preference.
By default, bell notifications expire and are removed from the Notifications menu two weeks after they are delivered or after they are read. You can view all received notifications, both read and unread, in the Notification Inbox application. Learn more in Notifications menu.
In order to receive notifications from emails, additional configuration steps are required. Learn more in Messages.
There are several applications used for notifications, including:
- Notification Definitions application
Application developers can attach a notification to a workflow to inform specific users about a record transitioning from one state to another.
- Notification Channel Definitions application
Application developers and service administrators use the Notification Channel Definitions application to define channels where notifications related to specific processes or solutions are sent. Then, users set up a delivery setting for that channel in order to receive those notifications.
- Notification Delivery Settings application
Use the Notification Delivery Settings application to change your preferred method or opt out of receiving notifications from notification channels.
- Notification Inbox application
Use the Notification Inbox application to view records of all read and unread notifications.
Notification Channel Definitions application
Application developers and service administrators use the Notification Channel Definitions application to define channels where notifications related to specific processes or solutions are sent. Then, users set up a delivery setting for that channel in order to receive those notifications.
For example, there are several delivered channel definitions including General, Approvals, and Sales. The General channel is the default channel for all unclassified platform notifications, the Approvals channel is used for all workflow approval notifications, and the Sales channel is used for message events related to sales transactions. By default, all notifications belong to the General notification channel.
In each channel definition you'll configure the default method for notifications, supported methods for notifications, and a unique name for identifying the record. Then, you'll create a notification delivery setting for each user that should be included in the channel notifications. Learn more in Notification Delivery Settings application.
Notification Delivery Settings application
Use the Notification Delivery Settings application to change your preferred method or opt out of receiving notifications from notification channels.
Notification channels are defined in the Notification Channel Definitions application, and contain a default method of notification delivery for all users. Learn more in Notification Channel Definitions application.
To change or opt out of notifications for that channel, create a record in the Notification Delivery Settings application and select a different delivery method or leave the preferred method blank to stop receiving messages.
Notification Inbox application
Use the Notification Inbox application to view records of all read and unread notifications.
Bell notifications can be viewed in the Notification menu, but disappear after two weeks or once they have been read. The Notification Inbox application allows you to view and filter on previously received messages, and can be accessed by selecting the Manage Notifications button in the Notification menu, or by searching for the application in the Navigation menu.
Each record contains information such as the notification channel the message belongs to, the message severity, and a summary of the notification.
Required fields
Required fields must have a value entered in them before you can save a record. You can make fields required in the Table Definitions application or Application Builder, or conditionally required using the Style Definitions application and Logic Block Builder.
Table Definition
You can make a field required at the table level. This ensures the field is required in every application built over that table.
To configure, in the Table Definition record, select the Fields.Required checkbox on any fields that should be required.
Application Builder
You can make a field required at the application level. This ensures the field is required in that particular application, but not over other applications built over the same table.
To configure, in the Application Builder record, on the Detail Form Fields page, select the FieldSelection.ApplicationRequired checkbox for any fields that should be required.
Style Definition and Logic Block Builder
Style definitions configured on fields can be referenced in the Apply Styles action in a logic block. This enables you to change the behavior of a field using conditional logic. For example, you can make one field required if a value is entered in a different field.
To configure, create a new record in the Style Definitions application. Then:
- Select
Fieldin the Type field. - Select the Conditionally Required checkbox.
In the Logic Block Builder, in the Apply Styles action, select the appropriate application and field, then enter the name of your style definition.
Learn more in Style definitions and Apply Styles action.
Troubleshooting: Why can't I change a field value?
This topic reviews reasons why a field may be locked, disabled, or field value changes have not persisted, within an application.
To troubleshoot, review the following locations for existing configurations:
- Logic Block Builder—A logic block may exist which changes the field value back to the original value.
- Table Definitions—The field may be defined as a locked field or work field in the table definition. Learn more in Table Definitions application and Work fields.
- Application Builder—The field may be defined as a locked field in the application definition. Learn more in Application Builder.
- Application Setting Definitions—The field may be defined as a disabled field in the application setting. Learn more in Application settings.
- Restricted Field Definitions—The field may be defined as a restricted field for the specified table. Learn more in Restricted Field Definitions application.
- Workflow—The field may be included in a workflow configuration that locks the field, such as:
- Workflow Type Definitions—The field may be included in workflow type criteria. These fields are locked by default, but can be reevaluated in certain instances. Learn more in Workflow types.
- Workflow Orchestration Definitions—The field may be included in a workflow orchestration definition. These fields are locked. Learn more in Workflow orchestration.
- Workflow Restricted Field Definitions—The field may be defined in a workflow restricted field definition. Learn more in Workflow Restricted Field Definitions application and Create or customize workflow restricted fields.
Record Batch Definitions application
Application developers use the Record Batch Definitions application to define the records and parameters for a batch definition. Batch definitions are similar to a job scheduler which periodically runs on a group of records, except you specify both a time limit and record limit for when the batch should be processed.
To create your batch definition, specify the table and any filter criteria you want used to identify the appropriate records. Define the number of records and maximum time to wait until the batch begins processing, as well as the logic block which should be applied.
For example, you could create a batch definition which filters for records in a table with a status of Ready for Batch Processing. Then, you can specify which logic block should process those records once 1000 records matching the filter criteria exist, or once the maximum time of an hour has elapsed.
Each batch definition also must contain an identifier field on the table. Records included in a batch are assigned the same identifier value which is referenced in the processing logic block.
Once the batch definition is created, system administrators create a record in the Record Batch Setup application to debug, activate, and run the batch definition. Learn more in Record Batch Setup application.
Deprecating and removing delivered metadata
Nextworld application developers and solution development partners that need to remove support for features that they've already delivered to their customers must develop deprecation strategies that consider the impact on their users.
Removing metadata that is being used downstream can have significant impacts on your users. For example, you may need to update a workflow definition and delete a workflow state. However, if you deliver the updated definition and your users have records in the removed workflow state, those records are locked and can no longer be edited, which can be detrimental to their business.
To remove metadata, you must first deprecate it. Deprecation is the process of informing your users that a feature is no longer supported and will be removed in a future release. This is essential to ensure your customers' data remains in a functional state when you delete metadata objects.
The process of removing delivered metadata occurs in the following stages, usually over the course of multiple releases:
| Stage | Release | Description |
|---|---|---|
| 1—Strategy | 1 | In general, you should strive to make sure that the applications you have already delivered work with any new or updated metadata and avoid removing anything you've already delivered. If you do need to remove objects, you must come up with a strategy of doing so that limits the impacts on your users. |
| 2—Deprecation | 1 | After you've determined the metadata you need to remove and determined a strategy for doing so, select Deprecate checkbox on each of the objects. When selected, each object displays a warning message when it's accessed in the Developer Studio. For example, if a logic block has been deprecated, a warning displays when it is opened in Logic Block Builder. Certain metadata objects, such as applications and reports, also display a warning if they are launched. |
| 3—Release notes | 1 or 2 | Using either the Release Note Builder application or an external tool of your choice, write a release note that informs the user that the metadata is no longer supported, and will be removed in a future release. In Release Note Builder, the Note Category should be Deprecation Notification. Do not delete any of the deprecated metadata during this stage in case you need to deliver a patch involving those objects.Sometimes, your users may need to take certain actions over the course of the release to ensure the integrity of their data and applications when you remove the deprecated metadata. For example, they may need to move some records out of a certain workflow state, or create copies of the deprecated metadata objects. If this is the case, you must clearly outline any required steps in the release note, and ensure that the Action Required checkbox on the note is selected. |
| 4—Removal | 2 or 3 | Confirm that your users are no longer using the deprecated objects and that removing those objects will not affect the integrity of their data. After this, you can delete the objects or move them to a product family that is not delivered, such as Playpen. |
Learn more in Best practices for objects released to production.
Metadata translations
If the applications and other metadata you create need to be used in other languages, you're responsible for managing the translations for those objects with the translation workbench applications.
Both customers and Nextworld solution development partners may need to translate their metadata:
- Customers—If you have created your own metadata objects, and some or all of your users need to access them in a different language, you need to translate those objects. For example, you may create a new customer defined attribute (CDA) that's used in multiple financials applications. If you support the Spanish language, your Spanish-speaking users may access those applications in Spanish, but your CDA appears in English until you translate its text-based elements.
- Solution development partners—If you have a customer that needs to use your product in another language, you need to translate all the metadata that's a part of your solution into that language. For example, if you have customers in both Mexico and Germany, you need to translate your applications, documentation, and more into both Spanish and German before you deliver your solution to them.
Translation records and language support
Each metadata object is associated with one or more translation records. Every translation record represents a text-based element of an object for a particular language. For example, each data item may have a Spanish translation record for its Label, Short Label, and Help Text.
In order to translate your metadata into a new language, you must first support that language using the Tenant Environment Setup application. Learn more in Support additional languages on the platform.
When you support a language in your environments, this activates all the translation records associated with the metadata in your environments. The translation records for all Base metadata contain translation values that have already been filled out, so if you change your locale, you can view those objects in that language. However, the translation records for all your Owned metadata are empty by default, so you must provide the translated values.
Translate your metadata
After you've supported the language you need to translate your metadata into, you can populate the translation values for all the applicable translation records. Typically, you export the translation records to a CSV file and hire an external vendor to perform the translations. Then, you can import the records back into the system.
Translation applications
The following applications contain the translation records for the various translatable elements of your metadata:
- Translation Workbench application—Contains translation records for data item labels, field-level help text, application settings, list lookups, the translatable elements of your applications, and more.
- Tenant Core Translation Workbench application—Contains translation records for menu entries, dashboard page titles, dashboard card titles, and Nextworld Help topic titles.
- Authored Content Translation Workbench application—Contains translation records for the written content of Nextworld Help topics.
Considerations
Translation records are tied to each metadata object and move automatically when you migrate metadata. This means that you should always perform translations in your development environment, where the metadata is created.
You should only develop new metadata in English. By default, any new metadata you create is considered the English version, regardless of whether you are using a different locale setting. For example, if you have your locale set to Spanish, and you create a data item with a Label of Temperatura, the label is stored as the English translation record. Instead, you should specify a label of Temperature, and then populate the associated Spanish translation value for the object with Temperatura.
Translations should always be performed by product family.
How to translate your metadata
This topic contains the instructions for translating your metadata into a new language.
Prerequisites
Before you can translate your metadata into another language, you must support that language in your environments. Always perform translations in your development environment where you create your metadata. Learn more in Support additional languages on the platform and Metadata translations.
Procedure
- In the Translation Workbench application, use the Reload Translations form action.
- Specify the language and product family of the metadata objects you are translating.
- In the Lifecycle field, specify your tenant default lifecycle. Your tenant default lifecycle is configured in the Tenant Environment Setup application.
- Select Submit.
- After you recieve a notification that the reload is complete, navigate to the Data Export Definitions application.
- Filter for the data export definition relevant to the metadata you are translating. Use the table below as a reference.
- Use the Copy row action to copy the data export definition.
- In your copied data export definition, on the Filters and Sorts page, in the Filter subtable:
- Update the value for the
TranslationLanguagefield with the language you're translating into. - Update the value for the
SystemGroupfield with the product family of your metadata objects. - Update the value for the
Lifecyclefield with your tenant default lifecycle.
- Update the value for the
- Save the data export definition, and select Run Export.
- After the export is complete, download the CSV file from the attachments folder.
- In the CSV file, update the
TranslationValuecolumn with the correct translations. Often, this can be done by an external translation vendor of your choice. Do not modify any other data in the file. - Navigate to the Data Import Definitions application, and filter for the relevant data import definition using the table below.
- Remove any existing attachments to the record.
- Attach the CSV file you exported to the record, complete with the updated
TranslationValuecolumn. - Save the data import definition, and select Run Import.
Data export and data import definition reference
Refer to the following table to ensure you're selecting the correct data export and import definitions for the metadata you are translating:
| Metadata to translate | Data export definition | Data import definitions | Application to view translation records |
|---|---|---|---|
| Data item labels, field-level help text, application settings, list lookups, and the translatable elements of your applications | TranslationWorkbench | TranslationWorkbenchImport | Translation Workbench application |
| Menu entry titles | MenuTranslationsJoin | TenantCoreTranslationsDataImport | Tenant Core Translation Workbench application |
| Dashboard card titles | CardTranslationsJoin | TenantCoreTranslationsDataImport | Tenant Core Translation Workbench application |
| Dashboard page titles | DashboardPagesTranslationsJoin | TenantCoreTranslationsDataImport | Tenant Core Translation Workbench application |
| Nextworld Help content topic titles | DocAuthoredContentTranslationsJoin | TenantCoreTranslationsDataImport | Tenant Core Translation Workbench application |
| Nextworld Help authored content | DocAuthoredContentTranslationsJoin | DocAuthoredContentTranslationImport | Authored Content Translation Workbench application |
Translation Workbench application
Use the Translation Workbench application to manage the translation records associated with the metadata in your environments. The translation records in this application include data item labels, field-level help text, application settings, list lookups, the translatable elements of your applications, and more.
Each translation record represents a text-based element of a metadata object for a particular language. You can identify the object the translation record is associated with using the Object Source field.
When you make changes to existing metadata, the associated translation records are kept in-sync, and the Source Value of the record is automatically updated with the new value. The Translation Value, however, is not updated. Instead, the Dirty checkbox is selected, indicating that you need to update the Translation Value again with the correct translation.
Translation records for new metadata objects are not created automatically, however. When you create new metadata, use the Reload Translations form action to create these records. Specify the language and product family of the objects you need to create translation records for. In the Lifecycle field, specify your tenant default lifecycle, and then select Submit.
Learn more about translating your metadata in Metadata translations.
Tenant Core Translation Workbench application
Use the Tenant Core Translation Workbench application to manage the translation records associated with the metadata in your environments. The translation records in this application include menu entries, dashboard page titles, dashboard card titles, and Nextworld Help topic titles.
Each translation record represents a text-based element of a metadata object for a particular language. You can identify the object the translation record is associated with using the Base Table and Base Table Field fields.
For example, a record with a Base Table of Menus and a Base Table Field of MenuTitle2 is a translation record for a menu entry title.
When you make changes to existing metadata, the associated translation records are kept in-sync, and the Source Value of the record is automatically updated with the new value. The Translated Value, however, is not updated. Instead, the Dirty checkbox is selected, indicating that you need to update the Translated Value again with the correct translation.
Learn more about translating metadata in Metadata translations. Always follow the instructions listed in How to translate your metadata when you translate.
Metadata sharing
Transfer Customized and Owned metadata objects across tenant environments, or between environments that are running on different versions of the platform.
To move metadata with metadata sharing, use the Metadata Sharing Export Utility application to generate a .zip file containing your metadata, and the Metadata Sharing Import Utility to upload that metadata in a branch lifecycle in different environment. From there, it can be merged to the tenant default lifecycle, or to base. Learn the specific requirements and steps in Metadata sharing configuration.
Considerations
Metadata sharing is an advanced migration tool and should not be used for standard migrations. Customers can learn more about how to migrate their metadata in Move your data between environments. Solution development partners should reference the Deliver your metadata to customers topic.
You cannot use metadata sharing to transfer metadata created in relationship applications, such as Role Hierarchy Definitions or Content Builder.
Metadata Sharing Export Utility application
Use the Metadata Sharing Export Utility application to create bundles of Owned and Customized metadata objects. You can use these bundles to export metadata from one environment and import it into another environment.
Each metadata sharing export record can have multiple bundles configured and saved. Exported bundles are saved as a .zip file on the record, and can be uploaded in a new tenant in the Metadata Sharing Import Utility application. Bundles can contain Owned and Customized objects, but cannot have base objects. If you export a table which contains base objects, the new tenant provides those objects when the table is imported in.
Bundle Creation Entries
Define the objects you want exported in the bundle. Save and create the bundle in order to export the objects.
Bundle Creation Records
View and open previously created bundles.
Metadata Sharing Import Utility application
Use the Metadata Sharing Import Utility application to import customized and owned metadata object bundles which were exported from the Metadata Sharing Export Utility application into different environments.
Bundles are exported and imported as a .zip file, and contain only Owned and Customized objects. Base objects are not imported as part of the bundle.
Once the objects have been uploaded to the application, you can review the Status Message field for conflicts. Once conflicts have been resolved, you can commit the objects to the new tenant.
Files are automatically renamed with the appropriate namespace for the environment.
Learn more in the Metadata sharing topic.
Metadata sharing configuration
Use the Metadata Sharing Export Utility, Metadata Sharing Import Utility, Branch Lifecycle Management, and Merge Requests applications to move metadata between environments using metadata sharing.
Your source environment contains the metadata you need to export. Your target environment is the environment where you need to import the metadata.
Metadata Sharing Export Utility
In the Metadata Sharing Export Utility application, in your source environment, you must:
- On the Bundle Creation Entries page, specify the metadata you want to export. There are multiple ways to include metadata objects in the bundle:
- Add Bundle Creation Entries button—Manually add each individual object you want exported in the bundle. Dependent objects are not automatically included. For example, if you want to export a table, you must specify the table as well as each individual data item.
- Merge Requests—Specify a single merge request to load all of the metadata included in the merge request. The merge request must be in a
Mergedstate. - Branch Lifecycle Import—Specify a single branch lifecycle to load all of the metadata checked into that lifecycle into the bundle.
- Save the record and select the Create Bundle form action.
- Download the attached .zip file from the associated record on the Bundle Creation Records page.
Branch Lifecycle Management
Sign in to your target environment. In the Branch Lifecycle Management application, you must create a new branch lifecycle.
Objects are imported into this branch, where they can then be merged to the Merge Request Target Lifecycle, which is usually the tenant default lifecycle. Solution development partners can merge to the base lifecycle, or a different branch lifecycle of their choosing.
Metadata Sharing Import Utility
In the Metadata Sharing Import Utility application, in your target environment, you must:
- Create a new import record, and specify the branch lifecycle you created in the Import Lifecycle field.
- Enter your tenant default lifecycle in the Merge Request Target Lifecycle field. Your tenant default lifecycle is defined in the Tenant Environment Setup application application.
- Use the Attachments form action to upload the .zip file that you downloaded, and then save the record.
- Select the Extract Bundle form action to load the objects from the attachment into the detail form.
- Review the Status Message field for each object. If any objects have errors, fix them and select the Resolve Bundle form action.
- Select the Commit Bundle form action to import the objects to the environment, in the branch lifecycle you created.
Branch Lifecycle Management
In the Branch Lifecycle Management application, in your target environment you must:
- Use the Lifecycle menu in the Main Menu bar to switch to the branch lifecycle you created.
- Navigate to the branch lifecycle record in the application.
- Select the Create Merge Request form action to navigate to a new record in the Merge Requests application.
Merge Requests
In the Merge Requests application, in your target environment, you must:
- Select
Metadata Sharingin the Type field. - Enter your tenant default lifecycle in the MergeRequestTargetLifecycleLookup_Lifecycle field, and save the record.
- Solution development partners can specify the base lifecycle, or any other branch lifecycle they choose.
- Select the Approve Merge Request form action, and save the record again.
- Select the Validate form action.
- Select the Merge form action to merge the metadata objects into your tenant default lifecycle, making them available to the users in the environment.
Customization Merge Utility application
Internal operations use the Customization Merge Utility application to perform customization merges in internal development environments.
In production environments, customization merges happen automatically when changes are patched. Development environments are not patched, therefore changes to base objects are not automatically merged in tenant environments which have customized those objects.
You can merge a single object or table, or all tables, within one or many environments.
White Label Definitions application
System administrators use the White Label Definitions application to implement their own brand and logos within the platform.
Dictate the company, product, and platform names which you want visible in the UI. Select default themes for both the platform and the sign in screen.
In the Preview section, review the list of required images. Each image has a required file format, naming convention, and size which can be viewed in the field level help of that image.
Once your images are created, upload each image in the Inline Attachment Manager of the record. Validate the uploaded images by comparing them to the existing examples in the Preview section. Once you have completed your review, select the Download Brand button to create a .zip file.
Create a support request with your .zip file attached that requests your white label brand be implemented.