


.svg)

The diagram below shows how records are stored in tables and seen in an application built over the table.
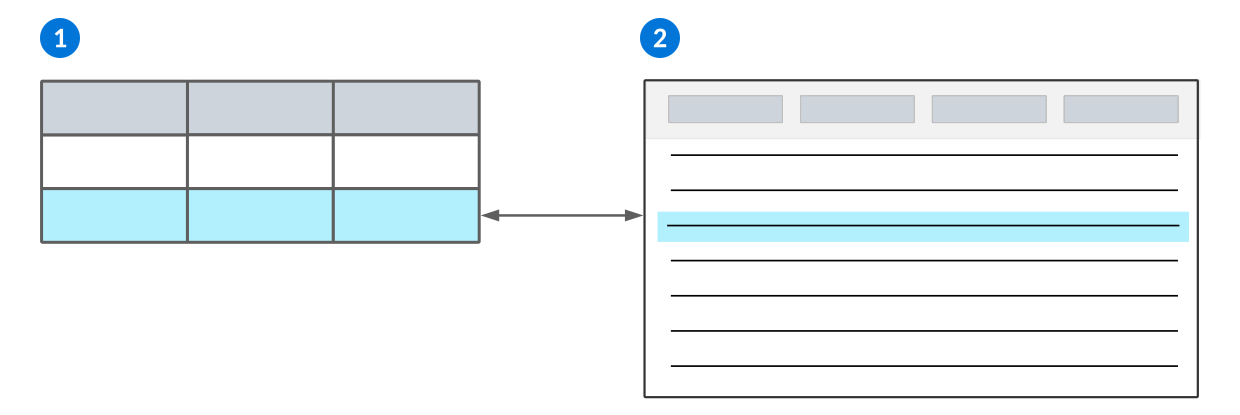
 | Table—Enter fields into the table to create both column headers and detail view items for your application. The table rows become records in your application. |
|---|---|
 | Application in list form—When you add a record in your application, it is saved as a row in your table. |
Tables can include visible data items that appear as fields in applications, as well as hidden data items. Data items that are hidden don't appear in the application, but can be used for logic blocks or other functions that a business user doesn't need to see.
Multiple applications can be built over the same table. All records stored in the table are accessible in every application built over that table.
Every table has a table type, which controls some structure and features options in the table. Different table types are required for different application types. For example, a main table is commonly used with the Standard applications, while module settings applications can only be built over a settings table.
For more on table types, see Table types.
Table types
The type of table you build determines how an application can use the stored information.
Primary table types
| Use type... | If you want to... |
|---|---|
Main | Create a relational table whose unique values and data items create the rows and columns in the table. |
| Settings | Configure settings that apply to all applications in a module. |
| Header Detail | Create a table that either:
|
| Header | Build and configure fields for the header portion of a Header Detail table. |
| Detail | Build and configure fields for the detail portion of a Header Detail table. |
| Join | Create a view that joins one or more tables for use in a logic block, relationship application, standard application, or advance list application. The following relationships are currently supported:
Learn more in Join tables. |
| Sub Subtable Main | Create an abstracted form of a table which is referenced in a single field of an application. This is helpful when you want to provide specific information that goes with a parent record, but don't need all of the information from the referenced table. Subtables can be of type Sub, or type Subtable Main. Learn more in Subtables. |
| View | Create a read-only version of a table that displays a limited set of fields and records for use in reports. Learn more in View tables. |
| Summary | Use a dimensional modeling approach to capture and prepare transactional data from multiple tables. Summary tables are an advanced development feature for use in interactive reports. Learn more in Summary tables. |
Temporary and data structure table types
| Use Type ... | If you want to... |
|---|---|
| Work Table | Define a list of data items to pass data to and from a logic block. Work tables do not store data. Once the work table has been created, write any associated logic blocks over the table. See the Work tables topic. |
| Component | Define certain fields by using additional objects. For example, a Name object contains additional objects such as First Name, Last Name, Suffix, and so on. |
Header Detail table structure
This topic outlines the necessary tables and required steps for building a Header Detail table structure on which you can build a Header Detail application.
Use the following tables to build a Header Detail table structure:
- Header table—The table that contains the fields that make up the header of a header detail application. This is information that is applied to all detail records.
- Detail tables—The table that contains fields that make up the details of the Header Detail application. Use as many Detail tables as necessary to create your Header Detail structure, but you must have at least one Detail table to build this structure.
- Header Detail table—The table you use to bring the Header table and Detail table(s) together.
For example, the Ship Via application is built over a Header Detail table structure. The ShipVia Header Detail table, which the application has been built over, is comprised of the ShipViaHeader Header table and the ShipViaZones and ShipViaRates Detail tables.
Next steps
Once you build the table structure, see the Header Detail application section for more information about how to build and design a Header Detail application over the Header Detail table structure. There is also a standard that all Header Detail table structures should also have an integration table. See the Data import integration configuration section for more information on how to build and design a Header Detail integration application.
Join tables
Use a join table to connect multiple tables that share related data. A join table uses fields from each table to identify overlapping values and connect records based on the overlap. The result is a joined table that can be viewed in a new application.
When creating a join table, select the tables you are joining and the fields from each that you want to connect the tables. The primary table is the base of the join table you are building. Thesecondary tables are the tables that connect to the primary table through the join fields.
Join Fields are the fields that share common values, on which the tables are joined. For example, you could use the field of City Name from the primary table and the field of Birthplace from the secondary table as Join Fields if each has a record for Denver.
Join tables are useful when you want to view related records from multiple tables in one location. For example, the General Ledger application is built over a join table. The primary table shows multiple fields such as the Status, Company, Ledger, Transaction Date, and GL Account. The secondary table shows fields such as the Org Unit, Company Debit, Type, and Transaction Number. The join fields for this table are the Company and Org Unit. Though the fields are from different data items, they have shared records of the same companies. From the join table you are able to view the data from both tables about the company records that they have in common.
Join Cardinality
Join tables must have a join cardinality defined. Join cardinality defines the relationship which exists between the primary table and the secondary tables in your join table. This ensures aggregations are counted accurately.
The types of relationships available for join tables are:
- One-to-Many—The primary table has one record which is related to multiple records in the secondary table. For example, the primary table holds a header record which is related to multiple detail records in the secondary table.
- Many-to-One—The primary table has multiple records which are related to a single record in the secondary table. For example, the primary table has multiple detail records that are related to a single header record on the secondary table.
- One-to-One—The primary table has one record which is related to a single record in the secondary table.
- Many-to-Many—The primary table has multiple records which relate to a single record in the secondary table, and the secondary table has multiple records which are related to a single record in the primary table. This cardinality is not common.
To view a diagram of how join tables work, see the Join table types topic.
To see a theoretical example of how a primary and secondary table are connected in a join table, see the Join table example topic.
Join table types
The following diagram shows how two tables can be joined into either a left outer join table or an inner join table.
When values from the join fields match in both the primary table and secondary tables used in the Join table, those records are connected. How the records are connected depends on the join type you choose for the Join table.
The join types available are:
- Left Outer Join
- Inner Join
The shaded fields from each table represent join fields. Join Fields are the fields that share common values, on which the tables are joined.
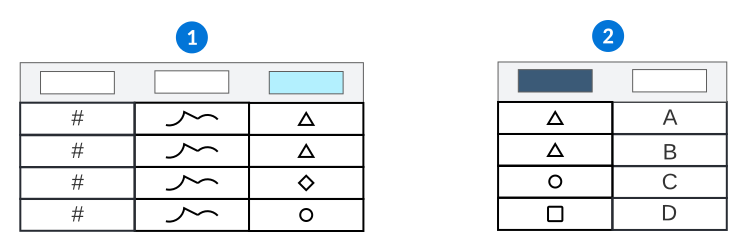
| Primary Table—The table that forms the basis of the Join table you are building. |
|---|---|
| Secondary Table—The table that connects to the primary table in the Join table you are building. Only the records that have a matching field in the join field from the secondary table are included in the Join table. For example, the  is found in the secondary table but not the primary table, therefore it is not included in either an inner or left outer join table. is found in the secondary table but not the primary table, therefore it is not included in either an inner or left outer join table. |
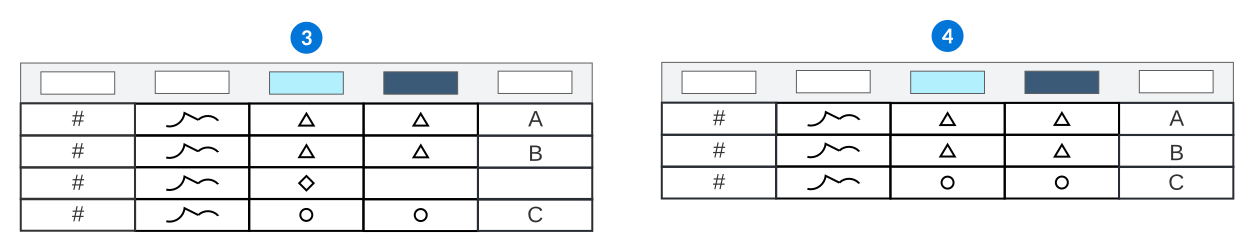
 | Left Outer Join table—All records in the primary table are part of the join table. Records from the primary table that do not have matching data from the secondary table are still shown. The fields where there is no data from the secondary table display as empty. |
 | Inner Join table—Only the records from both the primary and secondary tables that have matching fields in the join fields are included in the Join table. |
Join table configuration
Configure a join table using the Table Definitions application in order to show related records from from multiple tables in one place.
Table Definitions
Once you've selected a Table Type of Join, navigate to the Settings page. There are several fields to consider during configuration, such as:
- Join Type—Select either Left Outer Join or Inner Join.
- JoinFields.TableSchemaForJoins—Define your primary table.
- Secondary Table—Select the Add button for each secondary table you want in the join table.
- Join Fields—Select the Add button for each join field you want in the join table.
- When you define multiple join fields on a inner join table, only the records from the primary and secondary table that match all the join fields criteria are included.
- When you define multiple join fields on a left outer join table, all the primary table records are included, but only records from the secondary table that match the join field criteria are included.
- Join Cardinality—Select the relationship which exists between your primary and secondary tables. This ensures aggregate counts are accurate. See the Join tables topic for more information.
Considerations
There are several things to consider about join tables, such as:
- Only filtered table lookups defined on the primary table are honored in the join table. You cannot configure a filtered table lookup directly on the join table, and any defined on the secondary table are not inherited.
- You cannot define indexes for Join tables. Nextworld determines the best index to use based on the primary and secondary tables.
- Join tables are view-only. You cannot add, delete, or edit records from a join table.
Join table example
The following is a hypothetical example of how two tables can be joined into either an inner join or left outer join table.
The following tables represent the two tables that are being joined through a Join table:
Table A (primary)
| Product | Quantity |
|---|---|
| Shirts | 100 |
| Pants | 75 |
| Shoes | 60 |
| Socks | 120 |
| Dresses | 50 |
Table B (secondary)
| Product | Price |
|---|---|
| Shirts | $15 |
| Pants | $30 |
| Dresses | $60 |
| Hats | $10 |
If you join these two tables with Product as a join field, the records that the Join table contains differ depending on the join type you choose:
Left Outer Join table
| Product | Quantity | Price |
|---|---|---|
| Shirts | 100 | $15 |
| Pants | 75 | $30 |
| Shoes | 60 | NULL |
| Socks | 120 | NULL |
| Dresses | 50 | $60 |
Inner Join table
| Product | Quantity | Price |
|---|---|---|
| Shirts | 100 | $15 |
| Pants | 75 | $30 |
| Dresses | 50 | $60 |
Any records found on the secondary table that don't match the primary table records are never included. For example, the secondary table in this example has a record for hats, but the primary table does not. Hats are therefore not included on either an inner or outer join table.
To view a diagram of how the inner and outer join tables work, see the Join table types topic.
Subtables
Subtables are a type of table that you can add as a field in the detail form of an application. They appear as lists embedded inside the record detail form. Subtables collect information related to a specific record.
For example, each contact in the directory application can have multiple phone numbers associated with it. These phone numbers are stored in a subtable that has fields for phone number and type. Within the detail form of the contact record, a user can add multiple phone numbers and specify whether each is a mobile, home, or work number.
Subtables can be built from a table of type Sub, or type Subtable Main.
Once you have configured your subtable, you must create a Subtable data item with the same name as the subtable. This allows you to add the data item into an application in order to show the subtable. See the Subtable configuration topic for more information.
Subtables have development considerations as outlined in the subheadings below.
| Subtable Main | Sub | |
|---|---|---|
| Can you fetch records? | Yes | No. You must loop through the subtable records to find the record you want. |
| Can you index? | Yes | No |
| Does security apply? | Yes | No. This can be helpful if you want a simplified security model and don't need a full table representation. |
| Can you access the subtable records outside of the parent record? | Yes, you can access the reference table to read or modify the subtable records. To modify the subtable with logic blocks, use the subtable specific actions. | No. |
Only subtables of type Sub can be used in Work tables.
View tables
View tables provide business users with a simplified data model of their business which can be used in reports. View tables are read-only tables built over another table, but limited to only the fields relevant for reporting.
Apply filters and sorts so that only the records from the underlying table that meet your criteria exist in the View table.
For example, the Directory table is made up of hundreds of data items. It contains information about all internal and external contacts, such as customers, suppliers, and employees. If a business user needs to create a quick report about their suppliers by selecting the Directory table as their data source, they see fields like EmployeeFunction and BirthDate, which aren't relevant to their report. Instead, they can select the SupplierDirectoryView table, which contains data about their suppliers only.
Related View
Narrow the returned fields from a table lookup in your View table with related views. A related view is a View table built over the table which the table lookup points to.
A related view can be defined on the Table Lookup data item, or from the Field Selections subtable in the View table definition. If the related view is defined on the View table definition, that related view is always used. If no related view is defined on the table, but one is defined on the data item, that related view is used. If a related view is not defined on either the data item or the table definitions, only the primary, secondary, and tertiary search fields defined on the data item are available.
For example, the Expense Reports table could include a table lookup for Org Unit in the Directory table. By default, the table lookup would include the primary, secondary, and tertiary search fields for Org Unit which are the Name, Numeric Code, and Nickname. For expense reports, you may want to include other information that is relevant to the Org Unit, such as the Org Unit Type, and omit details, such as the Nickname. To accomplish this, you can build a view table over the Directory table that specifies the fields you want included, and then reference it in the Related View field in either the table lookup data item configuration, or in the view table definition for the expense report.
For naming conventions and standards, see the Tables best practices topic.
Work tables
Use work tables to define a list of data items to pass information to and from a logic block. Work tables do not store data, but can be used to hold pending records for use with logic blocks.
There are several use cases for work tables, including:
- Hold pending records which can then be inserted or deleted through use of action blocks or logic blocks. These records are often used to update other tables.
- Provide values for fields in an application. Logic blocks are called to read the values in those fields.
- Call a logic block for a reusable purpose, such as retrieving the dates for a given fiscal year.
Often, mini apps are built over these tables to provide further user interactions.
Pending Records
You can use action blocks or logic blocks to insert or delete pending records. Once pending records are present in a work table, there must be a configuration to remove them, otherwise you receive an error.
Indexes
An index is a field or list of fields designed to improve the performance of queries. This is done through use of filters, logic block fetches, or use of a specific row without reading the entire table. A unique index ensures that no two rows in the table contain identical values to maintain data integrity.
Indexes are defined by creating an index ID and then adding data items to the index ID. More than one data item can be associated with an Index ID.
Index ID
There are several ways to characterize an index:
- Unique index—These do not allow fields with duplicate values in records. Configure fields as unique creates a primary key for your table's records.
For example, the application Chart of Accounts allows you to view, edit and create general ledger accounts. The application's table has a unique index which contains the field Account Number. If a user tries to create a record for an account number which already exists, the unique index prevents a duplicate record from being created by generating an error when you try to save.
Subtables of type Main can use unique indexes, but type Sub cannot. In order to create unique indexes which are unique to the parent record, but not globally unique, specify the nwHeaderId.
Primary index —A primary sort needs to be added in the applications built over the table, or in the logic blocks associated with them. Learn more in the Sort configuration topic.
Index Fields and Sub Fields
Identify one or more fields from the Fields page to associate to an index. The Sort Order determines whether the field will sort ascending or descending. By default, the index sorts in ascending order. You can also specify sub fields for fields that are Component data items. This means the index is associated with a specific component of the field, such as the currency code from a currency field, rather than the entire object.
In order for a user to use wildcard searching in a field, an index must be created for that field in which the Text Pattern checkbox is selected. If an index is not created, or the Text Pattern checkbox is cleared, then any filter searches in that field must be an exact match to an existing value.
Types of indexes
| Indexed Fields | Notes | |
|---|---|---|
| Default Indexes | nwId, nwHeaderId, and nwExternalId | The system automatically creates these when a table is defined. nwHeaderId and nwExternalId include nwNateId and nwTenantStripe automatically. |
| Auto-Generated Indexes | Fields of type Table Lookup, List Lookup, Auto Number, and Translatable | Auto-generated indexes include nwNateId and nwTenantStripe automatically unless the index is a base index. They are visible beneath the Indexes section on the Indexes tab in the Table Definition. |
| User-Defined Indexes | Any fields dictated by a developer. | nwNateId and nwTenantStripe are automatically added unless the index is abase index. |
| Workflow Indexes | WorkflowCurrentState and WorkflowCurrentStateType | When workflow is enabled for a table, the system automatically creates these indexes. |
| Subtable Mains Indexes | nwHeaderId | The system automatically adds InternalSeq as a field to the default index containing nwHeaderId when a table of type Subtable Main is defined. |
| Join Indexes | nwId stored as text | The nwId is stored as text, so it works better in certain situations than others. For example, it helps connect the join tables, but is not great at filtering. You may still need to create more specific indexes with the nwID first and then any fields you want to filter on. This allows the system to use the same index for the join table and the filter operations. |
Index query restriction
Index query restrictions allow application developers to limit which fields a user can filter and sort in the list form of an application. Putting these restrictions on fields removes them from fetch filtered data queries. This improves performance, especially for applications that access large numbers of records.
Control index query restrictions through the Index Query Restriction checkbox on the Indexes page in the Table Definitions application.
When Index Query Restriction is selected, the following data items types are no longer filterable or sortable in the list form:
- Address
- Currency
- Date
- DateTime
- Name
- Number
- Phone
- True False
- Text
- Text Area
All other data item types are still filterable and sortable in the list form, including any Text data items that have list lookups associated with them. These list lookup data items are automatically indexed upon their creation, which allows them to remain filterable and sortable in the list form even when index query restrictions are applied.
Tables that are meant to save records in the thousands, such as tables that hold transaction or master data, should have Index Query Restriction selected. Tables that store large amounts of data and don't have any index query restrictions could face significant performance issues and failures when they perform queries to fetch filtered data from the database. Tables that are meant to be smaller, such as setup tables, do not require index query restrictions because the amount of stored data should not significantly impact performance levels.
Index query restrictions in Relationship applications
If you want to enable index query restrictions on a relationship application, you must select the Index Query Restriction check box on the table that the relationship application is built on and the table that the associated detail application is built on.
For example, the Suppliers and Contacts application is a relationship application that is built over the ContactRelationships table. The associated relationship detail application, Suppliers, is built over the Directory table. To enable index query restrictions for Supplier and Contacts, you must select the Index Query Restriction check box on both the ContactRelationships and Directory tables.
Sort and filter on restricted fields
If index query restrictions is enabled on a table and it contains a list form field that you want a user to be able to filter and sort on, you can create index IDs for that field to enable filtering and sorting. If there are multiple fields associated with the same index ID, only the first data item associated with an index ID is recognized by the index query restrictions. If there is a data item that must be filterable and sortable but is not the first data item listed for an index ID, you must create another index ID in which it is either the only data item or it is listed first in the sequence.
The steps required to enable filtering and sorting on a restricted field vary by data item type. Some data item types only require one index to enable both filtering and sorting. Other data items types require two separate indexes, in which the first enables filtering, and and the second enables sorting.
These data item types require one index to enable both filtering and sorting:
- Currency, if Text Pattern is not selected for the index field
- Date
- DateTime
- Number
- True False
These data items must have two index IDs created for them if they must be filterable and sortable. The first index you create makes the field filterable, and the second index you create makes the field sortable. These fields cannot be sortable without being filterable.
- Currency, if Text Pattern is selected for the index field
- Address
- Name
- Phone
- Text
- Text Area
The table below demonstrates how you should structure indexes in a table with Index Query Restriction selected. The table has a Name field, Date field, and a Number field that all need to be both filterable and sortable. The table also has a Text field that must be filterable, but not sortable.
| Index ID | Field | Result |
|---|---|---|
| A | FirstName | Filterable |
| B | FirstName | Sortable |
| C | TodaysDate | Filterable and sortable |
| D | NumberOfItems | Filterable and sortable |
| F | Description | Filterable |
Wildcard search through Text Pattern
If a Text, Email, Address, Name, or Phone type data item must be filterable, sortable, and searchable using wildcards, you must select the Text Pattern check box on one of the indexes you create for that data item. Text Pattern does not need to be selected for both indexes.
See Indexes for more information wildcard enabling through indexes, and Wildcard characters for more information on the wildcard characters used by Nextworld.
Example: index query restrictions
The WOTransactionHeaders table is a helpful example of index query restrictions because it has the restrictions enabled and also requires additional indexes since it has Date fields that need to be sortable, filterable, and searchable with wildcards.
Object overview
The WOTransactionHeaders table is used as the header table for the WOMaterialTransaction header detail application. The WorkOrderMaterialTransaction application allows the user to issue parts, from a specified issue-location, from a work order.
WOTransactionHeaders has the Index Query Restriction check box selected. The table contains a field in the list form that must have additional indexes created for it: WOTransactionDate is a field that must be filterable and sortable.
Configuration elements
The Index Fields subtable is configured as such:
| Index ID | Field | Sort Order | Text Pattern |
|---|---|---|---|
| A | WOTransactionNumber | DESC | False |
| A | WOTransactionDate | DESC | False |
| B | WOTransactionDate | DESC | False |
Index A—Created for logic block purposes. WOTransactionNumber and WOTransactionDate are listed in the order that they are requested in a logic block query action. WOTransactionNumber is listed first, so it is recognized by the restrictions and becomes filterable in the generated application's list form. WOTransactionDate is not recognized by the restrictions because it is not the first data item listed in the index.
Index B—Created to make WOTransactionDate filterable and sortable. WOTransactionDate only needs to be in one new index because it is a DateTime data item.
Index sequencing
The information here describes the configuration options and requirements that you should be aware of when sequencing fields in indexes and logic blocks.
Indexes are ordered by the fields in the index from left to right. If you want to use an index your filter needs to have, at minimum, the first field defined in the index.
For example, you could have an index with the fields of Last Name, First Name, and Org Unit. You would need to include Last Name in your filter, then could optionally include First Name. If you filter for a last name, the entries would then be sorted by first name. If you included Last Name and First Name, you could then also include Org Unit. The order of fields is not important, so filtering for Org Unit, First Name, and Last Name is treated the same as filtering for Last Name, First Name, and Org Unit.
The order of data items in an index does not need to match the order of data items in a logic block request if all of the data items are contained in an index. For example, the following table demonstrates a logic block fetch request with indexed fields:
| Index ID | Index A fields | Fetch order | Successful index | Successful index |
|---|---|---|---|---|
| Index A | Field 1 | 1st | Field 1 | Field 2 |
| Field 2 | 2nd | Field 2 | Field 3 | |
| Field 3 | 3rd | Field 3 | Field 1 |
You can perform a partial logic block request of an index. For example, the following table demonstrates a partial logic block request:
| Index ID | Index B fields | Fetch order | Successful index | Successful index | Failed index (does not contain first index field) |
|---|---|---|---|---|---|
| Index B | Field 1 | 1st | Field 1 | Field 1 | Field 2 |
| Field 2 | 2nd | Field 2 | Field 3 | Field 3 | |
| Field 3 | 3rd | ||||
Fields can also be associated with more than one Index ID. For example, the following table demonstrates multiple indexes with the same field in each index.
| Index ID | Indexed fields |
|---|---|
| Index A | Index A Field 1 |
| Index A Field 2 | |
| Index A Field 3 | |
| Index B | Index B Field 1 |
| Index B Field 4 | |
Structure
When indexes are created, you should consider how you expect queries to be structured. If you have two fields, Field 1 and Field 2, the indexes you create would differ depending on the expected queries. If the queries are over:
- Field 1, Field 1 and Field 2—Create an index for [Field 1, Field 2]. This allows you to query Field 1, Field 1 and 2, but not Field 2 alone.
- Field 1, Field 2, Field 1 and Field 2—Create an index for [Field 1] and an index for [Field 2]. This allows you to query each index individually, as well as together. If there are many queries for Field 1 and Field 2 together, you should also create a third index for [Field 1, Field 2].
You can always combine separate indexes, but you will have increased performance if you create additional indexes with the necessary fields included. This is especially true if there is large amounts of data being queried.
Fetch actions and dynamic expressions
You can define multiple indexes for dynamic expressions used in the fetch actions of your logic block, though it may be more performant to have a single index which contains all of the fields.
For example, you could have the following configurations:
- Index A: [Field 1, Field 2]
- Index B: [Field 3, Field 4, Field 5]
- Dynamic Expression action contents: [Field 1, Field 2]
- Fetch action content: [Field 3, Field 4, Field 5], [dynamic expression] OR [dynamic expression], [Field 3, Field 4, Field 5]
You could have Index A and B defined, but if those 5 fields are always going to be queried together, it is more performant if there is a single index with all 5 fields.
Index configuration
Configure an index using the Table Definitions application to have a field, sub field, or a list of fields designed to improve the performance of queries, whether it be through filtering or logic block fetches, by making it possible to locate a specific row without reading the entire table
You must define your Indexes using the Indexes page in the Table Definitions application. Use the two subtables on the page to define your indexes.
Indexes
On the Indexes subtable, you must:
- Enter a unique identifier for your index fields in the Index ID field. These values can be anything, such as A, B, or C.
- Indicate whether the Index is unique or not with the Unique checkbox.
- Primary indexes must be configured at the application level, or with logic blocks. See the Sort configuration topic for more information.
Index Fields and Sub Fields
On the Index Fields subtable, you must enter the Index ID you created and all the fields that you want associated with each ID. The sequence in which the fields are entered heavily impacts how you configure logic blocks that use indexed field.
You can also configure sub field indexes if the Field is a Component data item. For example, if you wanted to index a workflow state type from a workflow, or the currency code from a currency field. To configure this, you would select the workflow as the field, then the workflow state type as the subfield. Or, you would select the currency field as the field and the currency code as the sub field.
If you don't add the subfield, the index is on the entire object.
Index best practices
These best practices ensure that all indexes are configured consistently and correctly throughout Nextworld.
Indexes and index fields are created and configured in the Table Definitions application. Indexes that are part of fetch actions should be designed to perform efficiently throughout Nextworld.
Common best practices
Name index identifiers in alphabetic sequence. For example, the first index ID should be named A, the following should be named B, and the next C.
Unique index
Optionally, the unique index can be named UK1, UK2 as a reference to the unique key on the data model.
Every table automatically has a unique key created for the nwId. Do not create a unique index over the nwId.
There should be at least one unique index created for the table which is human readable that can be used to uniquely identify the record using one or more data items that are in the table. For example, Item is the unique key for the Items table. Item and OrganizationalUnit combined are used to uniquely identify a record in the ItemOrgUnits table. There can be exceptions to this rule since on occasion there are tables that do not have a unique key.
Avoid creating unique indexes on the NwHeaderID field in Detail tables. A unique index is only appropriate on Header tables or in rare 1:1 header-detail relationships. The standard header-detail pattern assumes a 1-to-many relationship so applying uniqueness at the Detail level contradicts this design. If a 1:1 mapping is required, a different construct should be explored.
Position unique index fields at the top of the list on the Fields page. Additionally, list these fields in the same order on the Fields page as they appear on the Indexes page.
Once the table is in production and contains data, the these additional considerations apply:
- A field cannot be removed from the unique index that will cause existing data to be non-unique.
- A unique index cannot be modified or added that will cause a unique key violation on existing data.
Learn more about what an nwId is in the nwId topic.
Performance considerations
NwId is a unique-friendly field and ideal for identifying a single record. It is not included in user-defined indexes by default, but including it manually in indexes can boost performance
Ensure that you don't create too many indexes, which may create performance issues. Keep in mind the auto generated indexes count towards the number of indexes against a table. A list of auto generated indexes display for any list lookup or table lookup field. The list of auto generated indexes can be found on the table definition by using the Refresh Auto Generated Indexes button. Disable the auto generation of these indexes if you do not need them. Each insert, update, and delete to the table requires all indexes to be maintained and updated accordingly.
Do not create index that has the same fields as another index in the same order. For example, if index A has Field A, B, C and index B has Field A, B, C, and D, only index B is needed as partial indexes will be used.
Do not create additional indexes that include the unique key plus additional fields, since the unique key is already unique, you cannot make it more unique.
All fetches in logic blocks should be backed by an appropriate index. Indexes can be used for fetches with partial filtering fields. Indexes with the correct filter but different sort may identify the result set efficiently but force the database to do a costly extra sort step. See Index sequencing for more information on index and fetch sequences.
Index selection is determined by:
- Index definitions
- Fetch filtering criteria, which also includes sorting
- Data distribution, or the nature and characteristics of the data in the table
Missing table indexes can result in a full table scan, which is a sequential read-through of all records to determine which records should be in the result set.
Index query restrictions
Index Query Restriction should be turned on for transaction tables and tables that contain a large amount of data.
When Index Query Restriction is enabled on the table, additional indexes will need to be created to allow filtering using the table filter. Be cautious on the number of indexes created which will defeat the purpose of turning on index query restrictions to limit the filtering.
Limit the enablement the Text Pattern on the index which will allow wildcard and case insensitive searches on the fields that are listed in the index.
Referential integrity
Referential integrity ensures that the user cannot delete a record in a table if the record is referred to in another table.
How to Create
Referential integrity is configured in the following ways:
- Table Lookups—When a table lookup is established, select the Reload Data button in the Referential Integrity Setup application to view the records. Open the records associated with your table lookup to select the Integrity Mode.
- User Defined Field Mappings subtable—Fields that are connected but are not table lookups must have records manually created. Select the Create button and fill in the User Defined Field Mappings subtable.
In referential integrity, there are two types of tables involved:
- Foreign table—Contains records that are referenced in base tables. Foreign table records can be associated with multiple base tables, so when a record is being deleted in a foreign table, referential integrity checks every base table associated with the foreign table.
- Base tables—Contain referenced records from the foreign table. Records from this table can be deleted and are not subject to referential integrity enforcement unless they are a foreign table to another base table.
The diagram below displays enforced referential integrity between two tables.
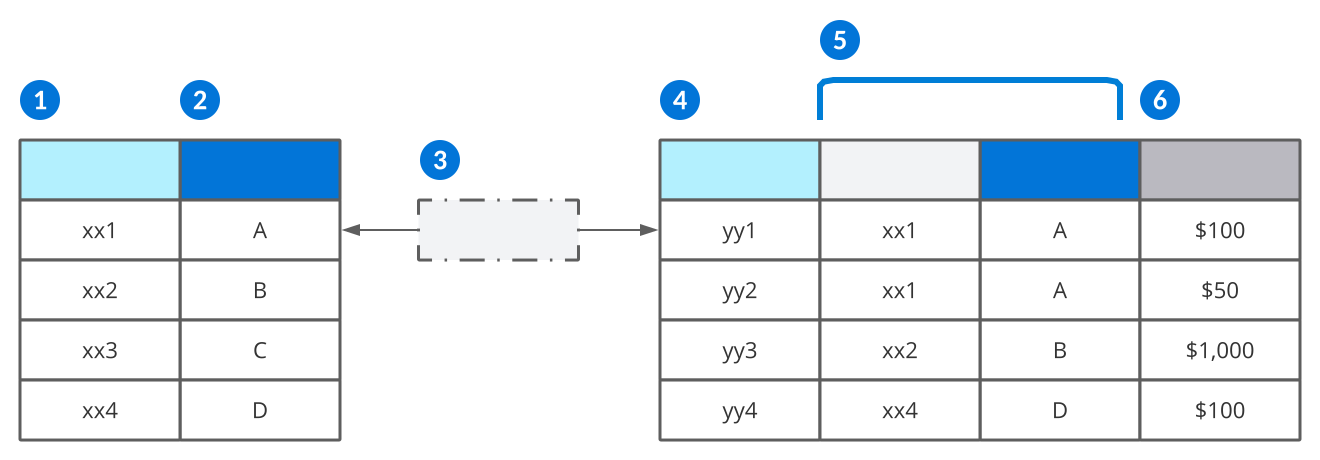
| Foreign Table nwId—The unique nwId for records in the foreign table. This field is hidden. |
|---|---|
| Foreign Table Fields—Records in a field on the foreign table. |
| Referential integrity—Checks base tables for referenced records from the foreign table when a user tries to delete a foreign table record. If the same, unique combination of fields that make up the foreign record is found in a base table, referential integrity stops checking any other base tables and immediately throws an error. Referential integrity exists between the two tables because the base table has a table lookup on the foreign table's field. |
| Base Table nwId—The unique nwIds for records in the base table. This field is hidden. |
 | Table Lookup—A table lookup of the foreign table on the base table. The table lookup points back to a specific record in the foreign table and has the nwId from that foreign record associated with it. Learn more about in the Table lookups and foreign keys topic. The nwIds in the table lookup are hidden, but the information from the other field is shown in the base table. |
 | Base Table Fields—Fields on the base table. |
In this example, only record xx3, C could be deleted from the foreign table. Since the other records in the foreign table are referenced in the base table, referential integrity protects those records from being deleted.
Integrity modes
Once a record appears in the list, you can change the status of referential integrity for each record through the Integrity Mode field. Integrity mode dictates whether referential integrity enforcement is enabled or disabled. Subtables are currently ineligible for referential integrity enforcement. The different integrity modes are:
| Integrity mode | Mode explanation |
|---|---|
| Default Off | Referential integrity is not applied to this record. This is the default mode applied to all new records. |
| Enforced | Referential integrity is enabled for this record. This ensures that deletions are not allowed in foreign tables, and returns a referential integrity error with the base table and field in conflict identified. |
| Off | Referential integrity is purposefully turned off for this record. |
| Ineligible | Referential integrity is disabled for this record's combination. This mode is automatically configured in a table that's using a subtable. It allows the user to delete the main record without deleting every row in a subtable first. |
Referential Integrity Setup application
Application developers use the Referential Integrity Setup application to prevent records from being deleted if they are being referred to from another table.
Use this application when you want to prevent a record from being deleted if the record contains a primary key that is referenced by another table's foreign key.
Records that define referential integrity between tables are created and stored in the Referential Integrity Setup application. These records can be created using different two methods:
- Automatic Records – Created when table lookups are built and saved. The record does not appear in Referential Integrity Setup until you select the Reload Data button in the application.
- Manual Records – Created using the Create button to set up user defined field mappings for fields that are not table lookups.
Once records exist in the Referential Integrity Setup application, referential integrity can be enabled or disabled through the record's form action. This reflects in the Integrity Mode on the list form field.
See the Referential integrity section for more information on configuring referential integrity.
Referential integrity best practices
Referential integrity ensures that the user cannot delete a record in a table if the record is being referred to in another table.
Referential integrity is configured for tables in the Referential Integrity Setup application. New foreign key relationships can be loaded by using the Reload Data action and should always be reviewed at the end of every release.
New foreign key relationships are loaded with the referential integrity set to . Each instance should be evaluated and changed to or . Once a referential record has been updated to or , the Reload Data action will not overwrite that selection. If the Integrity Mode is set to use the Notes field to give an explanation. The Enable row action can be used to set the Integrity Mode to and the Disable row action can be used to set the Integrity Mode to .
Some records will be loaded with a Integrity Mode of . These are usually for tables, which should be deleted when the base record is deleted. If referential integrity is enabled, all subtable records would have to be deleted prior to deleting the record that contains the subtable records. The system recognizes this relationship and automatically sets the Integrity Mode for these types of records. A record can be deleted from the Referential Integrity Setup application, but if the table was not altered and the Reload Data action is used, that record would be brought back in at .
Set the Integrity Mode to for the following type of tables and data:
- Any table that contains setup, master, or transactional business data that should not be deleted if it is referenced in another table. For example, an item should not be deleted if it is referenced by an inventory location, item ledger transaction, purchase order, or sales order. Or a sales order should not be deleted if it was used to create a drop ship purchase order. Or once a transaction is recorded in the item ledger for a procurment order detail, that procurement order detail should not be deleted.
- The examples above can be found in any combination of the following Table Type: , , , or . Each table and field relationship should be evalauated and understood prior to enforcing referential integrity.
- tables, the report will break if the data it references is deleted.
Set the Integrity Mode to for the following type of tables and data:
- , these types of table never store data, they just show data from other tables.
- , and , these types of tables are not loaded into the Referential Integrity Setup application.
- For any tables that are designed to move data or temporarily use the data for a process, rather than store it. This statement could apply to any table type.
- explicity means the data is not stored, but other tables could have similiar use cases even if the table type is not set that way. , , , or tables could also be used this way, if so, referential integrity is not needed.
- For example, BackorderReleaseHeaderLB and BackorderReleaseDetailLB tables are loaded and used for a process, but the data in this table is never stored long-term, so no referential integrity needs to be setup for items or sales orders that are referenced in these tables.
- Any table used for integrations, these are designed to move data from an external source. Once the data is uploaded successfully, the data in the integration table is typically deleted.
- Any table used for reports, these are designed to only be used when running a report. The data in these tables is purged on a schedule.
- Any tables used for Test Harnesses.
- Any table referencing the CurrencyConfig table, these values are delivered and can never be deleted by an end user.
- Any field that is configured as a common field on a table, that is already on the table.
- Any fields that are already enforced in an upstream transaction and the downstream transaction requires and enforces integrity with that upstream transaction. For example, the directory fields on the work order transaction tables (i.e. WOMaterialTransactionLines) do not need to be enforced since they were enforced on the work order header table (i.e. WorkOrderHeaders) and the work order tables are (i.e. WorkOrderComponents and WorkOrderOperations) required and enforced on the transaction table (i.e. WOMaterialTransactionLines). Production capacity tables (i.e. ProductionCapacitySupplyOrders) do have referential integrity turned on for directory fields, since a work order is optional on these transactions.
- Any fields in report parameter tables, these are tables that that define the inputs for reports. These are typically downstream from transactional data and would provide very little value to check since most field would have already been enforced in the transaction record. For example, directory fields on the sales order report do not need to be enforced because those fields would have been enforced on the sales order table itself.
- Most report parameter tables will have the following fields included in the of ReportAppConfigFields. These should be set to :
- ReportSettingNameTextTL - table lookup of type text to ReportSettings
- ReportLayoutTextTL - table lookup of type text to Reports
- BucketDefinition (Optional in some tables) - table lookup of type text to ReportBucketDefinitions
- Most report parameter tables will have the following fields included in the of ReportAppConfigFields. These should be set to :
Manually create a User Defined Referential Integrity record that has a Integrity Mode of for tables that contain the following type of data:
- Foreign key references that are not defined as table lookups.
- For example, most transaction tables do not store a table lookup to the ItemOrgUnits table. Instead, they store a table lookup to the Directory (i.e. OrganizationalUnit field) and Item tables. If the relationship between the Item and Organizational Unit should remain intact for that table, create a User Defined referential integrity record to prevent the deletion of that item/org unit relationship.
- User Defined: True
- Base Table: the table that needs the item and org unit relationship to remain intact.
- Foreign Table: ItemOrgUnits
- Base Table Fields: data item in the table representing the item, data item in the table representing the organizational unit
- Foreign Table Fields: Item and OrganizationalUnit
- For example, most transaction tables do not store a table lookup to the ItemOrgUnits table. Instead, they store a table lookup to the Directory (i.e. OrganizationalUnit field) and Item tables. If the relationship between the Item and Organizational Unit should remain intact for that table, create a User Defined referential integrity record to prevent the deletion of that item/org unit relationship.
Common fields
Common fields are data items that share values when they are used in two tables in the same application. For example, a Subtable and Main table, or a Header table and Detail table.
When a value is entered into one of the common fields, the value automatically populates in the common field of the other table.
Common fields are configured in the Table Definitions application. If the table is a Header Detail table, configure common fields in the Header / Detail page. For other types of tables, configure common fields on the Relationships page.
By default, common fields cannot be changed after they have been automatically populated. Use the SubListCommon.CommonFieldsLookup field to configure if users can change or clear a common field value in a Detail table or Subtable field.
Common fields allow you to:
- Align information between tables.
- Filter a table lookup field or search application.
- Create unique indexes for the Subtable or Detail table.
Updating common fields with logic
If you use logic to update one of the common field values, you must provide the Header Detail table as the Data Source Name. This allows the system to recognize the common fields between Header and Detail tables.
Work fields
Work fields are used to temporarily hold values when processing a record in the table. The value stored in the work field are not saved to the table.
In the Table Definitions application, configure fields as work fields with the Work Field checkbox.
Use a work field with a logic block to calculate and populate a field which you don't want saved to the table. For example, your company processes invoices in a Header Detail application, and you receives a payment from a supplier that has multiple open invoices. In this application, there are three fields that work together, Total Amount, Remaining Amount, and Apply Amount:
- The Total Amount field and Remaining Amount field are in the Header, and the Apply Amount field is in the Detail.
- The Total Amount field is the amount the supplier has paid the company.
- The Apply Amount field is the amount to apply to an invoice.
- The Remaining Amount field is the work field.
- A logic block takes the amount in Apply Amount field and subtracts that from the Total Amount field, and then displays that calculation in the Remaining Amount work field. This allows a user to check the remaining balance once an invoice has been processed, without having to save that amount to the table. The remaining amount is not a value that needs to be saved, but is useful in double checking amounts and calculations in the ledger.
You can also use a work field to enter manual information that you don't want saved to the table. For example, if you use an application to enter information for checks to be deposited, you can manually sum the expected deposit and enter that control value in the work field. As you enter all of the checks, you can use a logic block to add the amounts and enter the total in a calculated value field. If the final calculated value is different than the expected control value, you can review your entries for discrepancies. When you save your record, the calculated value is saved as part of the record, but the expected value in the work field is not.
Table and data purge
Table purges remove unnecessary data from platform tables.
Purges are environment specific, and enable you to select the specific records in each table that you want to remove. They can be manually initiated, or scheduled to occur recurrently.
To create your own table purge, use the Data Purge Definitions application. Learn more in Data Purge Definitions application.
Some tables are delivered with a recurrent purge already configured on them. These table purges are created and maintained by Nextworld, and are indicated by the Purge Active checkbox in the table definition record.
Data Purge Definitions application
System administrators use the Data Purge Definitions application to purge table data.
To create a data purge, you must:
- Create a new record and define the tables you want included. When executed, the table purge occurs in the order which they are listed in the subtable. Associated tables, such as Detail tables within a Header Detail application or Attachments, are included automatically.
- Filter for the records you want included. If no filter criteria is selected, the entire table is purged.
- Select the Execute Validations form action.
- Once the validation is complete, select the Execute Preview form action to review the data which is included in the purge definition.
- Select the Execute Purge form action to initiate the purge.
Optionally, you can call the DataPurgeExecutePurgeWrapper logic block and pass it your data purge definition record to have the purge run recurrently on a scheduled job.
Some tables are delivered with a recurrent purge already configured on them. These table purges are created and maintained by Nextworld, and are indicated by the Purge Active checkbox in the table definition record.
Data Purge Runs application
System administrators use the Data Purge Runs application to review the status and run information for purges configured in the Data Purge Definitions application.
Filter the list form for the purge definition you want to review. Open a record to review details about the purge, such as the run time, status, and run user.
On the Preview Results page, review any errors for failed purges or results of successful ones.
Learn more in Data Purge Definitions application.
Purge Configuration Setup application
Use the Purge Configuration Setup application to configure a schedule to purge table data. This application is for internal use only. Instead, use the Data Purge Definitions application.
Learn more in Data Purge Definitions application.
You can either select a single table to purge, or create a purge group to include multiple tables. Purge groups are defined in the List Lookup Definitions and Table Definitions applications. Once you select your table or purge group, determine the frequency you want the purges to occur. Purges can be configured to occur at a frequency between 1 and 24 hours.
You also select the minimum number of hours a record must have existed to be included in the purge. For example, you can set a purge frequency of 24 hours, with a purge age of 8 hours. The purge occurs every 24 hours, but only records that are older than 8 hours are included in each purge.
Single Table Purge Configuration
To configure a single table purge, in the Purge Configuration Setup application, you must:
- Enter the name of the table you want to purge in the Table Name field.
- Select the frequency which you want the purge to occur.
- Enter the minimum number of hours a record must exist to be included in the purge.
- Select the Purge Active checkbox.
Purge Group Configuration
Purge groups allow you to select multiple tables to purge at the same time. To configure:
- In the List Lookup Definitions application, open the
PurgeGrouprecord and add a unique name for your purge group in the Lookup Keys subtable. - In the Table Definitions application, on the General Configuration page of each table you want included, add the name of your purge group into the Purge Configuration Group field. Select the Purge Active checkbox.
- In the Purge Configuration application, enter the name of your purge group in the Data Purge Group field. Select the frequency of your purge, as well as the minimum number of hours a record must exist to be included. Select the Purge Active checkbox.
Table Definitions application
Application developers use the Table Definitions application to create and modify tables.
Use this application when creating a table for an application and establishing its table definition. The table definition is a collection and configuration of data items you’ve chosen to display as fields in your application.
The defining information of a table including the table’s name, type, category, and description is stored in the Table Definitions application header. After the header information is entered, you can further specify a table definition by using the application's pages. These pages can be configured based on what kind of application you want to build.
Use the Sync Security row action to ensure that other metadata objects related to the table are in the correct security group. When selected, Sync Security identifies all logic blocks and applications built over the table and sets their security group to be the same as the table.
Use the Refresh Table row action to update the indexes on a table, while allowing updates to continue. This refresh takes longer to complete, but has no downtime.
Use the Force Refresh row action to update the indexes on a table, while locking any changes from occurring if an index was removed. This refresh has a faster execution, but does have downtime.
See the Tables section for more information on configuring tables.
General Configuration page
You must define your product module and family. You can also specify your reason for creating the table, add action blocks, or define a customization pattern.
Settings page
Define the relationships your table has to other tables. For most table types, this is the page where you can:
- Define your primary and secondary type ahead search fields if you have added any table lookups.
- Enter the primary field (child) and the field for the parent if you are creating a relationship application.
If you are creating a Join table, this is the page where you can:
- Specify the join type.
- Input the primary and secondary tables that have at least one common field that you want to join.
- Enter the common fields that will join the primary and secondary tables.
See Relationship application configuration for more information on building relationship applications from combined tables.
If you are creating a header detail table, the page name changes to Header Detail and you can:
- Input the header table and detail tables you want to use to create the header detail table connection.
- Enter the fields that link the detail table to the header table.
See Header Detail application configuration in the Header Detail application section for more information on building header detail applications from header, detail, and header detail type tables.
Fields page
Create data items as fields and use additional tools to configure how you want your fields to display and act in your application. Use tools to:
- configure fields to reflect the calculated values of other fields.
- lock fields after an entry has been saved.
- require fields to have a value before it can be saved.
- configure table lookup fields.
Filtered Lookups page
Create and configure a table lookup to filter values in one field to narrow the value selections in another field.
For more information, see Filtered table lookups.
Indexes page
Create indexes and add index fields to help performance when querying or retrieving data from a table.
See the Indexes section for more information on configuring indexes.
Triggers page
Add and configure trigger logic blocks to execute an Insert, Update, or Delete action against the table either before or after a record is saved.
See the Table triggers section for more information on configuring table triggers.
Table Comparison Utility application
System administrators and application developers use the Table Comparison Utility application to generate a record of the changes made to tables in their environments between releases.
To generate a new record, you can enter a product family to include all tables within that family, or select individual tables. Once you have entered the prior and new releases which you want to compare, select the Generate Comparison form action.
Once the record is available, select the View Results form action to open the Table Comparison Results application. Once opened, you can view the list of all the tables included in the report. Open the detail form of the records to view any changes. Learn more in Table Comparison Results application.
Table Comparison Results application
System administrators and application developers use the Table Comparison Results application to view the records generated in the Table Comparison Utility application. Records contain changes made to tables between releases.
To access the Table Comparison Results application, select the View Results form action button in a record within the Table Comparison Utility application. Once opened, you can review the list of each table included in the table comparison record. Open a record to view details, such as new, deleted, or updated fields or indexes for that table.
Learn more in Table Comparison Utility application.
Tables best practices
These best practices ensure that tables are configured consistently throughout Nextworld.
Table configurations are done in the Table Definitions application.
Name tables so that they are free of numbers, special characters, and spaces. Once a table is created, the name cannot be changed at a later date. All words must be written in upper camel case, which means the first letter of each word should be capitalized. The name should reflect the type of information in the table. For example, GeneralLedgerBalances.
The table category for application and solution developers must be set to Customer - Business Data. To set to a different category, require approval.
Design your table based on the requirements for a family or module and with consideration for any extensions or features that you expect to add in the future. Spend enough time on your table design to minimize future disruptive changes, but do not add fields until you have functionality to use them. Make sure to think about interactive reports and views when creating a new table and when making changes. Customers will heavily use interactive reports and views over these tables.
Design changes to be backwards compatible. Backwards compatible changes are changes that do not require any user downtime during an upgrade. For example, backwards compatible changes include:
- Adding a field that is not used in a logic block.
- Adding a field that is not required and doesn't have a default value.
Disruptive changes are changes to the table that require any existing records in the table to be updated to match the new table settings. For example:
- Adding a new required field. When the table in production is updated, the required field is added to existing records without a value. This means older records cannot be saved until a value is entered into the new field. When records are modified through logic blocks, this can cause the logic block to error when the older record is saved.
- Adding a new True False field that has a default value of
True. Any records created before the field was added will have a default value ofFalse. This can cause a variety of issues with logic blocks, or even with application settings or user searches or filters
Ensure that the Create Audit check box is selected in tables built to capture setup and transaction data. This captures when records are created, updated, and deleted in those tables.
There are tables that do not require the Create Audit check box to be selected. If the check box is selected in these tables, you are creating unnecessary records that are often not actionable. Do not select the Create Audit check box if:
- Your table is not built to capture setup and transaction data. For example, if it's built to capture flat report, report parameters, integration, or hierarchy flattened data (table is used in an Hierarchy Definition).
- The table type is Component, Sub, Join, Header Detail, Work Table, View, or Summary.
Naming conventions and standards
Table names should reflect the type of information in table and follow the upper camel case convention. For example, GeneralLedgerBalances, SalesSettings, and RoutingOperations are all acceptable names for tables.
When a table performs a specific purpose, additional naming conventions may be necessary. The naming convention should only be in the Table Name field, not the Description field.
| Table purpose | Naming convention | Example |
|---|---|---|
Join | If the table is used as a join table, include Join in the name.Start the name with the primary table followed by the secondary table and then include Join.If there are more than two tables in the join or multiple joins over the same 2 tables, include a word that will provide context after the second table name. Optionally, name the table for the application that is using it. | CashReceiptsInvoiceJoinBOMComponentsBOMHeadersJoinDispatchListJoin |
Integration | If the table is used for integrations, end it with Integration. | StudentScheduleIntegrationCashReceiptsIntegration |
Header | If the table is used as a header table for a header detail table, include Header in the name. | GeneralLedgerHeaderWorkOrderHeaders |
Detail | If the table is used as a detail table for a header detail table, include Detail in the name.Optionally, choose a name that is descriptive of the details. | GeneralLedgerDetailWorkOrderOperations WorkOrderComponents WorkOrderOutputs |
| Header Detail | If the table is used as a header detail table, the table name should be plural. | GeneralLedgerTransactionsWorkOrders |
Work Table | If the table is a logic block table, use the name of the logic block and end it with LB. (work tables were previously known as Logic Block tables, hence the LB) | ExchangeRatesLB |
Main | The table name should be plural. Note the exceptions below:
| AccountTypes
BalanceSheetReport
BalanceSheetFlat
|
Settings | The table should begin with the module name followed by Settings. | FixedAssetSettings GeneralAccountingSettings |
View | The view table can be created to limit the fields from the base table. It is common to use the views for interactive reporting or as a related view in a data item or a related view in a table. See the Data Item Definitions application and Table Definitions application For a view that will be used for reporting the naming standard should be: <Table><TransactionType/Doc Type/Entity (if needed)>View For a view that will be used for as a related view in a data item or table: <Table><Entity(if needed)>TLView or <Table><Entity(if needed)><Product Family/Module>TLView | Reporting view examples: DirectoryEmployeeView, DirectoryCustomerView, SalesOrderView, SalesOrderSalesCreditView, SalesOrderSalesQuoteView Related view on data item or table examples: DirectoryEmployeeTLView (generic/default, used on a Employee TL data item used by many) DirectoryEmployeeMfgTLView (perhaps has fields from directory for employee that are specific to Mfg using this in a Mfg table view) DirectoryOrgUnitMfgTLView ItemsMfgTLView |
The Description field entry may match the name of the table, but should include spaces. Table descriptions should always reflect the data stored in the table. Don't use complete sentences when writing descriptions. For example:
| Table Name | Table Description |
|---|---|
SalesOrderHeader | Sales Orders, Sales Quotes, and Sales Credits |
SalesOrderDetail | Sales Order, Sales Quote, and Sales Credit Details |
SalesOrderFlat | Sales Orders, Sales Credits, Sales Quotes, Deposit Invoice Reports |
ProcurementOrderIntegration | Supplier Quotes, Purchase Orders, Subcontract Orders, Value Only Purchase Orders, and Value Only Subcontract Orders Integrations |
ReceivablesHeader | Customer Invoices and Customer Credit Memos Headers |
ReceivablesDetail | Customer Invoice and Customer Credit Memo Details |
If you are configuring a join table, the Specification text entry should list the two tables used in the join table and the intended use of the join table.
When creating indexes, the Index ID should be named A, B, C, and so on.
Name the Unique key index as UK1, UK2, and so on.
When creating a table, it is best practice to create a table lookup over the table that can be used as a foreign key reference to the table. On tables that have a plural name, create the table lookup using the singular name. For example, the table lookup for WorkOrderTypes is WorkOrderType.
It is best practice for most tables to use the Customization Pattern of AllowAdditionsAndTriggers. This helps partners extend and customers customize the base tables. It is also best practice for tables to use the Customization Pattern of AllowAdditions. In this case, tables usually need the ability to use Customer defined attributes making this Customization Pattern necessary, but not allowing the customization of triggers for performance implications. As with all standards, there could always be an exception.
Best practices for tables released to production
These best practices ensure that, once tables have been released to production, you are not making changes that will be disruptive to customers. Changing table configurations may negatively affect the purpose of tables.
Once tables have been developed and delivered, they are considered active in a production environment. Additional considerations apply.
Do not make the following changes:
- Do not delete fields.
- Do not change the data type of a data item that is in a table.
- Do not delete a table.
- Do not change security groups.
- Do not remove a subtable from a table.
- Do not change a subtable from type Sub to Main or vice versa. Changing from sub to main does not automatically migrate data. Our best practice is to always use a main table so this is not an issue.
- Do not remove unique fields from a table after data has been stored in the table. Removing the unique field negatively affects the data and possibly the logic blocks that are relying on the unique index.
- Do not make unique indexes more restrictive after they are in production. For example, if a table has fields A, B, C, and D and a unique index was created including field A and B, then you cannot add C and D after it goes into production. The unique index may not build if the customer's data already violates the new unique index. You can add a new field and make it part of the unique index if all the previous records have a null or blank value.
Considerations:
- Partners may have extended your table.
- Customers may have customized your table.
These changes are permitted:
- Changing order that the data items listed in the table
- Moving a field from or to a data item group within the table.
- Adding new optional fields.
- Adding new indexes.
- Changing existing non-unique indexes.
- Modifying the primary index. However, this will modify the default sort on all applications over the table.
- Adding new required field only if the new field can be defaulted if not passed in or entered.
Backwards compatibility strategy:
- We currently do not have a method to deprecate an individual field in a table. Each application team is documenting and tracking these fields.
- If a new field is required at the table level, consider defaulting the field from another field. For example, if a new date field is added, can the field be defaulted from another date field such as transaction date. A new module setting to determine where the default will come from may also be helpful.
- Determine if a the field can be populated as a record is edited or processed.
- If a new field is added that replaces an existing field, populate from the old field to the new field in a trigger or action block, providing notice to customers to adopt the new field throughout an entire release.
- If a data model change is needed and fields needs to be moved from one table to another, consider keeping the old fields in the original table, even though it may not be the ideal data model. With proper notification to customers, the fields can be removed in a later release.
Field lock best practices
These best practice ensure that table field lock check boxes are configured consistently and correctly throughout Nextworld.
Fields are locked in the Table Definitions application.
Use the Locked check box to prevent a field value from changing after the record is saved. Simply disabling a field in the application using a logic block or application setting will not ensure that the field cannot be changed.
- Fields that are populated by automatic numbers should be locked. Locking the automatic number field ensures that it will not be changed causing a gap in numbering or collision with a future automatic number.
- A field that is used as the Workflow Type must be locked. If it is not locked, the workflow instance may become corrupt and unable to progress.
- Typically, fields that make up the unique key that is used to identify a specific record should be locked w/ the exception of fields in the unique key that establish effective date ranges. For example, the unique key for
SupplierItemRelationshipisSupplier,Item,OrganizationalUnit, andEffectiveFrom.Supplier,Item, andOrganizationalUnitare locked.EffectiveFromis unlocked so the effective date range of the record can be modified. - Lock additional fields as needed to maintain data integrity or to meet business needs.
Table Lookup typeahead best practices
These best practices ensure that table lookups are configured consistently and correctly throughout Nextworld.
Table lookups are defined as Data Items that are associated to the table in the Table Definitions application for use as the foreign key to the table.
Create at least one data item as the table lookup for each table.
Create additional table lookup data items for a table as needed. The primary reasons for creating additional table lookup data items for the same table is either when there are multiple foreign key references to the same table by the same base table or when the use of a data item of a different name adds clarity to the foreign key reference. For example, in the case of multiple foreign key references, the work center table has a foreign key references to the IssueLocation and the CompletionLocation which are both table lookups over the InventoryLocations table. For example of the case of adding clarity, there are multiple table lookups over the directory to reference a Supplier, Employee, Customer, etc.
If only one field is needed to uniquely identify a record, make that field the primary type ahead field. This will make integrations to the table easier since only the primary field will need to be mapped.
Ideally, the primary and secondary lookup fields will uniquely identify a record. The type ahead search will only display distinct occurrences of the primary and secondary lookup fields. When the combination of the primary and secondary are not unique, the user will need to use the magnifying search icon to select record in the case of duplicates.
Identify a limited set of additional fields that will be available to applications over tables that have a foreign key reference to the table. Choose only the fields that will be broadly used by many applications. Start with a conservative list and add additional fields as needed.
Select the Typeahead Only if the field is a table lookup field and you know you don't need any of the lookup fields except the primary and secondary search fields. This ensures that the unnecessary fields do not appear in the application.
Company and Org Unit best practices
This topic describes best practices for the Company and Org Unit table lookup data items.
Org Unit name and numeric code do not need to be unique in Nextworld. This requires every table with a field that represents an Org Unit (table lookup to Directory) also have a Company in the table.
Add a Filter Table Lookup to filter Org Unit by Company.
Workflow and tables best practices
These best practices ensure that workflow is configured correctly in applications that require workflow statuses.
Workflow is configured in the List Lookup and Workflow Builder applications.
Use Workflow to enable business process flows and/or approvals:
- If a record (transaction) must go through different states or statuses. Workflow automatically places the workflow state on a table, so there is no need to add a field for state.
- To configure active/inactive status for records. For example,
ChartofAccountsuses workflow to indicate inactive accounts. Use workflow, instead of a true/false field on master data tables to allow a customer to add approvals.
The table is automatically configured with the workflow fields required to support workflow. You do not need to add workflow state or state type to the table.
If the table already has workflow and another status is needed to represent additional information, a static list lookup or checkbox can be used. For example, in the General Ledger, the state represents the state of posting. A checkbox is used to show the transaction was voided. Workflow should be considered first before adding a static field.
Validation Setup application
Application developers use the Validation Setup application to create and modify field validations. Field validations restrict what values are allowed within a field. For example, you can specify if no lowercases, uppercases, numbers, spaces, or special characters are allowed.
You can add further customization with a regular expression, or regex, validation and error. Once applied, if a user enters characters that are not allowed in the field they receive an error message when they try to save.
Validation can't be used to specify what is allowed in a field value. Instead use the Field Format Definitions application. Learn more in Field Format Definitions application.
Attachment Cross Reference Inquiry - Core Tables application
Use the Attachment Cross Reference Inquiry - Core Tables application to view information about attachments, such as the date the attachment was created, the table it is stored in, the user who attached it, and the status of the file, saved to tables containing metadata. By default, you are only able to see records associated with your own user account.
Every attachment saved into a tenant table automatically has a record created within the application. The record persists even if the attachment is deleted from the table record, and includes a copy of the attached file.
For example, a record with a status of DeleteMark indicates the attachment has been deleted from the business record and is no longer accessible within the table. The user who attached the file, or a system administrator with attachment permission to the table, would still be able to see and access it from within the attachment cross reference record.