


.svg)


Logic blocks are comprised of a record in the Logic Block Builder application and the actions which are selected on the Logic Block Builder page of the record. The type of logic block you build determines how it can be used. For example, Transaction logic blocks create, update, and delete records, while Validation logic blocks compare fields within a record or records to validate data. The actions that are available in a logic block are determined by the type selected. Learn more in the Logic block types topic.
Logic block actions are used in different combinations to achieve the logic block's intended purpose. One logic block action could be used to highlight a field if a value exceeds a certain amount, while another could be used to automatically fill in the sequential record number in a sales order field.
Data sources provide records and values for the logic block's actions and expressions to use. Every logic block is built over one, or many, data sources. Data sources can be either entire records or values within a record that can be used as inputs and outputs in the logic block's actions. Expressions are used to narrow down which records or values the logic block actions should apply to. Learn more in the Logic block values topic.
The diagram below shows the interaction between tables, applications, and logic blocks.

 | Table—Configured with the fields you want available in the applications and logic blocks which are built over it. Logic blocks and applications can create, update, or delete the records which are stored in the table. |
|---|---|
 | Application—Built over the table. Logic blocks can be attached to the application so that they initiate when certain events occur. For example, you can attach a logic block so that it initiates when a user selects a specific field or row action, or to validate a user entered value when a record is saved. Learn more in the Ways to initiate a logic block topic. |
 | Logic block—Built over the table. Acts as a container for data, values, and variables which are processed and updated as the logic block executes. The data used in the logic block, as well as what actions are performed on the data, are selected during the logic block configuration. For example, you could build a simple logic block to hide a field in the application if a value is entered into a different field. Or, you could use a more complex logic block to fetch records from an outside table in order to insert them into the table your logic block is built over. More complex processes can require multiple logic blocks to function. Learn more in the Logic block actions topic. |
 | Updated Application—Once the logic block has finished executing, any changes made to the application's UI are applied. |
 | Updated Table—Once the logic block has finished executing, any changes made to the table's records are committed. |
Configuration
There are several tools and applications used to create, debug, and test logic blocks. Learn more in the Logic block configuration tools topic.
Logic block foundations: Design, develop, and test
This topic reviews the foundations of logic block design and development. This includes selecting and organizing the logic block actions, determining the scope and required security, and determining how and where the logic block should be initiated.
Design and develop
The following elements should be considered when designing a logic block:
- What does this logic block need to achieve? The type of logic block you build determines the available logic block actions, how the logic block functions, and what it can be used for. Learn more in Logic block types.
- What records and values need to be available for the logic block actions? The logic block inputs and outputs control what records and values can be accessed by the logic block actions. Learn more in Logic block inputs and outputs.
- What type of security does your logic block need? The security option you select for your logic block dictates which permissions are applied to it and how it can be called. Learn more in Logic block security options.
- What objects or values that are created or modified by logic block actions need to be available to other actions? The actions you select, sequence you place them in, and the result of those actions determines the scope of the logic block. The scope references the objects and values which the logic block can see and use as it runs. If an object, value or data source has not been previously fetched or defined, it cannot be referenced in an action. Learn more in Logic block scope.
- How should the logic block be initiated? You can configure logic blocks to initiate based on user interactions, such as a row or field selection, or based on table changes, such as record saves, updates, or deletes. Learn more in Ways to initiate a logic block.
- What is the order of execution for your logic block when table mutations occur? Different configuration options, such as table triggers, logic blocks, auto numbers, and workflow occur in a specific order. Your logic block can be impacted by the other events that occur. Learn more in Sequence of logic block execution on tables.
Example
SCENARIO 1: Application A is used to create different types of receipts. It has fields for Receipt Type, Purchase Order, Item, Receipt Date, Company, and Org Unit.
When a user selects a Receipt Type, you want different fields to be hidden and shown. If a user selects a receipt type of Purchase Order, the Item field should be hidden. If a user selects a receipt type of Item, the Purchase Order field should be hidden. This improves the user experience and helps avoid confusion on what information they need to enter.
To accomplish this with a logic block, you could use the following options:
- Logic block type: You could use an UI or Transaction type logic block. If the logic block is going to perform other operations besides hiding and showing fields, you should use a Transaction logic block type.
- Inputs and Outputs: The logic block must be built over Application A's table.
- Security: The logic block should be included in a security group which users have access to. Likely, the same security group as Application A and its table.
- Scope: N/A
- How to initiate: The logic block should initiate based on a Field Value Changed event action. This means the logic block runs when a user changes a value in a field then exits it.
SCENARIO 2: Application B is a Header Detail application used to create invoices for inventory orders. It has fields for Item, Item Cost, Quantity, and Amount in the Detail application, and fields for Company, Invoice Number, and Order Total in the Header.
When a user enters detail lines for items to include in the order, the cost of an item should automatically populate in the Cost field once a user selects an item in the Item field. Once a user enters a value in the Quantity field, the Amount field should be automatically calculated by multiplying the Quantity x Cost. Once a user exits a detail line, you want the Amount from that detail line to be added to the Header's Order Total field.
To accomplish this, you should build two logic blocks. The first logic block to default the cost, and the second logic block to calculate and update the Amount field, then calculate and update the Order Total field. Use the following options:
- Logic block types: Transaction type logic blocks
- Inputs and Outputs: The logic blocks must be built over the Header Detail table of Application B.
- Security: The logic blocks should be included in a security group which users have access to. Likely, the same security group as Application B and its table.
- Scope: Logic block actions must be completed in a certain order, otherwise the values from previous actions won't be available for calculations. For example:
- Fetch action: Logic block one fetches the Item cost to populate the detail line when an item value is selected.
- Math action: Logic block two multiplies the Cost X Quantity to calculate the Amount for the detail line.
- Math action: Logic block two adds the Amount from each detail line as it is added to the Order Total field.
- How to initiate: The logic blocks should initiate based on a Field Value Changed event action. This means they run when a user changes a value in a field then exits it.
Test
It is essential to test your logic blocks to ensure they fulfill their intended purpose. To test your logic block, you use logic block test harnesses. Test harnesses validate the design of your logic block and monitor for regressions. The development of new logic blocks, or the modification of an existing logic block, is not complete without a test. Learn more in Logic block test harnesses.
Logic block types
Logic block type determines the available logic block actions, how the logic block functions, and what it can be used for. There are several logic block types to select from, such as Transaction, UI, Validation, Background Task, Data Transform, and Test.
| Logic Block Type | Description | Limits |
|---|---|---|
Modifies data by updating, creating, deleting, or fetching records. Transaction logic blocks:
| There is a limit to how long a transactional logic block can run before the system terminates it, and the logic block errors. | |
| Controls elements of the user interface such as hiding and disabling fields, but does not update any data. UI logic blocks:
| Errors if actions in the logic block insert, update, delete, or fetch. Errors if actions call a logic block that updates or creates records. | |
Compares fields within a record or between records to validate data. This logic block does not update any data. [lookup: missing name] logic blocks:
| Errors if actions call a transactional logic block. | |
Transactional logic block that runs asynchronously, and do not refresh the page when it finishes running. [lookup: missing name] logic blocks:
| ||
Tests the functionality of another logic block and runs as part of a logic block test harness. Test logic blocks:
| ||
| Used to add or update business data or metadata in a table or change how the value of a field in a specified table is calculated. Uses either a Bulk Update or a Fetch Records action to transform the data.
| Only one Data Transform can be run against a table, but the logic block can have multiple actions. | |
| | Used to build summary tables. They perform a limited set of actions. | Cannot be used to update, insert, or delete records. |
| Used for advanced data mappings in Webhooks. You must configure your mappings using Set Values actions. It should have one JSON Object data item as an input, and a record as the output with the table that the event definition payload is built over as the shape. Once you enter the logic block name, the input and output mappings are automatically populated in the subtables. Add the event payload key in the output mappings where you want to map the payload information. | Cannot be used in other processes. |
Use the questions below to decide what type of logic block to use.
| Does the logic block insert, update or delete records? | YES: Does the user need the results immediately? |
|
|---|---|---|
| NO: Does the logic block fetch records? |
|
Transaction logic blocks
Transaction logic blocks provide a way to change tables by updating, inserting, or deleting records.
In comparison, validation logic blocks fetch records, and then validate without changing the records. In other words, validation logic blocks fetch and verify records, and transaction logic blocks change them.
Validation logic blocks
Validation logic blocks provide a way to create advanced validation of table records. This means that you can use a validation logic block to validate values entered in a record are correct before they are saved. You can also create basic validation on a data item level, for example field formats.
When you create a validation logic block you define the criteria for the specific validations and the fields you are validating. For example, you could use a validation logic block with a bank record application. You could configure the actions to validate values in the Payments Applied field were greater than zero, and that values in the Payment Date field do not occur after today's date.
Validation logic blocks run at different times, including when the user:
- clicks the save button
- changes a field value
- exits a detail row
If the values entered do not match the validation configuration of the logic block, the user sees an error message and their records are not saved.
Background Task logic blocks
Background Task logic blocks provide a way to asynchronously update, insert, or delete records in tables. They are similar to Transaction type logic blocks except they do not have user-dependency on the results.
Regardless of how a logic block is initiated, it executes as a job on the batch server. If the Background Task logic block calls additional logic blocks, the behavior is dependent on what logic block action is used, such as:
- Queue Background Logic Block action—Causes a second process to initiate from the first. The first process continues to run subsequent actions in the calling logic block immediately while the second process is picked up by the batch framework.
- Call a Logic Block action—If the calling logic block is of type Background Task, the processing logic blocks actions are run within the calling logic block's process before the calling logic block resumes. If the calling logic block is a different type, a new job is submitted for the processing logic block and the calling logic block continues to run.
Data transform logic blocks
Data transform logic blocks are used in conjunction with the Data Transform Definitions application to update select business data in a specified table when changes have been made to an application that uses the table the business data resides in.
Sometimes when applications are changed some business data used by the application may need to be updated. Changes to an application can include adding or removing fields in a table or changing how a logic block calculates a value in a table. Data transform logic blocks are used to update the business data.
For example, if several empty fields in a SalesOrderDetail table need to be populated for the next release to accommodate changes made to the Sales Orders application, a data transform logic block could do the following actions for the table:
- For all SalesOrderDetail records with an empty Scheduled Pick Date field, populate the field with the ShipRequestDate value.
- For all SalesOrderDetail records with an empty Price Effective Date Time field, populate the empty field with the field specified in the Sales Pricing Date list lookup in Sales Settings application. If this list lookup is empty, it populates the Price Effective Date Time field with the current date.
- For all SalesOrderDetail records with an empty Gross Extended Price field, calculate the GrossExtendedPrice as Price × Requested Quantity and populate that field with the resulting value.
Use the Logic Builder in the Logic Block application to configure a data transform logic block that uses either an Update Record or a Bulk Update action to transform the data.
- Use the Bulk Update action for records to be uniformly altered. It is the most efficient way to alter a collection of records where all the records need to be updated to the same set of values. Learn more in the Bulk Update action topic.
- When records need to be individually queried and altered, the records need to be fetched with an applicable fetch logic block action and then updated with an Update Record action.
A data transform logic block can only be run when connected to a record in the Data Transform Definitions application. You cannot run a data transform logic block using any other method. It can't be called from another logic block, an application, a workflow transition, or other actions.
If a data transform logic block already exists for the table to be transformed, modify the existing logic block as needed to include any additional actions you want to include for the data transform.
Messaging
There are three main message types when processing a data transform logic block:
- Background Task Progress—Used to inform on the progress of a data transform that is being executed.
- The number of processed records should be displayed as an input.
- The message should be in the format of "TableName data transform is in progress."
- Background Task Summary—Used to inform ops of transform completion when viewing the execution record.
- The number of processed records should be displayed as an input to this message.
- The message should be in the format of "TableName data transform is complete."
- Data Transform Message—Used to log messages throughout the transform logic block and to record critical information that Operations needs to know about.
- This message type is inserted into the Messages subtable of the data transform execution. These messages also are within the job ID attached to the Transform for each tenant run.
- Errors don't cause Transform to halt, but they do fail and need to be resolved.
For more information about data transforms see Data transforms.
Logic block scope
The scope of a logic block determines what objects and values a logic block can use when it runs. The sequence in which you use actions, and the result of those actions, determines what values and objects are available for the logic block to use as it progresses through the different steps.
Building a logic block
Before you build a logic block, you must consider what actions you need to use, and where they should be placed. The placement of actions can impact what objects or values are available for actions used later in the logic block, for example:
- Variables—Used to set values in your logic block. In order to be referenced by an action, the variable must already be defined in a previous logic block action. If you set a value or a new variable in action 20 of a logic block, you can't use that variable in actions 0 - 19.
- Data sources—Provides values that can be used in the logic block actions. Data sources can be fetched or created. For example, if you use a Fetch Record action to fetch a table lookup on Table A in order to insert it into Table B, the action that fetches that table lookup must be before the action that inserts it. Or, if you use a temp table as a data source, the temp table must have already been created.
If an object, value or data source has not been previously fetched or defined, it cannot be referenced in an action and the logic block errors.
Loops
Some logic block actions, such as fetch actions, use loops. This allows the logic block to loop through retrieved records to apply actions to those records. All of the fetched records are only in scope (available) within the Data Found loop. Actions outside of the Data Found loop can only access the last record from the loop and its values. Alternately, if you use the Call a Logic Block action which does not use a Data Found loop, any values returned from the action are available for later actions.
Running a logic block
When a logic block runs, the scope is determined based on what actions are executed. For example, Conditional actions can compare two values, and then the logic block runs different actions based on whether or not those conditions are met. The actions are divided into a true branch, when the conditions are met, and a false branch, when the conditions are not met. If an action fetches a record in the false branch of a Conditional action, but the conditional is true when the logic block runs, the record cannot be fetched and cannot be used by later actions. If a later action tries to use that fetched record to set a value, the logic block errors since the record is not in scope.
Or, if you use a Fetch Records action and set the value of a new variable in the Data Found loop, and want to set the value of a field outside of the Data Found loop with that variable. If the Fetch Records action does not return any data, the Set Values action in the Data Found loop won't run. The logic block errors because the value of the field cannot be set since the variable was never created.
Naming conventions
Name and format the components of logic blocks consistently to identify different elements in the comments more easily.
Once you establish conventions, maintain them throughout the entire logic block. Think about how those conventions apply to the different elements you use in the logic block.
For example, if you fetch records from the Directory table twice, once to find suppliers and a second time to find customers, you should not name both fetches FetchDirectory. Instead, use FetchSupplierDirectory and FetchCustomerDirectory to make it clear and easy to identify which name to reference later in the logic block.
This includes how you format objects. Formatting refers to how object name is typed out in the comment, such as capitalization, special characters, and spaces.
The table below reviews several conventions used in logic blocks:
| Object | Convention | Example |
|---|---|---|
| Variable names | UpperCamelCase | Create Variable: InvoiceDate |
| Table names | Put the name of the table in parenthesis. | Fetch a table lookup with EmployeeName (Directory) |
| Constants | Format the variable name with UpperCamelCase, and then after the definition put the word constant in parenthesis. | ExchangeRate = 1 (constant) |
Commenting conventions
Comments are created automatically by the system for each logic action. Additional comments can also be manually added to explain things such as the intent, and use of that logic block.
Select the Advanced Action toggle in the Logic Builder to see more details about the logic block. Well designed logic blocks generally should not warrant additional comments.
Comments should not be used to repeat information that can be learned from the logic block actions, dictate task numbers, or as a change log.
If the logic block is not easy to use and understand, consider updating the logic block instead of using comments.
Logic block inputs and outputs
Logic block data sources provide records and values for a logic block's actions and expressions to use. Configure data sources directly on the logic block record, or specify data sources in the logic block's actions.
Inputs and outputs
Use the Table Name field to specify a single table as an input, or select the Advanced Input/Output button to open the Inputs and Outputs subtable where you can specify multiple inputs and outputs for your logic block. Inputs and outputs can be either:
- Records—A record within a table that holds multiple values. Records are represented in a logic block as a data source name (DSN). For example, if you need to compare data between multiple fields in a record, you would specify the name of the table which holds the record.
- Values—A value that only contains one piece of information. Values are represented in a logic block as a variable. For example, if you need to perform calculations on the value held in the
Costfield of an application, you would specify theCostdata item as a Value input and output. This would allow the logic block action to pull in the value held in that field, perform calculations on it, then pass it back to the application.
Logic blocks which use multiple inputs and outputs can only be called from other logic blocks. If the logic block is called by an application, only a single table can be passed to the logic block when it is initiated. The table must be marked as both an input and output, and it must be compatible with the table which the application is built over. This scenario may occur if you are using the same logic block in multiple places.
For example, you could have a logic block with the following configured in the Inputs and Outputs subtable:
| Type | Shape | Inputs | Outputs |
|---|---|---|---|
| Record | Sales Order Detail | x | x |
| Record | Sales Order Header | x | |
| Value | Cost | x | x |
If this logic block was called by an application, only the Sales Order Detail record could be passed to the logic block since it was marked as both an input and an output, and because applications cannot specify a data item.
If this logic block was called by another logic block, all of the inputs and outputs specified would be available as inputs and outputs in the Call a Logic Block action of the other logic block.
Additional data sources
Optionally, you can designate additional data sources, such as tables or other logic blocks, in logic block actions. Many logic block actions have a Data Source Name (DSN) field which can be used to reference outputs of data that the logic block creates. For example, if you use the Call a Logic Block action to pass a record to a processing logic block, then that logic block updates the record and passes it back to the calling logic block, the updated record information can then be used in other logic block actions by referencing the DSN from the calling logic block.
Learn more in Logic block data source development considerations.
Logic block lists
Logic block lists enable you to provide a list of either records or variables (values) to be used within your logic blocks. Lists are created in the Inputs and Outputs subtable of your logic block record, or with the Create List action.
To create a list in the Inputs and Outputs subtable, select the Is List checkbox on the appropriate row. The shape of the list entries is dictated by the LogicBlockInputsAndOutputs.LogicBlockShape specified on the row.
There are several logic block actions used with lists, including:
- Create List action—Create a list.
- Size of List action—Acquire an accurate record count from your list.
- Set Values action—Add, clear, remove, or set entries. Learn more in Set Values action
- Loop List action—Loop through the list entries. Learn more in Loop List action
Once a list has been created, it is treated like any other input or output on the logic block. This allows it to be passed between, iterated on, and referenced by other logic blocks without the limitations of temp table records.
Comparing temp tables to logic block lists
Lists functionally behave the same as temp tables. However, lists provide more clarity during the development process on how and where the list of records or values can be used and referenced.
The table below compares temp tables and input and output lists:
| Temp Table | Input and Output List |
|---|---|
| Created in the Create a Temp Table logic block action. | Created by selecting the Is List checkbox on an entry in the Inputs and Outputs subtable, or with the Create List action. |
| Can only contain records. The shape of the records is determined by the table selected during configuration. | Can contain either records or variables (values). The shape of the list entries is determined by the shape selected in the input and output row. |
| Entries are added to a temp table with the Insert Record action. | You can reference the list in a Set Values action and add, set, clear, or remove entries. |
| Limited to 15,000 records. | Record lists are limited to 15,000 records. Value lists are limited to 50,000 records. |
| Do not support indexes, and cannot be fetched by any filter criteria. | Entries within a list are considered data sources and cannot be indexed or filtered. |
| Uses the Fetch Temp Table action to retrieve records. | Uses the Loop List action to retrieve records. |
| Shared temp tables can only be accessed within the same transaction boundary. | Lists may be passed between transaction boundaries. |
| Temp tables can be used in background type logic blocks, but have limitations due to the transaction boundary limitations. | Record lists can be created, but not passed to background type logic blocks. |
| You can create an HD Structure of type temp using a temp table in the Create HD Structure action. For more information on NATE considerations, see the Create HD Structure action. | You cannot use lists to create an HD Structure. |
Learn more in Create a Temp Table action and Logic block inputs and outputs.
Logic block values
Logic block values are objects, such as fields, constants, and variables, that can be manipulated within a logic block's actions.
The values which the logic block can access and manipulate are provided by the data sources specified in the Inputs and Outputs subtable, data sources in logic blocks being called by your logic block, or from system defined values. Learn more in Logic block inputs and outputs.
Values
There are several types of values that can be used in logic block actions, as seen in the table below.
Value type | Description |
|---|---|
| Field | A field that the logic block has access to from the inputs and outputs defined in the logic block, or module setting attached to the underlying application. |
| Constant | A user defined value, such as a number or text, that is only valid for input values. Constants are defined within logic block actions. |
| Variable | A user or system defined value that is not found in an application. Variables are temporary values that can be reused throughout the logic block once they are defined, but are not saved to the table or application record. Once defined, you can also reference a variable within another logic block's Inputs and Outputs. For example, you could define a New Variable, select the Data Type of Date, then select a System Value of Today. The value of Today would then be available for use in your logic block actions. If you copy logic block actions that use variables into another logic block, you must:
|
| System | Common values that Nextworld provides. These are available for most, but not all, data types. |
| Table | The entire record of a table. Use this this type when fetching a series of records that you want to process as a group in a single transaction. |
Logic block expressions
Logic block actions use expressions to identify the records in a table which the logic block action applies to.
Expressions are configured in the properties of logic block actions. You can add multiple expressions to an action, and then organize them to dictate the order in which the action should be applied.
Logic block actions use operators to control how the action uses expressions. There are two operators, And and Or.
If you use And to connect your expressions, the action only acts on records that satisfy all the expressions. If you use Or to connect your expressions, the action acts on records that satisfy any of the expressions.
For example, you can use expressions to identify records with a payment of $100 And a remaining balance greater than or equal to $50. You could also use expressions to identify records with a payment of $100 Or a remaining balance greater than or equal to $50.
Field to field comparisons
You can also use logic block expressions to do a field to field comparison. For example, you could use expressions to fetch records where the value in the Debit Amount field is greater than the value in the Credit Amount field. To accomplish this, you would create an expression with:
| Type: Field | Greater Than > | Type: Field |
| Table: FetchedTableExample | Table: FetchedTableExample | |
| Field: DebitAmount | Field: CreditAmount | |
| Data Type: Currency | Data Type: Currency |
External expressions
External expressions are defined elsewhere, then referenced in your logic block action for use. For example, you might want your logic block to only fetch the records which match the filter criteria within the application. To achieve this, you would use the Received Filter expression.
There are different types of external expressions, including:
- Dynamic—Expressions created with the Build Dynamic Expression or Build Dynamic Sort actions which enables you to create reusable filter or sort definitions. You can modify existing dynamic expressions by selecting Existing for your expression type in the Build Dynamic Expression action, then referencing the name of the previously configured expression. You can use the AND or OR operators to add to the existing filter. If you don't reference the existing expression in your filter, it is overwritten.
- Received Filter—Expressions created by the platform based on the filter criteria defined in the application. Received filters can only be used on the table in which they were defined.
- Received Selection—Expressions that enable you to filter for all records selected on the application when the logic block is called.
- Inline Filter—Expressions created with the
Inline Filterdata item type which enable you to pass a record to a logic block and use the filter criteria saved in the record to filter fetched data. Learn more in Data item types.
To use external expressions, select the Add External Expression button in logic block fetch actions.
Logic block data source development considerations
This topic reviews development considerations for logic block inputs and outputs.
Outputs
If outputs are assigned to a new object, it creates a new Variable or DSN. If outputs are assigned to an existing object, it overwrites the existing variable, field, or DSN.
Header Details
If you specify a Header Detail table as a logic block input or output record, the data source stores information about the Header and HD Structure. To include the Detail records, you must either fetch each Detail table's records or specify them as additional inputs and outputs.
If a called logic block updates both a Header and Detail from within an HD Structure, the calling logic block must reference the Header output and re-fetch the Detail records to ensure current versions. If the Detail record is specified as both an input and output, you can inherit changes made to that data source instead of re-fetching to create a second and third copy. Outputs prevent HD maintenance within a logic block and improve performance.
NATE
Inputs and outputs behavior does not change with NATE turned on or off in a logic block.
Deprecation
Inputs and outputs configured in the Inputs and Outputs subtable cannot be deleted once a logic block has been delivered. Use the LogicBlockInputsAndOutputs.Deprecate checkbox to indicate the value or record is deprecated and add a new row to the subtable.
Currency in logic blocks
Currency fields can be used in multiple ways within logic blocks. This topic explains how and where currency fields are configured and stored, as well as what currency-specific system values can be used.
Currency fields
Currency fields are stored as objects that consist of two attributes, the amount field and the code field. These two parts make up the field value. For example, if the value of the TransactionAmount field is 12.00 USD, 12.00 is the amount, and USD is the code.
In the Currency Attribute field of your logic block actions, select an attribute to dictate how the field can be used, or leave the field blank to use the entire value.
Use the value attribute in math actions, use the code attribute to set or use the currency code, and use the amount attribute to reference the numerical subcomponent. There is limited support for currencies missing a code. For example, you cannot compare currencies without a populated code.
ZeroCurrency
Use the ZeroCurrency system value to set the value of a currency field or variable to zero. When you set a field to ZeroCurrency, you must also set the currency code in the same action. ZeroCurrency is considered the amount of the field, but the field also needs a code. You can do math with a ZeroCurrency field and can also compare currency fields to ZeroCurrency instead of 0.00 USD.
For example, if you want to validate if a field value is greater than zero, you would configure your expression to, if TransactionAmount > greater than ZeroCurrency.
CurrencyConfig
The CurrencyConfig table is used to manage the different currencies available for transactions. This table is fetched in logic blocks to ensure the currency codes used are valid. In other words, instead of hard-coding currency codes that could later be invalid, you fetch the values from a table.
Currency variables and extended precision
A currency variable is sometimes used in place of a currency data item in a logic block and can inherit characteristics of a currency data item, including decimal and extended precision used in calculations. Nextworld can store and use the extended precision in calculations.
For a currency variable in a logic block, you must define the Table and As variable attributes to use any extended precision inherited from a currency data item. The currency variable must have access to the applicable logic block table prior to setting the Table and As variable attributes. If you do not want to use extended precision for a currency variable, do not define the Table and As variable attributes.
For more information about extended precision, see Extended precision.
Currency math
This topic reviews the rules for currency math actions in logic blocks.
There are several rules to consider, such as:
- All inputs must have the same currency code. The only exceptions are the use of NULL codes as shown in the table below.
- You must have an amount set before you select a currency code.
- At least one of the inputs in the equation must have an amount and a code.
- You should never hard-code currency values.
- Outputs inherit the currency code of inputs.
The table below shows different scenarios for adding or subtracting currency fields, and what the results are with different input combinations.
| Input | Input | Output | ||||||
|---|---|---|---|---|---|---|---|---|
| Value | Code | Value | Code | Value | Code | Comments | ||
| 5.0 | USD | + or - | 10.0 | USD | = | 15.0 | USD | Both inputs have a currency code and non NULL amount. |
| 5.0 | USD | + or - | 10.0 | CAD | = | ERROR | Inputs have different codes. | |
| 5.0 | USD | + or - | NULL | USD | = | ERROR | Currency field has a NULL amount with a currency code. | |
| 5.0 | USD | + or - | 10.0 | NULL | = | ERROR | The second input has a currency amount, but no currency code. | |
| 5.0 | USD | + or - | 0.0 | NULL | = | 5.00 | USD | The second input is zero, and has no currency code. |
| 5.0 | USD | + or - | NULL | NULL | = | 5.00 | USD | The second input is treated as zero, even though it has no currency code. |
| 5.0 | NULL | + or - | 10.0 | NULL | = | ERROR | One currency code must be defined. |
Logic block security options
Logic block security options, such as Private, Public, and Public-Secured, dictate which permissions are applied to a logic block, and how the logic block can be called.
The security option also determines how other permissions associated with a record are applied when the logic block runs. These related permissions are:
- Row security—Row security profiles are configured in the Access Rules subtable in the Permission Definitions application, and indicate the level of access users have to a single table, or to related tables, applications, settings, and logic blocks associated with a security group. The permissions can be applied to the whole table, or be filtered to to parts of it, and determines user's ability to read, update, insert, and delete. Learn more in Row security.
- Security Group—Security groups are configured in the Security Group Definitions application, then can be referenced in tables, applications, logic blocks, and application settings that should have the same security. This allows security to be assigned to the entire group, rather than individual objects. Learn more in Security groups.
- Action security—Action security is configured in the Logic Blocks subtable in the Permission Definitions application, and controls a user's access to run logic blocks. When securing logic blocks, you can grant access to run a single logic block, or all logic blocks in a specific security group. Action security only applies to
Public-Securedlogic blocks. If no action security is configured, user permissions are applied. Learn more in Action security.
The table below details how a logic block interacts with other logic blocks, and how permissions are applied to the logic block, based on the value selected in the Security Option field.
| Security Option | Notes | Permissions Applied |
|---|---|---|
Private logic blocks must be called by endpoints or other logic blocks. If called by another logic block, it must be in the same product family as the calling logic blocks. These logic blocks generally have a very specific purpose and should not be used or called in other instances. For example, the Accounts Receivables applications have logic blocks built for currency calculations. These logic blocks should only be used in that product family and associated applications. Marking the logic blocks as | The logic block inherits the security of whatever logic block called it. | |
Public logic blocks can be called from anywhere. | Public logic blocks can only be accessed by users with the correct permissions. Each user's individual row security determines what they can do in the application. For example, one user may have standard read, update, insert, and delete access for the table which the logic block is written over. This user would be able to perform any actions associated with these functions in the application. Another user may only have read permissions in their row security and would get an error message if they attempted any actions that require update, insert, and delete access. Row security permissions are required for all tables which the logic block accesses. Users may have different read, update, insert, and delete access on calling logic blocks and processing logic blocks which can limit their access. Workflow security, restricted field security, and Org Unit security are honored and applied. | |
Public-Secured logic blocks can be called from anywhere. | All security is bypassed as long as the user has access to the initial table or logic block, or if they have access to the security group that the logic block or table are part of. Logic blocks are granted full access to the tables which they read and write from, without needing explicit row, field, or workflow permissions to the tables being read or modified. This means that the logic block can perform whatever actions it needs to run, regardless of whether the user has explicit permission for each of the actions. This is useful when a transaction needs to update a field that the current user isn't allowed to see or use, but is related to their job function. Workflow security and restricted field security are bypassed by calling the logic block to insert, update, or delete records with the appropriate action security checkboxes selected. Org Unit security is bypassed by default, but optionally can be applied in the Permissions application. If no action security is configured, user permissions are applied. If a user's row security grants them more access to the table than a selected security group is granted, the user retain their access. For example, if a security group only has read access, but a user has update, insert, and delete access, the user would retain their full access. |
For more information, see Logic block security option best practices.
Logic block security option best practices
These best practices ensure that the Security Options field in the Logic Block Builder application is configured with the correct Public, Public - Secured, or Private option.
The Security Option field controls how and when a logic block can be run. Learn more about these configurations in the Logic block security options topic.
Use the table below to determine which privacy setting to use based on the setup and type of logic block.
When choosing between Public and Public-Secured, by default we should use Public whenever possible. Do not use Public-Secured unless necessary. The use case of why it needs to bypass security should be thought out and it should not be blindly changed to Public-Secured. Adding a Public logic block to an existing feature may require additional security permissions to execute. Consult with your security point of contact if your use case requires additional access other than read-only.
| Logic Block Type/Function | Called From | Called Across Families | Configuration | Additional Considerations |
|---|---|---|---|---|
| Any Type | Any source | Yes | Public |
|
| Transaction or Validation | Any source | Yes | Public-Secured |
|
| Transaction or Validation | Logic block | No | Private |
|
Learn more about the different types of logic blocks in the Logic block types topic.
Ways to initiate a logic block
This topic reviews where you can connect logic blocks and how they are initiated.
Logic blocks are initiated in many ways, including:
- User interactions in applications
- Table changes, such as saves, deletes, or updates
- Workflow in auto and post transitions
- Using Ed to start a process, such as creating an application, table, or list lookup
- Data transforms
- Scheduled jobs that run async
- Action blocks called from endpoints
In the Application Builder application, on the Action page, configure logic blocks to initiate based on user interactions, such as:
- Field actions—Initiates when a user interacts with individual fields in an application. See the Logic blocks and field actions topic.
- Row actions—Initiates when a user selects a row action. See the Logic blocks and row actions topic.
- Event actions—Initiates when a user interacts with an application, such as selecting a row or creating a calendar event. Event actions run automatically, without requiring an explicit user command. See the Logic blocks and event actions topic.
Learn about configuring actions in Configure actions for an application.
In the Table Definitions application, configure logic blocks to initiate based on table changes, such as:
- Table triggers—Initiates before or after a record is altered in a table. Table triggers allow you to validate record data and update multiple tables, and ensure data is processed the same way, regardless of how the data is altered. See the Table triggers topic.
- Action blocks—Initiates instead of a save, update, or delete when a user selects a button to change a record. Action blocks contain logic actions to update the table they are configured on. See the Action blocks topic.
Action blocks and table triggers occur any time a record is modified by a user action. Learn about the order in which logic blocks are executed Sequence of logic block execution on tables topic.
Logic blocks and field actions
Configure logic blocks to run when a user interact with individual fields in an application.
Use field actions when the logic block only applies to a field within a record, and not the entire record. Field actions can be configured with different display options, such as:
- Button Only—Displays the button on the detail form.
- Button and Field Label—Displays the button and a field label on the detail form.
- List View Action—Displays the button on the list form.
- Calendar Event Action—Displays the button in the calendar event.
- Subtable—Displays a button icon next to the subtable field.
By default, field actions display the label, field, and button on the detail form. The logic block only runs when the user selects the button, so use a field action if the logic block is optional.
For example, in the Supplier Invoices application, there is a field action configured for the Supplier Name field that loads the last invoice for the supplier. Other field values, such as the Billing Address, Organizational Unit, or Payment Terms do not change between invoices. If you load information from the last invoice you can save time and reduce the margin for error. It isn’t necessary for the last invoice to be loaded each time a new invoice is entered, or every time a new value is entered in the Supplier Name field. This field action displays under the Supplier Name field as the Load Last Invoice button.
Field actions are part of the application design and are configured on the Actions page of the Application Builder application. Learn about configuring actions in Configure actions for an application.
Logic blocks and row actions
Configure logic blocks to run when a user selects a row action. There are different row action link types, such as logic block in trans boundary, and logic block not in trans boundary.
Row actions apply to entire records. For example, in the Journal Entries application, the Void row action voids the current journal entry record. Depending on the application type, creating a row action can result in action menu options in the:
- Row action menu in the application list form.
- Detail list form of a Header Detail application.
- Detail list form on the Relationships page of a Relationship application.
- Row group of an Advanced List application configured with Grouped Detail.
- Form action menu at the top of the detail form of an application.
- Subtable of an application.
Row actions are part of the application design and are configured on the Actions page of the Application Builder application. Learn about configuring actions in Configure actions for an application.
There are several row action link types you can configure, such as:
Application (Extend Trans Boundary)—Extends the NATE container to the application you are opening with the application link. For more information, see the Nested NATE containers topic.Application (Save Not Required)—Does not require the user to save the record before the application link opens the new application. Runs outside of the transaction boundary. Often, changes are still available when the user navigates back to the first application.Application (Save Required)—Requires the user to save the record before the application link opens the new application. Runs outside of the transaction boundary.Logic Block - Not in Trans Boundary—Does not require the user to save the record before the logic block runs. Runs outside of the transaction boundary, which means if this logic block updates a record, the change is applied whether or not the current record is saved.Logic Block - Not in Trans Boundary (Save Required)—Requires the user to save any unsaved changes to the record before the logic block runs. Runs outside of the transaction boundary.Logic Block In Trans Boundary—Does not require the user to save the record before the logic block runs. Runs within the transaction boundary and any changes from the logic block are part of the same NATE container. This means that if the record is not saved, any changes to the record made by the logic block are discarded.
Header Detail row action configuration option
Header detail row actions always run within a transaction boundary, regardless of the Link Type selected. To have the row action run outside of a transaction boundary, there are additional configuration requirements.
There are several components for this configuration:
- Processing Logic Block—The logic block that contains the logic you want attached to the row action.
- Calling Logic Block—The wrapper logic block that calls the processing logic block. This is also the logic block referenced in the Row Action subtable.
- Row Action Subtable—The subtable in the Application Builder application where you configure the row actions.
These steps occur after you have built a Header Detail application over a Header Detail table. For more information, see the Header Detail application configuration topic.
Processing Logic Block
In the Logic Builder, you must:
- Build a logic block over the Header table used in the Header Detail table configuration.
- Add the Create HD Structure action.
- In the HD Table field, select the name of the Header Detail table
- Name your HD Structure.
- Add the Fetch Detail Records action.
- In the HD Structure field, enter the name of the HD Structure you created.
- Enter the name of the Detail table used in the Header Detail table configuration.
- Create the logic you want associated with the row action.
Calling Logic Block
In the Logic Builder, you must:
- Build a new logic block over the same Header Detail table as the Header Detail application you're configuring the row action in.
- Add the Call a Logic Block action.
- Enter the name of the processing logic block you configured.
- Select the Run In New Database Transaction checkbox.
- In the Data Source Name field of the action, enter the name of the Header table you built the called logic block over.
For more information, see the Call a Logic Block action topic.
Row Action Subtable
In the Application Builder application, navigate to the Actions page. In the Row Action Subtable, configure your row action and reference the calling logic block you created.
For more information, see the Logic blocks and row actions topic.
Logic blocks and event actions
Configure logic blocks to run when a user interacts with an application on the Actions page of the Application Builder. Event actions run automatically, without requiring an explicit user command.
The table below discusses the different types of event actions, and what user actions prompts the logic block to run.
| Event Action | The logic block runs when a user... | Notes |
|---|---|---|
| Advanced List Form is Initialized | Opens an advanced list application in the advanced list form. | Only applies to advanced list applications. |
| Before Calendar Event Created | Drags and drops a record into a calendar slot. | Only occurs when a record is dropped into a specific calendar slot. The calendar event definition record for that specific time slot is sent to the logic block to run against, not the entire calendar record. Logic blocks needs to be built over the CalendarEventDefinitions table. The event can stop a calendar event from being created if the logic block errors. For example, some events require certain resource skills in order to be scheduled. If the event is dropped on a resource calendar who doesn't have those skills, the logic block rejects the event and won't let it be created. |
| Before Calendar Event Updated | Changes a calendar event. | Runs before calendar event updated is completed, and saved. If there is an error the event does not get updated and the calendar event updated logic does not run. |
| Before Group Save | Selects Save, when Save as Group is enabled. | Only applies to advanced list applications. |
| Before Row Delete | Deletes a row or when Save As Group is is selected on advanced list application. | This action runs before the row is deleted. Only applies to header detail and advanced list applications. |
| Before Save | Selects Save. | This action stops data from being saved or updated if there are any errors or warnings. If the associated logic block has any warning messages associated with the Before Save event or the Before Save event initiates a warning from the logic block, a dialogic box appears in the UI with the associated warning message(s). If other actions in the logic block perform inserts or updates, this action does not stop them and changes are not rolled back if the logic block returns a warning. |
| Calendar Event Created | Creates a calendar event. | The calendar event definition record for that specific time slot is sent to the logic block to run against, not the entire calendar record. Logic blocks needs to be built over the CalendarEventDefinitions table. |
| Calendar Event Deleted | Deletes a calendar event. | The calendar event definition record for that specific time slot is sent to the logic block to run against, not the entire calendar record. Logic blocks needs to be built over the CalendarEventDefinitions table. |
| Calendar Event Updated | Changes a calendar event. | The calendar event definition record for that specific time slot is sent to the logic block to run against, not the entire calendar record. Logic blocks needs to be built over the CalendarEventDefinitions table. |
| Composite Initialized | Hides a step of a composite application. | When the composite application is launched, the logic block runs to apply UI hints that hide the selected composite step. |
| Datatable True/False Click | Selects or clears a true false field. | Enables users to select a checkbox without having to enter edit mode on the row. |
| Datatable True/False Click (With Multi-Select) | Selects the checkbox that has the event configured on it. Selects Select All or Clear All visible checkboxes using the actions menu in the column headers of the detail list for multiple selection. | Enables users to select a checkbox without having to enter edit mode on the row. Configure other event actions, such as Field Value Changed, on the field if you want these events to initiate when a user selects the checkbox while in edit mode of the row.This action also enables the Select All and Clear All checkbox options in column headers. Reference logic in the configuration to make the Select All and Clear All options event actions. Other event actions do not occur if only the Select All or Clear All buttons are selected. This configuration is available on the detail lines of Header Detail applications, the detail list of Relationship applications, and on subtables used in any application type. |
| Field Entered | Selects or tabs into a field. | |
| Field Exited | Selects or tabs out of a field. | |
| Field Value Changed | Changes the value in the defined field and then exits the field, or hits enter. | |
| Form is Initialized | Opens the application in an application form. | This event does not run when the list form of an application is initiated. |
| Gantt Double Click | Double clicks a component of a Gantt application. | This event action must be configured with an application link. When the action occurs, a mini app should open that allows editing of the underlying record. By default, Gantt applications are read-only. Learn more in Gantt application configuration. |
| Load Button Clicked | Selects Reset or Load button on the application page. | Only applies to group detail applications. |
| Load Data on List Form | Fetches business data from the table that the logic block is built over. For example, when an application is initially launched, or the Refresh button is selected. | The logic block configured on this event action is run over every record individually when the records are fetched. This means only the records visible on the list form are included in the event action. This is useful for conditional logic. This action is not supported in logic block debugging. |
| Pivot Row Group Changed | Changes any of the row group values and then exit the row group. | This action is specific to the cells in the row group values, not the cells under the pivot columns. |
| Pivot Row Group Entered | Selects any cell within a row group. | This action only runs on the first select of a cell in the row group. If you select another cell in the same row group, the action isn't triggered again. The action does trigger if you select a cell from a new row group. This action runs on all records in the row group when one cell is selected. |
| Pivot Row Group Field Value Changed | Changes any of the field values in the row group configuration. | When you drop a record onto another record, values from the source record are copied into fields for the receiving record. The action runs on the record the record is dropped into, not the original record, once the record is dropped in the new location. For example, in resource scheduling, you could drag an event record onto a resource's calendar. The action would run on the entire resource calendar. |
| Pivot Series Next | Selects the next arrow on the right side of the current date range to move the range forward in pivot view. | For example, if a user selects the next arrow, you could have a logic block trigger to change the value being shown in the current cycle field to reflect the new date range they are viewing. See the [link: 'PivotTableStyleNavigation'] and [link: 'PivotTableStyleNavigationExample'] topics for more information. |
| Pivot Series Previous | Selects the previous arrow on the left side of the current date range to move the range backwards in pivot view. | This action runs when a value for the row group field is changed. |
| Record Drop | Drags and drops a record from one location to another. For example, from a list view to an advanced list record. | |
| Row Added | Selects the Add Row button in an Advanced List or Header Detail application. | If a Row Entered action is also configured, only the Row Added event runs when a row is added. When you apply UI hints, such as hiding or disabling a checkbox, to different fields on this logic block, those UI hints are applied only on the newly added record. This action is not supported in subtables. |
| Row Entered | Edits or double-selects a row. | Only applies to header detail, relationship, and advanced list applications. This action is not supported in subtables. |
| Row Exited | Selects out of a row or saves a row. | Only applies to header detail, relationship, and advanced list applications. This action is not supported in subtables. |
| Row Changed | Changes a value in a row, and then exits a row. | Only applies to header detail, relationship, and advanced list applications. This action is not supported in subtables. |
| Row Deleted | Deletes a row. | This action runs after the row is deleted. Only applies to applications with a list or detail-list form. This action is not supported in subtables. |
| Row Action Event | Selects a row. Selects to open the row action menu. Selects a button from the row tray. | This action is not supported in subtables. This event only runs when you select the row action, and not on a form action. |
| Tree Node is Selected | Selects a tree node. | Only applies to relationship tree applications. |
Event actions are part of the application design and are configured on the Actions page of the Application Builder application. Learn about configuring actions in Configure actions for an application.
Table triggers
Configure logic blocks as table triggers so that they run before or after a record is altered in a table. Table triggers occur any time a record is modified by a user action.
There are different types of triggers. Each type of trigger is comprised of a classification and a mode. The prefix determines when the table trigger runs. The options are:
Pre—The table trigger runs before the change is saved to the table. Use for data validation, defaulting values, or both.Post—The table trigger runs after the change is saved to the table. Use for data validation and to update associated tables with updated record information.Validation—The table trigger runs on both Pre-Insert and Pre-Update. Validation triggers can be run multiple times before being committed.
See the Pre-triggers, Post-triggers, and Pre- and post-trigger topics.
The mode is how the table is being altered. The table below reviews the modes for table triggers:
| Mode | The table trigger runs when... | Example |
|---|---|---|
| Update | An existing record is changed. | The PayablesHeaderPreTrigger logic block is a Pre-Update table trigger that sets the Payment Status field in Supplier Invoices after the record is created or updated, but before the change is persisted to the table. |
| Insert | A new record is created. | The UpdateSupplierInvoices logic block is a Post-Insert table trigger that updates the Pending Payment field in the header table when records are saved in the detail table. The BankDepositsPostTrigger logic block sets the value of the LinkID field with a value that is comprised of the ContactID, TransactionType, and DepositTransactionNumber values saved in the record. The logic block runs after a change is persisted to the table, and is used to update values in associated or secondary tables with values from the new record. |
| Delete | An existing record is removed. | A Post-Delete table trigger runs a logic block to send emails to recipients notifying them of an event deletion from a calendar. |
Table triggers for Header Details run in a particular sequence. Learn more in Sequence of logic block execution on tables.
Considerations
There are several considerations for table triggers, such as:
- The Transaction Scope checkbox prevents records from being saved if an error occurs in the logic block. This means that when an error occurs, the entire transaction is rolled back. By default, this checkbox is selected.
- If you make any changes to the underlying table during a Post-trigger logic block, you must follow them with an Update action since these logic blocks run over a record that is already committed.
- Triggers that run on save events must run within thirty seconds or they receive a time out. Async can be used for save events.
- Table triggers run when subtable records are updated from the main table.
- Table trigger not initiated by a logic block are deferred to the time of the NATE container commit. Learn more in NATE containers and Sequence of logic block execution on tables.
See the Table triggers best practices topic for best practices information.
Pre-triggers
Logic blocks configured as pre-triggers run before the record is saved to the table, and are used for data validation, defaulting values, or both.
While records are being altered, and when the save is attempted, records are NATE pending. While the save is being attempted, records are database uncommitted and the pre-trigger logic block runs. After the pre-trigger logic block finishes running and is successful, the records are committed to the database and the save is complete.
If the logic block errors, any data changes made by the logic block are rolled back, and the record is restored to before the save was attempted.
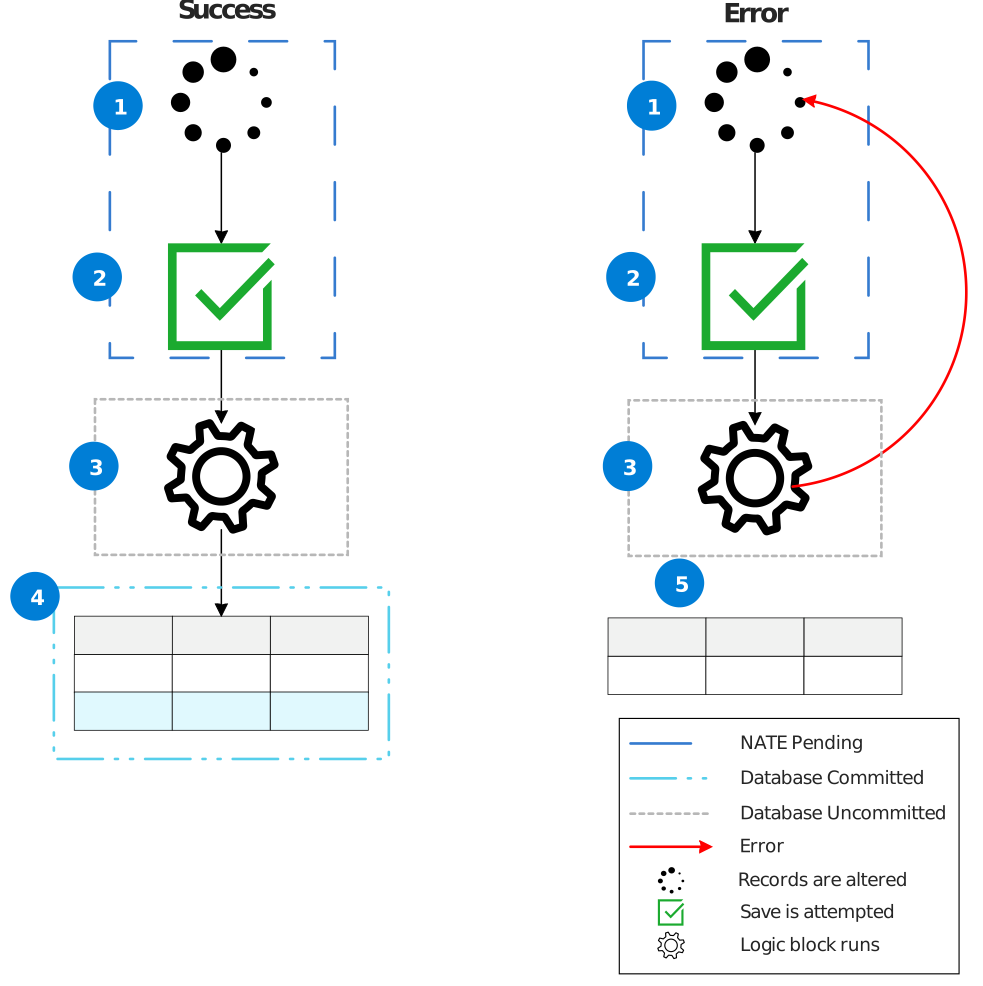
1. Records are altered
2. Save is attempted
3. Pre-trigger logic block
4. Records are committed
5. Data changes are rolled back
Post-triggers
Logic blocks configured as post-triggers run after the record is saved to the table, and are used for data validation and to update associated tables with updated record information.
While records are being altered, and when the save is attempted, records are NATE pending. The altered records are saved to the table, but are database uncommitted. While they are uncommitted, the post-trigger logic block runs. When it runs successfully, the post-trigger logic block updates additional tables with the altered record, and then the record is committed to the database. When a post-trigger logic block errors, records are reverted to before the save was attempted.
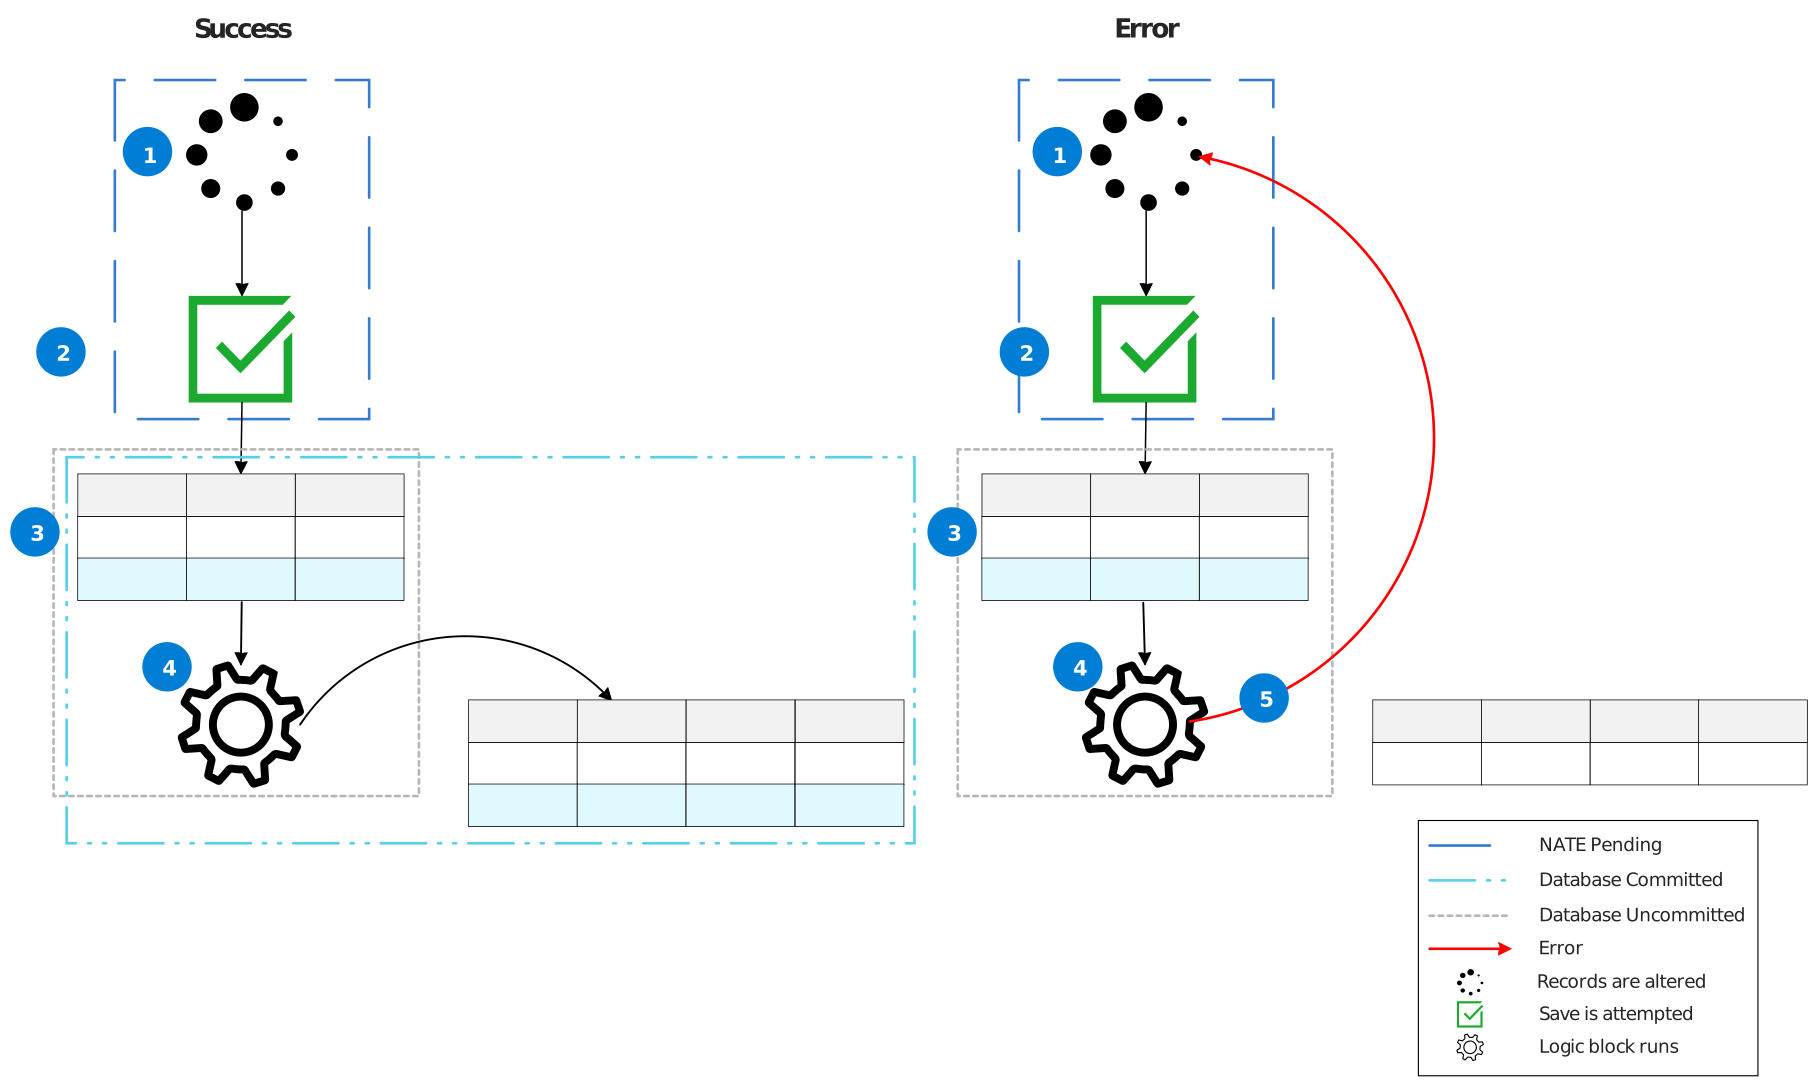
1. Records are altered
2. Save is attempted
3. Records are uncommitted
4. Post-trigger logic block runs
5. Data changes are rolled back
Pre- and post-trigger
When tables have logic blocks configured as both pre-and post-triggers, they run sequentially.
While records are being altered, and when the save is attempted, records are NATE pending. While the save is being attempted, records are database uncommitted and the pre-trigger logic block runs. After the pre-trigger logic block finishes running and is successful, the records are database uncommitted
After the records are altered, a save is attempted. During the attempt to save, the records are NATE pending. While the records are NATE pending, the pre-trigger logic block runs. After the pre-trigger logic block finishes running and is successful, the records are database pending. When they are pending but before they are committed, the post-trigger logic block runs. While they are uncommitted, the post-trigger logic block runs. When it runs successfully, the post-trigger logic block updates additional tables with the altered record, and then the record is committed to the database. When a post-trigger logic block errors, records are reverted to before the save was attempted.
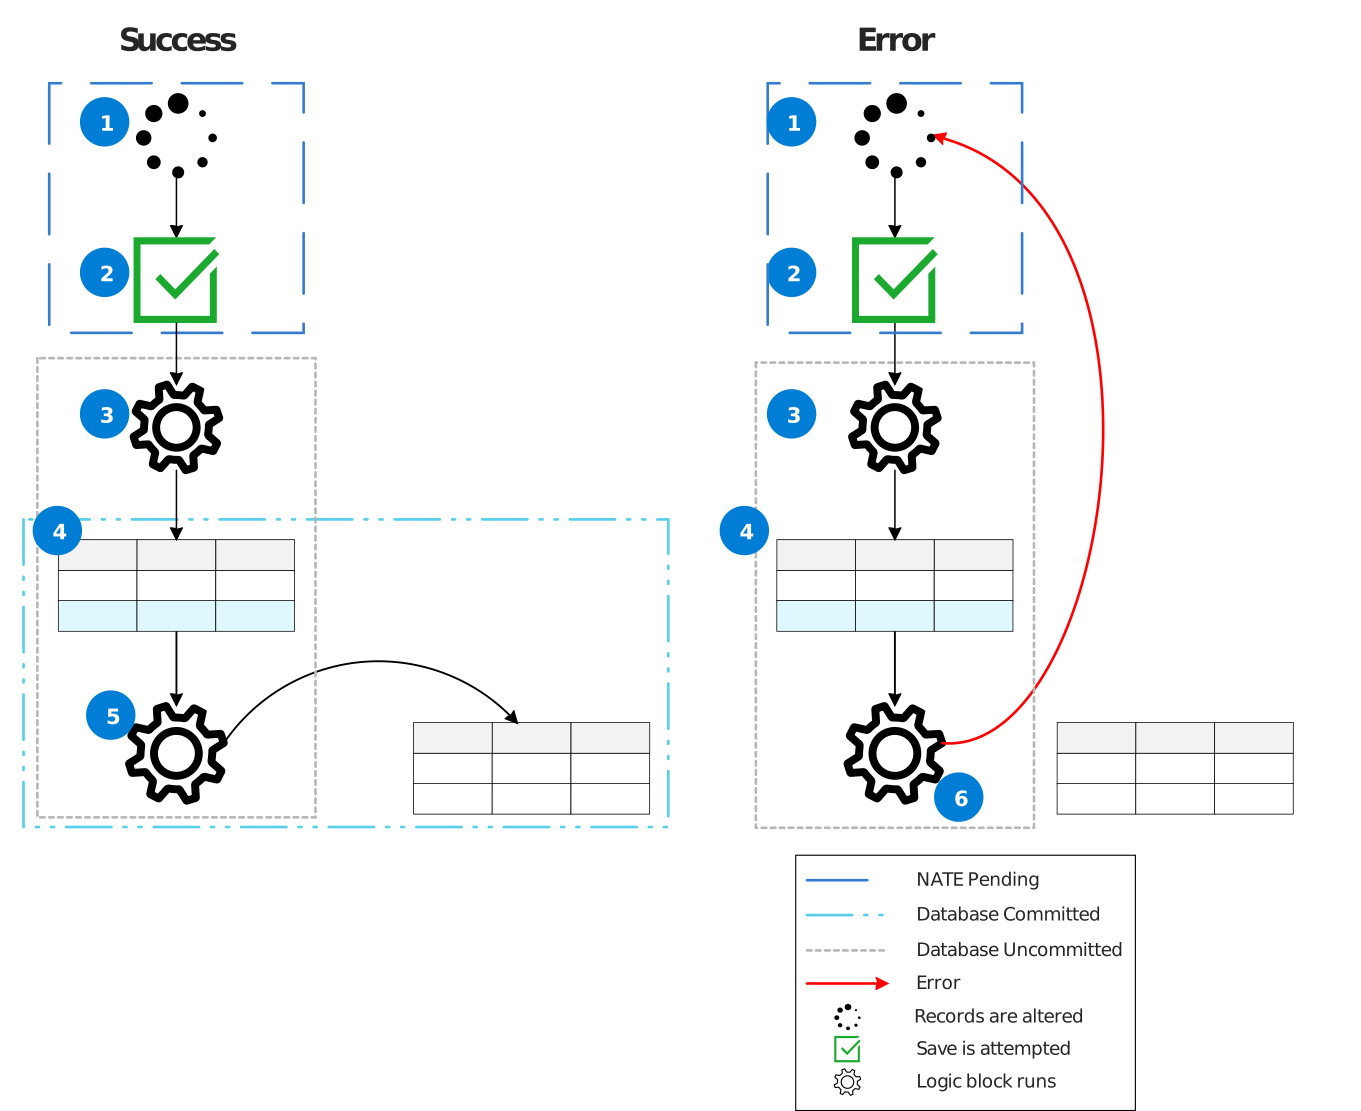
1. Records are altered
2. Save is attempted
3. Pre-trigger logic block runs
4. Records are database uncommitted
5. Post-trigger logic block runs
6. Data changes are rolled back
Table triggers best practices
These best practices ensure that table triggers are configured consistently throughout Nextworld.
Table triggers are built in Logic Blocks and configured in the Table Definitions application.
When to use
Pre-triggers execute before the record is saved to the table. Post-triggers execute after a record has been saved to the table. Use each type of table trigger for different purposes, such as:
- Pre-Insert: Use to validate, populate default fields, or populate derived fields.
- Pre-Update: Use to validate, set default fields, or set derived fields.
- Post-Insert: Update or insert to other tables, or update one of its own derived fields with a fresh auto number.
- Post-Update: Update or insert to other tables.
Any logic block that is run from the UI to validate field values should also be a table trigger. Using both the UI and table triggers may cause you to validate twice, but validating twice is better than receiving invalid data.
Considerations for using an action block instead of a trigger.
- Create an action block if other families will be inserting records.
- If you have large complex logic for the table.
Common best practices
A trigger logic block cannot have any UI-only logic actions such as Hide, Show, Disable, or Enable.
Ensure you don't have recursive logic. One exception is populating the LinkId field. The LinkId is a concatenation of three fields including an auto number. An auto number is not available until the post trigger. Only configure this option on the post-insert to avoid recursion.
Include default values in triggers on a case-by-case basis. If the user wants a non-required field to be left blank and clears out the UI defaulted value, the table trigger overrides the field the user intended to leave blank.
When possible, call only one logic block for a trigger event. That logic block can call other logic blocks to keep your logic modularized and also allows a logic block to be called from the UI.
If you are placing a trigger on a Header Detail table, the trigger must be placed appropriately. See Configure table triggers for Header Detail applications for more information.
Action blocks
Configure logic blocks as action blocks so that they run instead of a save, update, or delete when a user selects a button to change a record. Action blocks are added as part of the table configuration, and contain logic block actions to update the table.
Action blocks require specific user action to run. An action block would not run when data is imported to a table or another logic block inserts records to the table, but does run when it is called by other logic blocks.
Action blocks act as a link between the data and the database. They take the information from the table they are called from, and then either connect that data with another table, or insert the data into the table that calls them. Other applications or integrations should call the action block to insert records into the table.
Instead of automatically saving a record at the end of the logic block, you include actions in your logic block to manually save a record. For example, you could include an Insert Records or Update Records action. Taking over the save ensures that there is only one logic block that performs all validations and operations on the table. Taking over the delete ensures data integrity, making any necessary updates to other tables when a record is deleted.
Logic blocks are often configured as action blocks to:
- Ensure there is only one point from which records can be inserted into a table. The action block can validate the information and then save the record.
- Insert records into transaction tables which receive records from multiple sources.
- Insert information from an application used for data entry into a different table. The action block could include actions that call other logic blocks.
- Set the nwId for the DSN on an Insert action. This will return the nwId of the record created and allow for it to be passed back to any other logic block calling that action block.
Sequence of logic block execution on tables
Logic blocks have a specific table save order of execution when table changes (also known as table mutations), such as record inserts, deletes, and updates occur.
The order of execution for logic blocks is:
- Validation triggers
- Action blocks
- Pre-triggers
- Automatic numbers
- Operations such as insert, update, and delete
- Post-triggers
- Conditional Workflow logic blocks
- Workflow Post Run logic blocks
If the application type is not Header Detail, Workflow executes after post-triggers.
Header Detail tables
If the logic block is built over a Header Detail table, the Header events are run first. After the Header post-trigger is completed, the Detail logic executes in the following order:
- Common fields are populated
- Detail validation triggers
- Detail action block
- Detail pre-trigger
- Detail auto numbers
- Detail operations
- Detail post-triggers
- Header Detail post-trigger
After the records are processed and have gone through each of those steps, Workflow is submitted.
Sequence of logic block processing
This topic reviews the sequence of logic block processing based on the type of logic block being called, the type of logic block that calls it, and how the calling logic block is being run.
Calling logic blocks, also called parent logic blocks, often call multiple other logic blocks throughout the series of actions and logic which it must process. The logic blocks being called, also called processing logic blocks, can then also initiate additional logic blocks.
The type of processing logic block being called, the action that calls it, and how the parent logic block is run determines whether the processing logic block:
- Runs in the same processing event as the parent logic block. This means the parent logic block is interrupted by the processing logic block and does not resume processing until the child logic block and any logic blocks which it initiates completes their own processing event. This is the more common pattern for logic block processing.
- Runs independently of the parent logic block that called it. This means the parent and processing logic block run in separate processing events and do not effect each other.
There are three ways a logic block process can be initiated:
- A Transaction logic block is called from the UI and runs as a UI process.
- A Background Task logic block is called from the UI and runs in the background as a new job.
- A Background Task logic block is called from a scheduled Job and runs in the background as a new job.
The table below reviews how different logic blocks are processed:
| If the parent logic block is a... | And the child logic block is a... | The logic blocks process in the following sequence: |
|---|---|---|
| Transaction logic block | Called Transaction logic block | The parent Transaction logic block is paused, the processing Transaction logic block runs to completion, then the parent Transaction logic block begins processing again. |
| Transaction logic block | Called Background Task logic block Queued Background Task logic block | The parent Transaction logic block continues to run while the processing logic blocks run independently of the parent logic block. |
| Background Task logic block | Called Transaction logic block Called Background Task logic block | The parent Background Task logic block is paused, the processing logic blocks run to completion, then the parent Background Task begins processing again. |
| Background Task logic block | Queued Background Task logic block | The parent Transaction logic block continues to run while the processing logic blocks run independently of the parent logic block. |
Logic block configuration tools
Use the logic block configuration tools to build, debug, test, and compare your logic blocks.
For more information on logic block development, see the following topics:
- Logic Block Builder
Use the Logic Block Builder within the Logic Block Builder application to define the sequence of actions that occur when a logic block is initiated.
- Logic block debugger
Use the Logic Block Debugger to troubleshoot problems with any logic blocks that run because of an action in the UI. This includes table triggers and action blocks that run after a user saves.
- Logic block test harnesses
Application developers create logic block test harnesses to validate the functionality of their logic blocks and monitor for regressions. The development of new logic blocks, or the modification of an existing logic block, is not complete without a test.
- Logic block compare tool
Use the Logic Block Compare tool to view two logic blocks and see the differences between them. Access the Logic Block Compare tool from the Logic Builder.
- Logic block versions
Use the Create Version button in the L ogic Builde r to create a new version of a logic block. Access and manage versions with the Manage Versions button in the Logic Builder, or the Manage Versions action in the Logic Block Builder application.
- Branch and merge
Create logic block branches to enable concurrent development of the same logic block. Merge logic block branches to update the original logic block.
- Logic Block Builder application
Application developers use the Logic Block Builder application to create, alter, and build logic blocks.
- Logic Block Validations application
Application developers use the Logic Block Validations application to validate all the logic blocks owned by your current tenant.
- Asset Usage Inquiry application
Application developers use the Asset Usage Inquiry application to keep a record of the Nextworld objects that are consumed, or used, by logic blocks.
Logic Block Builder
Use the Logic Block Builder within the Logic Block Builder application to define the sequence of actions that occur when a logic block is initiated.
Select the Logic Block Builder form action, or navigate to the Logic Block Builder page, to view or select a logic block's actions.
The Logic Block Builder is comprised of three panels. Each panel serves a different purpose in building a logic block, as seen in the diagram below:
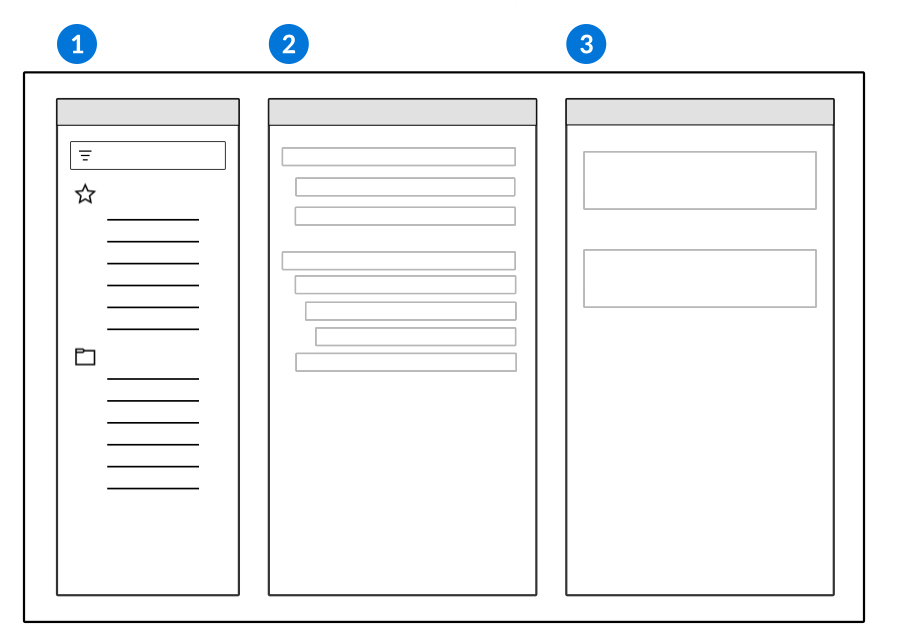
| Actions panel—The list of all available actions used to create logical expression. Logic block actions are categorized by their function. You can favorite useful actions so they are visible at the top of the list. Favorited actions are specific to the type of logic block you are building, and persist across different lifecycles. This panel is only visible when you have access to edit the logic block. |
|---|---|
| Logic Block panel—The sequence of logic block actions you select and define. Open the Logic Action Menu  on a selected action to access configuration shortcuts. on a selected action to access configuration shortcuts. |
| Properties panel—The configuration options for the action selected. |
See the Logic block foundations: Design, develop, and test section for more information on logic blocks.
Logic block actions
Use logic block actions in the Logic Builder to configure the function of your logic blocks.
There are many logic block actions that fulfill different purposes. For more information about specific logic block actions, view the following topics.
Fetch actions
- Aggregate action
- Logic block fetch actions
- Increment and Fetch Auto Number action
- Retrieve Module Settings action
- Traverse tree action
Logic Flow
Math
Text Manipulation
User Interface
Record Operation
- Additional mappings in logic blocks
- Copy Attachments action
- Create HD Structure action
- Set Values action
- Update Records action
Queue
Call
Messaging
- Add All Messages action
- Build Directory Collection action
- Create Message action
- Interrupt With Error action
- Loop List action
- Queue Dialog action
Date
Add All Messages action
The Add All Messages action allows application developers to copy all messages from a message list to the logic block's current message list.
With the Add All Messages action, execution of a logic block will continue after all messages are copied. This is true whether or not the message list contains messages with a severity of Error.
To configure specific errors to interrupt execution, use the Interrupt With Errors action.
To allow all messages from a child logic block to execute or interrupt execution as configured, use the Call A Logic Block action and select Adopt All Messages.
Aggregate action
Use the Aggregate action to find the maximum, minimum, total, average, or count of numeric or currency fields, or the count of non-numeric fields.
Configuration
There are several considerations for configuration, such as:
- The name you give your aggregate is used to reference the action in other logic block actions. For example, in conditional logic you would reference the aggregate name in the Table field.
- In the Expression section, you can fetch and filter your selected records.
- In the Aggregation section, you can select the fields you want to aggregate.
- There are different operators for aggregation, such as total, count, average, minimum, or maximum.
- Different data item types can use different operators.
- You can select multiple aggregate operators.
Group By
In the Group By section, you can group aggregates together. For example, if you wanted the total values of the Material Needed and Material Available in a manufacturing process, but you also want those totals to be grouped by the supply demand Date.
In the Aggregate action, you would specify:
- Field:
Material Needed, Aggregation:Total - Field:
Material Available, Aggregation:Total - Group By:
Date
The table below shows sample data for this example:
| Material Needed | Material Available | Date |
|---|---|---|
| 2 | 3 | 01/01/2022 |
| 2 | 6 | 01/03/2022 |
| 1 | 3 | 01/01/2022 |
| 3 | 5 | 01/04/2022 |
| 4 | 1 | 01/01/2022 |
The outputs for this configuration would be:
- Date: 01/01/2022, Material Needed: 8, Material Available: 7
- Date: 01/03/2022, Material Needed: 2, Material Available: 6
- Date 01/04/2022, Material Needed: 3, Material Available: 5
To access the aggregate outputs, loop the fetched records and insert them into a temp table. You can then pull the desired outputs from the temp table.
Considerations
The use of this action should only be used when the data is well-known and the filter criteria of the aggregation is as restrictive and limited as possible. There should also be a supporting index on the table being filtered and aggregated upon. For more information, see Index best practices. This action should never be used when the filter criteria is weak or if the logic is already looping through matching records for other reasons. Never use this action to check for the existence of a record.
Apply Styles action
Use the Apply Styles action to apply a style definition to elements in your application. Style definitions change or conditionally change the UI elements of fields.
In the Apply Styles action, enter the name of the application, the field you want to style, and the style definition you want applied. You can select a prebuilt definition or create your own. To view or create a style definition, navigate to the Style Definition application.
Each style definition designates what changes should be applied to the specified field. For example, the definition could highlight, change the font color, or mark a field as required. Use conditional logic to control when the style is applied. For example, the style definition could be applied when a value changes, is selected, or exceeds a certain amount.
Learn more in Style definitions and Style Definitions application topic.
Attachment actions
Use the different logic block attachment actions to manipulate attachments on and between records.
Loop Attachment
Use the Loop Attachment action to loop over the attachments on a given record. This enables you to add logic to process the attachments on the record, such as adding conditional logic that checks for a specific attachment.
Add Attachment
Use the Add Attachment action to add an attachment to a target record. This enables you to rename an attachment on a record, or to copy an attachment from one record to another record.
Delete Attachment
The Delete Attachment action allows you to delete a specific attachment, or all attachments, on a given record.
Example
For example, you could:
- Loop attachments on a given record to a specific attachment.
- Add the attachment back to your record with a new name.
- Delete the attachment with the old name.
Build Directory Collection action
The Build Directory Collection action is used to provide records from the directory.
Use this logic block action to provide a list of records from the Directory table to another application or process, such as the Message Definitions application or Workflow Approvals application.
Bulk Update action
The Bulk Update action allows you to update a group of specified records simultaneously. This is used in data transforms, such as workflow conversions, to update field values.
There are several operations you can perform with bulk update, such as:
- Add or subtract a field value by any number, or multiply by a whole number. The field can have only one math operation designated.
- Set a field with a new value.
- Clear a field to be empty.
The Bulk Update action performs the operation you configure on every record that matches the filter criteria.
Configuration
In the Logic Builder, application developers must:
- Select the Bulk Update action in their logic block.
- Specify the filter criteria for how the records should be selected.
- Designate the math operation, or value, which they want to use on the fields.
Workflow conversions
Use the Workflow Mappings section in the Bulk Update action to set the workflow state, workflow state type, and workflow type on records. This enables you to add or remove workflow support on a table which already has business data, since you can add or remove the znwWorkflowInstance field from records.
While bulk updates are generally more efficient than fetching and updating individual records, the bulk update does not take into account any workflow types added in downstream development. If workflow is newly added to a table, the production environments likely do not have any owned or customized workflow types, so it is safe to hardcode a workflow type in your workflow conversion.
Call External Endpoint action
Use the Call External Endpoint action to initiate a previously configured endpoint definition.
The endpoint definition describes the external endpoint to be called, how to construct the request, and how to interpret the response(s). Learn more in the Outbound endpoint configuration overview topic.
In the Logic Block Builder, select the action. In the Detail panels for the action, you must:
- Enter the name of the definition in the Select an External Endpoint field.
- Select your source type in the Source Type field. The available types are:
Temp Table—Use when you have passed records into a temp table in your logic block. The records from the temp table are then passed to the endpoint in the request body. Temp tables are limited to 15,000 records. If your requests contains more than 15,000 records, you must use theTablesource type.Table—Use to configure filters that specify which records from the Request Mapping Table in the endpoint definition should be passed in the request body to the endpoint.Logic Block Signature Mapping—Use when the table the logic block is built over is the Request Mapping Table from the endpoint definition.JSON—Use when you want to pass JSON objects and variables to external call requests. You must configure the JSON Object/Array in the Set Values action, then reference it here. Learn more in JSON manipulation in logic blocks.
- Name your Response DSN. This name can be referenced by other logic block actions that need to query the data provided by the endpoint response.
If your endpoint definition has a response set of type File, you must specify which record in your source table should receive the file attachment. Expand the Add Attachment section to select the record.
Call a Logic Block action
Use the Call a Logic Block action to define a processing logic block that runs and updates information before passing it back to a calling logic block.
When you use a Call a Logic Block action, you use the calling logic block to pass information to a processing logic block. Any data sources specified as inputs in the processing logic block are passed to the calling logic block. When the processing logic block runs, it uses that information, modifies it, and then passes updated information back to the calling logic block. The calling logic block uses the updated information in other actions. By default, the processing logic block doesn’t save the result of its processing, it just passes it back to the calling logic block.
You can use the Run in New Database Transaction checkbox to have the processing logic block run in a new transaction. If the new transaction is run live, the triggers are run immediately. If the new transaction is in a NATE container, the updates become pending and the triggers run when the transaction commits at the end.
If the processing logic block finishes successfully, the new transaction is committed. The changes from the processing logic block are then fully committed into the database and control is returned to the parent where it resume operation in its own transaction.
You can specify which fields you want to pass from the calling logic block to the processing logic block, or you can specify an entire table.
Logic block call mode and record disposition
The logic block call mode dictates what user actions initiate the logic block. For example, a logic block with a call mode of Create only initiates when a user creates a record.
You can dictate the call mode of processing logic blocks in the Call a Logic Block action. Optionally, you can then conditionalize the call mode with the Logic Block Mode system value. For example, if you have a trigger that runs on both insert and update operations, you could create conditionals which check if the Logic Block Call Mode is Create or Edit. This would ensure the logic block only initiates on one of those states which allows you to use shared logic in multiple scenarios.
Processing logic blocks initiated by a user interaction within an application are assigned a call mode based on the record disposition. The record disposition is managed by the platform, and tracks the current state of the record within a given NATE container. For example, a record that is being updated would have a record disposition of MODIFIED and would assign the call mode of Edit to the logic block. A record within the NATE container that hasn't been impacted by the transaction would have a record disposition of PRISTINE.
The table below reviews the available call modes and the associated user actions:
| Call Mode | User action |
|---|---|
| Create | Create a record |
| Edit | Change an existing record |
| Delete | Delete a record |
| Current | Create a record Change an existing record Delete a record |
If you want to always call the processing logic block as part of the calling logic block, use the Current call mode. The Current logic block call mode runs the processing logic block in whatever mode the calling logic block is currently running in. In other words, use the Current call mode if you want the processing logic block to run every time the calling logic block runs.
Adopt All Messages
The Adopt All Messages checkbox is selected by default and allows for all messages from a processing logic block to execute as part of the current logic block. Any errors on a processing logic block interrupt the current logic block.
To create a specific message list instead, clear the checkbox and enter the message list name in the field that populates. Any errors or other messages that occur when your logic block runs go into the message list you created instead. Clearing this checkbox indicates that the calling logic block throws its own error in response to errors in the processing logic block, or does not care about any errors thrown by the processing logic block.
Additional Mappings
Additional mappings allows you to pass in values from fields that weren't defined at the time of design, such as Customer defined attributes (CDAs), Extension fields, or Customized fields. See Additional mappings in logic blocks for more information.
Log Messages (Deprecated)
Select the Log Messages checkbox to create a log of messages generated by the processing logic block. This log does not display in the application.
You can access values in the log using a Fetch Messages action.
On Error (Deprecated)
Specify an On Error action to set the action that runs when an error occurs in the processing logic block. Usually this action calls another logic block or sets an error message. If there isn't an action in the On Error branch, the calling logic block continues to run, and any errors from the processing logic block don't display in the application.
An Interrupt With Error action stops the calling logic block execution and displays a message to the user.
You can access the values in the error message record fields when you use a Set Value action. When you do, the values display in a field in the application, but not the entire error. These fields include Field, DataItemName, InternalSeq, LogicBlock, MessageDescription, and MessageType.
If an error occurs when the processing logic block runs, any changes made by the processing logic block are discarded. However the calling logic block continues to run if there are no actions defined in the On Error branch.
Call a Logic Block – Dynamic action
Application developers use the Call a Logic Block - Dynamic action to call logic blocks that, instead of being specified in a Call a Logic Block action, are dynamic values entered in the application by the user. That is, a field value in a record or a variable created in the calling logic block can be used to specify the processing logic block.
Use the Input field of the action to configure how the processing logic block is determined. Generally this can either be a field in a record or the result of another logic block. For example, if there is a field in an application where a user can enter the name of a logic block, you can use that field value to determine the called logic block in the Call a Logic Block - Dynamic action.
In the Call a Logic Block - Dynamic action you enter the table that called logic blocks must be built over in order to run. If the called logic block that is entered is not built over the table you enter, it won't run.
When the user enters a name of a logic block that is not built over the specified table, they receive an error when the Call a Logic Block - Dynamic action runs. Generally the user entering the name of a logic block to call knows what logic block to call or have access to view logic blocks.
Like the Call a Logic Block action, you configure:
- The Logic Block Call Mode to determine when the logic block is called. Learn more in Call a Logic Block action.
- The Name of the data source for this action, which you use to reference the resulting data source in later actions.
- The Data Source Name to pass in to the called logic block.
Call Model or Prompt action
Application developers use the Call Model or Prompt logic block action to pass inputs to a model, run the model, and handle the model's outputs.
To use the Call Model or Prompt action using a valid model or prompt definition, configure the inputs for the model to use when it runs, as well as what to do with the model's outputs.
Use field mappings to pass input values to the model. Make sure you map values to the input fields defined on the definition you select.
If the model runs and successfully creates an output, it's returned as a DSN in the shape of the output table defined on the definition. The output fields on the definition are populated by the model in the DSN that's returned. You can then use these values in other logic block actions by referencing the DSN.
When you specify a prompt definition to run a LLM, the values you include in your input DSN are interpolated into the prompt defined on the prompt definition before it's sent to the LLM.
Anomaly detection model definition considerations
Some anomaly detection model definitions use a Group By Field to create multiple models based on the unique values in that field.
If this is the case, you must include the Group By Field value in the input DSN so that the system knows which model to run. In addition, there must be an existing model that matches this value for the model to run successfully.
For example, the models that power the Login Anomaly Detection dashboard are specific to each user. In order to run the correct model, the input DSN must specify the user.
Concatenate Text action
Use the Concatenate Text logic block action to take two or more text values and concatenate, or string them together. Use the concatenated value in a field, as a variable, or as a new variable.
When you use this action, select one or more inputs. An input can be any of the following:
- Field—A field in a table that is in-scope of the logic block.
- Variable—A variable that is in-scope of the Concatenate Text action.
- Constant—A user-defined value such as a letter, number, or symbol.
Use this action to connect multiple text values, and then use the concatenated value in a field or as a variable.
Add inputs in the action in the order that you want to concatenate them. Use the input type of Constant to add characters to the concatenated value.
For example, let's say your company uses a unique ID number to identify financial transactions. This identification number has three parts:
- Transaction number
- Account number for the transaction
- ID number of the employee that created the transaction record
Using the Concatenate Text action, you can combine these values into a transaction identification number. In the action, define these fields as inputs: Transaction Number, Account Number, and Employee ID. Set the output to the Transaction ID Number field.
Given a record with the following values for the input fields, the concatenated output for the Transaction ID Number field would be 19821006982.
| Field | Value |
|---|---|
| Transaction Number | 1982 |
| Account Number | 1006 |
| Employee ID | 982 |
Conditional action
Use the Conditional action to tell the system that if one condition is true, the logic block should do one action, and if the condition is false, the logic block should do a different action.
The Conditional action compares two values and performs other actions based on whether the condition(s) is true or false. Some may refer to this as an IF statement or an IF/Else Statement.
Add one or more conditional expressions for the comparison. The comparison can be between different value types, such as field to field, constant to field, variable to field, variable to variable, etc. You can also compare System Logic Block Modes and do expressions on a table. As of now, constants cannot be on the left hand side of an expression.
Expressions can be grouped using AND or OR statements. If several expressions are grouped together by an AND statement, it only evaluates to true if they are all true. If they are grouped together by an OR statement they evaluate to true even if only one of them is true. Anytime an expression or grouping of expressions does not evaluate to true, it evaluates to false, so similarly, in a grouping of expressions using AND, one false expression will evaluate the entire group to false, however, in an OR grouping, they must all be false for the group to be false.
Groups of expressions can be nested inside of other groups, and they will function the same as an expression, being evaluated based on their final true/false value.
See the Conditional actions best practices topic for more information.
Convert to Text action
The Convert to Text action allows you to convert field values, such as numbers, to text. Use the Convert to Text action to change the value of a non-text data item to text so that values can be compared to text values and manipulated.
For example, in an application used to enter bank deposits, you can use a Convert To Text action to convert the Deposit Transaction Number, which is a number, to text. You could then use another action to concatenate the transaction number and other information into a unique ID.
In the From section of the action, you can choose from different value types to convert to text including field values, system values, and variables.
In the To section of the action you can output converted values to different value types including:
- Variable—select a variable previously defined in the logic block.
- New variable—enter a name to define a new variable that can be used in subsequent actions.
- Text field—select a table, and then select a field.
Copy Attachments action
The Copy Attachments action allows you to copy all attachments from one business record to another.
To configure the Copy Attachments, you must include a unique data source name from the originating business data source, as well as the business data record to which they are being copied.
When the Copy Attachments action runs, all attachments associated with a business record are included. Attachments must exist in the source record. If there are no attachments, the logic block can run successfully, but no attachments are copied and there will not be a notification message.
Create HD Structure action
The Create HD Structure action allows application developers to group records from a Header Detail table, instead of handling the Header table and Detail table records separately. Use this action to insert new records to a Header Detail table, update Header Detail records, or pass a Header Detail record into a called logic block.
Create HD Structure
The Create HD Structure action must have an HD Template selected. This is the table that you want to base your HD Structure on, and persist records into. For example, if you are going to insert Header Detail records into the PaymentRun table, which is a Header Detail table, you would select the PaymentRun table as the HD Template.
Use different types of HD Structures for different use cases in logic blocks. The table below describes the different types of HD structures, when you might use them, and how they work with Nate Containers:
| Type | Use to... | How it works with NATE containers |
|---|---|---|
| New | Insert a new record to a Header Detail Table. | This indicates an intention to persist both header and detail records. At the time the HD structure is created, no trip to the database is made. The end of the logic block or specific actions will trigger a push to the database, whichever comes sooner. All altered HD’s are pushed to the database at those triggering points. At the time of persistence, the presence or absence of a NATE container is relevant. If using a NATE container, no table triggers run. If not using a NATE container, table triggers run. See the note below this table for more information. |
| Existing | Update an exiting Header Detail record. | This indicates an intention that the header is an existing record that will be inspected or updated. The details can be changed (inserted, updated, or deleted). Same rules apply to the NATE container as New. |
| Temporary | Create a structure that isn't saved automatically such as passing a Header Detail record in to a called logic block. If you use temporary HD Structures but want to commit them, you must use the Save HD action. | This indicates the HD structure is backed by a temp table created elsewhere. As these pass between logic blocks, they are still in-memory lists, nothing persists. It is only when a Save HD action is called that anything happens in the database. Only then do these records turn into real persisted records. At that point, the presence or absence of a NATE container becomes relevant because the records are either persisted to the NATE container or to the database. See the note below this table for more information. Keep in mind that using the record's disposition or using filters and sorts on the Fetch Details action are not supported when using temp HDs.A common use case is for one caller to create a temp table, create an HD structure out of it, and then call an action block. This pattern works because the action block is obligated to call the |
Update HD Structure
If you use an HD Structure in a loop that fetches records, there may be changes to the data that makes it necessary to recreate the HD Structure. For example, if you had Header information that changes in a Header Detail table. Use the Create HD Structure action again in the logic and use the same name as your previous HD Structure. This creates a new HD Structure and deletes the old one.
Delete HD Structure
To delete a header and associated detail records from an HD Structure in a logic block, you must first fetch from the Header Detail table and then use the delete action specifying the data source returned by the fetch. An HD Structure is not required.
Create Multiple HD Structures
If you want multiple HD Structures in your logic, use the Create HD Structure action multiple times, but with different names.
Create Message action
You can use theCreate Message action to communicate important information to application users.
Messages provide a way to convey information that is a result of a logic block, such as a calculation. For example, you can set an error message in a directory application when a user enters a birth date that occurs in the future.
To use the Create Message action in a logic block, you must first create a data item of type Message. The synonym that you configure in the data item displays in the application as the message. Storing and maintaining the message information in a data item rather than in the logic block keeps messages consistent and organized, and makes translation easier.
Message Type
There are several types of error messages which display in different ways, such as:
- Alert—Displays in a banner attached to the header. These messages persist until the user clicks Dismiss.
- Background Task Progress—Updates the Progress field in the Jobs application for a Background Task logic block.
- Background Task Summary—Updates theSummary field in the Jobs application for aBackground Task logic block. When the logic block completes, the message is included in the notification the user receives in their Notification menu.
- Notification—Displays in a pop-up window in the bottom right corner of the screen. These messages dismiss automatically after three seconds.
- Data Transform Message—Updates the Messages subtable in the detail of the Data Transform Execution application. This message type can only be used for a Data Transform logic block.
You can learn more about the message severities and when to use each in the Message severity topic.
Error Source
Select the table and field which are associated with the error message you create. Once the logic block executes, the field is highlighted to indicate which field must be addressed to fix the error.
Inputs
You have the option to add inputs to your Create Message action to help add context to the message, such as displaying the field that has a missing or invalid value. The input displays information differently dependent on the value type selected. The different value types you can select include:
- Field—Displays field name and the field value, using the synonym for the application such as,
Field Name: Value. - Constant—Displays the type of value and value of the constant such as,
Constant: Value. The constant is defined in the input. - Variable—Displays variable name and the variable value such as
Variable Name: Value.
The table below describes where the inputs display for each type of message:
| Message Type | Inputs Display |
|---|---|
| Alert | In details of banner message. |
| Background Task Progress | In the Progress field in the Jobs application after the message. |
| Background Task Summary | In the Notifications menu after the message. |
| Notification | Below message in the notification window. |
| Data Transform Message | In the Messages subtable after the message. |
Source Types
You have the option to use an Existing message in your calling logic block that was previously created in a processing logic block. When using an existing message, you can use the same Message Type and Message Severity, or change them for your specific use case.
To use an existing message, in your calling logic block you must:
- Clear the Adopt All Messages checkbox.
- In the Message List Name field, enter the name of the processing logic block's message list.
- Use the Loop Message List action to loop the calling logic block's message list.
- Optionally, select the Message Type and Message Severity if you want the message to have different selections than the original message.
Message severity
This topic reviews the message severities which are used in the Create Message action in the Logic Builder.
Text
| Message Severity | Use for |
|---|---|
| Success | Action is complete. Example: The directory import has been completed successfully. |
| Info | How to use the application or accomplish a specific goal. Example: Once saved, you cannot change your scheduling preferences in this application. |
| Warning | An action that could be disruptive for the user, but does not prevent any changes being saved. Example: The account link to the product definition could not be automatically established because another account is already linked. |
| Error | An action that has failed, and prevents the user from saving changes. Example: The student role is only available for active contacts, and this record is marked as inactive. Change the contact role selection or mark them as active. |
Create a Temp Table action
Use the Create a Temp Table action to create a list of records that can be used and referenced in logic blocks. Temp tables hold records but do not commit them to the database.
Records inserted into the temp table are shaped based on the fields of the table you select during configuration. You can select whether the temp tables holds one, or many records, and whether the temp table can be shared in other logic blocks.
To hold many records, the Allow Multiple Entries checkbox must be selected in the Create a Temp Table action. When not selected, only one record may be inserted, and that record can not be changed or fetched.
To share a temp table, the Shared checkbox must be selected in the Create a Temp Table actions in both logic blocks, and the names must be the same. Shared temp tables bring any contents held inside them into the new logic block. For example, if you create a temp table in one logic block and insert records into it, then you create a new temp table in a different logic block and give it the same name and select the Shared checkbox, the records inserted into the first temp table exist in the new temp table.
Use the Fetch Temp Table action to fetch and loop over all the records in the temp table.
Record and value lists
Alternately, you can create lists within the logic block Inputs and Outputs subtable, or with the Create List action. Lists functionally behave the same as a temp table, but provide more clarity during the development process on how and where the lists can be used and referenced. Learn more in Logic block lists.
Fetch Record action
Use the Fetch Record action to retrieve records from other tables.
This action is an automatic looping action. The query loops through each row retrieved and the selected actions are performed for each row.
You cannot use the Fetch Record action to retrieve records from a Header Detail table. Instead, fetch the Header records, then use the Create HD Structure action to create a Header Detail structure. This enables you to interact with the Header as a Header Detail so you can perform functions such as using the Fetch Detail Records action to fetch Detail records from the HD Structure.
The Fetch Record action is one of several fetch actions you can use in logic blocks. Fetch actions use expressions to refine the records which are fetched. Learn more in Logic block fetch actions and Logic block expressions.
Chunk Fetch
You can also select the Chunk Fetch checkbox to fetch, process, and release results in batches until the query has been completed. This is helpful for fetches that are looped over a long period of time so that the system can process large amounts of records in smaller batches. Chunk fetch works on join tables and with dynamic expressions, but is not supported with aggregations.
Fetch Record actions configured with Chunk Fetch must be run live, not in NATE containers.
Sorts
The sort defined in the logic block is always used when present in a logic block fetch. If no sort is defined in the logic block, it uses the database’s sort preference. This may align with the sort specified on the table index, but that is not guaranteed and should not be relied upon.
Increment and Fetch Auto Number action
Use the Increment and Fetch Auto Number action to retrieve the next number from an automatic number definition.
Automatic numbers are non-repeating, alphanumeric values attached to data items that need to increment automatically as records are created. Automatic numbers are configured in the Automatic Number Definition application. Learn more in the Automatic number configuration topic.
To use this action, the definition must already be configured. On the Details panel of the action, identify the data item and table from the automatic number definition you want to reference.
When this action runs, the system automatically pulls in the next value from the definition without assigning it to a record.
Interrupt With Error action
Application developers use the Interrupt With Error action to set an error and interrupt the execution of a logic block.
This action is similar to the Create Message action. However, you will not have the ability to set the severity of the message or map from a pre-existing message since the severity level must always be error for this action. When the Interrupt With Error action is triggered during the execution of a logic block, the message will be created, added to the current logic block’s message list, and execution will immediately be interrupted.
Once the logic block is done executing, the field associated with the error message in the error source section is highlighted.
Logic block fetch actions
Logic blocks contain a number of fetch actions, such as Fetch Detail Records, Fetch Records and Lock, and Fetch a Table Lookup, that allow you to access data from different sources.
There are two types of fetch actions that you can use in a logic block: fetch actions that retrieve from the database and fetch actions that are limited to data that is exclusive to that specific logic block.
Fetch from database
The following fetch actions are designed to retrieve records from the database. When the logic block fetches the records, it gains access to and loops over each record.
| Fetch actions | Use this action to... |
|---|---|
| Fetch Detail Records | Retrieve records from the detail table of a Header Detail application. This action fetches all detail records or the just the active row from the UI. Only use this action with logic blocks that are built over a Header Detail structure. After the logic block fetches the records, actions later in the sequence can access those records. |
| Fetch Original Record | Fetch the original version of a record. That is, fetch the version of the record saved to the database (outside of the NATE Container), which can be different than the current version (inside the NATE container). |
| Fetch Records | Access records from a single table that is not the driver table. Use expressions in the action to specify the records that you want to fetch from the table. |
| Fetch Records and Lock | Retrieve records from a table and, while they are being fetched by the logic block, locks them from being changed by others. Fetch and locks only concern record updates. If a normal fetch action is used on the same record as the fetch and lock, the normal fetch action proceeds as normal. If two fetch and lock actions are used on the same record, the first fetch and lock must finish processing before the second action can proceed. |
| Fetch a Table Lookup | Fetch a record from the source table. This action fetches all of the fields in the record associated with the table lookup field, not just the table lookup field. If you do not use a Fetch a Table Lookup action, the logic block only has access to the table lookup field. |
Fetch within logic block
The following fetch actions are designed to retrieve data created and stored within a logic block. These fetch actions do not leave the confines of the logic block and are not able to interact with the database.
| Fetch actions | Use this action to... |
|---|---|
| Fetch Messages | Fetch all messages, such as severity or type, set by a called logic block. |
| Fetch Temp Table | Fetch updated records after you create and insert records into a temporary table. Select one or more fields to sort by and then configure the sorting order of the records. |
Loop List action
The Loop List action gives application developers the ability to loop through messages in a message list or entries within a record or value list.
Message lists
Message lists can include:
- The current logic block's message list.
- Any message list created from a Call A Logic Block action.
Each time the logic block loops through the message list, a message matching the specifications for the LBErrorWarningTable is made available in order to inspect the message attributes such as type, severity, and source.
Record and value lists
Lists can contain either records or values and are created in the logic blocks Inputs and Outputs subtable, or with the Create List action.
When you loop over a record list the output is a DSN which can be referenced in other logic block actions. When you loop over a value list the output is a new variable.
Learn more in Logic block lists.
Loop Multiple Selections action
The Loop Multiple Selection action is used to process values in a multiple selection list lookup field.
Use this action to:
- Retrieve multiple selection field values, so they can be acted on individually within the loop.
- Loop through each selected field value and act on them.
- Count the number of values in the field.
A multiple selection field is a list lookup field in which you can select multiple values. List lookup fields in applications are stored as data items that are associated with a list lookup definition. When one of these data items is used by a logic block without using a Loop Multiple Selection action, it is handled as a text data item and all the selected values are strung together and treated as a single text value. That is, the different values in the field are not seen as individual values. To access the selected values, you must use a Loop Multiple Select action. Actions outside of the loop, only have access to the last selected value that was looped over.
Math Expressions action
Use the Math Expressions action to build formulas of values, operators, and functions to use on specified records in a table. This action enables you to use multiple math operations in a single action.
Configuration
In the Expression Builder section, select the components of your formula with the drag and drop functionality. There are several components to select from, such as:
- Field—A field from a specified table, secondary table, or module setting.
- Constant—A user defined value. This can be a number or a currency value.
- Variable—A variable that has been previously defined in the logic block.
- + Add
- − Subtract
- × Multiply
- ÷ Divide
- ^ Raised to the power of (square root)
- ( ) Round brackets—Groups things together to specify the order of operations in the formula.
- i Imaginary Unit
- Σ Sum—The total amount of the values.
- ∣x∣ Absolute Value—Selects a field whose absolute value is used in the formula. Absolute values are always positive.
Once a value is selected, you can define the data source in the Formula Item Properties section. The result of the math equation is the output value.
Math actions
You can use different logic block actions to complete math actions using values in your application.
For example, you can:
- Add
- Subtract
- Multiply
- Divide
When you use one of these actions you define the inputs and the output. The inputs are the values used in the calculation. They can be variables, such as today's date, or fields in the application. You can also define the input value as a constant. Every time you use a constant in an action you must define the value because constants cannot be reused. In math actions, a constant can be a number or a currency value. The output is where the calculated value is used, and whether the calculated value is stored as a variable or in a field. Outputs that are variables only exist within the logic block, and outputs that are fields are stored with the application.
For example, if you use a Subtract action to calculate the remaining balance for a general ledger application your inputs would be Balance Due minus Payments Applied. You would define your output either as a variable named Remaining Balance to be used later in the logic block, or save the output to the Remaining Balance field to be saved in the application.
Values
For a math action, when you add an input or an output, the first field you define is the value type. Value types include:
- Field—a field that the logic block has access to. You can use fields from the current table, a secondary table, or a module setting.
- Constant—a user-defined value. This can be a number or a currency value. This type is only valid for input values.
- Variable—a variable that has been previously defined in the logic block.
Read more in the Logic block values topic.
After you define the value type you define the value. If the value is a constant, you need to define the data type as either a number or a currency. If the value is a field, the data type is automatically populated.
If you want the calculated value to be rounded, you can choose one of the following rounding options:
- Round—rounds values to the nearest whole number. For example 1.5 pounds would round up to 2, and 1.4 would round down to 1.
- Round Up—rounds the value up to the nearest whole number. For example, 26.3 would round up to 27.
- Round Down—rounds the value down to the nearest whole number. For example, 26.6 would round down to 26.
If you do not select a rounding option, no rounding is applied to the calculated value.
Null values
Null values in math actions are treated as 0.
Math action input options
This topic reviews many of the available input combinations for the Math action in the Logic Builder.
The following table reviews some of the input combinations you can use in the Math action:
| Input Type 1 | Input Type 2 | Valid Sum Output Types | Valid Minus Outputs | Valid Multiply Outputs | Valid Divide Outputs |
|---|---|---|---|---|---|
| Currency | Currency | Currency, Number, Text | Currency, Number, Text | None | Number, Text |
| Currency | Date | None | None | None | None |
| Currency | Datetime | None | None | None | None |
| Currency | Number | Currency, Number, Text | Currency, Number, Text | Currency, Number, Text | Currency |
| Currency | Text | Currency, Number, Text | Currency, Number, Text | Currency, Number, Text | Currency, Number, Text |
| Currency | Time | None | None | None | None |
| Date | Date | None | Time, Number, Text | None | None |
| Date | Datetime | None | Datetime, Number, Text | None | None |
| Date | Number | Date, Number, Text | Date, Number, Text | None | None |
| Date | Text | Date, Number, Text | Date, Number, Text | None | None |
| Date | Time | Datetime, Number, Text | Datetime, Number, Text | None | None |
| Datetime | Datetime | None | Time, Number, Text | None | None |
| Datetime | Number | Datetime, Number, Text | Datetime, Number, Text | None | None |
| Datetime | Text | Datetime, Number, Text | Datetime, Number, Text | None | None |
| Datetime | Time | Datetime, Number, Text | Datetime, Number, Text | None | None |
| Number | Number | Time, Number, Text | Time, Number, Text | Time, Number, Text | Time, Number, Text |
| Number | Text | Time, Number, Text | Time, Number, Text | Time, Number, Text | Time, Number, Text |
| Number | Time | Time, Number, Text | Time, Number, Text | Time, Number, Text | Time, Number, Text |
| Text | Text | Time, Number, Text | Time, Number, Text | Time, Number, Text | Time, Number, Text |
| Text | Time | Time, Number, Text | Time, Number, Text | Time, Number, Text | Time, Number, Text |
| Time | Time | Time, Number, Text | Time, Number, Text | None | Time, Number, Text |
Queue Agent action
Use the Queue Agent action to define a task for an agent to complete in the background.
Agents that run in the background are known as ambient agents. Learn more in Ambient agents.
After you add the action to your logic block and select the agent, define an Agent Task. This task must be a text string that's consumable by an LLM. This may be similar to a request a user might send to Ed, but you can dynamically interpolate values using the values and variables available in you logic block.
Use the Concatenate Text action to output a variable using a mix of constants, variables, and field values, and use this variable as your Agent Task. Learn more in Concatenate Text action.
Shared values
Some agent tools output field values that can be used throughout the subsequent actions in an agent flow. Learn more in Share values between agent tools.
The agent you call in your logic block may require a value that would have otherwise been generated by a tool executed earlier in the agent flow. If this is the case, use the Shared Values section to define how these values are derived. When your agent is called, these values are made available to it.
Queue App Link action
Use the Queue App Link action to automatically navigate users to different applications or composite application steps using logic blocks. The action opens an application link defined in the underlying application once the executing logic block has completed.
For example, a composite application could use the Queue App Link action to automatically navigate users to the appropriate application step based on the value they select in a field. This is useful for mobile application users who may be navigating through multiple application steps while creating a record.
Or, an application could have a row action which executes a logic block to create a new business record. When a user selects the row action, the logic block could use the Queue App Link action to open the application where the new record was created.
Configuration
To configure, add the Queue App Link action to your logic block, then:
- Specify the name of the application the user would interact with. This could be a different application, or an application step within a composite application. This allows the action to see what application links are available.
- If your application is a composite, select your Composite Link Type. For guided composite application, see the subheading below. For standard composite applications, options include:
Composite App Link—Queues an application link defined in the composite application link subtable of the Application definitionComposite Step—Queue an application link to a specific step within the composite application.
- Select your Link Type.
Guided composite app links
For guided composite applications, your Composite Link Type options include:
Complete Current Step—Executes the Navigation logic block defined on the current composite step. If the logic block queues an application link, the user is navigated to the specified application. Otherwise, the user is navigated to the next step defined in the composite pattern.Composite Cancel and Add New—Enables you to perform a Cancel and Add New action dynamically with your queue app link. For example, based on the quantity a user entered in a field, the logic block could cancel the save action and navigate the user back to a previous step of the flow with specific information copied to the new record.Composite Save and Add Another—Executes any action block or trigger on the table definition that the composite is built over, and takes the user back to the first step of the composite pattern. For example, based on the quantity a user entered in a field, the logic block could conditionally save the record and navigate the user back to a previous step of the flow with specific information copied to the new record.Composite Save and Add New—Enables you to perform a Save and Add Another action dynamically with your queue app link. Optionally, add field mappings to create default values on the record that gets created.Composite Save and Exit—Executes any action block or trigger on the table definition that the composite is built over, and exits the user out of the composite application.Select Steps—Select which application step to navigate the user to next. The available steps are from the configured application steps within the composite application.
Queue Dialog action
Use the Queue Dialog action to open a dialog box when event actions, such as field value change or selection of a button, occur. For example, when a user selects the Generate All form action in the Application Builder, a dialog box opens which asks them to confirm or cancel the action.
To configure, select the Queue Dialog action then:
- Select if the dialog box is an Error, Warning, Info, or Success message.
- Create the message to be displayed in the dialog box.
- Select the button options you want displayed, such as Ok and Cancel, or Yes, No, and Cancel.
- Select what action occurs when a user selects a button. For example, calling a logic block or closing the dialog box. Any called logic blocks must be built over the table of your underlying application.
Queue Event action
Use the Queue Event action in a logic block to create a business event emitter.
In the Logic Block Builder application, create a post run logic block and:
- Select the Queue Event action.
- In the Details panel, in the Event Action Type field, select either
User-Defined EventorMessage Event.- User-defined events are configured in the Event Definitions application. Learn more in Event configuration.
- Message events are configured in the Message Definitions application. Learn more in Message configuration.
- Enter the name of the event.
- For message events, if the event must be executed in a certain order in relation to other events, use the Sequential Execution Key field to specify a key.
- Use the Payload Entries fields to map in values from a data source to the payload entry.
Queue Parallel Processing action
Application developers use the Queue Parallel Processing action to efficiently batch process a large number of business records. This occurs by dividing the records into multiple buckets, then processing the buckets with the same logic block concurrently.
Create a logic block of type Background Task, then add the Queue Parallel Processing action. In the actions details, you must specify:
- Logic Block—Select the logic block which processes the buckets concurrently.
- Table—Select the table which holds the records you want to process.
- Expression—Select the criteria for filtering which rows from the table you want included in the batch job.
- Distinct Fields—Optionally, select distinct fields to define any variables that extend outside of a single row in a query. This allows you to aggregate multiple rows into single rows based on unique values of the selected fields. For example, selecting Order Number as a distinct field would aggregate all records that fall into the same Order Number into a single row. This means the processing logic block is only called for one record per sales order and processes all of the records with the same order number at the same time.
- Bucket Field—Optionally, select bucket fields which indicate how the records should be sorted into buckets. You should only specify bucket fields if records must be sorted into specific buckets to avoid contention. For example, you could bucket records based on the Customer ID. This would sort records into buckets based on distinct customer ID numbers. If no bucket field is specified, the system divides the records equally into buckets based on their nwId.
- Sort—Optionally, specify a sort to organize the records based on a row value. For example, you could sort based on the Submission Date. This is helpful if there is a business rule for a customer that specifies orders must be processed in the order they are submitted.
- Post Run Logic Block—Optionally, select a logic block to run after the processing logic block has completed.
The only required configuration is the filter criteria in the Expression section.
Once you configure your logic block with the Queue Parallel Processing action, you must attach the logic block to an event which processes a large number of records. For example, a form action or scheduled job which processes a large number of business records. Once the event occurs, the action submits the batch job to run, fetches the records which meet your filter criteria, sorts the records into buckets, then processes the buckets with the processing logic block concurrently.
This action eliminates the need for a fetch loop, since that process is done in the background task which is initiated.
Queue Report action
Use the Queue Report action in a logic block to run a designated report version application in the background and to send the report output to a desired location.
Users can navigate to other parts of Nextworld while the report is running, and will receive status related notifications after report execution. If the report is successful, the notification contains a link to the report output.
Configuration
Choose the report by specifying a report version application with the desired report’s details in the application definition. Report version applications can be customized to point to a different report record. If the report version application is customized, the report from the customized application will be run.
There are multiple mappings and options within the Queue report action.
| Configuration Option | Use |
| Post-Processing Data Source | Use for cases where the report triggers a workflow report transition. The post-processing data source is the record undergoing workflow. |
| Field Mappings for Selected Report Version Application | Use to select the inputs for the report. |
| Add Attachment | Use to name, format, and copy the output of the report to a business data record that you specify. Use the Regenerate Report if an attachment already exists on the source record. For example, if there is a generated sales invoice, you can use the one that is already generated, even though the logic block is telling the system to generate one. |
| Queue Message Event on Report Success | Use to specify post run actions for after the report finishes, such as emailing the report to a customer. |
Refresh logic block actions
Use the Refresh Record and Refresh in Transaction Boundary actions to trigger a full refresh of the display once all other actions in the logic block have completed.
Each refresh action is useful for different scenarios.
Refresh Record action
The Refresh Record action refreshes the display, but discards any changes made after the logic block was initiated. It can be used in both the Detail and List form of an application.
Refresh in Transaction Boundary action
The Refresh in Transaction Boundary action refreshes the display, but retains any unsaved changes to the records within the transaction boundary. This is useful when the logic block makes changes which you want the triggering user to see on their screen, but you don’t want any of their unsaved changes to be lost. For example, when you make a change in the Header and want to refresh the Detail form, or if you make a change in an inline application and want to refresh the parent application.
Retrieve Module Settings action
Use the Retrieve Module Settings action to retrieve values defined in a Module Settings application to use in your logic block. Module settings configure options or administrative settings that drive the behavior of applications within a family or module.
For example, if you configure a logic block to populate the InvoiceDueDate field in the Supplier Invoice application and the supplier doesn't have specific payment terms, you can use this action to retrieve the module settings that determine the default payment terms.
Module settings can be set on different levels including:
Global—Applies to all org units. In most cases, global settings are the default, applied at all levels unless explicitly overridden.Org Unit—Set for a specific org unit that is defined in the company structure. If the org unit does not exist in the company structure, you receive an error. Org units defined as a Company are the highest level in the hierarchy defined by the Company Structure application. Company module settings are traversed above other org unit types.Person—Applies to all records associated with an employee record.
The Retrieve Module Settings action retrieves all of the settings defined in a Module Settings application, regardless of their level. If the requested level corresponds to a setting that's empty, the action automatically traverses up the company structure until it finds a level that is not empty. If no org units have a non-empty value after traversing the entire company structure, the Retrieve Module Settings action returns the setting configured on the Global level. Employee records are not associated with the company structure, so you must define the org unit you want Person settings to traverse to in the logic block action.
For example, you could have a Module Settings application configured with the following module settings:
- Default Payment Terms setting: Table Lookup field, Do Not Traverse: False
- Default Shipping Terms setting: Table Lookup field, Do Not Traverse: False
- Receipt Required setting: Checkbox (True/False field), Do Not Traverse: N/A
- Default Shipping Note setting: Text field, Do Not Traverse: True
| Default Payment Terms | Default Shipping Terms | Receipt Required | Default Shipping Note | |
|---|---|---|---|---|
| Global setting | Net 30 | Ground | True | Thank you for your business! |
| Company type Org Unit setting | Net 45 | False | ||
| Org Unit setting | Ground Express | True | ||
| Person setting | Not Defined | |||
If the Retrieve Module Settings action retrieves the Company level, the returned data would be:
- Default Payment Terms setting: Net 45
- Default Shipping Terms setting: Ground
- Receipt Required setting: False
- Default Shipping Note setting: N/A
If the Retrieve Module Settings action retrieves the Org Unit or Person level, the returned data would be:
- Default Payment Terms setting: Net 45
- Default Shipping Terms setting: Ground Express
- Receipt Required setting: True
- Default Shipping Note setting: N/A
Example
The WriteItemBalance logic block is called by the WriteItemLedgerTransaction logic block. The purpose of the WriteItemBalance logic block is to validate, and then update or insert records in the ItemBalances table, based on records passed in from the ItemLedgerTransactions table. This logic block uses module settings to validate if the AllowNegativeInventoryBalances setting is selected if the transaction results in a negative QuantityOnHand. If the AllowNegativeInventoryBalances setting is cleared, the user receives an error message.
The logic block has a Retrieve Module Settings action that retrieves the Inventory module settings. When it retrieves the module settings, it retrieves the record configured for the org unit that was passed in. If there isn't a setting record for that org unit , the action traverses the company structure until it finds an Inventory module setting record for a traversed org unit. If no org units are found after traversing the entire company structure, the Retrieve Module Settings action returns the setting configured on the Global level.
Round action
Use the Round action to round the number found in a specified field based on the rounding rule selected.
There are several rounding rules to select from, such as:
Half Round Up—Rounds to the nearest whole number. Values with .5 or above as a decimal are rounded up.Round Away From Zero—Rounds up to the nearest whole number. A value of 1.1 would round up to 2.Round Towards Zero—Rounds down to the nearest whole number. A value of 1.9 would round down to 1.No Rounding—No rounding is applied.Half Round Down—Rounds to the nearest whole number. Values with .5 or below as a decimal are rounded down.
Run Model Definition action
Use the Run Model Definition action to initiate a model created in the Model and Prompt Definitions application.
Output
The Output Data Source is shaped by the outputs of your Model Definition record. The values populated are dictated by the type of model definition being run, such as:
- Automated Machine Learning and Anomaly Detection—Populates the prediction fields for your Automated Machine Learning or Anomaly Detection definitions.
- Prompt Definitions—Populates the fields defined on the Output Definitions page of your prompt definition. The output is the response from the LLM.
Provide a unique name for the output so that it can be referenced in other logic block actions.
Input
The Input Mappings are dictated by the type of model definition being run, such as:
- Automated Machine Learning and Anomaly Detection—Specify an entire record as the input to provide meaningful data for the machine learning.
- Prompt Definition—Specify either an entire record or individual fields as inputs. The input is how you insert values into your prompt definition.
Semantic Search action
Use the Semantic Search logic block action to enable use of semantic search within your logic block. Configure how the search is conducted in the Semantic Search Definitions application, then reference that record in the logic block action.
Enable semantic search in applications so users can search for records that contain information similar to, but not exactly matching, their search queries.
For example, if a user was looking for records related to a company, traditional filtering would only bring up exact matches. By using semantic search, the search field could also find records that use an acronym or short hand format of that company name.
Or, if multiple employees create records in the same application but use different words to describe the projects or tasks they are doing, semantic search could find the records that all relate to the same type of project, regardless of the descriptive words used in the records.
To use the logic block action, you must:
- In the Semantic Search Definitions application, create or identify an existing semantic search definition that matches your criteria.
- In the logic block action, reference the semantic search definition and define the search term.
- Name your search results. Results can be accessed in the Data Found loop by referencing the search name you entered.
The search results return a list of results ranked from most similar to least similar. If there is an exact match, semantic search is not initiated.
Learn more in Semantic search.
Set Values action
Use the Set Values action to set or clear a value in a field or variable, or to set a data source name (DSN) from a different DSN. Values can be field values, variables, constants, system values, or workflows. Data source names can be newly created by the action or existing.
There are several considerations for the Set Values action, such as:
- There are two components, the value you are setting From and the value you are setting To.
- The action replaces whatever value was previously in the To field or variable with the value you specify in the From section.
- You can use previously defined variables or data source names (DSN), or create new variables or DSNs in the action.
- The action can be used for almost any type of variable.
- The order in which you specify the action determines when it runs.
Create new DSNs
You can use the Set Values action to create new DSNs to serve as the source data for insert actions. This enables you to conditionally set values on the DSN, and use the Insert Subtable Record action to include subtable values in the DSN. The DSN can then be used as the input for the Insert Records action which inserts a record with all specified values, including the subtable records.
For example, if you are using a logic block to create a new record in the Directory table and want to populate the Email and Phones subtables in the new record, you could:
- Use the Set Values action to create a new DSN which points to the Directory table
- Use the Insert Subtable Record action to insert the subtable records into the DSN.
- Specify that DSN in the Insert Records action.
When the logic block initiates to create a new record, the subtable values are then included in the record creation.
Add, remove, or set values in a list
Lists are created in the Inputs and Outputs subtable of the logic block record or with the Create List action. Once a list is created, you can:
- Add/Remove from list—Add or remove DSNs or variables from lists with the add/remove operators.
- Clear/Set from list—CLear entire lists or assign the contents of one list to another through the clear/set operators.
Learn more in Logic block lists.
Create a UUID
You can use the Set Values action to create a standalone universally unique identifier (UUID). To create a UUID, in the Set Values Assignments section, have a To New Variable of type Text, and a From System of type UUID.
Create a JSON request body
You can use the Set Values action to create JSON Objects and JSON Arrays as variables in your logic block. Then, you can use the JSON Objects in the request body for endpoint requests.
JSON Arrays create lists of strings, texts, or JSON Objects, and are referenced within a JSON Object. JSON Objects are composed of keys and values. Keys have to be a string, while a value can be a text, number, list, or other object.
You can Set a JSON Object From:
- Another JSON Object
- A variable or field of type Object
- A serialized version of a JSON Object in a text value
The value at the JSON Object key can be set from variables, fields, or constants that match their data type.
You can Set a JSON Array From:
- Another JSON Array
- A serialized version of a JSON array in a text value
You can also create a new empty JSON Object or JSON Array using the Clear action. Then, add values to the JSON variable.
You can Add to a JSON Array From any field, variable, or constant that resolves to a:
- Number
- Text
- JSON Object
- JSON Array
JSON Arrays are not type-specific, which means lists can hold numbers, texts, or other objects in the same list.
Set values for different data item types
The table below details how the action works on different data items.
| Data Item Type | Source/From value must... | Value when cleared |
|---|---|---|
| Address | Be an address. It also must have multiple attributes, and cannot be a constant, system, or workflow value. | null |
| Color | Be a CSS color value. | null |
| Currency | Be a currency. | null |
| Date | Match the system date format. If assigned from a DateTime or a System value, a time zone must be provided. Use the Date Time Decomposition action for breaking a DateTime into a Date and a Time. | null |
| DateTime | Match the configured data item format. Use the Date Time Composition and Date Time Decomposition actions to convert between DateTimes, Dates, and Times. | null |
| Match the configured data item format. | null | |
| Expression [Limited Use] | Not supported. | - |
| Name | Be a name. It must have multiple attributes, and cannot be set from a constant, system, or workflow value. | null |
| Number | Match the configured data item format. | null |
| Number (Lookup) | Be a Number type data item configured with a list lookup value. | |
| Phone | Match the configured data item format. | null |
| Picture | Must be a picture field. Source value cannot be a variable, constant, system, or workflow value. | null |
| Subtable | Not be set for the subtable. Set values of fields in the subtable instead. To clear, use the Clear Subtable action. | Not supported. |
| Table Lookup | Be a nwId value. To set values of related values, do it in scope of a Fetch Table Lookup action. | null |
| Text | Be set from any value. Use the Convert to Text action to convert values. | null |
| Text (Lookup) | Be a Text type data item configured with a list lookup value. | |
| Text Area | Be a text value if setting from a field. Can't set from a system or workflow value. If setting from a variable it must be the same type of data. | null |
| Time | Match the configured data item format. Must use a duration subtype when setting a duration subtype. | null |
| True False | Be set from a true or false value. | false |
| Web Link | Not supported. | - |
Text Manipulation action
Use the Text Manipulation action to configure string values with various string manipulation operations. Select parts of the string text so that the string manipulation function applies to a selected output.
| Operation | Function | Example |
|---|---|---|
Slice | Retrieve a part of the input text. Start with selecting a starting index with either:
Then define a length of characters that you want to include. If you started with -1, you work backwards negatively. | If you have the text value input, Hello world, and only want to display world as the output, you can either:
|
Replace | Replace a substring, or a portion of the string, within your input string. These values can all come from a variable, field, or constant. | If you have a text value input of This replaces all instances of the substring so for example if you have |
Split | Split off a substring of the input string by selecting a piece of the original string, and displaying the substring as the output. | If you want |
Trim | Cut off a sequence of characters from the beginning or end or both from a string. | If you want to trim the number
Trimming |
Find | Find an instance of a substring in the original input string. It returns the index of the first found substring or -1 if not found. | If you have an input of |
Length | Identify the number of characters that make up the length of a string. | If you have Hello world as an input, it yields an output of 11. |
To Lower Case | Convert an entire string to lower case and convert the value as the output. | Hello world displays as hello world. |
To Upper Case | Convert an entire string to upper case and convert the value as the output. | Hello world displays as HELLO WORLD. |
Traverse tree action
Instead of performing and nesting multiple fetches, use the Traverse Tree action to step up each level of a tree. The Traverse Tree action allows you to find the path of a unit in a structure.
For example, the DeriveGLAccount logic block traverses the tree to find the company for a defined org unit. That is, the logic block traverses the tree of the OrgUnitRelationships table, starting from the org unit defined in the OrganizationalUnit field. When a match is found, the logic block uses the result of the Traverse Tree action to set a field value.
When you choose a table to traverse it must be associated with a Relationship application. The field you choose to start from is usually a table lookup field that looks up on the table you choose to traverse. For example, in the DeriveGLAccount logic block traverses the OrgUnitRelationships table, starting from the OrganizationalUnit field of the GLMapping table. The OrganizationalUnit field of the GLMapping table is a table lookup field that looks up on the OrgUnitRelationships table.
The Traverse Tree action checks up the tree from the Start From field to the top. Control where in the tree the action stops with a Conditional action or a counter. Use a conditional action when you know what level you want to stop on. For example, the DeriveGLAccount logic block uses a conditional to check if the OrganizationalUnitType of the contact = . This means that when the level in the tree is a company level, the action stops traversing. Use a counter when you know how many levels you want to traverse. For example, if you only want to traverse 3 levels up the tree.
When you use the Traverse Tree action you can access all of the fields in the records without fetching them separately. However, if you want to update the records, you must use the Fetch Records action in the Data Found branch of the Traverse Tree action.
Update Records action
Use the Update Records action to update an existing record with values set by prior logic block actions.
In the action, define the table which you want to update. The action updates existing records, not individual fields, with values defined in previous actions.
If there are Pre-Update or Post-Update table triggers on the table being updated, those logic blocks run. If the table triggers do not result in an error, the updated records are saved to the table. As with any logic block, if an error occurs, no changes are saved.
After records have been updated, you can use the updated values in later actions. For example, if you use a math action after you use an Update Records action, the updated value is used in the math action.
Update Secret action
Use the Update Secret action to update a secret stored in the Endpoint Secret Setup or OAuth Setup application.
Select the type of secret and record which you want to update. Options include:
- Endpoint Secret—Updates a secret in an Endpoint Secret Setup record.
- OAuth Client Secret—Updates a secret in a Endpoint JWT Setup record.
The logic block action automatically registers whether the secret is a Key Value or JWT secret and prompts you for the required information.
Use cases
This feature can be used with scheduled jobs to automatically update secrets at scheduled intervals. Learn more in Automatically update endpoint secrets.
Advanced processes for logic block actions
There are several advanced processes for logic block actions.
These processes include the following:
- Compare addresses with a logic block
- Configure a dynamic logic block to use in a customization
- Message lists and error handling for logic blocks
- Parallel processing in logic blocks
- Effective dates
- Insert into detail records without saving to the database
- Additional mappings in logic blocks
- Date and time considerations
- JSON manipulation in logic blocks
Compare addresses with a logic block
Compare addresses with logic blocks using the Conditional or Fetch actions.
Use Fetch actions to compare addresses using address attributes. For example, you can use the AddressFull attribute to compare whole addresses. For the AddressFull attribute to be populated, the record containing it must have been saved at least once. This can cause issues in some circumstances such as passing a temporary DSN or defining an Address variable.
If you use a Conditional action to compare addresses, you don't need to speciy an address attribute.
Configure a dynamic logic block to use in a customization
Dynamic logic blocks provide a way to dynamically call a logic block in a specific process. Use this when we know most customers will want to customize the process and not use the base functionality.
For example, base functionality can be delivered to determine the pricing of an item on a sales order or how to generate a lot or serial number for an item. These are examples where we know some customers may want to have their own customization to fit their specific needs. Delivering the base functionality to handle a dynamic logic block provides a way for customers to create their own logic and have it called by the base functionality.
Once you have identified a process where you think most customers would want their own logic, the following steps should be followed.
- Create a List Lookup
- Name Dynamic Logic Blocks
- Examples, Generate Lot Number Dynamic Logic Blocks or Procure to Pay Pricing Solution Dynamic Logic Blocks
- Customization Pattern = Complete Unlock Or Allow Additions (if some logic block is being delivered out of the box for them to select).
- The Lookup Value must be the exact name of the logic block that will be used for the dynamic logic block call.
- Example,
GenerateLotNumberMonthCodeTransactionDatein the Generate Lot Number Dynamic Logic Blocks list lookup.
- Example,
- If you think the customer could use different logic blocks based on another list lookup, then this list lookup could have a dependent list lookup.
- Example, Generate Lot Number Dynamic Logic Blocks is dependent on the Lot Generation Frequency list lookup. That means different logic blocks could be available based on the frequency of the the lot generation.
- Name Dynamic Logic Blocks
- Create a Data Item of type Text
- SameNameAsLLCreateInStep1DynamicLB
- Lookup Name = Name of the list lookup created in step one.
- Lookup type = Single Selection Lookup
- It is best practice to mention the name of the source table the customized logic block should use.
- Example, see the OrdertoCashPricingSolutionDynamicLB data item.
- Add the data item to the table where the user can specify the logic block to be used. An example is in
Base SettingsorItemOrgUnit. This field now just acts like any other text data item tied to a list lookup and the user can specify the logic block to use .- Examples, GenerateLotDynamicLB and GenerateSerialDynamicLB in the
ItemOrgUnitstable. ProcureToPayPricingSolutionDynamicLB, OrdertoCashPricingSolutionDynamicLB,IntercompanyPricingSolutionDynamicLB added toBaseSettingsand ReservationSupplyManagementDynamicLogicBlock added toReservationSettings.
- Examples, GenerateLotDynamicLB and GenerateSerialDynamicLB in the
- In the base logic block, the table with the new data item can be fetched to access the name of the logic block to use for processing. Use the Call a Logic Block - Dynamic action and pass in the name retrieved from the table.
- The input for the logic block that the customer creates must be the same as the table used for the logic block that executes the Call a Logic Block - Dynamic action.
- Examples,
GenerateSerialNumbersLBorRetrievePriceLB.
- Examples,
Message lists and error handling for logic blocks
Message lists hold all of the messages generated when logic blocks are run, such as error or warning messages. Every logic block has one message list by default that holds all of its current messages, but you can also create additional message lists that other logic block actions can reference.
When a logic block calls another logic block and messages are returned to the calling logic block, there are two ways to interact with these messages:
- Assign message to new list—The calling logic block creates a new message list during execution to hold any returned messages from the processing logic block. When the Adopt All Messages checkbox is cleared in the Call a Logic Block action, you can name the new message list. Once messages are assigned to the new list, execution continues as normal regardless of if errors are returned or not.
- Adopt messages—The calling logic block adopts the messages of the processing logic block. The default message list is used when you select the Adopt All Messages checkbox in the Call a Logic Block action, or use the Add All Messages action.
Messages are shown on the screen if the logic block runs on the UI, are returned to the parent logic block if was called by another logic block, or are saved in the batch job if it was run asynchronously.
There are several logic block actions that can interact with the message list, as seen in the table below.
| Logic block action | Interaction with message lists |
|---|---|
| Call a Logic Block | When selected, the Adopt All Messages checkbox executes all messages from a processing logic block as part of the parent logic block. When the messages are adopted, it behaves as if the messages were set in the parent logic block itself. If any errors are returned from the child logic block's message list, execution is interrupted. When cleared, the Adopt All Messages checkbox allows you to create a new message list. This enables application developers to access the message list in any action that follow the Call a Logic Block action. See the Call a Logic Block action topic for more information. |
| Add All Messages | Copies the messages from one logic block's message list to the current logic block's message list. Once the messages are copied execution of the logic block continues, even if the message list contains message with a severity of Error. See the Add All Messages action topic for more information. |
| Create Message | Create a new message or error and add it to the current logic block’s message list. If a message with severity of Error is created, execution is not interrupted. The message is added to the current message list and execution continues. Once the logic block is done executing, the field associated with the error message in the error source section is highlighted. See the Create Message action topic for more information. |
| Interrupt with Error | Configure specific errors to interrupt logic block execution. This action is similar to the Create Message action, except you can't set the severity of the message or map from a pre-existing message since the severity level must always be error for this action. When the Interrupt With Error action is triggered during the execution of a logic block, the message is created, added to the current logic block’s message list, and execution is immediately interrupted. Once the logic block is done executing, the field associated with the error message in the error source section is highlighted. See the Interrupt With Error action topic for more information. |
| Conditional | Tells the logic block to do one thing if a message list is empty or contains errors, and another thing if the message list is not empty. This enables application developers the ability to designate when errors should be processed during execution instead of automatically being processed after the Call a Logic Block action. See the Conditional action topic for more information. |
| Loop Message List | Loops the messages in the message list. This enables you to loop the messages, create a message action, then select which messages are returned and displayed to the user. See the Loop List action topic for more information. |
Parallel processing in logic blocks
Application developers use parallel processing to batch process large amounts of business records efficiently.
Traditional batch processing involves a single logic block moving sequentially through the records. Often, records are independent of one another and do not require sequential processing. Parallel processing enables you to filter for the required records, sort them into buckets, then process the buckets concurrently to save time.
For example, customers may recurrently need to make batch payments from within an application. There may be thousands of payment records that must be processed at a time, and a normal batch job can only process a single record at a time. This process is time-sensitive and can be detrimental to the business if it does not process quickly. With parallel processing, the batch of records can be divided into multiple buckets so that the logic block can process the buckets concurrently. This allows the records to be processed significantly faster than with traditional batch processing.
The diagram below illustrates how parallel processing works:
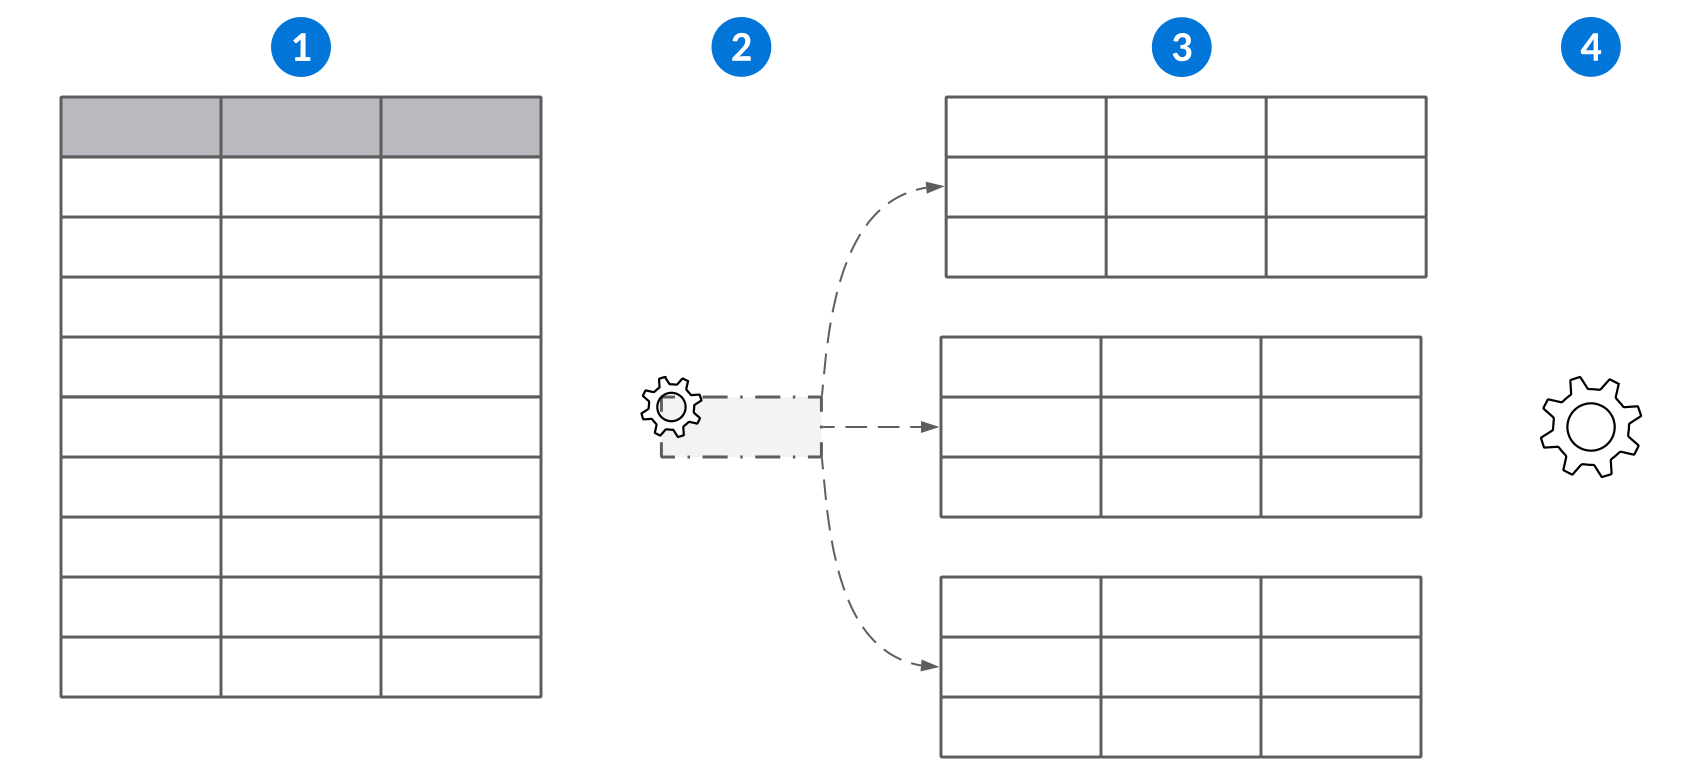
| Action | For example... | |
|---|---|---|
| Identify the table that has a large quantity of records you need to process. | The application table which holds payment records. |
| Build a logic block with the Queue Parallel Processing action to refine which records from the table should be included, and to select the logic block which should be used to process the selected records. Optionally, define distinct fields for any variables that extend outside of a single row in a query. This aggregates rows based on unique values found in the specified distinct field, then a logic block processes those aggregated rows together. Optionally, select bucket fields to indicate how the records should be divided into buckets. You should only specify bucket fields if records must be sorted into specific buckets to avoid contention. If no bucket field is specified, the system divides the records equally into buckets based on their nwId. | Filter for any records that have not been processed. If there are multiple rows for each order number, you could specify the Order Number field as a distinct field to ensure the logic block processes all of an order's rows at the same time. If orders are created under multiple customer IDs and the customer's records should be processed within the same bucket, you could specify the Customer ID field as a bucket field. This would ensure each customer's records are processed in their own bucket. |
| The system divides the records into buckets. Each bucket is processed by the same logic block concurrently. | |
| Optionally, assign a post-run logic block that is initiated after the parallel processing is complete. | For example, using a post-run logic block to change the status of the processed payment records to complete. |
Order of execution
The order of execution for parallel processing is:
- The table records are mapped into buckets.
- A batch job for each bucket is queued.
- Each record in a bucket is provided as input to the processing logic block when the batch job runs.
- Once all the records in all of the buckets have been processed, any specified post-run logic blocks run.
Learn more in Queue Parallel Processing action.
Effective dates
Use the Effective Dates logic block pattern to check that the effective dates of records do not overlap.
- EffectiveFrom is not empty.
- If EffectiveThrough is populated, it is greater than or equal to EffectiveFrom.
- Fetch the existing record if the call mode is Edit.
- When the call mode is Edit, check if EffectiveThrough∅ is empty
- True: Check if EffectiveThrough is empty OR EffectiveThrough ≥ greater than or equal to current EffectiveFrom
- False: If EffectiveFrom ≥ greater than or equal to EffectiveFrom AND EffectiveFrom ≤ less than or equal to EffectiveThrough
- Overlap found
- False: If EffectiveFrom ≤ less than or equal to EffectiveFrom
Validate that effective date range a record or groups of records is within the effective date range of another record.
Single record validation
To validate the effective dates of a since header detail record, you must configure your logic to check:
- If EffectiveFrom [Detail] ≥ greater than or equal to < less than EffectiveFrom[Header]
- Set an error
- If EffectiveThrough [Header] ∃ is not empty OR EffectiveThrough [Header] ≥ greater than or equal to and EffectiveThrough [Header]> greater than EffectiveThrough[Header]
- Set an error
Build your logic block over the header table, and then add it to the table as a Post Update table trigger. Configure your actions as follows:
- Fetch detail records by EffectiveFrom date Ascending (limit 1)
- If EffectiveFrom [Detail] < less than EffectiveFrom [Header]
- Set an error
- If EffectiveThrough [Header] is ∃ is not emptycheck the EffectiveThrough dates
- Fetch Details where EffectiveThrough ∅ is empty (limit 1)
- Records Found then
- Set an error
- Fetch detail records by EffectiveThrough date Descending (limit 1)
- If EffectiveThrough [Detail] > greater than EffectiveThrough[Header]
- Set an error
Insert into detail records without saving to the database
Use a logic block to insert records into the Detail of a Header Detail application to make records available to users as part of a business process. If a user cancels the transaction, the detail records aren't saved.
For example, you can configure a logic block to populate open invoices for a supplier so a user can select invoices to pay. These types of logic blocks should be launched from the UI when a user initiates the Header Detail form of an application.
Configuration requirements
To configure, the logic block must:
- Be built over the Header Detail table.
- Insert records into the Detail table.
- Define criteria to fetch existing records if Detail records do not exist. If Detail records do exist, do not populate new records.
Examples of this configuration include the DefaultRoutingInquiry and UpdateInvoices logic blocks.
Additional mappings in logic blocks
Additional mappings allow you to pass in values from fields added in downstream environments. There are several scenarios where fields are changed or added to tables after they have been delivered to the partner or customer. For example, customer defined attributes (CDAs) and fields in customized tables are defined by customers at the time of implementation, and extension fields are defined by solution developers in their own tenants. Additional mapping options are available on logic block actions, such as the Insert Record, Insert Subtable Record, Call a Logic Block, and Save HD actions.
When values are passed into one of these logic block actions, there are some scenarios where added fields are not included. If the logic block actions reference an entire data source, any added fields are automatically included. If the logic block action only passes values as individual Field Mappings, you must configure additional mappings to include the added fields.
Example
In the Supplier Invoices application, when a record transitions to a workflow state of Posting, the WritePayablesGL logic block initiates to create a General Ledger transaction record. A common extension or customization pattern is to include a field for Reference Number on both the Supplier Invoice and General Ledger. Supplier Invoice and General Ledger have different table shapes and fields, so the logic block actions use Field Mappings, rather than a DSN, to pass the specific values needed between the records.
To ensure any new fields, such as Reference Number, added to the underlying tables are included, an Additional Mapping of PayablesHeader, which is the data source for the Supplier Invoice table, was specified on the insert logic block action at the time of design. Without the additional mapping specified, the Reference Number from the Supplier Invoice would be empty on the General Ledger record.
Header Detail tables
For additional mappings on Header Detail tables, use additional mappings on inserts on the Header and Detail tables. To get the mappings on the detail of a Header Detail, you must specify them on the insert to the Detail record itself. Mappings specified on the Save HD action only apply to the Header record.
Order of Operations
The sequence in which you create the additional mappings should match their relative importance. Once a field's value is found in a data source, that becomes the value for the target and the system stops looking for a value. However, any field mappings included in the logic block overwrite existing values found from the source record or additional mappings. The first DSN listed as an additional mapping should have the highest priority, since values are picked up from sources in the following order:
- The source record.
- The values from CDAs, Extended fields, or fields added to Customized tables in the order they were entered in additional mappings.
- Individually mapped fields.
For example, you could have an entire table, additional mappings for CDAs, Extended fields and fields on a Customized table, as well as individually mapped fields included as data sources for a logic block. In this instance, the following occurs:
- The new empty DSN is created and passed to the called logic block or logic block action.
- The values from the underlying table referenced as a DSN are mapped to the new DSN.
- The values from the custom, extended, and CDA fields from additional mappings are mapped to the new DSN in the order in which the additional mappings were entered. These values do not overwrite any previously found values from the table.
- The values from individual fields included as DSNs are mapped to the new DSN. These values overwrite any existing values found from the table or additional mappings.
Copy Additional Mappings action
Use the Copy Additional Mappings action to copy the additional mappings from one, or many, data sources into a specified target data source.
Logic blocks that fetch data from other data sources and use that data to populate values in a preexisting data source should use this action. If you insert a new record, any additional mappings from the other data sources are available. If you update an existing data source in your logic block which previously had few values populated, the Copy Additional Mappings action ensures any fields added in downstream development are also included in the update. For example, the PopulateCustomerCreditFields logic block fetches data from the ReceivablesHeader data source and uses that data to populate values. To ensure all of the fields from the ReceivablesHeader data source are included in the fetch, the PopulateCustomerCreditFields logic block should copy the additional mappings from the ReceivablesHeader data source.
Date and time considerations
DateTime data items store values differently than Date and Time data item types. Logic blocks can be used to manipulate the display values, such as setting the time zone based on the tenant time zone. Locales are used to designate the format for how dates and times are viewed.
System
There are several considerations for DateTime, Date and Time data items, including:
- Values in
DateTimedata items are stored by the system as Coordinated Universal Time (UTC). Everything is compared to one standard clock reference, and is stored as a point in time. When the values are retrieved for display purposes, by default they are converted to the appropriate time based on the user's time zone, which is controlled by browser settings, environment settings, or user profile settings. Learn more in Time zones. - Values in
Timedata items with a system value ofNoware stored as hard values. They are not time zone aware or stored as UTC. - Values in
Datedata items with a system value ofTodayrequire a time zone to be entered in the logic block action's properties. - If you decompose a DateTime field, you must select a time zone. For example, if you have a DateTime field value of 12:00am 1/1/2025 GMT and decompose it into a Date and Time, you could select GMT-6. This would give you a Time value of 6:00pm and the date of 12/31/2024.
- Values in
DateTimeandTimedata items can be configured with a Time Format. Time format controls the display and precision for time values. For example, you can specify only hours display in the field, or you could specify that hours, minutes, seconds, and milliseconds should display. The maximum precision for time is three digits (milliseconds).
Learn about date and time calculations in Date and Date Time calculations and Exclude dates in Date Time calculations.
Logic Blocks
Logic blocks can be used to convert Date and Time data item values to the appropriate time zone based on either a System value, like the tenant time zone, or a dynamically mapped value. The mapped value must be fetched, or pulled in as an input record.
There are several logic block actions that can assign the Date from a DateTime. Some examples are:
- Date Time Decomposition action—Allows you to decompose, or break down, a
DateTimevalue into its individual components. The outputDateandTimeare pulled from the inputDateTimeafter it is converted to the time zone specified. If no time zone is specified, the tenant's default time zone is used. Optionally, you can also use the time zone as the output. - Set Values action—Allows you to use a
Dateas the output, and different types of inputs, such as aDateTimefield, a System value ofToday, or a Text or Number data item with a lookup on time zones.- You can also use this action to designate a different time zone than the tenant. For example, if the time zone is fetched from the Org Unit, that time zone would be used when converting the
Date.
- You can also use this action to designate a different time zone than the tenant. For example, if the time zone is fetched from the Org Unit, that time zone would be used when converting the
Defaulting date and time values
When defaulting date and time values using the data mapper, application settings, or the Now or Today buttons within an application, the system chooses which time zone to use. The system determines what time zone to select based on the Display Preferred Time Zone checkbox on the Tenant Environment Setup record for that environment. Options include:
- Display Preferred Time Zone selected—The system looks for a Custom Time Zone in the User Profile. If no Custom Time Zone exists, it uses the Tenant Environment Setup application record's Default Time Zone. If no time zone is selected for this environment, the system uses the default time zone configured by the platform.
- Display Preferred Time Zone cleared—The system looks for a Custom Time Zone in the User Profile. If no Custom Time Zone exists, it uses the user's browser's time zone.
Interfacing with platform APIs
Endpoint integrations into Nextworld support any ISO-8601 valid format for DateTime values. It is preferred to use the format which the platform stores, but UTC DateTime formats may include a time zone offset for integrations. For example, the following UTC formats represent the same timestamp and are both accepted by the system:
2024-02-28T07:00:00.000Z (preferred)
2024-02-28T14:00:00.000+07:00
Locale
Locale is set in the User Menu and designates how date and time are formatted in the system. For example, English (United States) locale formats the date of November 01, 2022 as 11/1/2022, but French (France) locale formats that date as 01/11/2022.
JSON manipulation in logic blocks
Manipulate JSON objects and arrays using the Set Values action in your logic block. Optionally, pass the JSON objects and variables to external endpoint requests.
Set Values action
You can use the Set Values action to create JSON fields and variables in your logic block. Then, you can use them in the request body for endpoint requests. You can:
- Set JSON variables and fields from text variables or fields that contain valid JSON in the same shape as the target.
- Set JSON variables and fields from Object variables or fields that contain valid JSON in the same shape as the target.
- Have JSON arrays or objects as fields in a temp table and pass them between logic blocks. These can only be used as work fields and cannot be persisted to the database.
Learn more in Set Values action.
Call External Endpoint action
You can use the Call External Endpoint action to pass JSON fields and variables to external endpoint calls. This enables you to produce and use JSON request and response payloads of indefinite complexity and depth. Learn more in Call External Endpoint action.
You can also:
- Output the response code from the call into a new number variable.
- Output responses by response code to new variables, variables, new DSNs, and DSNs. This enables you to conditionally perform logic based on what the endpoint returns.
Optionally, use the Loop Array action to loop over a given array and output to a new variable.
Logic block debugger
Use the Logic Block Debugger to troubleshoot problems with any logic blocks that run because of an action in the UI. This includes table triggers and action blocks that run after a user saves.
The Logic Block Debugger runs a logic block a single action at a time. Once you identify issues, you can open the logic block in the Logic Block Builder to fix them. Learn more in the Run a logic block debug session topic.
Debugger components
Use the different tools and buttons in the Logic Block Debugger to control which actions are run. Other components of the debugger allow you to view table data, field values, and other information in your logic block.
Like the Logic Builder, the Logic Block Debugger is comprised of different panels. Each panel serves a different purpose in debugging a logic block, as described below:
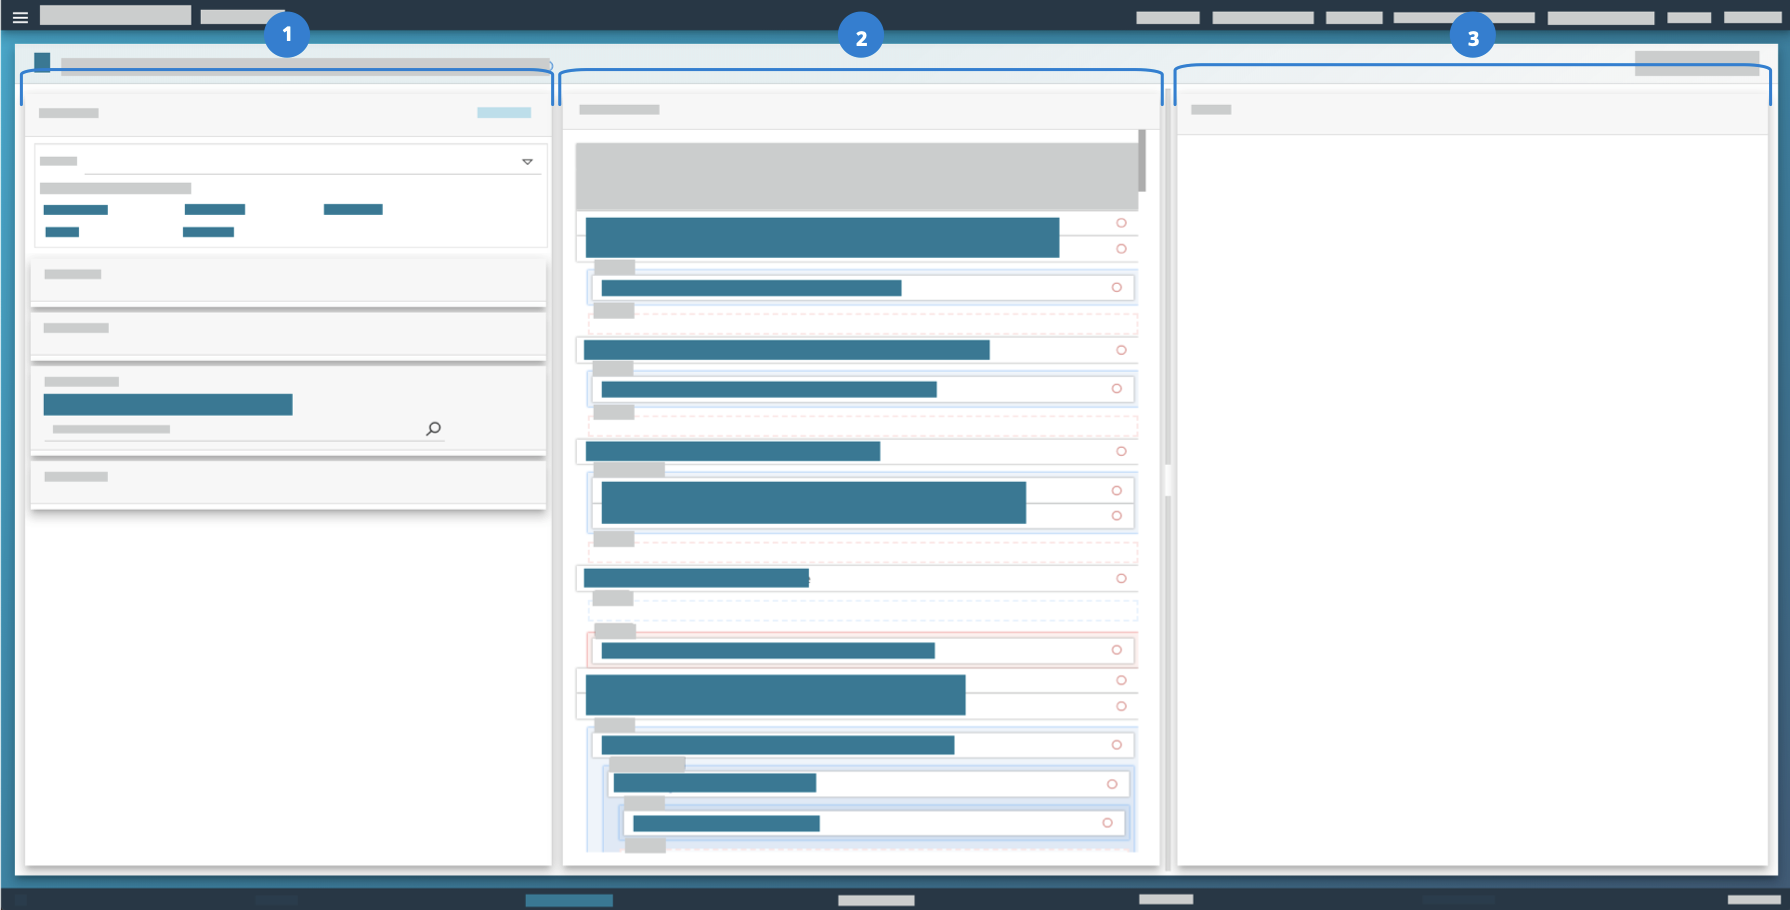
| Debugger—Control the logic that runs, and view information specific to your session. Includes the current state of the data for whatever action is currently selected. The Debugger panel includes several components, such as:
|
|---|---|
| Logic Block—View the actions that make up the current logic block. Select actions and set breakpoints in this panel. |
| Details—View the configuration of each action. |
Run controls
Run controls determine how actions run in the Debugger. These controls include:
- Step Over—Run the selected action. For example, this runs a Set Values action, and then stop.
- Step Into—Open the logic block being called or run as a result of an action in the Logic Block panel. For example, you can step into a logic block from a Call a Logic Block action. You can also step into a table trigger logic block that runs as a result of an Update Records action.
- Step Out—Close a called logic block and return to the calling logic block. This closes a logic block that ran as a called logic block or as the result of an action. You can also use this control to step out of a loop.
- Run—Run all the logic block actions before or after a breakpoint. This does not stop on selected actions.
- Run To—Run the logic block up to a defined breakpoint or selected action.
Breakpoints
Breakpoints allow you to specify a point in the logic block where you want the debugger to stop running. This means the logic runs up to that set point, without having to step over individual actions. For example, if you want to see what values are in a field before a Set Values action, you could set your Set Values action as a breakpoint. Then, when you run your logic block in the Debugger, it would run up until the action you specified, but would stop before the Set Values action is run.
Breakpoints can be created, modified, and removed from the debug session or the Logic Block Builder. To set or remove a breakpoint, select the Breakpoint toggle on the action before running the logic block. Optionally, select the dropdown menu on the action to create a conditional breakpoint. Conditional breakpoints are only set when the conditions you specify are met. This is helpful when you debugging data within a loop.
After you have breakpoints configured, you can:
- Clear Breakpoints—Removes all set breakpoints in this session.
- Disable Breakpoints—Temporarily turn off breakpoints so that you can run through the logic block, but keep the actions configured as breakpoints.
Breakpoints are unique to user, environment, and lifecycle, and persist between debugging sessions, even if you don't save the logic block before you exit. This means when you debug a logic block and set a breakpoint, that breakpoint still exists the next time you debug. This helps when repeatedly debugging a save with multiple triggers, or when debugging a logic block with multiple nested logic block calls. Any breakpoints older than 30 days are automatically cleared.
The Logic Block Breakpoint Utility application allows you to view which logic blocks and lifecycles you have breakpoints in, and to quickly remove a large quantity of breakpoints from different logic blocks and actions in one place. Access this application from the navigation menu.
Run a logic block debug session
Use the logic block test debugger to troubleshoot problems with logic blocks.
To enable logic block debugging, select the Logic Block Debugging toggle located on the Settings page of the User Profile menu. The User Profile menu is accessible from the main menu bar.
Start a debug session from the application
In the Application Builder application, the Debug dropdown menu is available on any part of the application once debugging has been enabled. Select the actions you want to debug from the list of the logic block actions attached to the Debug menu. For example, if you select Delete on the Debug menu, a debug session launches on delete of any record from the list form.
Perform the actions that runs the logic block you selected to debug. This opens the Debugger window over the current application. For example, if the logic block is configured as a Field Value Changed event, if you change the field value in the application associated with that event, the Debugger window opens.
In your session, use the controls in the Flow Control panel to run the logic block. Learn more about these controls in the Logic block debugger topic.
If you close the debug window before you're done debugging the logic block and have not selected the Cancel button, you can still access the session in the Logic Builder.
Start a debug session from the Logic Builder
In the Logic Block Builder application, you must:
- Open the Logic Builder inside the logic block record.
- Select the Debug button, or select Debug Session from the Session dropdown menu in the Debugger panel.
If you are trying to open a previous session that you haven't cancelled, you must be in the same environment and lifecycle as where you ran the logic block.
End a debug session
There are several ways to end a debug session, such as:
- Select the Cancel Debug Session button in the application window.
- Select the Cancel button in the Debugger window.
- Run the last action of the logic block. This completes the session.
Ending a debug session doesn't automatically close the Debugger window. If you don't close the Debugger window and start debugging a different logic block, the same window is used.
Ending a session means that you can't use the Debugger to run any other actions.
Logic Block Breakpoint Utility application
The Logic Block Breakpoint Utility application allows you to view which logic blocks and lifecycles you have breakpoints in, and to quickly remove a large quantity of breakpoints from different logic blocks and actions in one place.
Debug logic blocks initiated by inbound endpoint request
Configure your inbound request payload with additional parameters in order to debug the logic block initiated by the endpoint.
In your request payload, you must:
- For endpoints with triggers or action blocks, add "nwDebugMode": true to the body of the payload and submit it.
- For traditional logic blocks on
:executeendpoints, add “debug": true to the body of the payload and submit it.
Open a logic block record in the Logic Block Builder, then:
- In Options, toggle Debug on.
- Refresh the session. This opens the created debugging session.
Logic block test harnesses
Application developers create logic block test harnesses to validate the functionality of their logic blocks and monitor for regressions. The development of new logic blocks, or the modification of an existing logic block, is not complete without a test.
For example, you could build a test harness that ensures record mutations occur as intended. Or, you could build a test harness that ensures development changes, such as changes to user roles, don't change the functionality of your logic block.
To create a test harness you must identify the processes, or test cases, from your target logic block that need to be validated. For example, if a required field is empty, does an error get thrown. Then, build a logic block of type Test. The test block calls the target logic block and performs the validations for the test cases you identified. Complex logic blocks may have multiple test blocks.
Once your test blocks are built, create a record in the Logic Block Test Harness Definitions application that references the test blocks you want used, and the sequence in which to run them. Additionally, specify the temporary tenant you want used for testing.
Temporary tenants use metadata from your development environment and business data from a seed environment. The business data is copied into the temporary tenant while the test harness runs, and then discarded after the test finishes. Learn more in Temporary tenants and Test harness data setup.
Applications
Use the following applications to create, run, and view results for your test harnesses:
- Temporary Tenant Template Setup - Test Harness application—Set up a template that enables you to quickly create temporary tenants. Learn more in the Temporary Tenant Template Setup - Test Harness application topic.
- Temporary Tenants - Test Harness application—Create a temporary tenant using a template. When a temporary tenant is created, it's populated with a copy of the business data and metadata from the environments defined in the template. Learn more in the Temporary Tenants - Test Harness application topic.
- Logic Block Builder—Build the logic block of type
Testwhich calls the target logic block and performs validations of the identified test cases. Complex logic blocks may have multiple test blocks. - Logic Block Test Harness Definitions application—Configure and launch your test harness. Select criteria such as the roles and permissions applied, environment settings, the test blocks to run, and the sequence to run them. Learn more in the Logic Block Test Harness Definitions application topic.
- Logic Block Test Results Inquiry application—Evaluate the coverage of your test, and view the results. The coverage measures how many logic block actions are being tested by the test harness. The higher the coverage percentage, the easier it is to find disruptions in the logic block when changes occur. Learn more in the Logic Block Test Results Inquiry application topic.
- Logic Block Test Harness Group Definitions application—Create test harness groups. After logic blocks are fully developed and tested, their test harnesses are added to test harness groups that run regularly in scheduled jobs to validate the functionality of logic blocks in use. This ensures if a new development disrupts the functionality of existing logic blocks, you can quickly identify the issue. Learn more in the Logic Block Test Harness Group Definitions application topic.
- Logic Block Test Harness Group Results Inquriy application—View the results of your test harness group. Learn more in the Logic Block Test Harness Group Results Inquiry application topic.
Learn more in the Logic block test harness configuration and Nextworld example: Identify test cases for a logic block topics.
Logic block test harness configuration
Configure logic block test harnesses with the Logic Block Builder, Logic Block Test Harness Definitions, and Logic Block Test Results Inquiry applications.
Prerequisites
Before you create your test harnesses, you must:
- Review the logic block which you want to test. This logic block is referred to as the target logic block.
- Identify test cases for the target logic block. Test cases validate that processes in the target logic block work as expected. For example, a conditional action in the target logic block would require a test case for both the true condition and the false condition.
- Create a temporary tenant where you'll run your test. Temporary tenants are created in the Temporary Tenants - Test Harness application using templates configured in the Temporary Tenant Template Setup - Test Harness application. Learn more in the Temporary Tenants - Test Harness application topic.
Build a test harness - Logic Block Builder
To build a test harness, in the Logic Block Builder, you must:
- Create one or more test blocks that validate the test cases you identified. Some logic blocks require multiple test logic blocks for full test coverage. Learn more in the Test harness test block configuration topic.
- Create the test data you need to run the tests. For more complex logic blocks, you can use input and output tables to pass in data and compare results. Learn about the different ways to create test data in the Test harness data setup topic.
Build a test harness - Logic Block Test Harness Definitions
To build a test harness, in the Logic Block Test Harness Definitions application, you must:
- Create a test and specify the target logic block you want tested, environment options, roles and permissions, and the test blocks to be used. Learn more in the Logic Block Test Harness Definitions application topic.
- In the application header, optionally select the Display All Validated Expressions checkbox to show all expressions when a test harness failure occurs. This helps you determine why the test harness failed.
- On the Environment Options page, select any tables whose data should be cleared before the test is run.
- If your logic block runs based on user interactions, such as a logic block initiated by a row action, select the Run by UI checkbox.
View test harness results
In the Logic Block Test Results Inquiry application, view the results. Learn more in the Logic Block Test Results Inquiry application topic.
Debug the test harness if errors occur. Learn more in the Debug a logic block test harness topic.
Test harness test block configuration
Application developers use the Logic Block Builder application to create test blocks, also referred to as unit tests, for use in logic block test harnesses.
Logic Blocks
In the Logic Block Builder application, you must:
- Create a new logic block with a name that follows the convention
Test<target logic block name>[optional test case identifier].- Example:
TestRetrieveProductDefinitionis a test logic block for target logic blockRetrieveProductDefinition. - Example:
TestConvertUnitOfMeasureEAToLBis used to testConvertUnitOfMeasurefor test caseEAtoLBconversion.
- Example:
- In the Logic Block Type field, select
Test. - In the Table Name field, select
NWATLBHarnessHeader. - Set the Security Option field to
Public. - Enter the remaining required information, and then save the record.
Logic Builder
On the Logic Builder page, select the Call Target Logic Block action. Replicate the scenario that uses that logic block, such as updating, deleting, or creating.
To validate records:
- Select the Validate Record action. Insert logic expressions to validate things about one of the target logic block's tables.
- Add Validate Record actions for all tables needed to test the target logic block.
To validate messages:
- Select the Validate Message action. Message fields that can be included in the validation are the same set of message fields used in the Fetch Message action. These include DataItemName, MessageType, MessageDescription, FunctionNumber, InputValues, and Severity.
- The recommended set of fields to include as expressions are DataItemName, MessageType, and Severity with a list lookup value of
LBMessageSeverity. An example expression would look like DataItemName =ManufacturingMsg287AND MessageType =AlertAND Severity =Error
- The recommended set of fields to include as expressions are DataItemName, MessageType, and Severity with a list lookup value of
- Add Validate Message actions for all messages that are expected to be returned for that call to the target logic block.
The table below reviews the logic block actions used in your unit test:
| Action | Function | Details |
|---|---|---|
| Call Target Logic Block | Calls the logic block specified in the action. | This action works similar to the Call a Logic Block action, except:
|
| Validate Record | Validates that the record matches the expressions. | This action works like a conditional action. Choose a table, then validate that fields on that table are as expected. If the Validate Record action fails, the test results detail the expected value versus the actual value. |
| Validate Message | Validates that a message matching the expressions exist in the message list. | This action checks if a message which matches the conditional statement exists in the current message list. This is used to validate if an error was thrown without failing the test. Each Validate Message action used can only find one matched message. If a logic block test sets three errors, then three Validate Message actions are needed. If more than one expression is used in the conditional and the Validate Message action fails, the message that closest matches the condition is displayed. If a close match is not found, the number of checked messages is shown instead. |
Test harness data setup
Application developers can create test data for the execution of test harnesses in multiple ways.
Insert Record Action
Use the Insert Record action directly in the unit test logic block to create the required data. This method of data creation may only be feasible for testing simple logic blocks that have basic data requirements.
Any data committed to the database this way may need to be explicitly deleted before the test logic block completes, depending on the nature of the test logic block. Think carefully about the test flow to make sure that test data created or modified in one test case doesn't negatively impact the execution of subsequent test cases.
Data Creation Logic Block
Create a separate test logic block that is only used to create the required test data.
This logic block can be called directly from the unit test logic block or configured as the initial step in the logic block test harness.
Add Data to Seed Data Environment
Create seed data in the environment that corresponds to your product family. The amount of data in the seed environments directly impacts the performance of the test execution. For example, the larger the number of records in the set of tables that are copied at the time of environment initialization, the longer the load time for the test harness.
To keep the seed data volume to a minimum, teams may want to implement a process to review and discuss data creation requests.
Migration scripts are used to determine which tables are copied when the test environment is initialized. There are situations when seed data is required in a new table that isn't already identified in the script used for your test environment.
Combination
Some test cases may require that new data be created in the seed data environment which is then augmented/modified at test execution time.
Debug a logic block test harness
Debug your logic block test harness in the Logic Block Test Harness Definitions, Logic Block Test Results Inquiry, and Logic Block Builder applications.
After you have designed and created your test harness, you may find that it fails upon execution. Debug your test harness to help you determine the cause of the failure.
Use the following applications to debug your test harness:
- Logic Block Test Harness Definitions application—Select the Debug Test or Debug with Options row action on the detail rows for the logic blocks you want to debug.
- Logic Block Test Results Inquiry application—Navigate to the detail record for your logic block test results and select the Debug Test form action. This automatically launches the Logic Block Debugger found in the Logic Block Builder application. If your debug session doesn't connect immediately, refresh the list or refer to the Logic Block Test Results Inquiry application to view the status of your test.
Temporary Tenant Template Setup - Test Harness application
Use the Temporary Tenant Template Setup - Test Harness application to create templates for temporary tenants for logic block test harness testing. After you configure templates, use the Temporary Tenants - Test Harness application to create isolated environments where you can test your logic blocks without compromising data in other environments.
To create a template, specify the environments in which to pull metadata and business data from in your temporary templates. Specify a Base User that has all the necessary roles to conduct your automated and manual tests. Learn more in Temporary tenants.
In the Tables to Migrate subtable, include all the tables to migrate from the seed environment when a new temporary tenant is created using the template.
After you create a template, select the Create Tenant form action, or navigate to the Temporary Tenants - Test Harness application and select the Create Test Harness Instance form action. Learn more in Temporary Tenants - Test Harness application and {* link 'TestAutomationLogicBlockTestingLogicBlockTestHarness'=name *.
Temporary Tenants - Test Harness application
Use the Temporary Tenants - Test Harness application to create temporary, isolated environments that you can use for logic block testing without affecting data in other environments. You create tenants using templates configured in the Temporary Tenant Template Setup - Test Harness application.
The Temporary Tenants - Test Harness application includes all the temporary tenants that have been created for testing. Open a record in the detail view to access the login information to access that tenant.
To create a new temporary tenant, select the Create Test Harness Instance form action and select a temporary tenant template. Optionally, you can specify additional Roles for the base user of the tenant.
Learn more in {* link 'TestAutomationLogicBlockTestingLogicBlockTestHarness'=name *.
Logic Block Test Harness Definitions application
Application developers use the Logic Block Test Harness Definitions application to configure logic block test harnesses. Test harnesses are used to test the functionality of logic blocks.
The Logic Block Test Harness Definitions application is where you select:
- The logic block the test harness tests.
- The lifecycle the test harness runs in.
- The roles and permissions applied when the test harness runs.
- If failed test harnesses display all expressions, or only the expressions which fail.
- The environment type that holds the data needed to run your tests in. This should be the same environment type specified on the template used to create your temporary tenant. This is what links the temporary tenant with your test harness definition.
Row actions in the detail form of the application enable you to submit and run the test, debug the test, or navigate to the Logic Block Test Results Inquiry application to view results after the test harness runs. Learn more about the configuration process in the Logic block test harnesses and Logic block test harness configuration topics.
Environment Options
Configure the test harness to run with a specific user from the directory, or assign which roles you want applied. Select the Replace Roles checkbox to replace the roles with those entered in the Assigned Roles subtable.
Optionally, use the Tables To Clear subtable to designate tables which the system clears data from before the test runs.
Optionally, import data into your test environment. To configure, attach a CSV to the test harness record then create an import name and enter the name of your CSV attachment in the Data Imports subtable.
Details
In the detail list, add test blocks for this test harness. This is where you can configure:
- The test blocks to run and the sequence to run them
- A unique name for a test block to identify what it is testing
- If the test block is run from the user interface or not.
- If the test block can be debugged using the Logic Block Debugger.
Logic Block Test Results Inquiry application
Application developers use the Logic Block Test Results Inquiry application to view results for logic block test harnesses that have been submitted. The results in this application include details about the test whether the test harness was successful when it ran, and error information for troubleshooting.
Use the Test Harness form action to open the Logic Block Test Harness Definitions application record for a test harness. This is helpful if you need to make a change or view more details.
Results
Gives an overview of whether the test harness was successful or failed, how many tests within the harness were run, and how many of those were successful, failed, or skipped. Review the fields on this page for counts of validations and any error messages that weren't checked by the test harness.
When validations are included in the test blocks in the test harness, the total, successful, and failed validations are tracked here.
Times
Provides information about when the test ran, which includes the start, end, and total times. The total time includes any time spent on creating the test environment or generating objects. The total test time, start time, and end time, only include time when the test blocks were running.
Test Setup
Shows information from the test harness configuration such as the environment, lifecycle, user and roles.
Debug Information
Displays any system errors that occurred when the test harness was submitted. For example if there was an issue generating a logic block, or if the logic block the test submitted was in a different lifecycle.
Details
There is a detail record for each test logic block that was submitted as part of the test harness. Open a detail record to view more detailed information including failure details. The information on this page can be helpful when you're troubleshooting the test block and identifying any changes in expected versus actual functionality.
The Failure Details field displays information for a failure including:
- The action in the test block that failed.
- For example,
Action 20.
- For example,
- The reason that action failed.
- For example,
1 expression failedorError message not validated.
- For example,
- The expressions and the expected value of a validation action.
- For example,
Expression 6: Expected 100000.00 to equal 50000.00.
- For example,
Logic block expressions also display in tables in this text area that include the values from the expression. This can help you identify the expected versus actual values, and narrow down what type of change caused the actual results.
Logic Block Test Harness Group Definitions application
Application developers use the Logic Block Test Harness Groups application to create groups of completed logic block test harnesses, which then run in sequence.
After logic blocks are fully developed and tested, the test harnesses are added to test harness groups. Test harness groups are run regularly in scheduled jobs to validate the functionality of logic blocks in use. That way if a new development change disrupts existing functionality, you can quickly identify the disruption. Use this application to add multiple test harnesses to a test harness group.
The header fields provide general information about the test harness group, including the name, family, and module.
Logic block test harness groups are organized by product family and module. The different tests to run as part of the group are added as details in the test harness group record, and don't require a specific sequence.
Logic Block Test Harness Group Results Inquiry application
Application developers use the Logic Block Test Harness Group Results Inquiry application to view results for logic block test harness groups that were submitted. The results in this application include details about the test whether the test harnesses in the group were successful when they ran and error information for troubleshooting.
Use the Test Harness detail row action to open the Logic Block Test Harness Definitions application record for a test harness in the group. This is helpful if you need to make a change or view more details.
Results
Gives an overview of whether the tests were successful or failed, how many test were run, and how many of those were successful, failed, or skipped. Review the fields on this page for counts of validations and any error messages that weren't checked by the test.
When validations are included in a test block, the total, successful, and failed validations are tracked here.
Times
Provides information about when the test ran, which includes the start, end, and total times. The total time includes any time spent on creating the test environment or generating objects. The total time, start time, and end time only include time when the tests were running.
Debug Information
Displays any system errors that occurred when the test harness was submitted. For example, if there was an issue generating a logic block, or if the logic block the test submitted was in a different lifecycle.
Details
The detail records in this application represent the different test harnesses that were submitted. Use the Test Harness Result action to view the Logic Block Test Results Inquiry record for the test that is part of this group.
Nextworld example: Identify test cases for a logic block
This topic shows an example of how to review a logic block to identify test cases, and how to create a test block to validate those test cases.
This example uses the RetrieveCompanyForOrgUnit logic block.
Logic Block
The RetrieveCompanyForOrgUnit logic block is a common logic block called by multiple families. When it is called, the OrganizationalUnit field value is passed to the logic block, and then the Company field is set from the InternalOrgParentCompany field in the Directory table. If there isn't a value for the OrganizationalUnit field, an error message is set. If a company is passed to the logic block instead of an organizational unit, the same company value is returned.
The logic block actions are:
- If OrganizationalUnit Is Not Empty
- TRUE: Fetch a TableLookup with OrganizationalUnit
- Set Company from InternalOrgParentCompany
- FALSE: Set Alert/Error: Organizational unit is required
- TRUE: Fetch a TableLookup with OrganizationalUnit
- If Company Is Empty
- TRUE: Set Alert/Error: A company was not found for the given organizational unit.
Logic paths
Based on the actions in the logic block, you would test the following data:
OrganizationalUnitis emptyOrganizationalUnitis not emptyOrganizationalUnitis not empty and data is found for the Fetch a Table Lookup actionOrganizationalUnitis not empty and there is no data found for the Fetch a Table Lookup actionCompanyis emptyCompanyis not empty
Test cases
To test the identified logic paths, you could use six separate test cases. Or, you can pass in data to the test harness logic block in different combinations to reduce the number of test cases. You'll still achieve good test coverage, but don't have to write as many test cases. For example, you could write the following test cases:
OrganizationalUnitis empty.- Validate the error in action 3.
- Test case—Validate that error is set when
OrganizationalUnitdoesn't have a value.
OrganizationalUnitis not empty,Companyis empty, no data found for the Fetch a Table Lookup action.- Validate the error in action 5.
- Test case—Validate that the error is set when
OrganizationalUnithas a value,Companydoes not have a value, and there was no data found for the table lookup. This might not need to be a test case because there are not invalid records passed in the table to fetch.
OrganizationalUnitis not empty,Companyis empty, valid data found for the Fetch a Table Lookup action.- Test case—Validate that the Fetch a Table Lookup action retrieved the company for the
OrganizationalUnit, and the value in the logic block forCompanyis set with the retrieved value.
- Test case—Validate that the Fetch a Table Lookup action retrieved the company for the
OrganizationalUnitis not empty,Companyis not empty, no data found for the Fetch a Table Lookup action.- No change to validate, and might not need a test case.
You would have three total test cases, with one success scenario and two error validation scenarios.
Test harness logic block
The TestRetrieveCompanyForOrgUnit logic block is the test block for the RetrieveCompanyForOrgUnit logic block. It includes actions to test the different test cases identified. It uses different actions including:
- Fetch Records—Fetch records from directory to retrieve the
OrganizationalUnitandCompany. - Comment—Provide information about what each action does, the test cases, and the expected results.
- Call Target Logic Block—Calls the logic block the harness is testing.
- Validate Message—Validate the message is being set. This is a test-specific logic block action.
The logic actions for the TestRetrieveCompanyForOrgUnit logic block are in the image below:
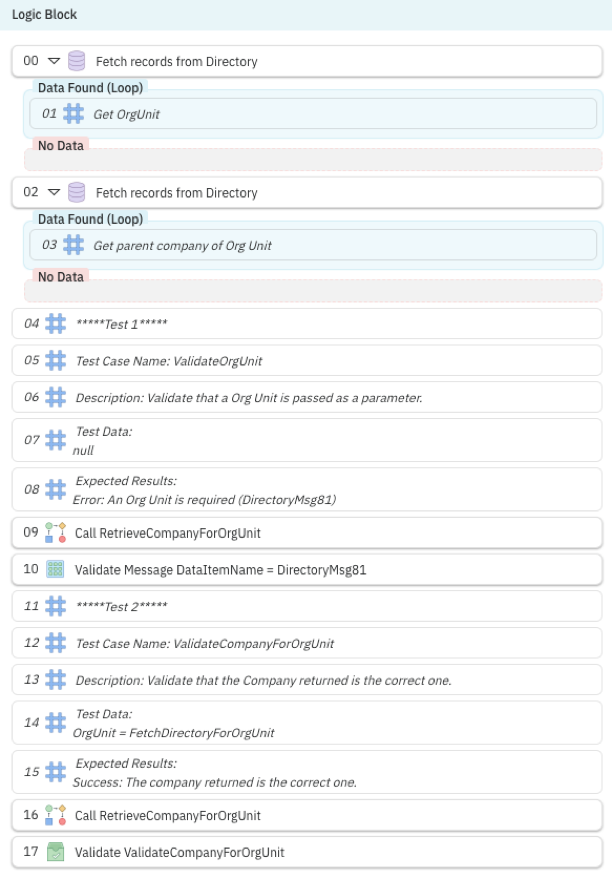
Logic block compare tool
Use the Logic Block Compare tool to view two logic blocks and see the differences between them. Access the Logic Block Compare tool from the Logic Builder.
You can compare different logic blocks, the same logic block in different lifecycles, or different versions of the same logic block.
The diagram below represents the layout of the compare tool:

| Compare logic block—The logic block you select in the dialog window displays on the left. This logic block is always read-only. |
|---|---|
| Active logic block—The logic block you opened in the Logic Builder displays on the right. You can modify this logic block in the Merge tool. |
| Description of change—Indicated on the actions, both with text and color. The types of differences identified include Added, Removed, Moved, Modified/Moved & Modified. |
Differences between logic blocks
The compare tool shows the differences between logic block actions. Actions in logic blocks are uniquely identified in several ways, such as:
- Logic action ID—The type of action. For example, Fetch Records, Add, or Call a Logic Block.
- Globally Unique Identifier (GUID)—Unique identifier which is automatically generated when a new action is created. If you copy a logic block the GUIDs remain the same. However, if you copy an action within a logic block, a new GUID is generated.
- Action Number—Where the action is in the Logic Builder.
The table below describes the types of differences between logic blocks, and how the change is described in the compare tool:
| Difference between logic blocks | Description of Change |
|---|---|
| GUID exists in the Compare logic block but not in the Active logic block | Added |
| GUID exists in the Active logic block but not in the Compare logic block | Removed |
| GUID exists in both logic blocks and has a different action number | Moved |
| GUID exists in both logic blocks, has a different action number, and the action has been modified | Modified/Moved & Modified |
| GUID exists in both logic blocks, has the same action number, and the action has been modified | Modified |
How to use the Compare tool
To use the compare tool, you must select the Compare button in the Logic Builder and then enter the logic block you want to compare to, the lifecycle it is in, and the version.
When you click on an action in either logic block, the corresponding action is highlighted and selected in the other logic block.
When an action is selected, view the Action Editor page for details of the action. For example, you can select a Set Values action, and then open the Action Editor page to see exactly what values are set by the action.
If you want to merge actions between the logic blocks you're comparing, select the Merge button to open the Logic Block Merge Tool.
Learn more in the Branch and merge topic.
Logic block versions
Use the Create Version button in the Logic Builder to create a new version of a logic block. Access and manage versions with the Manage Versions button in the Logic Builder, or the Manage Versions action in the Logic Block Builder application.
Versions are uniquely identified by the Version Name field. When you create a new version, you can also use the Logic Block Version Description field to add notes about why a new version was created, how it is used, or how it is different.
Every logic block version has a ParentID, which connects the version with the logic block it was created from. This value is created automatically and does not display.
Versions of a logic block are different than branches of a logic block. Logic block versions are historical, and only the active version can be edited. You can compare version to each other and restore older versions if necessary. Branches are used for concurrent development. The system automatically creates versions when you merge changes to your branch of a logic block that you can revert to. A version is also automatically created when changes are made to a base logic block that has outstanding branches, so that you can review the changes before merging your changes. Learn more in the Branch and merge topic.
Versions can be accessed and managed with the:
- Logic Builder—Select the Manage Versions button to open a list of versions. From this list you can create, view, or delete versions. When you view a version you can see the logic block actions, and the details of a selected action. To revert to an older version, view the version you want to apply and select the Apply Version button. You must save your logic block to apply this change.
- Logic Block Builder application—Select the Manage Versions row action to open a mini app that displays the list of logic block versions. From the Versions mini app you can use the Apply Version row action to restore a previous version, or to delete a version.
Branch and merge
Create logic block branches to enable concurrent development of the same logic block. Merge logic block branches to update the original logic block.
Select the Branch row action in the Logic Block Builder application to create s a branch of the source logic block in your current lifecycle. You can have multiple branches of the same logic block in different lifecycles. Use the Merge row action in the Logic Block Builder application to merge your logic block branch with the source logic block. Each logic block branch has a ParentID, which connects it to the source logic block. This value is created automatically, and is used in the Merge row action.
To manually merge your branches, use the Logic Block Merge tool which is accessible in the compare tool of the Logic Builder.
Merge row action
Use the Merge row action to merge your changes with the original logic block. Changes are moved into the logic block automatically if there are no conflicts.
An example of a conflict is if you and someone else create branches of the same logic block, make different changes to the same action, and then the other person merges their branch in before you do. When you tried to merge your logic block would receive an error because the changes you made to the action are different than the changes already merged.
If there are conflicts, you must use the Logic Block Merge tool which is accessed through the Logic Block Compare tool. When you open the Logic Block Merge tool, you can see the differences between the actions, and merge in the right change.
Logic Block Merge tool
Use the Logic Block Merge tool to manually merge actions from one logic block to another. You'll need to manually merge when there is a conflict between actions.
Select the Merge button to access the Merge tool from the Logic Block Compare tool. You can learn more about the Compare tool in the Logic block compare tool topic.
While the Merge tool is open, you can edit details of the Active logic block, but the Compare logic block is read-only. Different options are available for different types of actions.Depending on the type of change made to an action between logic blocks, you have different options for each action. These options include:
- Compare logic block
- Add Action—Moves action from Compare logic block to Active logic block
- Keep Change—Persists the change in the Compare logic block and does not apply it to the Active logic block
- Active logic block
- Keep change—Persists the change in the Active logic block
- Merge changes—Opens the Actions Editor page for both logic actions
- Move—Moves the action up or down in sequence to match the location in the Compare logic block
- Remove action—Deletes the action from the Active logic block
- Take modification—Persists change from Compare logic block to the Active logic block
After you merge changes, you must save your logic block to apply the changes.
Logic Block Builder application
Application developers use the Logic Block Builder application to create, alter, and build logic blocks.
Use the Logic Block Builder to build expressions for tables, applications, application records, and other Nextworld objects. Each logic block is configured with a sequence of actions that interact with and change the objects they are built over. For example, there are logic block actions that can:
- Apply logic based on the conditions you define.
- Apply styles to fields.
- Perform complex math.
- Set values in a field.
- Call other logic blocks.
Learn more in Logic block actions.
General Configuration
Define the type of logic block, security options, and data sources. By default, logic blocks are built over a single table but you can select the Advanced Input/Output field action to define multiple data items and records as data sources for your logic block.
Logic Block Builder
Define the sequence of your logic block in the Logic Block Builder. The Logic Block Builder is accessible as a page in the logic block record, or from the form action.
The Logic Block Builder contains three sections in which you can configure and build your logic block. The three sections are the:
- Actions panel—The list of all available actions for your logic block type.
- Logic Block panel—The sequence of logic block actions you select and define.
- Properties panel—The configuration options for the action selected.
See the Logic Block Builder section for more information on building logic blocks.
Logic Block Validations application
Application developers use the Logic Block Validations application to validate all the logic blocks owned by your current tenant.
To validate, select the Validate Logic Blocks form action within the application. This initiates a background task which refreshes the list form, validates your owned logic blocks, and then notifies you upon completion.
Records are created for any failed validations found in your logic blocks. Open a record to review the error message, and the number of the action which failed validation.
Asset Usage Inquiry application
Application developers use the Asset Usage Inquiry application to keep a record of the Nextworld objects that are consumed, or used, by logic blocks.
Use this application when you want to filter for a Nextworld object to see which logic blocks consume it or are consumed by it. For example, you can use the Asset Usage Inquiry application to filter for a specific table to see all the logic blocks it is used in, or you can filter for a specific logic block to see all the tables that are used in it.
When you save or generate a logic block in the Logic Block Builder application, records are automatically created and saved in the Asset Usage Inquiry application. The Asset Usage Inquiry records contain data on the logic block that allows a user to filter for logic blocks and the objects that use them or are used by them. Each record in Asset Usage Inquiry lists the consumer asset, which is always a logic block, and the asset being consumed, the object being used in the logic block. The object being consumed by the logic block can be a:
- Data Item
- Table
- Logic Action
- Logic Block
The records in Asset Usage Inquiry are updated any time the logic block is updated in Logic Blocks.
For example, if you searched for the SalesOrderDetail data item in the AssetUsageConsumed field filter to see which logic blocks use it, this is how a few of the records would appear in Asset Usage Inquiry:
| AssetUsageConsumerType | AssetUsageConsumer | AssetUsageConsumedType | AssetUsageConsumed | Table Name |
|---|---|---|---|---|
| Logic Block | AddToOnHandQty | Data Item | SalesOrderDetail | ShipmentDetail |
| Logic Block | ConvertQuoteToSO | Table | SalesOrderDetail | |
| Logic Block | HideShowItemLedgerTransactionsFields | Data Item | SalesOrderDetail | ItemLedgerTransactions |
If you searched for the HideShowAgreementsField logic block in the AssetUsageConsumer field filter to see if any data items, tables, or logic action definitions are in it, this is how a few of the records would appear in Asset Usage Inquiry:
| AssetUsageConsumerType | AssetUsageConsumer | LogicBlockAssetUsageConsumedType | LogicBlockAssetUsageConsumed | Table Name |
|---|---|---|---|---|
| Logic Block | HideShowAgreementsField | Table | AgreementDetail | |
| Logic Block | HideShowAgreementsField | Data Item | CompanyCurrency | AgreementHeader |
| Logic Block | HideShowAgreementsField | Logic Action | Comment |