


.svg)

Data items are configured as different types, such as Picture data items and Text data items. The type of data item determines how you can use the information stored in that data item and how the information is displayed. For example, a Picture data item always holds an image, but also allows you to dictate whether the image has a border, square or rounded edges, and its aspect ratio. A Text data item creates a text field with a single line, but also allows you to dictate whether there is default text populated in the field, if there are required text formats, or if there are maximum character counts for the field.
Learn more in the Data item types topic.
The diagram below shows how data items are used in tables and applications.
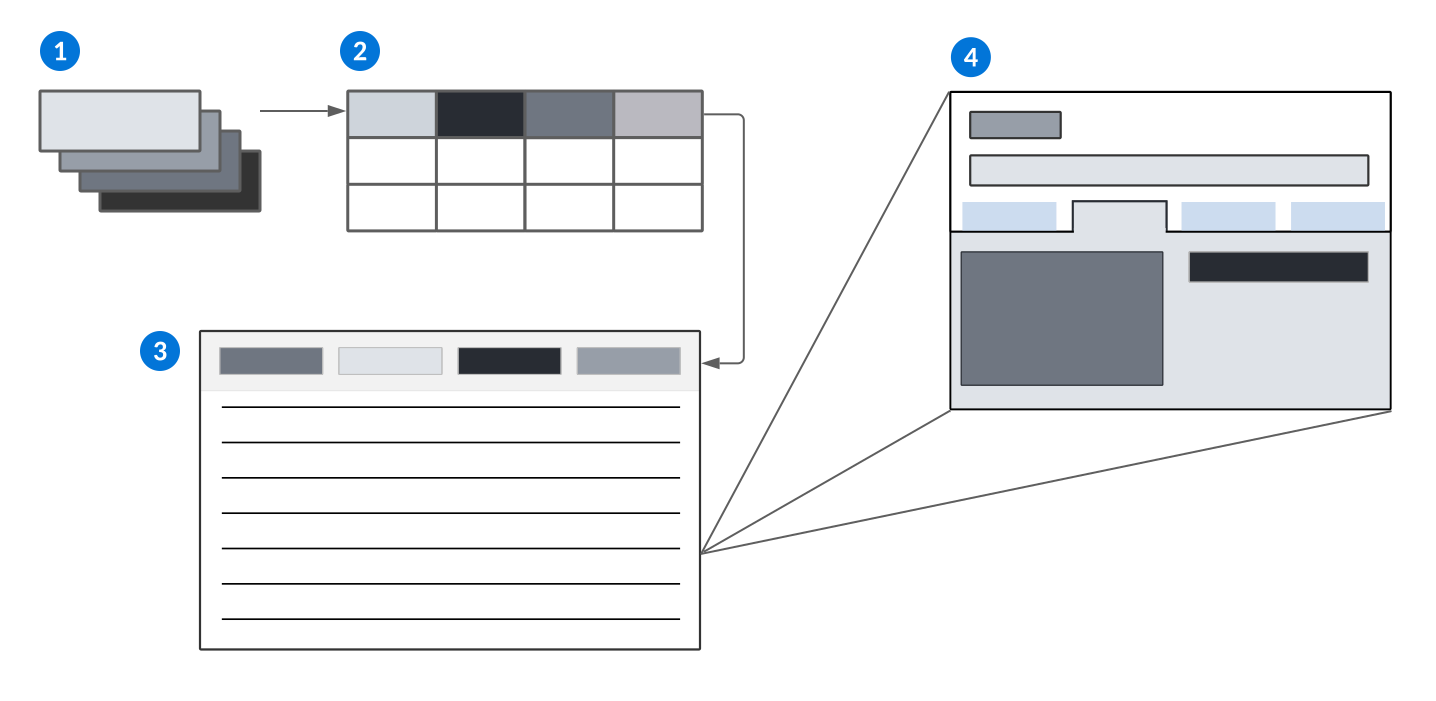
 | Data items—Data items are built or customized in order to capture and track different kinds of information, such as names or dates, in your tables and applications. |
|---|---|
 | Table—Data items are used in tables as column headers. |
 | Application in list form—Data items are used in applications as fields and column headers for the records. They can also provide more complex options, such as the ability to add record entries into subtables, or the ability to reference a data item from another table so the field in your application displays the current value of the referenced data item. |
 | Application in detail form—Data items are used in applications as fields and are displayed for one primary record. |
Data items are configured in the Data Item Definitions application, or from within the Application Builder. Learn more in Application Builder and Data Item Definitions application.
Data item types
Data item types fall into several categories. The type of a data item controls what information can be stored in a field. They can be configured in the Data Item Definitions application.
These data items use only one component to display and store data.
| Use type... | If you want to... | Sort and filter in list form |
|---|---|---|
| Date | Display a date. You can configure:
The date is stored as a string in the ISO 8601 UTC format. For more information on how these fields work with time zones, see the Date and time considerations topic. | Yes* |
| DateTime | Display a date and time. You can configure:
The date and time are stored in the ISO 8601 UTC format. For more information on how these fields work with time zones, see the Date and time considerations topic. | Yes* |
Display an email address as a link that can be clicked to compose mail to the address. This data item validates that the values contain all components of a well-formed email address. You can configure:
| Yes* | |
| Label | Display a label for form and row actions used to initiate manual transitions. Once the data item has been created, reference it in the Action Label field to change the default button text. | Yes* |
| Message | Create a message for the user. This data item is used exclusively in logic blocks to give an error, warning, or success message to the user. | No |
| Number | Display a number. You can configure:
| Yes* |
| Phone | Display a phone number with a phone icon that brings up a menu with Call and Message options. You can use those options if your browser and operating system supports them. | Yes* |
| Static Text | Create non-editable text that displays directly on the form without being bound to a text box or text area. The synonym label and help text bubble for the data item does not show in the application. The text entered in the help text field is what displays. You can configure:
Learn more in the Static Text data item configuration topic. | No |
| Text | Create a text field with a single line. You can configure:
| Yes* |
| Text Area | Create a text box. This data item is similar to the text field, but with more space. You can configure:
Text area fields have a limit of 3,000 characters. | Yes |
| Text Editor | Create text box for rich text. This text editor provides full text formatting. You can format:
Text editor fields have a limit of 1,000,000 characters. | No |
| Time | Display a time in a desired format. You can configure a time type data item to capture either:
For more information on how these fields work with time zones, see the Date and time considerations topic. | Yes |
| Translatable Text [Limited Use] | Create a text field with a single line that can be translated into other languages. You can configure:
Logic Block support for Translatable Text data item type is limited. | Yes |
| Translatable Text Area [Limited Use] | Create a text box that can be translated into other languages. This data item is similar to the text field,
Logic Block support for Translatable Text Area data item type is limited. | Yes |
| Translatable Text Editor [Limited Use] | Create text box for rich text that can be translated into other languages. This text editor provides
Logic Block support for Translatable Text Editor data item type is limited. | No |
| True False | Create a checkbox. The checkbox evaluates to
| Yes* |
| Web Link | Display a web address as a link that can be clicked to open the page. You can configure:
| Yes |
These data items use multiple components to display and store data.
| Use type... | If you want to... | Filterable in list form |
|---|---|---|
Address | Address fields are complex data items which enable users to enter multiple lines of information that are stored as a single value. Address fields have one, or many, format definitions available for users to select from. Each format definition is delivered with component lines that prompt users for the information needed to complete the address. For example, one format definition may have component lines for City, State, and Postal Code while another may have lines for Street Number, Street Name, and City. How the field was configured controls whether a format definition is defaulted into the field or if users can select from a dropdown list of available formats. Learn more in Configure format definitions. | Yes* |
| Color | Use a color as a supplementary aid or an aspect of brand identity. This data item type is currently used exclusively for themes. You can configure:
| No |
| Currency | Display money of any currency. This data item combines a number with a set decimal precision and currency code. The currencies available are controlled for the zone by the currency manager application. You can configure:
You can learn more about currency rules in the Currency math topic. | Yes |
| Expression [Limited Use] | Store a FEEL expression which can be used to define metadata, such as decisions. This data item type is for internal use only. | No |
| Inline Filter | Add a data item to your application that stores filter criteria. Inline filters are configured with fields, operators, and values, just like filters on list forms. When a user creates a record and configures the inline filter field with the desired operators and values, those selections are saved as part of the record. Learn more in Advanced Filter. Inline filters enable you to pass a record to a logic block and use the filter criteria saved in the record to filter fetched data. Learn more in Inline Filter data item configuration. For example, when working with inventory in a warehouse, workers pick inventory in groupings called waves. Waves optimize the warehouse pickers movements by grouping items from multiple orders which need to be shipped. In an application which manages waves, an inline filter data item could be configured that enables users to define the filter criteria for what should be included in each wave record. One wave record could define filter criteria that states all priority mail shipments due to be shipped today should be picked in a wave, while another could specify any standard mail shipments due to be mailed in the next three days should be picked as a wave. | No |
| Name | Name fields are complex data items which enable users to enter multiple lines of information that are stored as a single value. Name fields have one, or many, format definitions available for users to select from. Each format definition is delivered with component lines that prompt users for the information needed to complete the name. For example, one format definition may have component lines for First Name and Surname, while another may have lines for Title Before Name and Surname. How the field was configured controls whether a format definition is defaulted into the field or if users can select from a dropdown list of available formats. Learn more in Configure format definitions. | Yes* |
| Picture | Display a picture, or create a signature field for your records. Pictures have a size limit of 350 KB. You can configure:
For example, you can use Picture data items to add a logo to a company record in the directory. These logos can then be used in reports. Learn more in Report Builder configuration options. Or, you can create a signature field with, or without, a timestamp. Learn more in Signature field configuration. | No |
These data items refer to other data to display and store data.
| Type | If you want to... | Filterable in list form |
|---|---|---|
| Calendar | Display a calendar in an application. You can configure:
Configure the calendar in the Calendar Definitions application and reference the calendar data item. This data item holds the calendar once data mappings, application settings, logic blocks, or the Form Dependencies in the application tell the calendar data item which calendar to display. Learn more in the Calendar configuration topic. | No |
| Data Item Group | Create a collection of data items that can be included as a set in more than one table. Use this data item type if you have a group of data items that need to be collectively added in a number of tables or applications. This data item type is used to create multi-segmented data items. A multi-segment data item is a group of data items whose values are combined into a single formatted text field. The individual fields that the format uses to combine these values are referred to as segments, and the field that stores the combined values is referred to as the concatenated field. Multi-Segments are displayed as s single field but can be filtered by the individual segment fields that were used to create the concatenated value. | No |
| Object | Referential. An object is a single field that is comprised of a collection of data items in a table. You can configure:
| No |
| Subtable | Use this data item type to include a small subset of data as a table in your applications. This data item allows you do include an Add button so that users can add entries to the subtable from the current application. Subtables only display in the detail form of an application. They cannot be used in the list form. | No |
| Table Lookup | Create a reference to a data item in another table so that the resulting application field always displays the current value of the referenced data item. The Table Lookup data item stores the Nextworld internal ID (nwId) of the item it looks up, and evaluates to a display value at runtime. You can configure:
| Yes* |
Date and Date Time calculations
Use the Date Math, DateTime Math, DateTime Decomposition, DateTime Composition, Set Values, and other math actions to calculate dates, durations, time, and timezones.
The Date Math action is designed to handle the complexities of adding and subtracting dates. You can add a modifier, which determines the units of measure for the output.
The following actions are available to perform date math:
| Action | Description | Input | Output | Use to |
|---|---|---|---|---|
| Date Math | Perform math with a date value. | DateApply a modifier, such as a number, duration, or system value. | Date | Add a week to a date. |
| Perform math with a DateTime value. | DateTimeApply a modifier, such as a number, duration, or system value. | DateTime | ||
| Subtract | Calculate the difference between date values. | Date - Date | Duration or Number | Find the number of days between two dates. |
| Calculate the difference between two DateTime values. | DateTime - DateTime | Duration | Find the time difference between two DateTime values. | |
| Calculate the difference between time values. | Time - Time | Duration | ||
| Add/Subtract | Add or subtract a duration to get a new time. | Time - or + Duration | Time | |
| Add or subtract two durations. | Duration - or + Duration | Duration | ||
| Set Values | Convert a number to duration, or duration to number. | |||
| DateTime Math | Perform math with a DateTime value. | DateTimeApply a modifier, such as a number, duration, or system value. | DateTime | |
| DateTime Decomposition | Decompose, or break down, a DateTime value into its individual components. | DateTime | DateTimeTimezone | Change the timezone of a DateTime value. |
| DateTime Composition | Create a DateTime value. For example, you can change a date and time value into a DateTime value. | DateTimeTimezone (optional) | DateTime | Change the timezone of a decomposed DateTime value. |
Date and time considerations
DateTime data items store values differently than Date and Time data item types. Logic blocks can be used to manipulate the display values, such as setting the time zone based on the tenant time zone. Locales are used to designate the format for how dates and times are viewed.
System
There are several considerations for DateTime, Date and Time data items, including:
- Values in
DateTimedata items are stored by the system as Coordinated Universal Time (UTC). Everything is compared to one standard clock reference, and is stored as a point in time. When the values are retrieved for display purposes, by default they are converted to the appropriate time based on the user's time zone, which is controlled by browser settings, environment settings, or user profile settings. Learn more in Time zones. - Values in
Timedata items with a system value ofNoware stored as hard values. They are not time zone aware or stored as UTC. - Values in
Datedata items with a system value ofTodayrequire a time zone to be entered in the logic block action's properties. - If you decompose a DateTime field, you must select a time zone. For example, if you have a DateTime field value of 12:00am 1/1/2025 GMT and decompose it into a Date and Time, you could select GMT-6. This would give you a Time value of 6:00pm and the date of 12/31/2024.
- Values in
DateTimeandTimedata items can be configured with a Time Format. Time format controls the display and precision for time values. For example, you can specify only hours display in the field, or you could specify that hours, minutes, seconds, and milliseconds should display. The maximum precision for time is three digits (milliseconds).
Learn about date and time calculations in Date and Date Time calculations and Exclude dates in Date Time calculations.
Logic Blocks
Logic blocks can be used to convert Date and Time data item values to the appropriate time zone based on either a System value, like the tenant time zone, or a dynamically mapped value. The mapped value must be fetched, or pulled in as an input record.
There are several logic block actions that can assign the Date from a DateTime. Some examples are:
- Date Time Decomposition action—Allows you to decompose, or break down, a
DateTimevalue into its individual components. The outputDateandTimeare pulled from the inputDateTimeafter it is converted to the time zone specified. If no time zone is specified, the tenant's default time zone is used. Optionally, you can also use the time zone as the output. - Set Values action—Allows you to use a
Dateas the output, and different types of inputs, such as aDateTimefield, a System value ofToday, or a Text or Number data item with a lookup on time zones.- You can also use this action to designate a different time zone than the tenant. For example, if the time zone is fetched from the Org Unit, that time zone would be used when converting the
Date.
- You can also use this action to designate a different time zone than the tenant. For example, if the time zone is fetched from the Org Unit, that time zone would be used when converting the
Defaulting date and time values
When defaulting date and time values using the data mapper, application settings, or the Now or Today buttons within an application, the system chooses which time zone to use. The system determines what time zone to select based on the Display Preferred Time Zone checkbox on the Tenant Environment Setup record for that environment. Options include:
- Display Preferred Time Zone selected—The system looks for a Custom Time Zone in the User Profile. If no Custom Time Zone exists, it uses the Tenant Environment Setup application record's Default Time Zone. If no time zone is selected for this environment, the system uses the default time zone configured by the platform.
- Display Preferred Time Zone cleared—The system looks for a Custom Time Zone in the User Profile. If no Custom Time Zone exists, it uses the user's browser's time zone.
Interfacing with platform APIs
Endpoint integrations into Nextworld support any ISO-8601 valid format for DateTime values. It is preferred to use the format which the platform stores, but UTC DateTime formats may include a time zone offset for integrations. For example, the following UTC formats represent the same timestamp and are both accepted by the system:
2024-02-28T07:00:00.000Z (preferred)
2024-02-28T14:00:00.000+07:00
Locale
Locale is set in the User Menu and designates how date and time are formatted in the system. For example, English (United States) locale formats the date of November 01, 2022 as 11/1/2022, but French (France) locale formats that date as 01/11/2022.
Configure data items
Configure certain data item types and related applications using the following topics.
Data Item Group configuration
Configure a data item group using the Data Item Definitions application and Table Definitions application.
Data Item Definitions
In the Data Item Definitions application, you must:
- Create a data item of type
Data Item Group.This creates a field you can use to add a group of associated data items to an application. - Give the
Data Item Groupdata item the same name as the associated table created in this topic's Tables section.
Table Definitions
In the Table Definitions application, you must:
- Create a table of type
Subto hold the associated data items that are part of the data item group. - Give the table the same internal name as the
Data Item Groupdata item created above. It is critical that the table shares the exact same name of the data item, including capitalization. This is how the two objects are linked, and if they are not given the exact same name, then the data item group configuration won't work.- Do not add the
Data Item Groupdata item to this table.
- Do not add the
- Add the
Data Item Groupdata item to the table that the application is built over. The application will automatically have all the fields in the data item group available to it.
Subtable configuration
Configure a subtable using the Data Item Definitions, Table Definitions, and Application Builder applications.
Data Item Definitions
In the Data Item Definitions application, you must:
- Create a data item of type
Subtable. This creates a field that you can use to add data items. - Give the
Subtablethe same name as the related table created in this topic's Table Definitions section.
Table Definitions
In the Table Definitions application, you must:
- Create a table of type
Subtable Mainor type Sub to hold the related data items that are part of the subtable. - Give the table the same internal name as the
Subtabledata item created above. It is critical that the table shares the exact same name of the data item, including capitalization. This is how the two objects are linked, and if they are not given the exact same name then the subtable configuration won't work.- Do not add the
Subtabledata item to this table.
- Do not add the
- Add the
Subtabledata item to the table that the application is built over. The application automatically has all the fields in the subtable available to it.
Application Builder
In the Application Builder application, you must:
- In the Detail form configuration, clear the Hide On Table checkboxes for any fields that you want to appear in the subtable in the generated application. By default, all fields have the Hide On Table checkbox selected. If none of the fields have the checkbox cleared, then no fields appear in the subtable on the generated application.
Data item validation configuration
Configure field validations using the Validation Setup application and Data Item Definitions application.
Validations
If a validation doesn't already exists for your field entry requirements, then in the Validations application you must:
- Create a new validation to create a unique validation for field entry.
- Specify the validation rules necessary for field entry. Field validation rules include no lowercase letters, no uppercase letters, no numbers, no spaces, and no special characters.
Data Item Definitions
In the Data Item Definitions application, you must:
- Create a data item of type Text. A data item of type Text is the only data item type that you can validate.
- On the Settings page, enter the name of the validation in the Validation field.
Automatic number configuration
Application developers use the Data Item Definitions, Table Definitions, and Automatic Number Definitions applications to configure automatic numbering for a data item.
Data Item Definitions
In the Data Item Definitions application, you must:
- Create a data item of type
NumberorTextto apply the automatic number sequence to.- Use the type
Numberfor data items that don't use automatic formatting. - Use the type
Textfor data items that use automatic formatting.
- Use the type
- On the General Configuration page, select the Automatic Number checkbox.
Table Definitions
In the Table Definitionss application, you must:
- Add the
Numberdata item to a table. - Select the Locked field when configuring the Automatic Number field in the table configuration. This prevents the automatic number from being changed once the record has been saved and an automatic number has been assigned to the record.
- Add the Automatic Number field to the table's unique index.
- For more information see Indexes.
Automatic number definitions
In the Automatic Number Definitions application, you must:
- Create a new automatic number definition to define the numbering sequence for your data item and related table.
- Specify the Initial Number and the Increment by which it should increase.
- Specify the Org Unit Security Field and the Table Name that connect the automatic number to records.
- If you specify a Dependent Value, then you must also specify the Dependent Field. Any dependent fields used must be part of the specified table. These fields also enable you to create company or org specific automatic numbers. Learn more in Dependent values for automatic numbers.
If you want to format your automatic number, select Go To Auto Format to define the formatting. See Automatic formats for more information.
Inline Filter data item configuration
Configure Inline Filter data items with the Data Item Definitions, Table Definitions, Application Builder, and Logic Block Builder applications.
Prerequisites
Create your data item of type Inline Filter and add it to the table which your application is built over.
Application Builder
In the Application Builder, add your data to your application. Then, in the Field Dependencies section in the Confiugration panel, you must:
- In the Selectors.ControllingFieldType field, select
Inline Filter Table Name. - In the Selectors.SelectorControlling field, enter the name of the table which your logic block will fetch data from.
- In the Selectors.SelectorDependent field, enter the name of the field in your application where you want the filter applied.
Logic Block Builder
In the Logic Block Builder, you must:
- Create a logic block over your application which fetches data from the table referenced in the Selectors.SelectorControlling field.
- Use your inline filter in the fetch actions, or the Build Dynamic Expression action, to filter the data you want to fetch:
- In the Expression section, select the + Add External Expression button.
- In the External Expression Type field, select
Inline Filter. - Reference the filter field's value in the expression.
Multi-Segment data item configuration
Configure Multi-Segment data items using the Data Item Definitions, Table Definitions, Application Builder, and Format Definitions applications to concatenate data item values into a single text field.
Data Item Definitions
You must create all of the data items that make up your multi-segment.
In the Data Item Definitions application, you must:
- Create a data item of type
Textthat stores the concatenated value - Create a data item of type
Textthat stores the name of the format that is used to create your concatenated value - Create a data item for each of the individual segments that make up the concatenated value. This data item must be of type
Text,Number, aList Lookupof typeText, aList Lookupof typeNumber, aTable Lookupof typeText, or aTable Lookupof typeText. - Create a data item of type
Data Item Group. On the Settings page, select the Treat as Multi-Segment checkbox and add the data items you created for your concatenated and format fields in the Multi-Segment Format Field and Multi-Segment Concatenated Field.
Table Definitions
In the Table Definitions application, you must:
- Create a table of type
Subwith the same internal name as theData Item Groupdata item created above. The table must share the exact same name of the data item, including capitalization. This is how the two objects are linked. If the names don't match, the data item group configuration won't work. - Add all of the segment data items that you want to use in your concatenated value into the subtable, as well as the two text fields that were configured to store the format and concatenated fields.
- Do not add the Data Item Group data item to this table.
- Add the Data Item Group data item to the table that the application you want to use the multi-segment in is built over. This automatically pulls all of the fields from the corresponding subtable into the application.
Application Builder
Once you've added the data item to the application's table, you must configure it in the application.
In the Application Builder application in the Configuration panel, you must:
- In the List form section, set the display property of all the fields, including the Data Item Group, to the same value. The fields must have the same Display Value in order for the multi-segment to work.
- In the Detail form setion, add your multi-segment to the detail view. The Data Item Group and all of your segments must be added to the same row and column.
See the Application Builder topic for information on field dependencies that can be use with multi-segment data items.
Format Definitions
In order to use the multi-segment in the application, you must create a new format.
In the Format Definitions application, there are several configuration options to consider, such as:
- The Format Name is the identifier that is stored in your Multi-Segment Format field. It is also used when entering data into the controlling field of a format field dependency.
- The Format Type must be
Multi-Segment Format. - The Format Description is the displayed name when you select a format from the dropdown in the multi-segment panel.
- The data items you created must be added to the Individual Segments subtable. The order in which they are added to the subtable is how they appear in the list.
- The Format Delimiter is the single character that is used to combine your segment values into your concatenated value.
Signature field configuration
Add signature fields to your applications with Picture data items.
To configure, in the Data Item Definitions application, create a new data item of type Picture. Then, on the Settings page, use the Style Options field to select the type of signature field you want included, such as signature with timestamp.
Once the data item is added to the table and application, users can use a mobile device or their mouse to sign in the box. Signatures include the username of the signee within the bottom corner of the field.
Static Text data item configuration
Application developers configure Static Text data items to show a section of non-editable text in an application.
Persistent text
To configure a static text field that never changes, you must:
- Create a data item of type
Static Textin the Data Item Definitions application. - Create a synonym for the data item. This text is what populates in the application.
- Create a table in the Table Definitions application.
- Reference the data item in the table on the Fields page.
When you create a new record in the application built over the table, the synonym text associated with the data item at the time of creation is saved to the record. If the synonym is changed later, the application does not update with the new text.
Updating text
To configure a static text field that always shows the most current synonym text, you must:
- Create a data item of type
Static Textin the Data Item Definitions application. - Create a synonym for the data item. This text is what populates in the application.
- In the Table Definitionsapplication, add the data item to an existing table or create a new table.
- On the Fields page, select the Fields.WorkField checkbox for that data item.
Each time you open a record in the application, the current synonym associated with the data item shows in the application.
Synonyms
Application developers use synonyms to configure the way a data item displays in different contexts, such as different product families, modules, applications, and view tables.
Data items are reused in multiple tables and applications to capture information. Even though a data item captures a single type of information, you can use it differently in different contexts by defining different synonyms with different parameters.
For example, when you reuse the Name data item in the Company Directory application and the Suppliers application you're capturing the same type of information, a name, that is used differently. In the Supplier Invoices application, the field captures the name of a supplier and uses the label Supplier Name. In the Company Directory application, the field captures the name of a person or organization and uses the label Name. In addition to different labels, these fields also have different help text to explain how the field is used in each context.
Each synonym is made up of the following components:
- Short Label—The field name that displays on list forms, detail lists, and subtables.
- Label—The field name that displays in detail forms.
- Help Text—The information about the field that displays when users click the Help
 icon next to the field name. Help text should help users understand the purpose of the field in an application. Learn more in How to write field names and help text.
There are best practices you should adhere to when creating synonyms. Learn more in Synonyms best practices.
Synonym parameters
In order for the same data item to display different synonyms in different contexts, you must specify parameters for your synonyms. The synonym that displays for a field is always the one with the parameters that most closely match the context of where the field is displayed.
You can configure synonyms for an entire product family, for an entire module, for a specific application, and more. The system evaluates these parameters in a hierarchy, with product family being the broadest parameter.
For example, you may create a synonym that specifies the Supplier Invoices application as a parameter, and another synonym that specifies the Financials product family as a parameter. When you launch the Supplier Invoices application, the latter synonym displays, because the Supplier Invoices application is in the Financials product family. In order for the first synonym to display, you must specify both the application and product families as parameters.
If a synonym has no parameters specified, it's considered a global synonym. Global synonyms display anywhere the field appears, provided a synonym with matching parameters doesn't exist.
The following table summarizes how synonyms display when they are configured with different parameters:
| Specified parameter(s) | Synonym is used for all instances of the data item... |
|---|---|
| Family | In all applications within that family. |
| Family, Module | In all applications within that family and module. |
| Family, Module, Application | In the given application. |
| Application, Secondary Join Table | In the secondary join table in the given application. |
| Application, Subtable | In the specified subtable in the given application. |
| Application, Table Lookup | As a related field, on the table lookup field, in the given application. If you want to override the synonym for the primary search field of a table lookup, add a unique synonym on the table lookup data item itself. For other related fields, create unique synonyms in the related field’s data item. |
| Application, Subtable, Table Lookup | As a related field, on the table lookup, on the subtable, in the given application. |
| Application, Secondary Join Table, Table Lookup | As a related field, on the table lookup, on the secondary join table, in the given application. |
| View Table | In the view table. If the view table is built over a join table, the synonym is only used for the data item from the primary join table. Reports built over the view table show the specified synonym. |
| View Table, Secondary Join Table | In the secondary join table the selected view table is built over. Reports built over the view table show the specified synonym. |
| View Table, Table Lookup | In the related field from the selected table lookup. If the view table is built over a join table, the synonym is only used for the data item from the primary join table. Reports built over the view table show the specified synonym. |
| View Table, Table Lookup, Secondary Join Table | In the related field from the selected table lookup in the secondary join table. Reports built over the view table show the specified synonym. |
Synonyms and Header Detail applications
For synonyms specific to header detail applications, specify the header or the detail application, depending on which application the data item is in. If the same data item is used in both the header application and detail application of a header detail application, you can create specific synonyms for the header and for the detail.
Synonyms and application layouts
Some applications have application layouts specified within their application setting. If you want to customize a data item's synonym on these applications, you must specify the name of the application layout in the Application field of your synonym configuration.
Write help text with Nextworld intelligence
You can use Nextworld intelligence to generate suggestions for the field-level help text of your synonyms.
Every data item definition requires at least one synonym, which includes a label, short label, and help text. The help text should describe the purpose of the field and the information it captures.
While generating synonym suggestions may streamline your development process, you must always carefully review the generated suggestions before you use them. Generated synonyms may contain inaccurate information, and even if you choose to use a suggestion, you may need to modify to ensure the information is helpful.
Learn more in How to write field names and help text.
Generate suggestions
In the Data Item Definitions application, use the Generate Synonym Suggestions row action to generate help text suggestions for the data item. After you receive a notification that the suggestions have generated, use the Review Synonym Suggestions row action to open the Synonym Generator mini app. There, you can review, refine, and select a suggestion to use.
The Synonym Generator mini app displays multiple suggestions for the field's help text. These suggestions are derived using Nextworld intelligence using the data item's Org Unit Security Field, Type, and Description. Optionally, you can include additional context on the purpose of the field, how it relates to other fields in the application in the Additional Details field and generate new suggestions.
To use one of the suggestions, select the checkbox associated with the suggestion. Otherwise, you can select the Keep Current Help Text checkbox. After you save, the selected synonym on the data item definition is updated.
By default, the suggestions generated are for a global synonym. Clear the Generate Global Synonym checkbox to specify the specific scenarios where the synonym is used. Learn more about global synonyms and synonym parameters in Synonyms.
Generate suggestions for multiple data items
You can generate suggestions for multiple data items at the same time using the Suggest Synonyms form action in the list form of the Data Item Definitions application. This generates suggestions for all the data items you have filtered for, but only if they are in your current lifecycle. You can then use the Review Synonym Suggestions row action on each of the data items.
When you select this form action, you must specify synonym parameters. You cannot generate global synonyms for multiple data items. For example, if you created a new application, you could generate suggestions for synonyms specific to that application.
Synonym Generator mini app
Use the Synonym Generator mini app from the Data Item Definitions application to generate suggested help text for synonyms using Nextworld Intelligence.
To use the Synonym Generator mini app from the Data Item Definitions application, you can either:
- Use the Generate Synonym row action on a data item, and then use the Review Synonym Suggestions row action to open the mini app.
- Use the Improve Existing row action in the Synonyms Listing subtable.
By default, the suggestions generated are for a global synonym. Clear the Generate Global Synonym checkbox to specify the specific scenarios where the synonym is used.
The Synonym Generator mini app doesn't store any suggestions unless you chose to use them. To use one of the suggestions, select the checkbox associated with your chosen suggestion and select Save and Exit. You can always make edits to the suggestions before you save.
You must always carefully review suggestions from Nextworld intelligence. Learn more in Write help text with Nextworld intelligence.
Extended precision
Extended precision allows you to add additional decimals to currency and number data items for applications that deal with complex financial calculations, such as tax amounts, product or labor costs, sale price, and invoicing.
All data items that are part of the same transaction flow must use the same precision to avoid miscalculations and rounding errors. To help prevent these errors, Nextworld uses precision profiles to group data items together and control precision at a group level. Precision and extended precision for all Currency is controlled in the Currency Manager application, while for Number data items it is controlled in the Number Precision Setup application.
To use extended precision in an application, a data item must be associated with a precision profile group.
Extended precision profile groups - Number data items
Extended precision for all Number data items is controlled at a group level in the Number Precision Setup application.
Learn more in the Extended precision configuration – Number data items topic.
Extended precision profile groups - Currency data items
By default, the precision used for a Currency data item is determined by the Currency Decimals field in the Currency Manager application. Currency data items must have extended precision set for at least one currency in the Currency Manager application. Precision profiles let you manage the extended precision for all data items associated with the profile. You can build your own profile group or use one of Nextworld's delivered extended precision profile groups.
Learn more in the Extended precision configuration – Currency data items topic.
There are several currency profile groups Nextworld delivers with all relevant data items, and all currencies in the Currency Manager application with a set extended precision of seven decimals, such as the:
CurrencyFullPrecision—Used with currency variables for logic blocks using extended precision. This is a general precision profile and not uniquely associated with any one product family or transaction flow.ExtendedCostExtendedDecimal—Used for calculations with extended precision costs inManufacturingdata items.
There are also profile groups Nextworld delivers with all relevant data items, but no currencies or preset extended precision decimal, such as:
PriceExtendedPrecision—Used for calculations with price-related data items.CostExtendedPrecision—Used for calculations with cost-related data items.
If you want to use extended precision on data items not delivered, consider all the currency fields related to each other within a transactional flow and attach them all to the same precision group.
For more information on how to create your own extended precision profile group, see Precision Profile Group Setup application.
Currency Manager application
System administrators use the Currency Manager application to format currencies, set extended precision for a currency profile group, and to add additional extended precision profile groups to currencies.
Access the Precision Profile Group Setup application through a form action in the Currency Manager application. or from the Navigation Menu. In the application you can create a new profile group, or format an existing profile group. For more information see the Precision Profile Group Setup application and Extended precision configuration – Currency data items topics.
Sign out and sign back in to to see any changes made in the Currency Manager application.
To learn about delivered currency extended precision profile groups, see the Extended precision topic.
Precision Profile Group Setup application
Application developers use the Precision Profile Group Setup application to create precision profile groups that manage the extended precision for a set of related currency or number data items. Extended precision adds additional decimal places to the data items for complex financial calculations.
To open the application, select the Precision Profile Group Setup form action in the Currency Manager or Number Precision Setup applications, or open it from the Navigation Menu.
Once the profile group has been created, reference it in the Associated Profile Group field in any data items you want included in the group. Learn more in the Extended precision configuration – Currency data items and Extended precision configuration – Number data items topics.
To view a list of data items associated with the profile group, select the View Associated Data Items form action in the Precision Profile Manager application.
Number Precision Setup application
System administrators use the Number Precision Setup application to format and set extended precision for all of the data items in a number profile group.
To set up new profile groups, open the Precision Profile Group Setup application through a form action in the Number Precision Setup application, or from the Navigation Menu. Once a profile is created, you can add number data items to the profile through the Data Item Definitions application.
Once the data items are added, you can set the extended precision as well as the number of decimals to display in number precision setup.
To learn more about extended precision , see the Extended precision and Extended precision configuration – Number data items topics.
Modifying extended precision in production environments
Number precision setup records do not migrate with metadata. If a different extended precision is required, you must create a new record in the Number Precision Setup application.
Extended precision configuration – Currency data items
Configure extended precision for a currency precision profile group using the Currency Manager application, and the Data Item Definitions application.
Currency Manager
You can either create a profile group, or use one of the delivered profile groups. To learn more about the delivered extended precision profile groups, see Extended precision.
To create a profile group:
- Open the application with the Precision Profile Group Setup form action from the Currency Manager application, or from the Navigation Menu.
- Select Create.
- Once you've created the profile group, navigate to the Data Item Definitions application to attach the data items to your profile.
Data Item Definitions
To associate a Currency data item with the profile group, select the data item in the Data Item Definitions application, navigate to the Settings page, and enter the name of the profile group in the Associated Profile Group field.
For more information see Data Item Definitions application.
Currency Manager
To associate a profile group with a currency:
- Select the Edit row action on the currency you want to associate the profile group with.
- In the Extended Precision Definitions section, enter a profile group in the Extended Precision field and enter the number of decimals to be used for the currency.
- Select the Use Extend Precision on Display checkbox to display the extended precision value of a profile group for the currency in applications. If the checkbox is not selected, applications with currency data items in profile groups use the extended precision for calculations but use the Currency Decimals field to display currency values.
- Select the NW Delivered checkbox to lock the profile group, meaning it can't be deleted and no changes can be made.
For more information see Currency Manager application.
Extended precision configuration – Number data items
Configure extended precision for a number precision profile group using the Number Precision Setup application, and the Data Item Definitions application.
Precision Profile Group Setup
Open the application with the Precision Profile Group Setup form action in the Number Precision Setup application, or from the Navigation Menu. Create a new profile, then navigate to the Data Item application to attach the data items to your profile.
Data Item Definitions
In the Data Item Definitions application, you can associate Number data items with the profile group. Select each data item, navigate to the Settings page, and enter the name of the profile group in the Associated Profile Group field.
Number Precision Setup
In the Number Precision Setup application, configure the extended precision for the profile group. In the application you must:
- In the Number Profile Name field, enter the name of the profile you created in the Precision Profile Group Setup application.
- Enter the extended precision you want associated with the data items, as well as the number of decimals to be displayed.
The extended precision and display precision from the number precision record are applied to all data items associated with the profile group. For more information, see the Number Precision Setup application topic.
Modifying extended precision in production environments
Number precision setup records do not migrate with metadata. If a different extended precision is required, you must create a new record in the Number Precision Setup application.
Automatic numbers
Automatic numbers are non-repeating, alphanumeric values which can be attached to data items that need to increment automatically as records are created.
Use automatic numbers when a data item record needs to be numbered automatically with a unique value. For example, shipping invoices require a unique number be generated for each record. Once the initial automatic number has been defined, the system ensures each record has a unique, incremented value. Learn more in Automatic number configuration.
Optionally, you can apply automatic formats to automatic number on data items of type Text. Learn more in Automatic formats.
Company or org unit specific automatic numbers
Optionally, assign automatic numbers based on a Company or Org Unit. This allows automatic numbers to be assigned within a specific company in a table and removes gaps in the assigned numbers for records belonging to that company. Learn more in Dependent values for automatic numbers.
Automatic number caching
Optionally, use automatic number caching to have the system preload a group of automatic numbers into a cache before they are assigned to records. Automatic number caching can be turned on for:
- Individual automatic number definitions.
- All automatic number definitions assigned to a specific company or org unit.
- All automatic number definitions within an environment.
This feature can increase performance, but can also create gaps between numbers and cause records to have numbers assigned out of sequence. This is primarily used by system administrators during implementation.
Learn more in Automatic Number Definitions application and Automatic Number Cache Overrides application.
Automatic formats
Automatic formats are used to format automatic numbers of data items of type Text. Automatic numbers allow you to automatically increment a non-repeating, alphanumeric value assigned to a data item.
Automatic formats can include adding prefixes or suffixes, specifying upper or lowercase for text, or padding or truncating an automatic number.
For more information, see Automatic Number Definitions application and Automatic Format Definitions application.
Automatic Formats configuration
Use the Automatic Format Definitions and the Automatic Number Definitions applications to format a Text type automatic number.
Automatic formats
In the Automatic Format Parts subtable, specify what format you want to apply to the automatic number using the following fields:
- Org Unit Security Field
- Constant Value
- Passthrough Value
- Special Value
Additionally, you can refine the automatic format using any of the following parts:
- Choose
Current Timestampin Special Value to format the automatic number as a timestamp; choose the formatting for timestamp in Special Value Format. - Choose
Universally Unique IDin the Special Value part to use a UUID for the automatic number; use Special Value Format to specify how the UUID should be formatted. - Use Options to change the case of an automatic number or remove or trim whitespace from the number.
- Use Prefix or Suffix to add text to the beginning or end of an automatic number.
- Use Length to set the length for a specified part; if the length of the automatic number exceeds the set length of the part, the automatic number truncates.
- Use Pad Type to select a character to fill the automatic number field if the entry does not meet the required length of the field. Use Pad Side to specify which side of the automatic number field to apply the padding to. Use Length to specify the length of the padding applied to the automatic number.
Apply the automatic format to the automatic number definition
Open the Automatic Number Definitions application:
- On the Settings page, enter the name of the automatic format in Automatic Format Name and use Automatic Format Field to specify the location of the formatted automatic number.
- If you selected Passthrough Value as the ordered part for the automatic format in the Automatic Formats application, specify the Key and Value pair for the Passthrough Values in the Dynamic Data section.
Automatic Format Definitions application
Application developers use the Automatic Format Definitions application to format automatic numbers of Data Item Type Text.
To create an automatic format, you must use one or more ordered parts from the Automatic Format Parts subtable in the Automatic Format Definitions application. You can use a value, a passthrough, a predefined format (such as a timestamp), or other formatting including prefixes, suffixes, padding or truncating.
For more information about configuring automatic formats, see Automatic Formats configuration.
After you have configured the automatic format, use the Automatic Format Name field and the Automatic Format Field in the Automatic Number Definitions application to attach the format to the automatic number.
Dependent values for automatic numbers
When you create an automatic number definition for a data item, you might not want it to increment every time the data item is inserted or updated in a related table. You can use dependent values to control when an automatic number increments.
For example, an automatic number for data item Batch Job Number could increment each time a record is inserted into the related table. Instead, you might want the automatic number for data item Shipping Receipt to increment only with a specific combination of state or city values.
Use dependent fields and dependent values in the Automatic Number Definition application to set the combinations. For example, if there is an automatic number definition with a Dependent Field of State and a Dependent Value of Colorado, then the number only increments if the record has a dependent value of Colorado.
Org Unit/Company Field is a unique type of dependent field that only filters for the company field of a data item record. So, in the example above, if you add a Org Unit/Company Field of Distributor and a Org Unit/Company Value of Nextworld, then the record only increments if the fields of State and Distributor are Colorado and Nextworld.
Learn more about creating an automatic number definition in the Automatic Number Definitions application.
See Dependent values for automatic numbers configuration for information on how to configure dependent fields and values.
Dependent values for automatic numbers configuration
Use a dependent or company field and value combination to set conditions on when an automatic number increments. For example, if you Set dependent conditions in the Automatic Number Definitions application.
Set a dependent field and value
On the Settings page of the Automatic Number Definition application:
- Enter the name of the data item to be used for the dependent condition in the Dependent Field.
- Enter the value associated with the Dependent Field for the data item in the Dependent Value field . The automatic number only increments for an exact match of the term entered in the Dependent Value field.
While Dependent Field and Dependent Value are not required fields, if you enter a dependent value, you must also enter a dependent field for the data item.
You can use the Dependent Field Description to enter a reason for applying a dependent field to the automatic number definition.
Set a company field
Org Unit/Company Field and Org Unit/Company Value fields are unique dependent fields specific to a company. If incrementing the automatic number is dependent upon an Org Unit/Company Value, the table which the automatic number definition is built over must:
- Have the Org Unit, Company, or both fields added.
- Have the
Supports Sequence Groupingtable label. - Have the correct field label marking the lookup field as the desired Org Unit/Company field.
Automatic Number Definitions application
Application developers use the Automatic Number Definition applicationto configure data items with numeric values that need to increment automatically as records are created. This enables you to add automatic numbering within a field for a specific table.
The data item must have the Automatic Number checkbox selected in its configuration for it to reflect the automatic number setup in the Automatic Number Definitions application configuration.
For example, the data item ChargeID has the Automatic Number checkbox selected and an automatic number definition set up for that data item in the Charges table. This means that in the Customer Charges application, which is built over the Charges table, the field ChargeID would start the automatic numbering with the number preset in the automatic number definition and would increment by a predefined value every time a new record is saved.
These are the requirements to create a new automatic number definition:
- The data item must be part of the specified table.
- If dependent fields are used, they must be part of the table.
- If you configure dependent values, you must also configure the dependent fields.
- The data item definition must have the Automatic Number checkbox selected.
- If a new automatic number is being made in a non-base environment, either the data item or table for the automatic number must be in the same non-base environment.
Optionally, select the Cached Automatic Number checkbox to have the system preload a group of numbers into a cache before they are assigned to records. While this can improve performance, it also can cause gaps and out of sequence numbers. Learn more in Automatic numbers.
Automatic Number Values application
Application developers, testers, integrators, and system administrators can use the Automatic Number Values application to view and optionally edit the most recently incremented automatic number data item in a table.
An automatic number is attached to a data item in the Data Item Definitions application and is defined in the Automatic Number Definitions application. When a correctly configured automatic number is in use, the Automatic Number Values application maintains a record that shows the number most recently assigned to a record in the associated table. The automatic number value record is created automatically when the first record is saved to the table, and updated each time a new record is saved. The name of the automatic number value record is identical to the automatic number definition record name.
For more information, see Automatic Number Definitions application.
Change the next number in the sequence
The only field you can edit in the Automatic Number Values application is the Most Recent Number field. This field represents the automatic number that was last assigned to a record in the table defined for the automatic number definition. The next record created will be assigned the number that comes after the Most Recent Number in the sequence. If you change the value in this field, the next record inserted into the table will increment from the value you specified.
Keep in mind:
- With the exception of the Most Recent Number field, no other fields in the Automatic Number Values application are available for editing; they are meant to be used for reference purposes only.
- The value of the Most Recent Number field is initially populated based off the Initial Number field value in Automatic Number Definitions application, but can be changed at any time. For example, if you used a block of numbers while testing and then wanted to reset the most recent number to the last number used prior to testing, you would edit the number value in the Most Recent Number field.
- Changing the value of the Most Recent Number field impacts the next record created, which will use the next number in the sequence. Records already in the table are not changed.
- If you change the most recent number value to an earlier number in the sequence and a record already exists in the table with the subsequent number, you may receive an error when you attempt to create a new record. This depends on whether the automatic number data item is a unique index for the table.
Automatic number status
You can view the status of an automatic number in the Automatic Number Status field, which keeps track of the current state of the automatic number value. Only automatic value records that have a Not Used status can be deleted.
The automatic number status does not update automatically. To refresh the status, use the Update Link Status form button.
Automatic Number Cache Overrides application
System administrators use the Automatic Number Cache Override application while importing data during initial implementation. Automatic number caching enables the system to place a group of automatic numbers in a cache to improve performance.
You can create an automatic number cache override that is specific to a company or org unit, or have it applied to all automatic number definitions within an environment. When applied to an entire environment, the cache overrides the cache setting defined on individual automatic number definitions and any other environment automatic number settings.
Learn more in Automatic numbers.
Automatic numbers best practices
These best practices ensure that automatic numbers are configured consistently throughout Nextworld.
Automatic numbers are configured in the Data Item Definitions application. They must also be configured in the Automatic Definitions application after the data item has been created.
Use the the Automatic Number checkbox for fields that need a unique identifying number. Do not use a logic block to fetch the table and then take the the previous row's automatic number and just add 1 to it. Applying an automatic number avoids conflict because it ensures that the same number is not applied to two records.
Check the Locked field when configuring automatic number fields in the table configuration. This prevents the automatic number from being changed once a number has been assigned.
If you have an automatic number field in a table, you must add the automatic number field to the table's unique index.
Automatic number records have the option of specifying a Dependent Field field. If an automatic number contains a Dependent Field field, then those chosen fields should also be part of the unique index. If the chosen fields are not included in the unique index, then you receive a duplicate key error, which is an error stating that a record with the same unique key already exists.
Consider if the automatic number may be configured to use an automatic format, either by Nextworld or by a customer, or if the automatic number will only be a number.
If an automatic format is defined, all fields specified in the Automatic Format Definitions application must be fields in the table and must be of type text.
Naming conventions and standards
Automatic number names should have spaces and do not follow the UpperCamelCase convention that most Nextworld objects adhere to. Automatic number names should be descriptive enough for someone to know what the automatic number is for. It can be helpful to use the name of the data item you are setting the number up for. For example, Asset ID or Agreement Number are acceptable names for automatic numbers.
Data Item Definitions application
Application developers use the Data Item Definitions application to create and modify fields.
Use this application when creating data items for a table. An application is built over the table that stores the created data items. The data items display as fields in the application.
The defining information of a data item, including the data item name, type, and description, is stored in the Data Item Definitions application header. After the header information is entered, you can further specify your data item definition using the application's pages. These pages can be configured based on what kind of fields you want in your application.
See the Data items section for more information on configuring data items.
General Configuration
Specify the data item's customization pattern to allow the user to lock, unlock, change or add on to lookup values in the field, and write your data item's synonym.
A synonym is a brief explanation of what the data item does as a field in the application. You must write help text for every synonym you create for a data item. Enter the module, family, and application for the synonym. You can provide both the name that appears in the detail form of an application, and the name that appears on the column header of the list form of an application.
Learn more in the following Nextworld Help topics:
Settings
Configure your data item based on the data item type you chose in the header. You can add a table lookup that points to a record in another table, or link the data item to a list lookup to create a dropdown list in the field of the application. This allows a user to select one or more values from a list to populate the field. You can also specify a dynamic lookup, allows you to create a dependency on another text field. If the name of the value in the text field is a list lookup, then that list lookup drop-down list becomes accessible in another field.
See Data item types for more information on the different types of data items.
Data item best practices
These best practices ensure that data items are configured consistently throughout Nextworld.
Labels and synonyms
There are several best practices to follow, including:
- Size fields based on the length of the short label and the expected length of the value of the field. Do not make the field big just to fill up empty space.
- Always include Help Text, a Label, and a Short Label when a you define synonyms.
- Do not include any punctuation, special characters, or symbols in the Label and Short Label.
- Labels for
True Falsedata items must be formatted as statements. If the statement is true, then the checkbox is selected. If the statement is false, then the checkbox is not selected.
Data items can be shared across families as synonyms can be specific to family, module and/or application. If any of the formatting and validation options, such as storage decimals, extended precision or min/max value are changed, should those changes affect your table or do you want to ensure consistency across tables. For example, the unit cost field is used in many tables. All tables throughout the entire business process flow must have the same extended precision, otherwise rounding will occur as the value moves from one table to another. In this case, it is better to use the same data item.
Naming conventions and standards
Name data items so that they are free of numbers, special characters, and spaces. Once a data item is created, the name cannot be changed at a later date. All words must be written in upper camel case, which means the first letter of each word should be capitalized. The name should reflect the type of information that is being stored in the table. For example, ItemNumber or TaxAmount.
The name of the data item should reflect the intent of the field and follow the upper camel case convention. For example, ItemNumber, TaxAmount, and AccountingMethod are all acceptable data item names.
If the data item is a Message type, the naming format is <ProductFamily>Msg####. The number is not automatically assigned, so you must find the number used in that product family's last created message data item to determine what the new message number should be. For example, PlatformMsg10, FinancialsMsg9, and ManufacturingMsg12 are acceptable names for message data items.
For data item groups, the naming format is <DataItemPurpose>Fields. For example, SupplierFields or ItemOrgUnitFields.
If the data item has the Automatic Number checkbox selected, the field name should contain ID or Number. For example, ContactID and PurchaseOrderNumber.
If the data item is used in the Action Label field in the Workflow Definition application, the data item needs to be defined as a Label type with the naming format of <ProductFamilyDescription>WFAction<ActionLabel>. The <ActionLabel> being the label used for the workflow transition. If the same workflow action label is used across many families, each family should have their own data item label. Do not share workflow action data items across families. For example, FinancialsWFActionPost, FinancialsWFActionActivate, and FoundationWFActionActivate are acceptable names for workflow action label data items.
Table Lookup Definition
When a data item is defined as a and a Primary Search Field, Secondary Search Field, or Tertiary Search Field is defined, that field will override the field defined in the table definition. At a minimum, an index should be established for whatever field is specified as the primary search field. You should also not define a data item as a primary, secondary, or tertiary search field if it's optional or could be empty.
Best practices by data item type
Some data item types have their own best practices. If you are using a data item of one of these types, follow the best practices for that type.
Currency data item best practices
These best practices ensure that Currency data items are configured consistently throughout Nextworld.
Currency data items are used for total amounts as well as individual amounts. For example, a unit price for an item is $1.10. If an order for a quantity of 10 is entered, the total or extended amount is $11.00.
Extended Precision
Data items that represent Unit Cost and Unit Price in Nextworld can hold more precision than what is determined by the currency code. For example, a unit cost in USD may have 7 decimal precision although the USD currency precision is set to 2 decimals. When the unit cost is calculated into the Total or Extended Amount (quantity x unit cost), it is rounded to the currency precision for the currency code. In the example above, if the unit price is set to $1.0981, the total amount is now $10.98.
Nextworld delivers two Precision Profiles. One for cost and one for price. Data items that need to follow the extended precision must have proper precision profile set in the data item.
Considerations:
- Consider the entire business process flow of the data item, so there is no loss of precision. For example, a unit price in a sales quote flows into a sale orders which flows into account receivables. The data item in different tables may be different. All data item must have the same precision profile.
- Only re-use data items with a precision profile if you need the precision. If you data item does not need the precision, then use a different data item.
Date and Date Time data item best practices
These best practices ensure that Date and DateTime data items are configured consistently throughout Nextworld.
Date and DateTime data items are configured in Data Item Definitions.
If you have data that crosses timezones, then use DateTime fields. If the data does not cross timezones, then use a Date field. For example, data items like BirthDate, StartDate, and EffectiveDate are Date fields that do not cross any timezones, but if you need to use a data item to track dates of flights, then use a DateTime field. Using the DateTime field always displays the correct time zone that the user is in.
When adding the EffectiveFrom Date or DateFrom DateTime data items to a table, consider adding EffectiveThrough Date or DateTo DateTime data items as well to create a date range. It is easier and more intuitive to fetch a date when it is within a range.
When using Date data items on an application and the default should be "today", these fields should be defaulted from the application settings whenever possible. This is because application setting defaults can use the user’s browser time zone and users will expect “today” to mean their current date. Use the following example, if the tenant time zone is UTC -6, the application’s Organizational Unit time zone is UTC -4, the user’s browser time zone is UTC +10, and the current UTC Time is 1:00:00. If the field is just defaulted to "today" in logic when using the Set Value action, a time zone must be specified in either the tenant time zone or the application’s Organizational Unit time zone, both of which are “yesterday” to the user. Using System (Current Date) Today from an application setting, will be in the context of the user’s browser time zone and give the appropriate value for “today.”
When using DateTime data items to an application and the default should be "now", it does not matter if this field is defaulted using a logic block or an application setting because "now" is always in UTC and is already handled by the system for display purposes.
Message data item best practices
These best practices ensure that Message data items are configured consistently throughout Nextworld.
Message data items are configured in Data Item Definitions.
If you are configuring a Message type data item, you must follow the Message type naming standards. See Data item best practices to find the naming standards for Message type data items.
Place the content of the message in the Description field when entering the description of the data item. This allows you to filter for messages when needed.
Use a unique Message type data item for each product module family. For example, you may need to create a message data item for an error in procurement even though an existing message data item in manufacturing has the exact message you want. You cannot reuse the manufacturing message. You must make a new Message data item exclusively for procurement.
When using the message in a logic block, include inputs to provide additional relevant information to the user.
If the message or input references workflow, use the workflow state type as the workflow state can be user defined.
How to write an error message
When you're writing an error message, your main goal is to tell the user what went wrong and how to fix it.
Bottom line
Let the user know exactly what the error was, why it happened, and what they can do about it.
Ask yourself:
- Will the user know where the problem is?
- Will the user know what to do to fix the problem?
- Is there a clear first step?
Tips
- Use complete sentences with proper punctuation.
- Avoid slang, jargon, colloquialisms, pop-culture references, and jokes.
- In general, you should address the user in second person using "you." However, you should never blame the user. It's better to use passive voice than to say "you messed up."
Words to avoid
- Oops
- Error
- Failed
- Problem
- Invalid
- Wrong
- Prohibited
- Sorry
When to reference object names that can be customized
Application names, field names, and field values can be customized by users in downstream environments. If you reference the name of the object in your message and a user customized the synonyms or menu entries for the object in their environment, it may confuse the user.
In general, strive to refer to generic concepts instead specific object names. If the object you need to reference in your message is a generic concept, great! Just don't capitalize the object's name so that it appears to be a generic concept.
However, there are cases where the risk that the user is unable to resolve the cause of the error without a reference to a particular object outweighs the risk that the object's name may be different in a customer environment. Use your best judgement.
Number data item best practices
These best practices ensure that Number data items are configured consistently throughout Nextworld.
Number data items are configured in Data Item Definitions.
Ensure that the settings for data precision and display precision are correct. Caution must be taken if the display precision stored is changed as rounding issues may occur.
When adding the QuantityFrom data item to a table, do not add the QuantityTo data item as well. Including a range may cause a quantity gap when a user enters values with decimals. For example, a user may enter from 1.0000 to 2.0000, with four decimals, and then from 3.000 to 4.000, with only three decimals. This could cause a discrepancy between stock amounts available from suppliers and stock amounts needed by customers.
Quantity Fields
When creating a Number data item that represents a quantity, the best practice is to set the Data Precision to 8 and the Display Precision to 2.
Extended Precision
Extended precision profiles can be configured and associated to a set of data items where the number precision must be the same for all the data items in the group.
Considerations:
- Consider the entire business process flow of the data item, so there is no loss of precision. For example, a quantity field in a sales quote flows into a sale orders which flows into account receivables. The data item in different tables may be different. All data item must have the same precision profile.
- Only re-use data items with a precision profile if you need the precision. If you data item does not need the precision, then use a different data item.
Static text data item best practices
These best practices ensure that Static Text data items are configured consistently throughout Nextworld.
Static Text data items are configured in Data Item Definitions.
Only use Static Text data items in applications when the application has parameters that are complex enough that it needs specific instruction and/or a major action is non-reversible. For example, the application Supplier Invoices has a Void row action that opens a mini app that allows you to add information on why you are voiding a record. The static text in this mini app provides instruction on what information is necessary and what you must do once that information is entered: Enter a date, and click Void to continue or Close to exit.
Configure the display size of the data item as Full. The Full size reliably covers the amount of space that a Static Text data item should cover in the generated application. For more on the amount of space that should be covered in the generated application, see the Application pages and rows best practices section.
Subtable data item best practices
These best practices ensure that Subtable data items are configured consistently throughout Nextworld.
Subtable data items are configured in the Data Item Definitions application. Tables built on top of Subtable type data items are configured in the Table Definitions application.
Always use a table of type Main when creating a table to attach a Subtable type data item to.
Subtables are limited to 700 entries per record. For example, in an application capturing contact details, a subtable of email addresses can store up to 700 emails for each contact.
Always position fields on the left and checkboxes on the right.
Use a standard application with a subtable when:
- You have a one to many relationship where the list of fields and the number of rows in the subtable is small.
Table lookup data item best practices
These best practices ensure that Table Lookup data items are configured consistently throughout Nextworld applications.
Table Lookup data items are created in the Data Item Definitions application, and configured in the Table Definitions application.
Use a Table Lookup type data item when the value in the Child Field of the table can change and you want the change to be reflected in all tables that are pointing to the record. For example, EmployeeName is a data item table lookup to Directory. If the employee changes their name, you want any expense reports or transactions to automatically reflect the new name.
Common best practices
Whenever configuring, use a table lookup to:
- Link fields from one table to another. Do this instead of storing values in multiple tables and using logic blocks to fetch them.
- Store a value in one table, and reference that value from other tables without duplicating the value. In other words a table lookup ensures that you don't have to store the value twice.
If you create a chain of table lookups, it should not be longer than two links beyond the source. If more than two levels are used in the table lookup chain, then an error appears when you try to generate an application over the table that is third level from the source.
Type Ahead Best Practices
These best practices ensure that type aheads are configured consistently throughout Nextworld.
Primary and Secondary type ahead should be configured at a table level. This ensures consistency in all applications.
The primary and secondary type ahead configured on the data item overrides the table type aheads and should be used sparingly. The exception is a data item that represents the Org Unit. Configure these data items to have the Primary Type Ahead as Org Unit Number and the Secondary Type Ahead as Org Unit
Best practices for data item specifications
These best practices ensure that data items are documented consistently throughout Nextworld.
Information for all data items
The specification must include the information needed to use the data item in a table. This means that the specification should explain what is unique about this data item configuration, and why the configuration is important. This includes information configured in fields on the Formatting & Validations page such as:
- Any configured Validation.
- If a Field Format is applied.
- Any Default Text configured for the field.
- This is true for all data item types.
- If a field is configured as an Automatic Number.
The specification should explain the function of the data item, and it should be different than the Help Text. The Specification should explain the technical information about the data item to an application developer, and the Help Text should explain to an end user how to use the field.
Depending on the Type, additional information should be included. The table below specifies the information to include for different data item types.
| Type | Information to include |
|---|---|
| Date |
|
| DateTime |
|
| Time |
|
| Number |
|
| Currency |
|
| Table Lookup | Describe the configuration in the Table Lookup Definition fields including the Related Table and Primary Search Field fields. |
| Subtable | Fields in the subtable if it is hidden when empty |
| Data Item Group | data items that are part of the group |
| Text | If it is used as a list lookup, describe what is configured in the fields in the Lookup Definition such as Lookup Name and Lookup Type Include any formatting and validations. |
| Text Editor | |
| Text Area | Default Text Area Text Lines Show as Static Text |
| True False | If the field is configured to Default True |
| If the field is configured to have a Default Email | |
| Address | List View Maximum Row Height |
| Name | List View Maximum Row Height |
| Calendar | Calendar Style Default View Start Date Calendar Item |
Best practices for data items released to production
These best practices ensure that, once data items have been released to production, you are not making changes that will be disruptive to customers. Changing data item configurations may negatively affect the purpose of data item.
Once data items have been developed and delivered, they are considered active in a production environment. Additional considerations apply.
Do not make the following changes:
- Delete a data item
- Delete a data item and add it again with the same name to change the data item type
- Change which list lookup is attached to a data item
- Change the related table fields for data items of type table lookup
Backwards compatibility strategy:
- Mark the item as deprecated and create a new field, if needed.
Data items in tables best practices
These best practices ensure that data items added to tables are organized consistently throughout Nextworld.
Data items must be added and configured as application fields using the Table Definitions application.
Use Table Lookup fields to establish foreign keys to other tables. The primary and secondary lookup fields are rendered as the typeahead values of the foreign key record in applications. At a minimum, an index should be established for the field that is specified as the primary search field. You should also not define a data item as a primary, secondary, or tertiary search field if it's optional and could be empty.
Organize data items in a logical order.
- List fields that make up the unique key first in the same order they are listed in the unique key.
- Place fields that serve a similar purpose together. For example, if there are several amount fields that work together such as
TransactionAmount,PaidAmount, andOpenAmountin a table. - Fields that establish a range be listed together with the From field followed by the Through field. For example,
EffectiveFromandEffectiveThrough. - Fields that establish a relationship should be listed parent followed by the child. For example,
ParentItemandChildItem. - Fields that establish a hierarchy should be listed for highest level to lowest level. For example,
Company,OrgUnit,InventoryLocation,Lot. - Place work fields at the very end of the list of fields.
For statistical information, use a Work Field to dynamically calculate the value rather than storing the value in the table where it requires to be constantly updated.
Do not add Work Field to store current value of a record. Instead, use the Fetch Original Record logic action.
The usage of common fields that are in both the main and subtable or header and detail should be limited since this denormalizes the table. Mapping of common fields should be configured in the table definition rather than writing code in logic block to keep the data in synch. The following situations may justify the need for a common field:
- To filter a table lookup field or mini app. It needs to be common field so it can be accessed.
- To use the field as part of the unique key in the subtable or detail table.
- To access data via a table lookup for display in an application.
- A field in the detail table is defaulted from the header, but can be overridden.
- When a table uses a Subtable Main, an integration table should also be created. See the Data import integration configuration section for more information on how to build and design a integration application. A Subtable Main would follow the standards for a Header Detail integration table.
Synonyms best practices
These best practices ensure that data item synonyms are configured consistently throughout Nextworld applications.
Data item synonyms are configured on the Synonyms page in Data Item Definitions.
Label and Short Label
The synonym should not contain any numbers, special characters, or punctuation in the Label or Short Label fields.
The list form field name you put in the Short Label field should be a shorter, more concise version of the detail form field name you have in the Label field. For example, if Unit of Measure is the name of the field in the detail form field, you can abbreviate the list form field as UOM.
Help Text
Write help text to be as reusable as possible. Data items need a different synonym when the field serves a different purpose. For example, the data item Notes can be used for many different purposes and requires multiple synonyms. If both the foundation and manufacturing families want to use Notes for their applications, they would make synonyms to use the same data item for different purposes. For an application in the foundation family the label may be Contact Notes, and in an application in the manufacturing family the label may be Work Order Notes.
Avoid creating a synonym where the labels and help text match another synonym. The family and module are multiple selection fields, so add your family or module to the existing synonyms. This helps control translation cost.
Avoid adding references to specific application or table names in the synonym help text, because these references reduce the reusability of the synonym and increase the likelihood that the help text has to be updated over time.
Use the examples below as reference when writing help text:
| Convention | Example: data item | Example: help text |
|---|---|---|
| Construct help text that defines the field’s purpose and avoids stating instructions. | DiscountDate | The last day that an invoice can be paid and still receive a discount. |
| Provide information in your help text about the attributes of a field. | FullCardNumber | The 15 or 16 digit number on the front of the credit card. If the card is an American Express card, there is a 15 digit number. Otherwise, there is a 16 digit number. |
| Provide examples in your help text that help users understand the field’s meaning clearly. | DirectoryDescription | A description of the contact, such as what their purpose is and how your company is associated with them. |
The help text must be written in full sentences and adhere to the Nextworld Style Guide. Learn more in Nextworld style guide and How to write field names and help text.
Synonym specificity
Create at least one generic synonym for every data item. A generic synonym has no family, module, or application entered. This synonym appears in applications that use the data item, but do not have a specific family, module, or application synonym defined.
When you define an application for a synonym, you should also define a family and module. When you define a module for a synonym, you should also define a family.
How to write field names and help text
Follow these guidelines when creating synonyms for the data items in your applications.
When writing help text, refer to the Nextworld style guide and the Microsoft Writing Style Guide.
In particular:
- Keep things simple. (Common words, shorter sentences.)
- Remember who your audience is and what they might be wondering about.
- Use complete sentences.
- Write to the reader, in second person. ("You"...)
- Use active voice as much as possible.
- Use inline styles to format your field values, as well as application, field, and button names. Learn more in Nextworld custom styles and Nextworld custom style examples.
Guidelines
| Field type | Labels and short labels | Help text | Example |
|---|---|---|---|
| Default (most fields and data item types) | A word or phrase that describes the information captured by the field. Don't use ending punctuation. | Start the description with a one-sentence statement describing the purpose of the field. Do not simply restate the field name in sentence form. Try to:
If the field label seems very self-explanatory to you and you have trouble composing a longer description, ask yourself under what circumstances someone might be confused. If it's a name field, is there any chance they might not know which name to choose? If they're entering a social security number, could they be worried about how their data is protected? | Label: Budget Owner Help text: The name of the person responsible for managing the budget for the organization. The budget owner receives workflow notifications and reports. |
| List lookup | A word or phrase that describes the information captured by the field. Don't use ending punctuation. | Follow the default guidelines, with these additional considerations. In most cases, you should not describe or define the options in the list. Only define the values when:
| Label: Country Help text: The country where the organization is based. Label: Customer Defined Attribute Profile Type Help Text: There are multiple types of CDA profiles, including:
|
| Subtable | A word or phrase that describes the information captured by the field. Don't use ending punctuation. | Start the help text with "Lists ..." and a brief description of the information the table captures. In the detail form of a record, a subtable with no entries appears with just the label and an Add button. Help text should provide enough information to explain the purpose of the subtable to a user who doesn't see a table. Remember the columns within the subtable have their own help fields. You only need to give a brief description of the table as a whole. | Label: Emails Help text: Lists all email addresses associated with the organization. You can make changes to the emails associated with the organization here. |
| True False | A word or phrase that describes the selected (or true) checkbox. Don't use ending punctuation. Provide a label that implies two opposite states. The label should describe the selected state. (The behavior if the box is checked.) For longer labels (where you need a longer phrase), write the check box label as a phrase or imperative sentence with no ending punctuation. If there's any ambiguity in the label, explain the states clearly in the help text. | This data item type creates a checkbox. Use selected to described a checked box, cleared to describe an unchecked box. (Don't talk about it being checked or unchecked.) Use language like:
| Label: Track Budgets Help text: When selected, budgeting applications automatically create budgets for this organization in the budget cycle process. If this checkbox is cleared, you can still create budgets for the organization manually. |
Format fields
Application developers can use the Format Definitions and Field Format Definitions applications to control different aspects of how fields are formatted. The Format Definitions application creates field formats which tell users what values to enter into complex data items such as name and address fields. The Field Format Definitions application controls how values are displayed or formatted once entered in a field.
Format Definitions
Use format definitions for complex data items of type Name, Address, or Multi-Segment. Build a format definition by designating the required components for that data item type. Once a format definition has been created, it becomes available for every field of that data item type in every application. Users access available formats for a field by selecting the field in the application and opening the dropdown list that appears below the default format.
For example, for Name fields there is one format available in the drop-down menu that has lines for First Name and Last Name, and a different format that has lines for Title, First Name, Last Name, Qualifications, and Suffix.
Format definitions inform the platform how to build a full value from composite values in these field types, but don't impact how a field is shown or stored. Learn more in Format Definitions application.
Field Format Definitions
Use field format definitions to control the format of values within a text data item. You can configure different format options such as field value patterns, placeholder values, and padding and alignment.
For example, you could create a field format with a format mask of 999-99-9999 and a placeholder of 000-00-0000. This would place the value 000-00-0000 in the field before a user enters their value, and only allow numbers to be entered in the field. This ensures if a social security number of 111223333 was entered in the field, it would format as 111-22-3333.
Learn more in Field Format Definitions application.
Configure format definitions
Configure formatted fields with the Format Definitions and Application Builder applications.
Format Definitions
In the Format Definitions application, there are several Format Types to select from, such as:
Name FormatAddress FormatMulti Segment Format
Every format created of that type becomes available in the dropdown menu of every field of that data item type.
Label formats with a clear, concise name so that users are able to select the appropriate option.
Application Builder
In the Application Builder application, formats are automatically available in every field that is a Name, Address, or Multi-Segment.
In the Configuration Panel, in the Field Dependencies section, you can also configure field dependencies to select a single format to be used in a field. To configure field dependencies in an application, you must select a Selectors.SelectorControlling that has a valid format name. That format is then used in the Selectors.SelectorDependent. Learn more in the Field Dependencies topic.
Format Definitions application
Application developers use the Format Definitions application to designate what information users should input into complex data item fields of type Name, Address, and Multi-Segment.
This helps guarantee there are valid field values.
When a user selects a configured field, a dropdown menu opens with options for the format they want to use. For example, one format could require only the City, State, and Country, while another format could have:
| Line 1 | Address Line 1 |
|---|---|
| Line 2 | AddressLine2 |
| Line 3 | AddressLine3 |
| Line 4 | City, State, Postal |
| Line 5 | Country (2 character designation) |
It is important to label the formats with clear, concise names so users are able to select the appropriate option.
Formats can be configured with field dependencies. Learn more in the Configure format definitions topic.
Customize name and address fields
Customize name and address fields to change the field names and synonyms of the component lines in the field details.
Name and address fields have one, or many, format definitions available for users to select from. Each format definition has component lines that together form a complete name or address value. How the field was configured controls whether a format definition is defaulted into the field or if users can select from a dropdown list of available formats. Learn more in Configure format definitions.
Format definition are delivered with component line names and synonyms alreadycreated. Each component line is defined by a list lookup record and an associated data item which matches the list lookup value. To change the line name and synonym, you must customize the data item.
Field Format Definitions application
Application developers use the Field Format Definitions application to create and modify constraints to information entered in a field.
Use this application when you want users to enter field values only in a specific pattern. Field formats provide a way to guarantee consistently formatted field values.
You can configure different formatting components including field value patterns, placeholder values, and padding and alignment.
For example, you could create a field format with a format mask of 999-99-9999 and a placeholder of 000-00-0000. This would place the value 000-00-0000 in the field before a user enters their value, and only allow numbers to be entered in the field. This ensures if a social security number of 111223333 was entered in the field, it would format as 111-22-3333.
If you apply a field format to a date field, the entire date is stored, but only the partial formatted date display in the application record.
Field formats do not constrain what characters can be entered into a field, but validations do. You can learn more in the Validation Setup application section.