


.svg)


The diagram below shows the structure of Nextworld security:
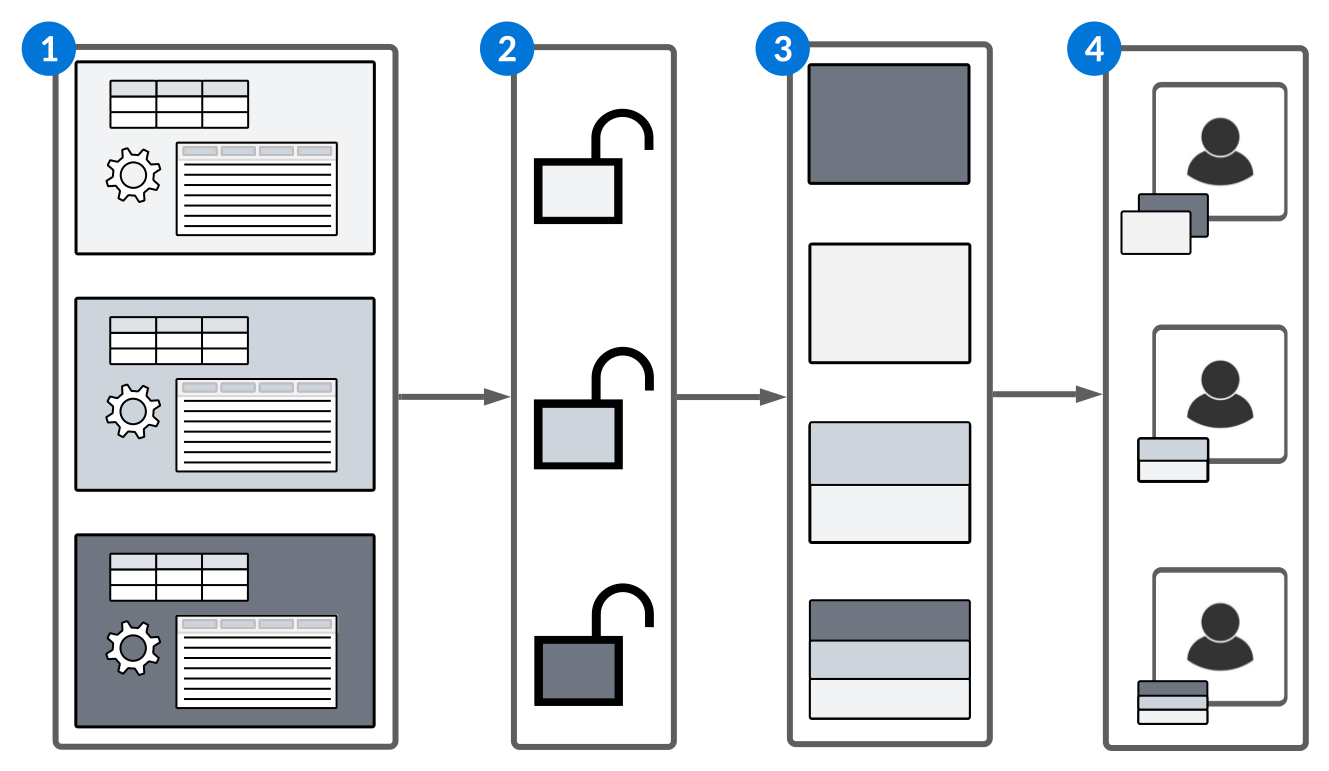
| Description | |
|---|---|
 | Security Groups—Groups related metadata such as applications, application settings, tables, and logic blocks. This enables you to define permissions that grant access to all objects in the security group to simplify security implementation. Learn more in Security groups. |
 | Permission Definitions—Define the level of RUID (read, update, insert, or delete) access that users have to a security group or to a specific object. Once created, a permission can be assigned to many roles. Learn more in Permissions. |
 | Role Definitions—Assign the combination of permissions needed to accomplish a job function to a role.
Learn more in Roles and Role hierarchies. |
 | Users—Assign roles to users to grant the access defined in the permissions. Once a user is given a role that grants access to an object, the only way to remove that access is by revoking or removing the role. Learn more in Users. |
Security groups
Security groups group related tables, applications, logic blocks, and application settings together so security administrators can define permissions for the entire group, rather than individual objects.
A security group is defined through the Security Group Definitions application. Once a security group exists, it can be added to tables, applications, logic blocks, and application settings using the Security Group field. If you want to apply the same security group to all applications and logic blocks associated with the table, use the Sync Security row action on the table.
In some cases, not all applications and logic blocks associated with a table should have the same security group. For example, there are several applications built over the Directory table including Employees, Customers and Contacts, and Suppliers and Contacts. Each of these applications exist for a different purpose and audience. Use the Prevent Security Group Sync checkbox to prevent the Sync Security row action from assigning the table security group to any associated applications or logic blocks.
After assigning security groups to tables, the next step is to create permissions. Permissions are the building blocks of Nextworld access control.
See Permissions for more information on building permission profiles.
Security Group Definitions application
Permissions
Permissions grant users the ability to read, update, insert, or delete information in fields, tables, logic blocks, and workflows. You can also grant RUID access to table data for specific org units, and enable users to launch applications from the Navigation Menu.
Permission definitions define which platform objects you want to grant access to, as well as the level of access that should be granted. There are many levels of permissions that can be granted, as detailed in the topics below:
- Row security
Row security permissions controls the level of access a user has to a table. You can filter what records a user sees, and define what type of data mutations they can perform in the table. Additional permissions may also be necessary to access tables depending on what type of data they contain.
- Field security
Field security deals with hiding or disabling certain fields. Field security can use filters to apply restrictions on a field based on the value in it or a related field. If one permission grants access to something, another permission cannot remove that access.
- Action security
Action security controls user access to run logic blocks, add attachments to records, and export records through the export action that is embedded in applications. Action security controls are found on the Action security page of the Permission Definitions application.
- Application security
Application security controls application access. With application security, you can hide an application from the menu so that a user can't launch it from that location.
- Workflow data and transition security
Workflow data security permissions control a user’s ability to see and interact with data based on the workflow state or state type combination. Workflow transition security permissions grant a user permission to perform secured transitions for a specific workflow.
- Org unit security
Security administrators can enable org unit security in their environments to control read, update, insert, and delete (RUID) access to data based on the org unit to which the business data belongs.
- Permission Definitions application
System administrators use the Permission Definitions application to create permission profiles. These profiles grant user groups access to view or change information in tables, run logic blocks, launch applications, interact with and transition workflow, and gain access to records with specific org units.
- Permission Access Granted Inquiry application
Security developers and systems administrators use the Permission Acess Granted Inquiry application to identify which permissions grant access to specific objects on the Nextworld Platform.
- Permissions Where Used application
Security developers and system administrators use the Permissions Where Used application to identify which roles use a specific permission.
Once permission definitions have been created, they can be assigned to one, or many, role definitions. The role definitions are then assigned to users to grant the permissions. Learn more in Security and Work fields.
Row security
Row security permissions controls the level of access a user has to a table. You can filter what records a user sees, and define what type of data mutations they can perform in the table. Additional permissions may also be necessary to access tables depending on what type of data they contain.
Row security is configured in the Access Rules subtable in the Permission Definitions application. You must define either a security group or table in a row security profile, you cannot define both. While row security is primarily configured on a security group, you may need to configure it on individual tables.
For example, if you want to limit the tables a user has access to, or grant broader access to tables, in a security group. If a user should only have update access to the header to transition workflow and they don't need update access to the details, you could configure a permission to only use a specific table.
With row security you can grant user access to either all records in the table, or you can filter it. Specify filters using either specific tables or security groups. When you filter using security groups, only records that contain the filter field are shown to a user. If a table within a security group does not have the filter field, the user does not see those records.
Enable row security
Define a field value or a value of a related field brought in through a table lookup to enable row security.
You can use a related field to grant access to Table B which has a table lookup field for Table A. This grants access to rows in Table B based on the value stored in Table A.
For example, the ContactNotes table stores notes about contacts in the Directory table. The security built for ContactNotes uses related table fields to grant access based on the ContactRoleGrouping in the Directory record that the note is about. This allows system administrators to grant one user access to notes about suppliers and another user access to notes about customers.
Additionally, row security can also grant exclusive access. When exclusive access is granted, a user is given access to all records in the table except where the specified filter is satisfied. In this context, it’s important to remember that the Nextworld security model is additive. If one permission grants access to something, another permission cannot remove that access.
Dashboard permissions
In addition to the standard permissions that are created, there are special permissions that need to be configured when you grant or restrict access to dashboard pages or dashboard sites.
Although dashboard pages are delivered as metadata, their security is treated as business data. In order to grant access to see a dashboard on their home page, a user needs read access to the DashboardPages table. In order for users to have access to dashboard sites, they need read access to the SiteBuilder table.
To control which dashboards are granted, the Row Security page in the Permissions application should be configured to use the data items and list lookups that are specific to dashboard pages and dashboard sites. The list lookups contain values that pertain to specific audiences.
For example, one value for the dashboard pages list lookup might be AP. If there are several dashboard pages that exist for members of the AP team, all that needs to be done to grant access is to use the AP dashboard grouping within the Dashboard Page Builder application.
Learn more in the Dashboard page permissions configuration and Dashboard site permissions configuration topics.
Dashboard page permissions configuration
System administrators and application developers configure dashboard page permissions in the List Lookup Definitions, Dashboard Page Builder, and Permission Definitions applications. This ensures users can view dashboard pages based on their Nextworld roles.
Before configuring dashboard permissions, decide how you would like to group your dashboard pages together based on which users should see which dashboard pages.
List lookup Definitions
In the List Lookup Definitions application, you must navigate to the DashboardPageGrouping record, then add a new Lookup Key for each of your user groups.
Dashboard Page Builder
In the Dashboard Page Builder application, configure each of your dashboard pages by setting the Dashboard Page Group to the value you created in the List Lookup Definitions application.
Permission Definitions
In the Permission Definitions application on the Row Security page, add an Access Rule with the following details:
| Field | Value |
|---|---|
| AccessRules.SecurityGroup | sysDashboardPages |
| AccessRules.FilterFieldChameleon | DashboardPageGroup |
| AccessRules.FilterValueChameleon | The list lookup value created for the group of dashboards a user accesses |
Role Definitions
In the Role Definitions application, add your dashboard page permissions to a new or existing role.
Users
In the Users application, add the role for every user that requires access to a group of dashboard pages.
Dashboard site permissions configuration
Dashboard site permissions are configured by system administrators and application developers. Both the dashboard site and the dashboard pages within the site have their own user roles configured for permissions.
Users who are granted permissions for the dashboard site can still only see and access the dashboard pages they have permissions for. Different users may have access to different pages within the configured site.
List lookup
If your dashboard site isn't using an existing site group, you must create a lookup key for it in the List Lookup application. If your dashboard site uses an existing site group, you can navigate to the Dashboard Site Builder application directly.
To create a new lookup key, navigate to the List Lookup application, select the SiteGrouping record, then add a new Lookup Key for your site group.
Dashboard Site Builder
In the Dashboard Site Builder application, select the Site Group you created in the List Lookup application or select a preexisting one.
Permission Definitions
In the Permission Definitions application, create a new record and add an Access Rule on the Row Security page with the following details:
| Field | Value |
|---|---|
| Table | SiteBuilder |
| Filter Field | SiteGrouping |
| Filter Value | The list lookup value you created or selected for the group of dashboards a user accesses. |
Role Definitions
In the Role Definitions application, add your dashboard site permissions to a new or existing role.
Users
In the Users application, add the role for every user that requires access to the dashboard site.
Field security
Field security deals with hiding or disabling certain fields. Field security can use filters to apply restrictions on a field based on the value in it or a related field. If one permission grants access to something, another permission cannot remove that access.
To set up field security, you must begin by creating a restricted field profile through the Restricted Field Definitions application. Use a restricted field profile to define the fields from a single table that you want to be restricted. Restrict fields on a field-by-field basis by hiding, disabling, and/or partially concealing fields. There are no limits to how many restricted field profiles can be set up for a single table, but it is a good practice to group fields, or list them within the same restricted field profile, if they are intended for a single audience.
For example, in the Directory application the Primary Phone field and the Phone Number subtable are defined in a single restricted field profile. This is because it makes logical sense that if the user is able to see a primary phone number, then they should also be able to see any additional phone numbers captured in the Phone Numbers subtable.
Grouping fields can also present some challenges. When fields are grouped in a profile in the Restricted Field Definitions application and that profile added to the Field Security page in Permission Definitions, a security administrator must make a decision to give a user read, update, or delete access to all or none of the fields in the profile.
Restricted Field Definitions application
Use the Restricted Field Definitions application to create a profile that specifies which fields from a table should be restricted.
Once a profile is created, the specified fields are automatically restricted for everyone. To allow access to the fields, you must configure permissions in the Permission Definitions application, on the Field Security page. There are different levels of permissions for fields, such as:
- Read—Permission that grants read access is needed.
- Update—Permission that grants read and update access is needed.
- Insert—Permissions that grants read and insert access is needed.
Once the permissions are created, assign them to roles. Roles are collections of permissions that are defined in the Role Definitions application.
To learn more about roles and permissions, see the Permissions and Roles topics.
Action security
Action security controls user access to run logic blocks, add attachments to records, and export records through the export action that is embedded in applications. Action security controls are found on the Action security page of the Permission Definitions application.
Logic Blocks
Logic block security is configured in the Logic Blocks subtable. Security can be applied to a single logic block, or to a security group which encapsulates multiple logic blocks. There are also additional security options that are configured during logic block configuration. Logic blocks can be configured as Private, Public-Secured, or Public. Learn more in Logic block security options.
Logic blocks configured as Public enforce the user's row, field, and workflow security. Users need access to the tables being read or modified through a logic block.
Logic blocks configured as Public-Secured enforce action security. If no action security is configured, user permissions are applied. This includes workflow restricted fields.
Action security consists of the following options:
- Full Read Access—When selected, logic blocks are granted full read access to the tables which they read and write from, without needing explicit row, field, or workflow permissions to the tables being read or modified.
- Full Update, Insert, Delete Access—When selected, logic blocks are granted full update, insert, and delete access to the tables which they read and write from, without needing explicit row, field, or workflow permissions to the tables being read or modified.
- Apply Org Unit Security—When selected, Org Unit security is applied when the logic block is run. Row security and workflow security are still disabled. If the user has another permission for the logic block that does not apply Org Unit security, Org Unit security is not applied, even if this checkbox is selected.
Logic block security always runs on the security of the first logic block. If Logic Block A is Public-Secured and calls logic blocks B and C, then logic blocks B and C run with the same security as logic block A. This includes the ability to bypass security limitations.
System Actions
Action security grants access to system actions including generations, attachments, and exports. All three of these system actions can be granted based on either a security group or a table.
There is an existing role in all developer role hierarchies that allows developers to generate all objects in all security groups, so that permission is not necessary to maintain.
Attachment permissions allow a user to view and modify attachments on a record using the Attachments row action.
Export permissions allow a user to use the Export to CSV form action that exports the existing data in the application to .csv file. Exports still maintain a user's org security so they are not able to export records that they don't have access to.
Application security
Application security controls application access. With application security, you can hide an application from the menu so that a user can't launch it from that location.
Define either the security group or the specific application that you want secured. Setting up application security for a security group is sufficient for users to be able to launch all of the apps in that security group.
Workflow data and transition security
Workflow data security permissions control a user’s ability to see and interact with data based on the workflow state or state type combination. Workflow transition security permissions grant a user permission to perform secured transitions for a specific workflow.
See Workflow security for more information on securing workflow through the Permission Definitions application.
Org unit security
Security administrators can enable org unit security in their environments to control read, update, insert, and delete (RUID) access to data based on the org unit to which the business data belongs.
Org unit security must be enabled within an environment. Once enabled, users must have both row security permissions which grant access to the tables and applications, as well as additional permissions that define the level of access they should have to the org unit records. Org unit permissions can be applied broadly to an environment, or be specific to single org units or tables. For example, you could create permissions that grant access to records:
- For a specific org unit in all tables.
- For a specific org unit in a specific table.
- For all org units in a specific table.
- For all org units in all tables.
- With no org unit specified in the Org Unit Security Field. For example, if Company is defined as the Org Unit Security Field on a table, any records that an empty or null value in the Company field would be included in this permission. This enables you to grant access to only records with an empty value, while restricting access to the other records in the table.
Optionally, you can also apply org unit permissions based on the company structure. The company structure is where system administrators create org units and define the hierarchal structure for the organization. This allows you to apply the same permissions granted on one org unit to any org units which fall beneath it in the hierarchy. Learn more in Company structure.
Org unit security is additive, meaning it can further restrict access to records, but can not grant more access than whatever row security permissions a user has to the table.
Learn more in Org unit security configuration and [link: ''].
Org unit security configuration
Application developers configure org unit security using the Table Definitions, Company Structure, Org Unit Security Setup, Permission Definitions, and Role Definitions applications. Security administrators enable org unit security in their environments using the Tenant Environment Setup application.
Table Definitions
Org unit security can optionally be applied to tables. Most org unit security is configured without specifying specific tables. Table specific permissions are only required for families or modules with table based org unit security permission requirementsTo configure, in the Table Definitions application, you must:
- Open the record for each table you want org unit security applied.
- On the General Configuration page, select a value in the Org Unit Security Field field. The value is a data item which holds the name of the org unit associated with the table's records.
Company Structure
In the Company Structure application, you must:
- Define the hierarchal structure of org units within your company.
- If a change is made to the hierarchy, select the Flatten Structure form action. Flattening the company structure rebuilds a flattened view of the relationships between org units. This process must be completed any time a new org unit is added, moved within the tree, or removed.
Learn more in Company structure and [link: 'CompanyStructureApplication'].
Org Unit Security Setup
In the Org Unit Security Setup application, you can batch create all of the roles and permissions needed for companies and org units defined in the company structure from a single location. To create, you must:
- Define the appropriate product family and product module.
- Select the type of roles you want to create. You can create roles of type
Duty RoleorOrg Unit Security Template Role. - Specify whether you want to create roles and permissions for all companies, all org units, a single company, or a single company and all associated org units.
- Select the appropriate RUID access.
Once you select the Create Roles and Permissions form action, individual records for each role, permission, and company or org unit combination are created.
Permission Definitions
In the Permission Definitions application, create any other permissions you need for org units in your org unit security, or edit the records created in the Org Unit Security Setup application. For new permissions, you must:
- On the Org Unit Security page, in the Org Security subtable, create a new row and specify the:
- OrgSecurity.OrgUnitPermissionType—Determines how to implement org unit security for a given org unit. Options include:
All Org Units—Grants access to all org units in all tables, including records with an empty or null value, if no table is defined. If a table is defined, grants access to all org units in the specified table.Specific Org Unit—Grants access to the specified org unit in all tables if no table is selected,. If a table is defined, grants access to the org unit within the specified table.Empty Org Units—Grants access to all records in all tables which have a null or empty value in the defined Org Unit Security Field. If a table is defined, grants access to all records in the specified table which have a null or empty value. For example, if Company is defined as the Org Field on a table, any records that have an empty or null value in the Company field would be included in this permission. This enables you to grant access to records with an empty value, while restricting access to the other records in the table.
- OrgSecurity.OrgUnitPermissionType—Determines how to implement org unit security for a given org unit. Options include:
- Select the RUID access for the org units or tables you defined.
- Optionally, select the OrgSecurity.ApplyHierarchy checkbox. This grants access to the org unit Org Unit defined in the OrgSecurity.OrganizationalUnit_Name as well as all the child org units defined beneath it in the Company Structure.
Learn more in Permissions and Company structure.
Role Definitions
In the Role Definitions application, edit the records created in the Org Unit Security Setup application, or apply the permissions you created to duty roles, then assign them to the appropriate Org Unit Security Template Role in role hierarchies. These roles can then be assigned to user profiles. Learn more in Roles and Role hierarchies.
Enable org unit security in a your environments
In the Tenant Environment Setup application, navigate to the Global Settings application step. Open the detail view of the appropriate environment, then select the Org Unit Security checkbox.
Org Unit Security Setup application
System administrators use the Org Unit Security Setup application to bulk create the permissions and roles needed for an environment that has org unit security enabled.
Select the Role Type you want to create. You can configure Duty Role or Org Unit Security Template Role.
Once you've selected your role type, determine whether you want to create roles for:
- All companies in the company structure
- All org units in the company structure
- A single company in the company structure
- A company and all associated org units in the company structure
Then, select the appropriate RUID access for your permissions.
Once you select the Create Roles and Permissions form action, individual role and permission records for all of the companies or org units selected are automatically created. There are standard naming formats for the records created. Learn more in Security naming conventions and standards.
Org unit filtering on filtered table lookups
Apply org unit filtering to filtered table lookups in the Table Definitions application. This ensures users can only select org units which they have permission to access.
Select the FilteredSchemaLookups.ApplyOrgUnitFiltering checkbox on org unit fields where you want filtering enabled. The table definition does not have to have org unit security applied in order to use org unit filtering.
Org unit security filtering also applies when a logic block tries to insert a record into the underlying table. If you don't have access to an org unit defined in a record, you cannot insert the record into the table.
Example: Global org unit security
This topic reviews a hypothetical example of how global org unit security can be applied to a company structure.
For global org unit security configurations, you must have the company structure configured and org unit security enabled in your environment.
In this example, we are assuming the following configurations are already in place:
- Row security permissions that grant RUID access.
- Org unit security enabled in your environment.
- A company structure defined with the following org units and hierarchy:
| >Headquarters |
| >Denver Office |
| >Denver Distribution Center |
| >Kansas Office |
| >Kansas Distribution Center |
With org unit security enabled and this company structure configured, you could create different types of permissions for different users. The table below reviews some of the possible permissions you could create:
| Access | Result | Configuration in the Org Security subtable |
|---|---|---|
| Read access to all org units. | Grant permission to read all org units in your environment. | In the OrgSecurity.OrgUnitPermissionType field, select All Org Units. Select the Read checkbox. |
Read and update access to the Denver Office org unit. | Grants read access to the Denver Office org unit | In the OrgSecurity.OrgUnitPermissionType field, select Specific Org Unit.In the OrgSecurity.OrganizationalUnit_Name field, enter Denver Office. Select the Read and Allow Update checkboxes. |
| Read and update access to Kansas Office, with OrgSecurity.ApplyHierarchy selected. | Grants read and update access to the Kansas Office and Kansas Distribution Center org units. | In the OrgSecurity.OrganizationalUnit_Name field, enter Kansas Office. Select the OrgSecurity.ApplyHierarchy checkbox. In the OrgSecurity.OrgUnitPermissionType field, select Specific Org Unit. Select the Read and Allow Update checkboxes. |
| Read and update access to the Headquarters org unit, with OrgSecurity.ApplyHierarchy selected. | Grants read and update access to all org units in the company structure in Table A and Table C, while retaining RUID access to Table B. | In the OrgSecurity.OrganizationalUnit_Name field, enter Headquarters. Select the OrgSecurity.ApplyHierarchy checkbox. In the OrgSecurity.OrgUnitPermissionType field, select Specific Org Unit. Select the Read and Allow Update checkboxes. |
| RUID access to any records that do not have an org unit specified. | In the OrgSecurity.OrgUnitPermissionType field, select Empty Org Unit.Select the Read, Allow Update, Allow Insert and Allow Delete checkboxes. |
Learn more in Org unit security configuration and [link: ''].
Example: Table specific org unit security
This topic reviews a hypothetical example of how table specific org unit security can be applied to a company structure.
For table specific org unit security, you must have the company structure configured, org unit security enabled in your environment, and have org unit security applied to tables in your environment. Table specific permissions are only required for families or modules with table based org unit security permission requirements.
In this example, we are assuming the following configurations are already in place:
- Row security permission that grant RUID access for a security group which contains Table A, Table B, and Table C.
- Org unit security enabled in your environment.
- Org unit security enabled in Table A and Table C.
- A company structure defined with the following org units and hierarchy:
| >Headquarters |
| >Denver Office |
| >Denver Distribution Center |
| >Kansas Office |
| >Kansas Distribution Center |
With org unit security enabled and this company structure configured, you could create different types of permissions for different users. The table below reviews some of the possible permissions you could create:
| Access | Result | Configuration in the Org Security subtable |
|---|---|---|
| Read access to all org units in Table A. | Grant permission to read all org units in Table A, retains RUID permission for Table B, but grants no access to table C. | In the OrgSecurity.TableSchema field, enter Table A. In the OrgSecurity.OrgUnitPermissionType field, select All Org Units. Select the Read checkbox. |
Read access to the Denver Office org unit. | Grants read access to the Denver Office org unit in Tables A and C, while retaining the RUID access for Table B. | In the OrgSecurity.OrganizationalUnit_Name field, enter Denver Office. Select the Read checkbox. |
RUID access to the Denver Distribution org unit in Table C. | Grants read, update, insert, and delete access for the Denver Distribution org unit in Table C, retains RUID permission for Table B, but grants no access to Table A. | In the OrgSecurity.TableSchema field, enter Table C. In the OrgSecurity.OrgUnitPermissionType field, select Specific Org Unit. Select the Read,Allow Update, Allow Insert and Allow Delete checkboxes. |
| Read and update access to Kansas Office, with OrgSecurity.ApplyHierarchy selected. | Grants read and update access to the Kansas Office and Kansas Distribution Center org units in Table A and Table C, while retaining RUID access to Table B. | In the OrgSecurity.OrganizationalUnit_Name field, enter Kansas Office. Select the OrgSecurity.ApplyHierarchy checkbox. In the OrgSecurity.OrgUnitPermissionType field, select Specific Org Unit. Select the Read and Allow Update checkboxes. |
| Read and update access to the Headquarters org unit, with OrgSecurity.ApplyHierarchy selected. | Grants read and update access to all org units in the company structure in Table A and Table C, while retaining RUID access to Table B. | In the OrgSecurity.OrganizationalUnit_Name field, enter Headquarters. Select the OrgSecurity.ApplyHierarchy checkbox. In the OrgSecurity.OrgUnitPermissionType field, select Specific Org Unit. Select the Read and Allow Update checkboxes. |
| RUID access to any records in Table A that do not have an org unit specified. | In the OrgSecurity.TableSchema field, enter Table A. In the OrgSecurity.OrgUnitPermissionType field, select Empty Org Unit. Select the Read, Allow Update, Allow Insert and Allow Delete checkboxes. |
Learn more in Org unit security configuration and [link: ''].
Company structure
The company structure enables you to define the hierarchal structure and function of the internal org units within your company.
To configure a company structure in the Company Structure application, you must first define the different org unit types. Nextworld delivers several options including Company, Balance Sheet and Elimination Company, but you can add additional values into the list lookup if necessary. Once the types are defined, create a record for each org unit in your company. Records include information such as the org unit name, org unit number, contact information, and function. Learn more in [link: 'CompanyStructureApplication'].
Org units are placed within the company structure in a hierarchy. The hierarchy can then be used in other processes such as reporting and org unit security. For example, security administrators can use the company structure to grant permission to records associated with specific org units, as well as the org units which fall beneath them in the hierarchy. Learn more in Org unit security.
Often, org units of the same type are placed at the same level of the hierarchy, though this is not required.
Example
For example, in the following company structure, divisions are always at level 2 of the tree, departments are at level 3, and cost centers are at level 4:
| Company Structure |
|---|
| >Company AA |
| >Division 1 |
| >Department X |
| >Department Y |
| >Division 2 |
| >Department Z |
| >Cost Center Z1 |
| >Cost Center Z2 |
| >Division 3 |
When transactions are entered, the segments are populated based on the org unit entered for each transaction. Where transactions are associated with departments and cost centers, you could see the following values:
| Segment 1 | Segment 2 | Segment 3 | Segment 4 |
|---|---|---|---|
| Company AA | Division 1 | Department X | |
| Company AA | Division 2 | Department Z | Cost Center Z1 |
| Company AA | Division 1 | Department X | |
| Company AA | Division 1 | Department Y | |
| Company AA | Division 2 | Department Z | |
| Company AA | Division 3 |
When in the list form of this application, you could filter for Segment 2 to view all transactions associated with divisions.
In contrast, a company structure that does not require that org units of the same type be at the same level of the tree might have the following structure:
| Company Structure |
|---|
| >Company AA |
| >Division 1 |
| >Department X |
| >Department Y |
| >Area XYZ |
| >Division 2 |
| >Department Z |
| >Cost Center Z1 |
| >Cost Center Z2 |
| >Division 3 |
This would result in segments populated like the following:
| Segment 1 | Segment 2 | Segment 3 | Segment 4 | Segment 5 |
|---|---|---|---|---|
| Company AA | Division 1 | Department X | ||
| Company AA | Area XYZ | Department Z | Department Z | Cost Center Z1 |
| Company AA | Division 1 | Department X | ||
| Company AA | Division 1 | Department Y | ||
| Company AA | Area XYZ | Department Z | Department Z | |
| Company AA | Division 3 |
When filtering for for different divisions, you would need to filter for both Segments 2 and 3 to get the full results. Similarly, you would need to filter for both Segments 3 and 4 to see all department results.
Solution specific org unit security
Solutions may each have unique org unit security implementations and recommendations.
Review the following topics for solution specific org unit security recommendations:
Permission Definitions application
System administrators use the Permission Definitions application to create permission profiles. These profiles grant user groups access to view or change information in tables, run logic blocks, launch applications, interact with and transition workflow, and gain access to records with specific org units.
Once permissions have been created, they must be assigned to roles. Once permissions are assigned to a role, users who are assigned that role are granted the permissions. Learn more in Roles and Security.
Each page of the application is used to assign different permissions. You can assign the permissions to a security group, or to the specific object or record referenced in the subtable.
Row Security
Configure permissions for accessing a table's data. You can specify a single table, or a security group which the table is contained in, then select the RUID access this permission grants on the table.
Field Security
Configure permissions for restricted field profiles. Only base restricted field profiles can be included in permissions.
Action Security
Configure permissions for logic blocks, system actions, or audit tables. Security rules only apply to Public-Secured logic blocks. Public-Secured logic block can be granted Full Read access or Full Update, Insert, and Delete.
Application Security
Configure permissions for applications. If a user does not have Application access, that application's menu item will not appear on the Navigation Menu.
Workflow Security
Configure permissions for workflow security profiles.
Org Unit Security
Configure permissions for org unit security. Specify either a table name, org unit, or both. If an org unit is selected, you must specify the org unit permission type. This determines if permissions are applied to all org units for the selected table, or only the org unit selected in the row.
Permission Access Granted Inquiry application
Security developers and systems administrators use the Permission Acess Granted Inquiry application to identify which permissions grant access to specific objects on the Nextworld Platform.
To use the application, select the type of object in question in the Access Type field.
You can filter for a list of permissions that grant access to a specific:
- Logic Block
- Application
- Application Setting
- Menu Item
- Table
- Workflow
- Restricted Field Profile
The results from this application can be used in the Permissions Where Used application to determine which role or roles must be assigned to a user to grant access to the desired Nextworld metadata object.
Permissions Where Used application
Security developers and system administrators use the Permissions Where Used application to identify which roles use a specific permission.
To review a list of the roles that have a specific permission assigned to them, enter the permission name in the Permission Name field.
Once a valid permission has been entered, the detail table populates with a list of roles that explicitly reference this permission. The list does not include roles that inherit the permission through the role hierarchy.
Roles
Roles are collections of permissions that enable you to access and use components of the platform which are required for your job.
Roles can be assigned to users, configured in a role hierarchy definition to inherit all of the permissions of roles placed beneath it, or used to define permissions which should be included in user templates. The role type determines how it can be used. For example, the SYS - Dashboard Developer role grants access to create dashboard pages, cards, and sites, as well as related components such as announcements, dashboard clocks, and content items. It is a functional role, meaning it is assigned to users and inherits the permissions of the duty roles found beneath it in the role hierarchy definition, but does not have permissions defined within its own record.
When creating roles, it is likely that several permissions should be included in a single role. For example, the ME - Production Lead role coordinates production activities, troubleshoots problems, and ensures quality and safety. Permissions for this role enable users to maintain safety incidents and work orders, record and discard work order operation and production completion transactions, and record and discard work order close transactions.
A role should only include a single security group. This helps with troubleshooting security issues, as well as allowing for flexible security access within an organization.
Learn more in Role Definitions application and Security.
Role Definitions application
System administrators use the Role Definitions application to create roles and assign permissions to those roles.
The type of role you create determines the function of the role. For example, duty roles are a collection of permissions that enables a user to complete a task, but are not directly assigned to users. Functional roles are comprised of multiple duty roles, and are assigned to users so they have all of the permissions associated with the the duty roles.
General
Select the permissions which should be associated with this role. Permissions grant user groups access to view and change information in tables, run logic blocks, launch applications, interact with and transition workflow, and gain access to records with specific org units.
When creating roles, it is likely that several permissions should be included in a single role. For example, the ME - Production Lead role coordinates production activities, troubleshoot problems, and ensures quality and safety. Permissions for this role include maintaining safety incidents and work orders, recording and discarding work order operation and production completion transactions, and recording and discarding work order close transactions.
A role should only include a single security group. This helps with troubleshooting security issues, as well as allowing for flexible security access within an organization.
Environments
Apply this role definition to a specific environment. If environments are defined in the Server Zones subtable, this role, as well as any roles that fall beneath it in a role hierarchy definition, are only available within the specified environments. If no environments are defined, the role definition can be used in any environment.
Menus
Grant access to menu pages, sections, or categories. To view a menu entry, you must have the location of the menu entry added to the role definition assigned to you. Additionally, you must have access granted to the application through application security in a permission definition assigned to the role. Learn more in
For more information on Nextworld roles, see Roles.
Application Access By Role Inquiry application
Systems administrators and security auditors use the Application Access By Role Inquiry application to review the security configuration for a family
Use the Populate form button to create a new role query. In the resulting mini app, select a Product Family to filter for roles in that product family. If desired, you can specify a specific role that you'd like to review. If you do not specify a role, the query looks for all roles in the family.
When you click Run, the query performs in the background. You'll receive a notification when the process is complete.
View the results in the Application Access By Role Inquiry application. Every role for the specified family will have an entry in the application. Open the record associated with a role to see a list of all applications that a user with that role can see, along with the unique menu key that identifies the application in the navigation menu. This list includes applications to which the role inherits access through the role hierarchy.
This list represents a comprehensive list of all applications that a user with the specified role can launch from the menu.
Role Assignments by User Inquiry application
System administrators use the Role Assignments by User Inquiry application to review information about the roles assigned to each user. This enables you to see which roles a user has and the status of those roles to ensure security best practices are followed and users don't use deprecated roles.
Every role assigned to a user has a unique record in the list form. You can review the role type, description, and deprecation status for each role.
Select the User Record row action to open the user record in the Users application.
User Role Access Utility application
System administrators use the User Role Access Utility application to review what roles have been assigned to a user, which tables the role gives access too, and what type of access was granted on the tables.
To view information for a user, select the Configure Run form action then enter the user's name. Select Execute and wait for the background task to complete. Once it has finished, use filters to find the records that are relevant to that user. Each record shows the name of the role, the type of role, the name of a table the role gives access to, and the RUID access for that table.
Use the Purge All Records form action to purge all of the records in your current tenant.
Role hierarchies
Role hierarchies enable security administrators to organize related roles in a hierarchal structure. Roles inherit the permissions of roles placed beneath them in the hierarchy, so only the topmost role must be assigned to user profiles.
Roles should only grant access to one security group. Role hierarchies create a relationship between a single role and many child roles, and can include roles from multiple security groups. The type of role, permissions associated with that role, as well as other configuration options, are configured in the Role Definitions application. There are several role types which are used in role hierarchies, such as:
- Duty Role—A logical collection of permissions that grants access to tasks someone performs as part of a job. Can contain many permissions and other duty roles.
- Functional Role—A job or abstract role that inherits the permissions of duty roles included beneath it in a hierarchy.
- Aggregate Role—A role that combines functional roles.
Duty roles are not assigned directly to users. Instead, collections of related duty roles are included in a hierarchy underneath a functional role. The functional role can be assigned to users, or it can be included with other functional roles underneath an aggregate role which is then assigned to users.
For example, you could have roles applied in the following hierarchy:
>Administrator (Aggregate role)
>Accountant (Functional role)
>General Ledger Exporter (Duty role)
>General Ledger Auditor Unrestricted (Duty role)
>Check Payment Update (Duty role)
>Check Payment Delete (Duty role)
>Invoicing (Functional role)
>General Ledger Viewer (Duty role)
>Check Payment Viewer (Duty role)
>Check Payment Add (Duty role)
In this instance, the Administrator role would inherit the permissions of the functional and duty roles that fall beneath it in the hierarchy. The Accountant role would inherit the permissions of the four duty roles beneath it, while the Invoicing role would inherit the permissions of the three duty roles beneath it.
Role Hierarchy Definitions application
Use the Role Hierarchy Definitions application to define role hierarchies. Role hierarchies allow roles to inherit the permissions of any roles that exist below them.
Create a hierarchy by assigning roles as children to other roles. Roles can be configured as different Role Types, such as:
- Duty Role—A logical collection of permissions that grants access to tasks that someone performs as part of a job. Can contain many permissions and other duty roles.
- Functional Role—A job role that focuses on a specific job a user performs, or an abstract role that represents common functionality that is not job specific. Roles of this type are assigned to users.
- Aggregate Role—A role that combines functional roles.
- Template—A role used to configure user templates. See the Configure User Templates for quick entry topic for more information.
To view a flattened, read only list of current role hierarchy records, select the Flattened Role Hierarchy button. See the Role Hierarchy Flattened Inquiry application topic for more information.
Role Hierarchy Flattened Inquiry application
Use the Role Hierarchy Flattened Inquiry application to access a Read Only view of existing role hierarchy records.
Access the application through the navigation menu, or with the Flattened Role Hierarchy button in the Role Hierarchy Definitions application.
Run the update process before viewing the records to ensure you have the most recent data.
Hide application actions with user permissions
Show or hide application links, field, row, and form actions based on a user's permissions in the Tenant Environment Setup application.
By default, most field, row, and form action buttons appear to users, regardless of their security permissions. If a user selects a button which they don’t have permission to execute, they receive an error message.
To hide these buttons instead, navigate to the Global Settings application step of the Tenant Environment Setup application and select the Secure App Actions. Once applied, the permissions required for different types of buttons are:
- Application Links—Requires
Readrow security access to the destination application's table. - Logic Blocks—Requires access to execute the logic block. This is determined by the type of security applied to the logic block:
- Public—All users are authorized to execute.
- Public-Secured—Users must have access to the table, logic block, or security group that allows them to execute.
- Private—Called from other logic blocks, so users can't execute directly.
Learn more in Row security and Logic block security options.
Security Comparison Utility application
System administrators use the Security Comparison Utility application to generate a record of the changes made to their security model between two environments.
Use the application to examine the differences in security between your current version of the platform and the new version. If you have copied and modified a role for your users, you can determine whether you need to update it so that they still have the proper authorization. Learn more in [link: 'SecurityReleaseComparison'].
Generate security comparison
When you create a record in the Security Comparison Utility application, the environments you specify determine how the the results are generated and where they are saved.
For example, new permissions may be added to an existing role in a development environment. If you specified the development environment in the From Environment field and a production environment in the To Environment field, the generated results would show the permissions that would migrate to production with the next code push.
If you clear the Save Results to Prior Release checkbox, the results are saved to the environment you entered in the To Environment field.
After you save your security release comparison record, use the Generate Comparison action so that you can examine the differences.
Examine results
After the comparison has been generated, use the View Results action to view a list of every role where there is a difference detected between environments. You can only view results in the environment where the results were saved. Differences include changes to the role hierarchy, roles, permissions, and workflow security. Open the detail form of a record and parse the Changes field to see the differences.
For example, you might filter for your functional financial roles and see that the FINS - AP Manager role has been modified. When you open the detail form, you determine that this is because the Reporting - User child role has been updated to include the ReportBucketDefinitions permission. In this instance, the value in the Changes field appears as follows:
{
"Changes": [
{
"FINS - AP Manager changed ": [
{
"Child changed": [
{
"finBaseUser changed ": [
{
"Child changed": [
{
"Reporting - User changed ": [
{
"Role definition changed": [
{
"PermissionsList subtable changed": [
{
"Referenced Permission changed": [
{
"Reporting - User changed": [
{
"AccessRules subtable changed": [
{
"ReportBucketDefinitions changed": "added"
Security Group Comparison Utility application
System administrators use the Security Group Comparison Utility application to generate and review records of the changes made to security groups between releases. Each generated record contains information for the security group changes made on individual tables, applications, application settings, and logic blocks.
Generate security group comparison
To create a record you must specify the environment to use as the basis for comparison, as well as the environment that you want to compare to it.
Examine results
Once the comparison has been generated, you can open the detail form of the record to review the list of every security group change between the two environments. Each detail line has a Security Group Status which indicates if the security group on an object has been added, removed, or modified.
Security best practices
These best practices ensure that security is configured consistently throughout Nextworld.
Nextworld solutions must be shipped with security enabled through security groups, permissions, roles, and role hierarchies. Role and role hierarchies should reflect typical business processes.
Granular security groups and permissions provide flexibility in creating roles, but can make it more complicated for a customer to configure their own permissions and roles.
For org unit security, always identify the org unit field at the table level. If this field is not identified at the table level, a customer cannot implement org unit security for the table.
Always deliver workflow security to provide options for the customer to secure transitions.
Design considerations
There are several considerations when designing security, such as:
- Segregation of duties—An internal control designed to prevent fraud by ensuring at least two individuals are responsible for separate parts of a process.
- This design considerations applies to security groups, permissions, roles and role hierarchies. Construct all the pieces with enough granularity to construct roles that allow segregation of duty possible.
- Field updates—Certain groups of fields need to be secured from update. Decide where in the process they should be restricted, and whether the field should be considered private information.
- Logic block classification—Some logic blocks should be classified as public secure.
- Workflow transitions—Determine at which steps security is required, and at which steps fields can no longer be changed. Consider the different roles and who might perform specific transitions.
- Permissions based on security groups rather than individual objects—Makes the upgrade process easier as new objects are easily introduced into a security group and may not require any changes to permissions, roles, or role hierarchy.
- Security groups cannot be customized by a customer. Consider separate security groups by task or function to provide greater flexibility of separating duties. For example, a person who can enter a transaction may not have the authority to void the transaction.
Granularity
Nextworld uses a granular security model which defines who can access each part of the system, and what they can do with that access. There are several different permissions to choose from, such as:
- Read Only access
- Full RUID (Read/Update/Insert/Delete) access
- Logic block (public secured) permission with read access
- Logic block (public secured) permission with full RUID access
- Application access
- Attachment permission which includes both read and write access
- Export permission
- Audit permissions, one audit permission to view audit information for a record (restricted) and one to view all audit records (unrestricted)
Public/Private setting best practices
These best practices ensure that the Security Options field in the Logic Block Builder application is configured with the correct Public, Public - Secured, or Private option.
The Security Option field controls how and when a logic block can be run. Learn more about these configurations in the Logic block security options topic.
Use the table below to determine which privacy setting to use based on the setup and type of logic block.
When choosing between Public and Public-Secured, by default we should use Public whenever possible. Do not use Public-Secured unless necessary. The use case of why it needs to bypass security should be thought out and it should not be blindly changed to Public-Secured. Adding a Public logic block to an existing feature may require additional security permissions to execute. Consult with your security point of contact if your use case requires additional access other than read-only.
| Logic Block Type/Function | Called From | Called Across Families | Configuration | Additional Considerations |
|---|---|---|---|---|
| Any Type | Any source | Yes | Public |
|
| Transaction or Validation | Any source | Yes | Public-Secured |
|
| Transaction or Validation | Logic block | No | Private |
|
Learn more about the different types of logic blocks in the Logic block types topic.
Security group best practices
These best practices ensure permissions and roles are configured consistently throughout Nextworld using security groups, even when new objects are introduced into production.
When new objects such as tables, applications, or logic blocks are released into production, users must have the proper access to use them. Security groups make it easier to release objects into production, especially if customers have defined their own permissions and roles, since new objects are automatically included in security based on the group.
Security groups should be granular when creating permissions to ensure segregation of duties is possible. For example, entering a supplier and a supplier invoice and then making a payment against a supplier invoice should each have their own security groups. This allows for permissions and roles to be configured where a single person cannot perform all duties. If all were in the same security group, the customer would have to instead configure security for every individual object which requires in depth knowledge of the system.
All objects for each function should have the same security group. For example, in the same security group include the tables, applications, application settings and logic blocks to perform a single function, such as entering a supplier invoice. Keep in mind the top level logic block dictates the security for any subsequent logic blocks they call. When securing a logic block that is a common object used by more than one module, the security group on that logic block should be the same as the main table(s) that the logic block is dealing with.
Security groups for specific applications should have the name of the application in the security group name.
Write the description of the security group with the purpose of the group or a summary of what is in the group.
Restricted Field Profile best practices
These best practices ensure that permissions are configured consistently throughout Nextworld.
Create restricted field profiles for fields that should not be updated. Do not put each field in its own restricted profile unless absolutely necessary. This creates complexity and overhead for the customer to configure.
Consider the grouping of fields that naturally go together and that should be restricted together. For example, if specific users can update the birth date of an employee but not update the marital status, then the fields must be in different restricted profiles.
Workflow security best practices
These best practices ensure that workflow security, workflow restricted fields and workflow transitions are configured consistently throughout Nextworld.
Workflow security must be configured for every table which uses workflow.
Workflow security can be designed to provide for read access versus update access, based on the different workflow steps.
While restricted fields can be used at any state type, for workflows with a closed state type, add a restricted field profile to lock the fields at a closed state. In particular, lock fields that may cause data integrity issue such as dates, quantity, and amount fields.
Design Considerations:
- Map out the different roles performing the transitions. Keep in mind workflow type.
- Determine if and which fields should be locked at certain transitions
- Determine RUID access at each step based on role
- Determine which steps in your workflow are secured and required permission to perform the step.
Permissions best practices
These best practices ensure that permissions are configured consistently throughout Nextworld. This includes row security, field security, action security, application security, workflow security and organizational (org) security.
Design Considerations
There are several considerations when designing permissions, such as:
- Segregation of duties
- If only rows for the specific user should display (use the system value _DirectoryUser)
- If your permission needs different restricted field profiles, in particular if a field is considered private information
- The granularity of permissions. Permissions are additive and can be re-used in multiple roles
- Logic blocks that are classified as public secured and whether elevated access is needed
- Map out workflow transition and determine at which steps security is required and which steps fields must be locked. Consider the different roles and who might perform specific transitions
- Descriptions should be user friendly to clearly describe the permission to a customer. (i.e. Role = arCashReceipts - R - Misc CR, Description = Accounts Receivable Miscellaneous Cash Receipts Data Accessor)
RUID (read/update/insert/delete) access
Create combinations of RUID to provide flexibility when assigning a permission to roles. Based on requirements create the following:
- Create one permission with full RUID access
- Create separate permissions for Read only access
- Create separate permission for read/insert/update (RUI) access or create separate read/insert (RI) and read/update RU)
- Create separate permission for read/insert RI) and for read/update RU)
- Create separate permission with Read/Delete, if needed
Row Security
Security groups can have multiple tables included that have a shared function. For example, there are different tables to store payment information and each table requires access in order to create a payment. Using a security group makes the permission easier to configure and understand. Nextworld delivers row security as a separate permission.
Only create permissions with a specific filter if it is common industry practice. Otherwise, create row security with your preferred RUID access and no fields or values selected. This allows customers to customize for more specific granularity, and is more performant than creating individual rows for each filter value.
Use table lookup fields and filter fields instead of storing duplicate data in your data model. For example, if you want row security based on the supplier's class code of Materials, use the table lookup field for Supplier and the filter field of SupplierClassification and the filter value of Materials (user defined). When using row security and defining a filter field, make sure an index is defined on the table. Otherwise, you could have performance issues. However, there are some caveats when the index gets used based on the data set. Learn more on Index best practices.
Restricted Fields
Critical transaction fields should be restricted once a record is in a closed state. For example, once a payment is posted, the amount fields, dates, and supplier field should not allow update. However, a note or memo field may be updated.
Action Security
For attachments and export, we recommend using security group. Nextworld creates separate permissions for attachments and exports.
For audit security, we recommend setting to be restricted (unrestricted access is unchecked) where a user can only view audit for the records they can see. Nextworld creates a separate permission for audit access, one for access is restricted and one for access is unrestricted.
For logic block access security, we recommend using the security group. Nextworld creates separate permissions for logic blocks as they are used in both entry applications and integrations. Only logic blocks that are classified as public secured must be specified in action security. Other logic block classifications can be called by any user, however, depending on the classification, a users security is applied.
Application Security
Always include your applications within a permission so the user only sees applications they have access to use. Nextworld creates a separate permission for application security.
Workflow Data Security and Workflow Transition Security
If your table has workflow defined, you must deliver workflow security. If you do not define workflow security, a user cannot perform any transitions or perform updates at certain steps.
Nextworld delivers workflow data security and transition as a separate permission. Always include a permission for workflow transition if your workflow has secured workflow transitions. Workflow transition applies to all transitions checked as Secured (all or nothing).
Org Security
For any table with an organization unit, always define the Org Field at the table level. If delivering org unit security, deliver only with the setting of User Orgs checked along with the RUID.
Roles best practices
These best practices ensure that security roles and role hierarchies are configured consistently throughout Nextworld.
Roles
There are three types of roles Nextworld defines:
- Duty Roles— Describes the access a user has for a record.
- Functional Roles—Describes the task and activities a user can perform.
- Aggregate Roles—Combines multiple functional roles.
Nextworld delivers functional roles for each family and module and duty roles with varying RUID (read, update, insert, delete) access, such as:
- Accessor—Read access to data only (R) with no application access.
- Viewer—Read access to data and app access (R).
- Create—Read and insert access to data (RI).
- Updater—Read and update to data and application access to all update records (RU).
- Admin—Read, update, insert and delete access to data (RUID).
- Delete—Access to data and app access to delete records (RD).
- Export—Access to export function.
- Attachment Accessor—Access to view attachments.
- Attachment Admin—Access to manage attachments.
- Auditor—Access to view the audit history.
- RecordAuditor provides access to view the audit history for a specific record. The user must have access to the record through other permissions.
- AuditorUnrestricted provides access to view the audit history regardless if they have access to the record.
Best Practices
There are several best practices to consider, such as:
- Include the Menu Family only when the role gives access to an application. Only include the family menu where the application is included.
- Descriptions should clearly describe the role to a customer.
- Define roles at a granular level. This enables the ability to create role hierarchies that combine multiple roles as well as include one role in multiple role hierarchies.
- Duty roles should not use permissions directly from another family; a functional role can be made up of duty roles from different families.
- As a best practice,
- Duty Roles describe a task
- Functional roles comprise of Duty roles and describe a job function.
- Aggregate roles group other functional roles.
- Permissions are assigned to Duty Roles only.
- Create two functional roles specific for audit history.
- Role to view audit of the record.
- Role to view all audit history.
- Create two functional roles specifically for attachments:
- Accessor to view the attachments
- Admin to manage the attachments.
Role Hierarchy
Define role hierarchies for different functional roles and levels of functional roles. For example, define roles for the data entry level (AP Accountant), department manager (AP Manager) up through different levels of the organization (Financial manager or controller).
With Nextworld, manager and higher level roles may have only read, update and approval permissions.
Do not set duty role as a top level in the role hierarchy.
The functional roles for audit should be placed as a top level. This allows the user to assign these roles to specific users with a role.
Aggregate roles are created for companies whose personnel perform many of the functions for a department. These roles contain Admin as part of the role name.
Security best practices for dashboards
These best practices ensure that dashboard security is configured consistently throughout Nextworld.
Configure dashboard security by functional area. One or more dashboards can be assigned to the functional area.
Ensure users are granted appropriate access for each dashboard.
Use DashboardPageGrouping to make configuration of permissions and roles sustainable as new objects are introduced into production.
Security naming conventions and standards
These best practices ensure naming conventions for security objects are done consistently throughout Nextworld.
The follow chart depicts the different naming conventions for each security type.
| Type | Format | Notes | Example |
|---|---|---|---|
| Security Group | <module name/acroynym><FunctionalTask or Area> Application setting specific security group (App Setting Specific groups that are for a specific audience/role ) <module><Audience/Role>AppSettings Filtered Application Settings (such as based on the Contact Role Grouping of the contact on record )(i.e. Hold Codes - Suppliers vs Hold Codes - Customers vs Hold Codes - Students) <module><Submodule/Area>AppSettings<FilterValue> | Module name/acroynm is lower case. Functional task or area is granular enough to separate different tasks throughout a business process process. | invBackordersRelease invReorderPoint invInventoryOverview apPayments apPaymentsVoid eduStudentAppSettings dirDefinitionsAppSettingsSuppliers |
| Permissions | <security group name><access modifiers> | There are different permissions for the same security group with different access modifiers. | invBackordersRelease - Apps invBackordersRelease - R all invBackordersRelease - RI all invBackordersRelease - RU all invBackordersRelease - RD all invBackordersRelease - RUID all invBackordersRelease - Apps invBackordersRelease - Logic Blocks invBackordersRelease - Logic Block R Only invBackordersRelease - Attachments invBackordersRelease - Attachements R Only invBackordersRelease - Export invBackordersRelease - Record Audit invBackordersRelease - Unrestricted Audit invBackordersRelease - Apps Setting |
| Permissions - Dashboards | <module>Dashboard - <dashboard group value> | module acronym is lower case. contains the word Dashboard | apDashboard - AP apDashboards - AP Portal External |
| Permissions - Org Unit Security | <org name><accessmodifers> <org name><apply hierarchy><accessmodifers> | EmeraldSmart - R all EmeraldSmart - RUID all EmeraldSmart - Apply Hierarchy - R all EmeraldSmart- Apply Hierarchy - RUID all | |
| Roles (Duty) | <securitygroup><access types> | Access Type examples include: Accessor Admin Viewer Create Updater Delete Export Auditor Record Auditor Unrestricted AttachmentAccessor AttachmentsAdmin | invInventoryReceiptAccessor invInventoryReceiptAdmin invInventoryReceiptViewer InvInventoryReceiptCreate invInventoryReceiptUpdater invInventoryReceiptDelete InvInventoryReceiptExport invInventoryReceiptAttachmentsAccessor invInventoryReceiptAttachementsAdmin invBackordersReleaseAuditorRecord invBackordersReleaseAuditorUnrestricted invBackordersReleaseApplicationSettings |
| Roles (Duty) - Dashboards | <module><module name><dashboard security group value>Dashboard<access types> | apPayablesAPDashboardAccessor apPayablesAPPortalExternalDashboardAccessor | |
| Roles (Duty) - Org Unit Security | <org name><accesstype> <org name><apply hierarchy><accesstype> | meraldSmartViewer EmeraldSmartAdmin EmeraldSmartAllHierarchyViewer EmeraldSmartAllHierarchyAdmin | |
| Roles (functional) | <module acronym> - <functional role name> | module acronym is capitalized | FINS - AP Invoicing PUR - Purchasing Buyer |
| Roles (Functional) - Org Unit Security | <ORG - ><org name><access type> <ORG - ><org name><apply hierarchy><access type> | ORG - Emerald Smart Viewer ORG - Emerald Smart Admin ORG - Emerald Smart All Hierarchy Viewer ORG - Emerald Smart All Hierarchy Admin | |
| Roles (aggregate) | <module acronym> - <functional role name>Admin | module acronym is capitalized Contains the word "Admin" | FINS - AP Admin PUR - Purchasing Admin |
| Workflow Security - Permissions | <module acronym>Workflow<table> - <functional area> OR <module acronym>Workflow<table> - <functional role indicator> | module acronym is lower case Contains the word Workflow | apWorkflowPayablesHeader - Invoicing purWorkflowProcurementReturnsHeader - Purchasing Buyer |
| Workflow Security - Duty Role | <module acronym>Workflow<table><functional area> OR <module acronym>Workflow<table> - <functional role indicator> | module acronym is lower case Contains the word Workflow Generally the same name as the Permission | apWorkflowPayablesHeaderInvoicing purWorkflowProcurementReturnsHeaderPurchasingBuyer |
| Workflow Security Profile | <table> - <functional role> | PayablesDetails - AP Invoicing PayablesDetail - AP Supervisor | |
| Workflow Transition Permission | <module acronym>Workflow<table name><State>to<State> | purWorkflowProcurementOrderClosedToReopen | |
| Workflow Restricted Field Profiles | Restricted Field - Profile Name: <module><table><Field>Hide Restricted Field - Permission: <RestrictedFieldProfileName> - <access modifier>Restricted Field - Duty Role: <RestrictedFieldProfileName> - <type of duty role> | Profile Name:
Permission:
Duty Role:
| |
| Restricted Field Profiles | <Module><TableName><DataItemName>[Hide|Disable] | module acronym is lower case. contains the word Hide or Show | arReceivablesHeaderHideSoldTo apPayableHeaderSupplierHide |
Audit security development
Application developers must create the related security objects required for users to access the audit data in the tables they develop.
By default, each new table definition has the Create Audit checkbox selected. This means that audit data is collected when records are added to, modified in, or deleted from the table. However, users require additional roles to access this audit data, even when they have access to the records themselves. It's important to configure these security objects consistently across all product families so that system administrators can easily provide their users with audit access across their enabled solutions.
Audit access security structure
Each product family requires multiple functional roles that provide different levels of access to the audit data for records in that product family:
- A record-audit access role—Allows a user to view the history of individual records in a table.
- A table-level audit access role—Allows a user to view the history of all records in entire tables.
Learn more about record-audit and table-audit access in Audit data access levels.
For both record-level and table-level audit access, you should configure an individual permission and duty role for each security group in your product family. Then, you should add these duty roles to a single functional role.
For example, the Financials product family has both the FINS - Record Audit and FINS - Unrestricted Audit roles, each of which provide different levels of access to audit data in the family. Both roles are comprised of different duty roles that provide the the appropriate level of access to records in the Financials family tables.
Record-level audit
The following table describes the structure of the different security objects needed to provide record-level audit access to tables in a product family:
| Security object | Description | Naming convention | Example |
|---|---|---|---|
| Permission | Provides record-level audit access to all the tables within a single security group within the product family. | <product family abbreviation><security group> - Record Audit | dirHolds - Record Audit |
| Duty Role | Provides record-level audit access to all the tables within a single security group within the product family. Each audit Duty Role should contain only the record-level audit permission for the security group. Each audit Duty Role for the product family should be provided to the associated record-level audit Functional Role. | <product family abbreviation><security group>AuditorRecord | dirHoldsAuditorRecord |
| Functional Role | Provides record-level audit access to an entire family. Every record-audit duty role should be included in this functional role in the Role Hierarchy Definitions application. | <capitalized product family abbreviation> - Record Audit | DIR - Record Audit |
Table-level audit
The security structure for the security objects that provide table-level audit access is similar to that of record-level audit, but each permission has the Unrestricted Access checkbox selected, and the naming conventions are different:
| Security object | Description | Naming convention | Example |
|---|---|---|---|
| Permission | Provides table-level audit access to all the tables within a single security group within the product family. | <product family abbreviation><security group> - Record Audit | dirHolds - Unrestricted Audit |
| Duty Role | Provides table-level audit access to all the tables within a single security group within the product family. Each audit Duty Role should contain only the table-level audit permission for the security group. Each audit Duty Role for the product family should be provided to the associated table-level audit Functional Role. | <product family abbreviation><security group>AuditorRecord | dirHoldsAuditorUnrestricted |
| Functional Role | Provides table-level audit access to an entire family. Every table-audit duty role should be included in this functional role in the Role Hierarchy Definitions application. | <capitalized product family abbreviation> - Record Audit | DIR - Unrestricted Audit |
Org unit security best practices
These best practices ensure org unit security is configured consistently and efficiently throughout the product.
Whenever you enable or disable org unit security on a table, publish a release note that explains the change. After a table with org unit security enabled is delivered to customers, you cannot remove the org unit without approval.
Only enable org unit security on Header, Detail, or Main type tables.
If you enable org unit security on a Header table, enable it on all associated Detail tables. If Detail tables are not secure, users can build custom applications and gain access to the data. Consider adding the Header org unit field to all the associated Detail tables and enabling that org field for org unit security.
Do not enable org unit security on tables that do not permanently store data, such as report flat tables, dashboard common context, logic block tables and test harnesses tables.
For report flat tables, you should instead secure all the data source tables that the logic block fetches data from before it inserts data into the flat table.
Do not enable org unit security using org unit fields that might be empty because users cannot access these records. The only exception to this is if the org unit field is on a detail table that is automatically populated with a logic block or common context.
Setting the Apply OUS filter on Filtered Table Lookup fields
This will filter the orgs a user can select to only those they have access to. Be mindful that this will also apply the OUS filter when inserting a record to the table via logic.
The Apply OUS filter can be set on any org unit fields. The table does not have to have OUS enabled to set the apply ous filter for a field.
You should always set the Apply OUS filter on a field used to enable org unit security on a table.
Integration tables by best practice do not have filtered table lookups setup. An exception is that the Apply OUS filter should be set on org for which OUS is enabled on the integration tables, providing for filtering when records are entered manually. This filter will not cause data import restriction issues as the table is already secured for OUS.
Report versions should not be secured as the org unit field in the table is almost always an optional field and therefore can be empty. This will allow users access to all of them. When they run a report version, however, the report will only include data for org units they have access to.
Secure integration tables by org unit, just like the transaction tables.
Do not enable org unit security on module settings. Modules settings are inherited based on the company structure. Limiting the view by org unit in settings will prohibit the user from being able to view the settings configuration.
Be aware of where Public Secured logic blocks are used as they bypass all security, including org unit security. If you want org unit security enforced in public secured logic blocks you need to set up the action security permission to the logic block to indicate that.
In the base product our best practice is to move the public secured logic block to a new version of the security group it is in with Restrict on the end of the name and then add a new row to the existing permission to secure that security group with apply org unit security.
Be aware that users cannot access values from a table lookup if they do not have access to the referenced table.